theunemployedstormtroopers
-
Posts
37 -
Joined
-
Last visited
Content Type
Profiles
Forums
Gallery
Articles
Everything posted by theunemployedstormtroopers
-
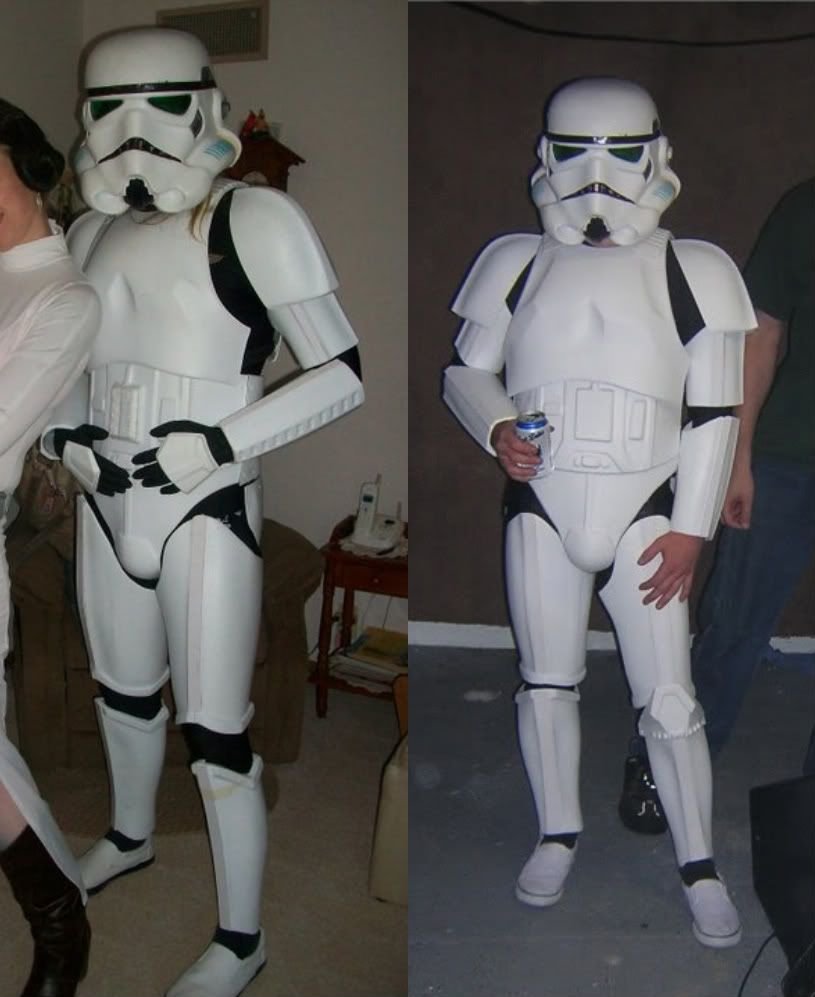
 Ive been so caught up in building that i have forgoten this thread....heres a pic of me(left) and our bass player Josh(right) We have both trimmed out our left forearms for added movement and yes we can play guitars in these things!!! touching the ground is another story....lol Last night josh split his cod piece in hopes of being able to bend over. it helped but didnt quite do the trick. Our drummer is doing heavy trimming at the moment. its getting kinda crazy!!! im kinda worried that his stage armor will not pass 501st or EIB requirements but if he cant play in it whats the point right? Next Week will be gluing and fitting. Our other guitar player is still in the trimming stages. Bieng 6'4, skinny and the biggest calve ive ever seen is taking a bit more thought. we are using a 40 mil cover strip on the calve!!! We havent even started to think about how we are going to keep his other shin over his prosthetic. But we do have 4 heads working together and tons of help from everyone in forums.
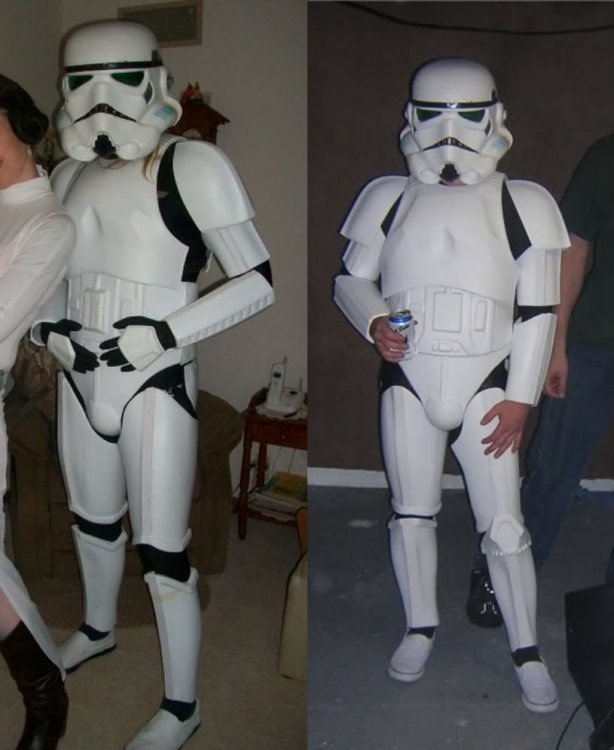
-
Build Time?
theunemployedstormtroopers replied to almost.infamous's topic in Assembly, Mods, and Painting
in five months at 6 hours a week weve gotten 2 suits of armor fitted and assembled and one trimmed. still have to do buckets and paint. with the right tools i could see a suit being fitted and painted within a 40 hour work week. Three 8 hour shifts would be one heck of a challenge!!! -
4 Set Build!
theunemployedstormtroopers replied to theunemployedstormtroopers's topic in Build Threads Requireing Maintenance
Allright... i finally got a test run in my armor!!!! Our bass player has been assembled and fitted for about two weeks now and i had been busting my butt trying to get caught up by halloween. I had plans for trick or treating with the boy and some adult time with his mother so it was important that i was star wars themed for the occassion. So after 4 days of trimming sanding and glueing i finally had my armor ready for its first trial run. I go to the first halooween party 2 hours late and before i even made it through the door i lost a snap plate for the elastic strap in the shoulder bell that hold the bicept up...so that was ripped completely off along with the other side, lol!!! As i walked in the door jaws dropped. ppl at the party had been waiting months to finally see me wearing the armor and they were all impressed to actually see it happen. after an hour of standing i thought i would try to lean my butt against a bar stool, then ping another snap plate popped. this time the elastic strap from my butt plate to the back of the thigh. to even things up i yanked out the other side as well. Then i started to feel a little nauesous. thinking it was my chest plate rubbing against my throat i found a razor blade and did some on the spot trimming. After the party i had to meet up with leia for some tavernackling. I found myself lacing up in 40 degree weather wearing only my spandex. we hit up 3 bars with many pictures, free drinks and good times with only one additional snap plate breaking. The next day as i suited up for trick or treating the plate on my inner shoulder strap came loose inabling my to keep my shoulder bell attached. luckily i had some crazy glue and a lighter cuz i was not about to let my sons first halloween be ruined. He got his candy, we got some pics....perfect!!!! This weekend worked out great. Halloween was a perfect time to test out my suit and work out the kinks. Having armor fall apart while trooping an event for the first time would have been embarressing. Couple things that are on my drawing board....Bigger snap plates with more plastic surface area for bonding, Fine tuning of openings for fitting and movement, split cod piece, straps for forarms to bicepts and of course primer and final paint. Current Status: 2 sets of armor wearable, 90% complete, 1 set of armor trimmed ready for assembly, final set in trimming stage. one bucket assembled and ready for paint and decals -
Over trimmed shins!
theunemployedstormtroopers replied to theunemployedstormtroopers's topic in Assembly, Mods, and Painting
alright...low pro velcro from walmart did it. It seems that i have fat thighs and chicken calves. i just trimmed down the velcro strips and did the over lap like the anh suits. how is it that i can take 8 mil off the calfs but have to add 20 mil to the thighs? either way we are good to go now!!! thanx all!!! -
4 Set Build!
theunemployedstormtroopers replied to theunemployedstormtroopers's topic in Build Threads Requireing Maintenance
Alright, its been time for an update. the project is going way slower then expected but we did manage to drink 6 times as many beers then we thought. one set of armor has been completed, shoulder bells and bicepts pieces were squared away with an elastic strap with a snap attached to the inside of the bicept. after that we had to split the forearms. they looked bulky so we brought them down to movie spec. Big note on fore arms!!! We had tried to make the seems bigger thinking that it would ease our big hands through....but really its about the opening at the end. the widest point in the opening is from top seam to bottom seam were your thumb knuckle and bottom of hand slide through. widening the seam doesnt make the opening bigger just wider, and with more bulk to the armor. Unless you are Popeye i would recomend keeping fore arms at movie spec and if you cant get your hand through go back and sand down and open up the wrist at the seams. Suit number 2 has legs(super fatty thighs) and arms glued, tonite i am sealing up the last of the snaps and rivets for the midsection. a night of glueing and tomorrow will be final strap assembly and hopefully be final fitting!!!! -
Need help with thighs
theunemployedstormtroopers replied to jimmylee7706's topic in Assembly, Mods, and Painting
-
Over trimmed shins!
theunemployedstormtroopers replied to theunemployedstormtroopers's topic in Assembly, Mods, and Painting
i think the cover strip is inevitable. im gonna check into the low pro velcro at corporate dethmart. ive seen pics of the elastic closuer system. id like to here more testimonials on that method -
Need help with thighs
theunemployedstormtroopers replied to jimmylee7706's topic in Assembly, Mods, and Painting
shooter's big V back. i glued the front of my thighs last nite. i too am going to be doing the big v backs in my thighs. Im trimmed, shimmed and ready for glue. years of motocross and skateboarding have left me with monster thighs and i cant get any where close to anh specs. i like shooter's cut out in the back of the knee to avoid pinching... gonna try that one also. -
Over trimmed shins!
theunemployedstormtroopers replied to theunemployedstormtroopers's topic in Assembly, Mods, and Painting
on the left shin which is anh style you can see the 23 mil (custom to fitting) over lap with the closeur being velcro. on the right is the over cut shin that only has 12.5 mil left on each half which is short of the over lap method -
Some how the backs of my shins were over trimmed. i still have 12.5 mil on each side which i could butt together with a cover strip on top but i need the backs to still open. the cover strip kinda takes velcro out of the picture because the 2 parts of the velcro will push the trim out an aditional 5 mil when closed. im also thinking about 4 elastic strips on the inside under the finish strip... at this point im open to all and any ideas on this before i finish these bad boys up
-
having to pay to go troop what you think?
theunemployedstormtroopers replied to Quebectrooper's topic in Off Topic
One thing that i could see being beneficial to a garrison with doing the "pay to troop" concept is keeping a garrison "Cash Kitty". almost like paying really low garrison dues. Garrisons would be able to keep small amounts of cash on hand to help out with such things as booths and rooms at conventions and events. its important to keep it non profit, but if as individuals in the garrison keeping a little garrison petty cash could come in handy....maybe even help fund garrison parties. -
4 Set Build!
theunemployedstormtroopers replied to theunemployedstormtroopers's topic in Build Threads Requireing Maintenance
a few more pictures. The first suit we put together was a mock up for test fitting pieces for each suit. we had some pieces that ran 15 mil butt joint seems and some with 20 / 25 mil joints so we had stuff to compare bieng that we are all different sizes. when we had a full suit we could try on different pieces and sizes to see what modification fit best. We finally have 1 suit almost complete minus attaching the knee ammo belt and the belt. all snaps and harnesses are really close to where they should be. e6000 all around. the last things to plague me are the arms....we pulled the forearms as close as we could with being able to still get our hands through....this ended up utilizing 20 mill butt joints/strips rather then the anh accurate 15 mil. once the forearms are on there is a hell of a gap in the wrists. im sure gloves will take up the slack but im looking for a beter option. now the last of my arm troubles deal with the bicept and shoulder bell...it seems that if the bicepts are not snug that the shoulder bells tend to push out and shift, im working on tightening up the bicepts and shaving down the return to pull the plastic closer to the flesh and then shaving out a little of the inside bottom of the bell to allow it to sit tighter to the bicept piece. some armor i see has a lot of white and very little spacing between pieces. we are trying to keep some nice solid seperation between pieces to aviod the "white out" armor look -
ANH Strips
theunemployedstormtroopers replied to jimmylee7706's topic in Assembly, Mods, and Painting
ive been searching for clear info on this..... ive read 30mm for the fronts of thighs and legs. backs of thighs and legs are whatever is needed to make your armor fit. 20mm for the fronts of forearms and bicepts with whatever is needed in the back for fitting. there was a great thread that went into detail about this but i cant find it again for the life of me. there must be sum sort of standardized spec for the front seem/finish strip for both legs and arms -
I finally got a test fitting with armor and helmet, the thread is under te2 derrived armor, 4 set build
-
4 Set Build!
theunemployedstormtroopers replied to theunemployedstormtroopers's topic in Build Threads Requireing Maintenance
The band was the primary objective. our intentions are to build these to meet 501st specs. The band and myself plan on trooping every chance we can and as a band we would love to perform for 501st functions and be involved in the 501st...further more the band would love to help promote the 501st and F.I.S.D. On the other hand i am not E.I.B. or 501st, yet. Im taking my time here and soaking up as much advice as i can in order to do these suits up rite rather then have our armor end up like chinced out fan made armor. many ppl have been super helpful in these forums and even though im only at my first full mock up, i would have never been able to do this with out the F.I.S.D.! I do believe that a build is a rite of passage and is part of being a stormtrooper similar to the 1st building of a chopper motorcycle. damn, im like an old AMC....just a Rambler!!! -
4 Set Build!
theunemployedstormtroopers replied to theunemployedstormtroopers's topic in Build Threads Requireing Maintenance
as i was cleaning last night i stopped dead in my tracks to finish my bucket.i just had to re drill holes 1/8 of an inch towards the rear of the face to get the cap where i needed it!!! im so stoked to finally be past this hurdle. now its onward to the painting of the first suit and bucket. a trooper in my garrison had suggested a new paint to me. the brand is Valspar. he claims it goes on easier then krylon and flexes with the hips better. he used it on his .060 hips te2 and it liked real nice. any one out there have any experience with valspar? -
4 Set Build!
theunemployedstormtroopers replied to theunemployedstormtroopers's topic in Build Threads Requireing Maintenance
I like the reference to cheek plate and cheek bolts. it pin points on where you want to apply pressure when setting a cap to the face, good call. i have to fill some hole, reinforce and try again on my first lid and then its onward to the other 3. thanx for the great advice!!! -
4 Set Build!
theunemployedstormtroopers replied to theunemployedstormtroopers's topic in Build Threads Requireing Maintenance
Between touring and remodeling i havent had time for nothing much less keeping up with this project but finally i have a mock up / test fitting. I tried to get some assistance from the 501st but didnt have much luck from the areas garrison. any ways....the first mock up is just elastic and self stick velcro. We needed to get a better understadning of how things fit and what we need to modify to be able to rock out in these things. All i can say is so far so good -
4 Set Build!
theunemployedstormtroopers replied to theunemployedstormtroopers's topic in Build Threads Requireing Maintenance
not recomended but it works. i pinched the cut tight and then glued it rather then filling the wound with glue and then closing it tight. it stung just a tiny little bit but it got me through 3 hours of guitar playing which is excactly what i needed it to do. My son had spinal surgey last week and they didnt use a single stitch or staple. A surgical adhesive was used and the docs refered to it as "super glue for skin". i had laughed cuz at the time i still had a decent chunk of glue on my left index finger yet. all in all i felt better about spending a dollar on a tube of crazy glue rather then have to see a doctor on a saturday and have to pay over a $100 to achieve the same results. As for the toxic factor...i just wont drink mt dew for a week or two and things should even out. Again, not recomended but it may serve its purpose. I actually picked up the trick from Travis Barker. on his first couple tours he would tear up his hands every night playing drums. he kinda took it to an extreme and over did it though.... which again is not recomended -
4 Set Build!
theunemployedstormtroopers replied to theunemployedstormtroopers's topic in Build Threads Requireing Maintenance
here you can see the gap difference on the brow between points A and B. the gap between the mask and lid is also more then id like it to be. they became a bit more drastic when the ears went on. ill tinker with it some more when i have some free time -
4 Set Build!
theunemployedstormtroopers replied to theunemployedstormtroopers's topic in Build Threads Requireing Maintenance
so i fitted and attached the ears on the bucket....and things shifted a little. not the worst for my first lid. i wanted to add some plastic pieces to the inside from the begining but now im going to be doing it to reinforce the holes i will be filling up and redrilling. but the lid is temporarily on hold. we finally got the 2nd 2 sets of armor in. after a full inventory of everything turns out we are short 2 thermal detonator covers, no big deal, should be easiily resolved. So all 4 of us got together and started. we set up a little work shop with an assembly line (trimming, sanding, fine sanding) and got started. I figured it would be better to do section by section all 4 at a time rather then do one set by one set. this way the results would be more uniform between the armor sets. First thing was the hand pieces and then we jumped right into the back plates. After 2 hours and 12 pieces we realized we could use a small bandsaw and a nice little table top belt sander. Our armor was formed at a heavier gauge hips so the score and snap method isnt the easiest and the hot knife is great for detail but too slow for someones who lacks patients. Another trip to menards for some more tools i guess. All and all im glad i started with the lid. it gave my a good idea of what i was geting ourselves into and i made sure to do things slowly removing little by little. Now that ive got the guys working on things as a group it is going smoothly. The boys are makng some real clean cuts lines and edges. I had my concerns being as picky as i am but things are going great. another week of trimming and sanding and we may be ready for some glueing. As always im terrible about taking pictures but i will try to get some up here in the days to come. on that note its time to slave the grind back in the stormtrooper sweat shop -
4 Set Build!
theunemployedstormtroopers replied to theunemployedstormtroopers's topic in Build Threads Requireing Maintenance
Some more trimming has been done. to set the visor line i used a piece of tag board and the force. you can see the line i drew and the difference from the first trim. These lids were pulled in 80 gauge hips so finding reference lines within the plastic was tricky. but again, the force was with me. I would compare the process as to pin striping a gas tank. so at that point i was ready for the dremel for some final trimming.....and then i found the tk-4510's helmet build video!!! Just about all my helmet questions were answered in one spot. the was some stuff about the ear placement that i will come back to when i get to that stage but my current concern is the excess molding on the top of the face and whether it should be removed it has a bit of a lip on it and that lip keeps the face back from the lid a bit as does the brow trim. Ive got another trip to the hardware store before i attempt to figure it out. Oh yeah...and that is blood on the inside of the lid. It was fun trying to play guitar later that night with my left index finger sliced open. Luckily half a tube of crazy glue got me finger through the 3 hour show. Exacto blades and utility knifes should have a "not for musicians" warning label -
The force is strong with this one! Born feb 11th 2010. I wish i would have named him Harrison rather then Adrian, cuz he is one hairy son.
-
Trimming question
theunemployedstormtroopers replied to Pyro's topic in Hard Armor (General Discussion)
The blood inside my lid is infact real! So now my hot knife has become my new best friend followed by a knock off dremel tool. The hot knife can leave a nasty goopey edge if real hot and moved too slow but a tiny sanding drum cleans it up quickly. One thing i would like to mention is choice of hot knifes. I use a simple one that is nothing more then a soldering iron that came with an attachment tip that uses excacto knife blades. Works well but blades seem to dull quicker when hot -
So it was decided long ago that we were going to wear armor one day. after 6 months of extensive research we finally choose which route we were going to take wether it was buy assembled or build. Of course being stubborn and cheap we went the long route. So we found a former to give us a sweet deal on 4 sets of armor and after some gigs and saving our order was placed. this week we recieved the first two sets of armor <br> I have a little more free time then everyone else so a took a lid home with me to tinker a bit to get the feel of things to come. <br> i had to do some digging in the ata archives to help me with this lid. Biggest and first thing i noticed was the angle of the face and getting the air tubes to line up. i did however find an awesome reference that is helping me out...( http://forum.whitearmor.net/index.php?showtopic=10138&st=0&p=127975&hl=helmet%20ears&fromsearch=1entry127975 ).. particularily the diagram at the end of the thread. im also worried the gaps between the lid and face. ive seen pics where the pulled together nicely once the ears were attached and i aint afraid of using some caulk and filler. <br> im thinking once i get the ear pieces in place with screws i will graze the inside of the mask with a heat gun and see if i can get things to snuggle up a bit. As of now im heading to the store for fresh blades for my hot knife (which was amazing that a was able to find and still owned) and some e6000 glue or what ever it is.....hopefully we will be refering to it as "the bomb" of all glues as i see others do. There will be many updates as this progresses. In two weeks the 2nd 2 sets of armor will be in and triming will commense on all the armor. seeing that its 6 am and i cant get back to sleep im gonna rock out a bit on this lid