
Leaderboard


Popular Content
Showing content with the highest reputation on 08/14/2017 in Posts
-
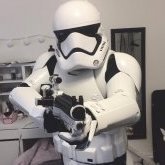
I'll keep this post brief, just wanna show the painting of the bucket. Same process as a full size helmet. I started off with the gray in the traps and the tears. Previously I had painted the teeth. Then did the vocoder. Drew a pencil line around the vocoder and painted within the lines. Use a small brush to paint the black trim lines. I bought some pin striping tape to mask off the traps and tears. I thought this would work great, it's flexible and goes down easy. Unfortunately it bled a lot. Either it's not meant for plastic or it's just a crappy pin striping tape. So, I simply took my gray paint and painted over the bleed areas. Also went pack in on the trim lines in the traps and tears with the gray to reduce the thickness of the original black lines I had put in as they looked a bit too thick. After the bleed-thru mess I went back to trusty painters tape. The kit comes with a tube decal but I wanted to have the blue painted vents like my full size lid. I know there are a lot of blue stripes on these sides but with the helmet proportions being a bit different than a full size one, I took some liberties. Here's the nearly complete helmet. I just need to install the neck S-trim but I'm waiting for my son to try it on before I cut it down to size. Overall this took about 6 hours to trim and assemble with another 5 hours to paint/touchup. EDIT!! After doing my last troop at the Detroit Tigers baseball game, which ended late at night, I realized it was really hard to see thru the green lens. Since my son will use this costume on Halloween I figured it would be a good idea to give him a clear lens rather than the green one for night time. A while back I ordered clear safety lens material (face shield) and cut it out using the same hole pattern that I'd already done for his green lens. Here are a few pics. Oh, I also primed the inside of his helmet black since you'll be able to clearly see into it with this new lens. If he ever troops with me during the day I can easily switch back to the green lens. Next....the EVA foam build begins! Sha Sha, see the book in the background? Really great resource, thanks for the recommendation. I bought the other Foamsmith Weapons book too.2 points
-
It's BBB day! Did a quick test fit when I got home from work. Fits nicely, but I'm definitely on the short side for a trooper so I have lots of trimming in my future haha1 point
-
Nice cuts Dan & congrats on BBB day. Don't be afraid to hit those edges up with a sanding block before you jump on to the Dremel. ABS sands easily and a Dremel can get away on you. You might no even need the Dremel from what I see.1 point
-
thanks - watched trooper bays video, but didn't see Walt's yet. Thanks for the link! agree - its scary cutting it because you can't put it back!1 point
-
Two years later (almost exactly!!) and I found and purchased a beautiful TK saber. It's from Arm on Fire Custom Sabers on Facebook, there was about a 4 month wait (he got an order for 6 sabers at once, which took a lot of time, of course). Here's the video the maker made, showing it off... This also serves as a POC for anyone who wants to buy their own. https://www.facebook.com/ArmOnFireCustomSabers/videos/1436817806401941 I built a quick and dirty belt attachment for the Covertech clip that fit the 1.5 inch belt clip part, as well as kept it centered on the plastic plate by way of a couple cap rivets around the belt clip portion. It's attached to my belt through the top two chicago screws that normally hold on my holster. The bottom two screws are just hanging out. It works a lot better than a pool noodle!1 point
