

Tilheyra
-
Posts
462 -
Joined
-
Last visited
-
Days Won
10
Content Type
Profiles
Forums
Gallery
Articles
Everything posted by Tilheyra
-
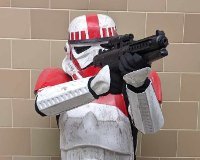
For The Empire!!! It was only after I changed out of my armor that I realized I forgot to wear my gloves... Oh well, the proper photo shoot will be at Indy PopCon next weekend!
-
Looks like it is time to start the build thread!
-
OUT FOR DELIVERY!!!!!!!!!!! I'm not going to get much done at work today, am I?
-
Thank you!!! I am really excited to try the full costume this weekend (maybe this evening)!
-
My previous post was not as clear as I should have written it (although, I may be misunderstanding your post). This is for my non-approvable FEM7 armor. I am wanting to hide the black-ish scuffs that have appeared from my black painted belt rubbing against my white armor. I am wondering if there is a recommended technique to cover over the scuffs with some sort of white paint or other substance for the purpose of returning the white appearance to the spot. I have thought of tapping the spot with the tip of a brush with white paint, or using white nail polish, or even using whiteout. I was wondering if folks have any tips for this. I am going to put a layer of Mod Podge over all edges of my belt to prevent further paint transfer. Maybe I am too focused on every single scuff that has appeared. Then again, I spent a lot of time painting my armor, so I want it to last as long as it can before I have to apply another coat or two of spray paint. Here's a photo of a scuff/paint transfer to give you all an idea of what I want to hide:
-
I have been wondering if there is a way to deal with the more noticeable scuffs without resorting to another session with spray paint. As I mentioned above, I have some paint transfer of black paint onto the white armor. I am wondering if there are techniques to do touch-ups of certain spots.
-
The armor is not quite complete yet, because I still need to attach the lower leg and kneecap armor to the strapping, but I am at the point where I can do an almost full test fitting! I just did so, and I am absolutely amazed at how great my armor looks on me!!! Here's another bathroom mirror selfie to show how far I have progressed (and you all get a partial face reveal as an added bonus). Just remember, the full costume is not complete until I also put on my makeup and wig! The arm strapping has just a bit more slack in it than planned, but fortunately, that does not adversely affect how the arm armor sits on me! The belt was difficult to properly fit, and the accessories did not help things. Nevertheless, I was able to get the belt to sit in a decent position. Another problem with the belt is some paint transfer has occurred from the black belt on to the white armor. I'll have to correct this before the con, and it appears the clear coat on the belt was not as sufficient as I thought (I probably missed spots, resulting in the paint transfer). Seeing myself in the armor I have worked so hard on is absolutely fantastic! Now, on to attaching the remaining pieces to the strapping.
-
Lots of gluing the past couple of days. The strapping has now been glued to the top of the thigh armor, and the adjoining snaps have been glue to the lower inside of the front torso armor. Snaps have been glued to the lower inside of the rear torso armor, and the straps have been glued to the bottom armor (this is a much more secure hold than the velcro I had been using). Straps have been glued to the top of the shoulder armor, and these will snap onto the shoulder straps. Also, the thermal detonator has now been glued into place! The forearms, biceps, and shoulder armor are currently being glued together. I fit everything on my arms the other day and measured the space between each of the pieces, and this was then translated into the needed lengths for the strapping. I placed the straps where I thought it was most logical, but I may want to change this following how well things work at the upcoming convention. My efforts this evening will be to measure the spacing between the lower leg armor and the thigh armor, as well as where to put the kneecap armor. I'll then get those straps glued! I hope to do a test of the full costume this weekend! The con is August 25 to 27, so I am keeping pace to get everything set to go!
-
BBB day might come sooner than usual. I bought a completely untrimmed WTF kit that a long-time member of Walt's Facebook group offered for sale on that group (with Walt's permission). The package is already on its way!
-
Progress continued on my build yesterday! I was able to determine where the thigh armor best sits, so I took the measurements for the strapping that will connect the thigh armor to the front torso armor. I did the same for the shoulder armor. The straps themselves will be glued to the thigh and shoulder armor, with the connection to the shoulder strapping and front torso armor via snaps. The other pieces of the leg and arm armor will be worked out once I get the thigh armor and shoulder armor where I want them. The positioning of the bottom armor still needs work, and the thermal detonator will soon be glued into its holder as well! I also devised the best way to insert the spacers between the front and rear torso armor (it requires the use of the mirror)! I also devoted some attention to my belt. I have already discussed my painted-over Nerf gun, and I show the Nerf gun in the holster below (my attention to detail with weapons means I am pained by the holster not covering the trigger of the Nerf gun, but I will have to ignore that for now), but I also purchased a pouch that will hold my phone, wallet, and a compact for makeup touch-ups. There is a pouch armor piece that is currently being glued to this pouch. Both the pouch and holster have straps to connect them to the belt. The two halves of the belt will be held together via black elastic straps, and one of the snaps for the elastic can be seen on the inside of the belt. I am getting so close to completion!!!
-
Alright, I've mulled over different kits and read the 501st databank guidance for both the shock trooper and ESB trooper. I'm going to go ahead and pull the trigger on the ESB kit I've been eyeing. I'd been thinking about this for a number of days before making this thread, so now that the pieces are coming together, I think it is time to commit!
-
The Bloodfin GML responded to my question on their forum. He said the same of what has been said here. ROTJ is preferred, but to be super diligent in getting the conversion right if I go with ANH/ESB armor. Decisions...
-
I went ahead and contacted the Bloodfin Garrison with my questions. I'll let you all know what I find out!
-
I was able to go back to the park and paint my boots today! I'd say it is a good start, but I am not quite satisfied yet. I am very happy the paint is adhering to the sides of the soles, but I expected the paint to cover the fabric better than it did. I should have figured this would happen with faux suede. I talked over these results with a friend that is more familiar with fabric painting, and she recommended I use white shoe polish to provide better coverage and smooth out the suede. I am not trying to preserve the suede, as I care more that the boots are a consistent shade of white, so this seems like a good way to proceed. The suede and tan color on these boots was a comprise anyway. I could not find a pair of white women's boots in my price range that was both large enough for my feet (10.5 in men's, but 12 in women's) and did not appear like it was meant to be worn by a drag queen (I'd buy those boots if I wanted to be a drag queen, but it's not the look I am going for, even though I am technically dressing in drag with this build). As such, I bought the boots I bought, and they are quite comfortable too! We'll see how the shoe polish works.
-
This is super helpful! Although I am aiming for Level 1 certification, I did not think about the differences at this level of detail. Thank you! I think it would be best for me to go ahead and contact the Bloodfin Garrison and ask their thoughts, especially given the discretion the GML has. A good amount of my excitement over this today is that I have seen approvable ANH/ESB armor in my price range. The ROTJ armor seems harder to find. When it comes down to it, having an approved stormtrooper with the 501st is a little more important to me than that stormtrooper specifically being a shock trooper. Also, now that I know some folks convert their costumes over time opens up more possibilities! I thought my FEM7 would be the only stormtrooper costume I would make, but here I am taking about another build, so the future is full of new opportunities!
-
Good to know I was understanding the similarities! I hadn't thought about converting over time. This opens up a lot of possibilities! Perhaps that is the direction to go...
-
One question I had was answered by @MaskedVengeance linking that shock trooper thread! I was wondering if there have been any recent shock trooper approvals using ANH armor, and it appears so! I'm looking for Level 1 certification, so I don't really have a preference of ANH vs ROTJ, just an approvable kit I can buy to start my next build! But I do have another set of questions: What is the suitability of ESB armor for a shock trooper build? My understanding is that, exempting the helmet and holster placement, the key differences between ANH and ESB armor are the different shaped handplates (it seems the ESB has the snowtrooper-style handplates called for on the shock trooper). Would ESB armor be suitable for a shock trooper in this case? Bringing the helmet back into question, are the differences between the ANH and ESB helmets more than cosmetic (are they the same helmet, structurally)? Could an ESB helmet be modified for a shock trooper?
-
Both threads are fantastic! Thank you so much!
-
My name is Brian, and I live in the U.S. state of Indiana. Some of you may know me from my FEM7 build thread in the non-approved costumes section of the forum. I really appreciate the help that has been provided, and as I mentioned in my thread, I certainly have been 'bitten by the bug,' so I am planning an approvable build! As such, I figure I would finally introduce myself here, so I can meet many of the others on this forum! I am aiming to buy a TK armor kit based on a style from the era of the original trilogy. I have mentioned the possibility of creating a shock trooper (and my understanding is that the armor can be made from ANH or ROTJ armor, but with different nuances), but I am still exploring other possibilities! I'll be exploring various threads across the forum, and welcome recommendations for threads to read!
-
All armor pieces have been painted!!! I painted the forearms, biceps, shoulders, kneecaps, shoulder straps, and smaller pieces! The boots were the only thing I did not get to today, so I plan to paint those tomorrow. I will be using fabric spray paint, rather than the paint shown in the photos above.
-
Bugs were a big problem when I was painting the chest armor! I shouldn't have been surprised as I was in Oklahoma at the time, and the heat, humidity, and bugs really, really annoyed me. There's an imperfection in the paint on the shoulder strap of my chest armor, and it was because a bug decided to land on that part as the paint was drying. Removing the bug removed some paint...ugh... I'll be wearing a wig that is long enough that it should cover that imperfection, however!
-
Done for the day! No big issues, and my very rudimentary painting rack did its job quite well! I completed the painting and clear coat for the thigh and lower leg armor. The pieces turned out great! I also did some touch-ups to the belt pieces, thermal detonator (did not get a photo), and my pistol. I have been so focused on my armor that I did not think about a weapon, so the painted-over Nerf gun is a stopgap until I buy a proper prop weapon. The Nerf gun will just be in a holster on my belt. My next paint session (ideally tomorrow) will consist of painting the arm armor (forearm, bicep, and shoulder), kneecap armor, and many smaller pieces (shoulder straps, hand armor, etc.). I may paint my boots tomorrow as well, but that may be put off to a third session as the other parts seem like a lot as it is.
-
Painting day has arrived! Unlike my previous paint session, I do not have a friend's yard to work in, nor do I have a good space at home, so this session will be at a not-so-busy public park! I've made a very rudimentary painting rack from the shipping box the armor came in to contain the overspray (I got the rest of the packing peanut bits out after I had taken the photo). The box flaps will be taped vertical when painting. I have punched holes in different areas of the box for different length dowels to support different size pieces as I work. The holes not being used will be covered with painter's tape. It should be a good conversation starter if anyone at the park wanders over to see what I am doing. I hope folks in my town like stormtroopers! With the number of pieces to be painted, and not having a really long stretch of time to do everything at once, the painting will actually take multiple days. I have a space in my apartment set up (next to a window and with a fan) to put things to complete the drying process, but the pieces won't be moved from where I paint them until the paint has dried enough to handle (the Krylon Fusion can notes to wait at least 1 hour).
-
Great catch! Thank you!!!
-
I have made pretty good progress the last 2 days. Most of the leg and arm armor pieces are ready to be painted, so I have made a special spot for those parts to have a visual indication of how much progress I have made in 2 days! The last couple of armor parts will be completed tomorrow evening, so I will be able to start painting the day after that! The painting will be a bit less complicated given that the chest, back, torso, and bottom pieces have already been painted.

