


Skiffy
-
Posts
91 -
Joined
-
Last visited
Content Type
Profiles
Forums
Gallery
Articles
Media Demo
Posts posted by Skiffy
-
-
Thanks gmrhodes - I'll take a look through that thread. This time of year (dark early in the UK) a taclight on an E11 is going to look great.
-
 1
1
-
-
Has anyone identified the tactical light on the E11's of The Mandalorian's (very scruffy) troopers? I'd like to add one to my issue.
")
-
Thanks Dom - I made the stock myself from standard steel bar and box section. It doesn't fold (yet). If I get around to doing it - I'll update this thread.
-
It's finished!! There are still some changes to be made - but I'm happy to leave them as is for a while.
The grip pattern turned out OK - I couldn't find and appropriate mesh, so I pressed a roughing file into the milliput, and I'm fairly happy with how it turned out. Later, I'll drill out the scope lenses - I've got some glass ones to go in.


-
I don't have a real sterling, but the cocking handle flares out where it meets the bolt - That larger hole at the back of the cocking channel is so you can pull the handle out (when the bolt is pulled fully back) to disassemble it.
I think I've got a pic that might help - I'll see if I can dig it out.
...Done!
You can see the handle at top left and the recessed hole it sits in in the bolt.
-
Yup.. That cocking handle is way off.
-
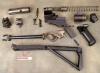
Pic update! I've been concentrating on all the little details I wanted to add...
First, bayonet lug.

Here's the fire selector, and (just visible) mag detailing.

The components of the D ring and housing.

"D-ring assemble!".. The four small nails aren't strictly canon, lol, but I didn't want to rely on glue alone.

This was hard to photograph - but it's the Empire roundel which will sit on the grip. I've yet to re-do the grip pattern.

That's it for now!
-
Nice weapon!!!!! I don't mean to sound too critical or nit picky, but I thought the scope rail was supposed to insert into the last barrel hole on top not get screwed into the top of the pipe?
Not a problem Gazmosis - you're quite right. I had to bolt it when the pipe split between two holes, and needed reinforcing. it does still clip into the barrel hole too, and the steel rail was a complete bugger to bend by hand. lol.
-
Thanks Martin! It's amazing the difference a good quality paint finish makes. I'm almost done now. Just a few more bits to add.
I was looking at this picture and thinking about the fact that these ANH E11's shot blank rounds to get the muzzle flash.
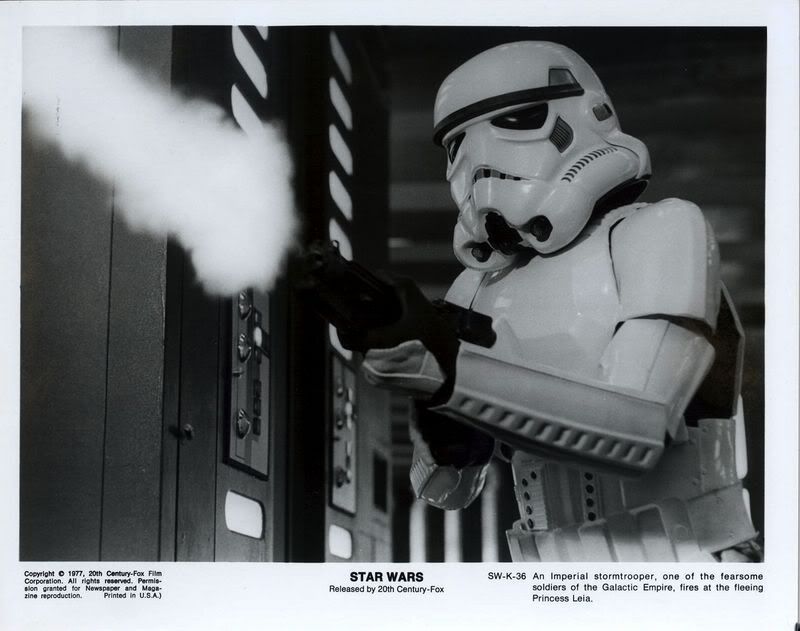
Then I saw something I've not noticed before in this famous lobby card image - see the ejected brass shell at bottom left!!
-
I had a painting disaster at first, had to strip the gun down - clean off all the crap black paint and find a better brand of rattle can. Went with an automotive satin black - which looks the bomb!
Still lots to do - including re-doing the grip - but it's starting to look shweet..


-
Note that you'll probably need a scope and counter too by the looks of that.
-
My 2 cents: (I've got a hasbro - and I'm almost done with my pipe scratchbuild).
I can't imagine trying to get the hasbro to look decent.
I would imagine the pipe kit from DoopyDoos to be about the same cost as their hasbro conversion one?
The scratchbuild will look as accurate as you want it to. Hasbro less so.
I'd definitely go for the pipe!
-
Hi Marv. I used the incredibly high tech method of covering the wooden surface with Milliput - waiting for it to dry - and filing grooves (at two different angles) according to markings I'd made with a ruler earlier. I think you're method is better = use a knurled mini-rolling pin. Genius!
Now, I'm off to play 'hunt the knurl'.
-
Haha - thanks guys - it certainly looks a lot better with a coat of unifying primer.
Unfortunately, with no cover for spraying (I'd be outside) and 50mph winds - doesn't look like I'll be putting any black on this sucker tonight. *Sigh*.
-
Wow, that has come a long way. Congrats! Are you thinking about putting electronics in it as well?
Funnily enough, I have thought long and hard about this. I've left room in the trigger housing for a pivot and return spring, and considered ripping open my hasbro to transplant the sound chip.
I think I'm gonna stay silent with this though, perhaps until I can afford a blastercore unit - now that would be the shizzle..
-
I haven't used E6000 so can't vouch for it's suitability, but...
If you can find it locally, use a 2 part epoxy adhesive (resin and hardener). I use Araldite in my build. It'll cover all areas - which is important when you're fixing wood to PVC to acrylic to steel to aluminium to resin to styrene to brass to ABS or whatever else.
Just make sure you key (roughen) your surfaces first.
If you need any help from someone who's been there with PVC pipe, just holler!
-
Okay, more primer and greeblies added.

We now have a trigger, a cocking handle and a rear stock-catch (minus the insert)..

We have a bolt on top of the mag housing, a mag with scallop detail and you can just see the front ironsight.

Next up in this overall shot you can see my cack-handed failure of an attempt at grip pattern. This will get smoothed and re-done. You can also see a little bulge where the scope rail bolts to the front of the body. This is re-inforcement where the PVC split right across two of the vent holes as I was fixing the rail in place. I tried and failed to glue it from inside, but luckily this 'patching' solution won't detract too much from the overall effect.

Lastly, a detail shot of the front ironsight - filed from acrylic sheet.

Still to add: D ring, bayonet lug on side of barrel, fire selector switch, more detailing at the back of the mag housing, non-wonky grip patterning! I plan to insert an imperial roundel in styrene to the right side of the grip - as I've seen in some resin versions - cuz it looks cool..
-
Thanks TK-Maxx! I'm working on some of the last little bits to add - then I'll start to think about paint. More pics soon!
-
Thanks TK Bondservnt 2392!
Interesting points on the stock mount, thanks. I felt it was high once it all started to come together.
I've not quite finished it just yet. There are some other small bits and bobs to add, including the top screw on the mag housing (which is not in shot) the cocking lever, the stock catch behind the grip and the trigger, of course.
I can smell the end coming soon though! Can't wait to throw some paint and clearcote on this puppy.
-
Hi 1mpulseS0D, as you've no doubt discovered, there are many factors to consider when deciding on which E11 to go for.
Probably best overall for trooping would be a hollow vac form shell (lightest) or a rubber cast. Sorry I can't help with where you might get those...
A de-ac sterling with authentic scope, counter etc will look great, but weigh an absolute ton (and cost a fine penny too).
The DoopyDoos kit looks fine, but you're right in saying it will be fairly brittle - and possibly won't survive a drop!
I'm hoping my own pipe build will be pretty rugged. At least I'll know how to repair it if it does get dropped. The main drawback to the pipe build is time. If you want something approaching authentic in looks, it's going to take a fair while to build up. If you've put a suit/helmet together you should have the workshop skills to do it..
-
Latest: T track cut, bent and epoxying in place as per these pics. Plus the two semi-circle guard things (whatever they are - they're the black styrene pieces).
Also, I've made up the mag and placed that - I can't show it yet until I can lay the blaster down on this side - when the glue dries!


-
Okay, some progress!
Started moulding the grip.
Smoothed in the mag housing.
Sculpted the stock catch under the end cap.
Made up the 'T' track.
I did have some older 'T' track, but it was far too flimsy. Made some new beefier stuff.

-
Right - chucked on a little primer - mostly so I can see where I'm filing/sanding. The mag housing has been epoxied in, and I'll smooth some milliput over the joins once it's cured. I've sanded the grip in prep for some epoxy too.

-
Thanks ZeroRoom - I actually don't plan to have the stock fold out. I was initially, back when I was following the fabulous work Smitty was doing on these boards, and went so far as to research how it went together, but there's just too much engineering needed for my modest table-top build.
Further on, I plan to make a better version with folding stock, but this one will be fixed. Check out Smitty's work here and on youtube for how a home-made functional stock goes together.

Tactical light for E11?
in Boots, Soft Parts, and other Accessories
Posted
I hunted for a suitable flashlight and found a slimline one that'll at least do for now. As I said earlier it's dark here in the UK so for opening night of RoS it'll look fine.
I know my E11 looks beaten to all hell - but I like the look.")