

Teach-
-
Posts
83 -
Joined
-
Last visited
Content Type
Profiles
Forums
Gallery
Articles
Everything posted by Teach-
-
Added a flashlight to coincide with my Rogue One TK. I used the Galactic Armory E11 flashlight. I cut a small hole on the barrel of the DLT-19 to fit it into. I used flat black and then powdered graphite like I did on the blaster. One experiment I tried was painting the lens white and then polishing the graphite into it to give it a sheen. I'm mostly happy with how that came out. I also weathered the flashlight to match what I had done on the blaster. I also have the wire for the T-tracks but can't find a RO image that has the wire. Maybe a future addition.
-
"Excessive sanding has always been an issue in the past.. a pain in the backside but well worth the finished product. What was the material/method that was used in this print? It came out really smooth, and anything that saves time makes life easier!" We used a Bambu Lab printer (I don't know what model exactly) and printed with PETG. It was the default setting.
-
I did some weathering and added a bakelite finish to the blaster. For the weathering of the metal, I used Rub 'n Buff Pewter for the majority and Rub 'n Buff Silver Leaf in about four spots that would get a little more wear. For the bakelite weathering, I used Rust-Oleum warm caramel as the undercoat. I then used the toothpaste method and did the top coat with Rust-Oleum satin espresso. I'm pretty happy with the results. I ordered the craft wire and will add that to the T-tracks in the future.
-
I decided not to build it with a movable bipod. I never planned to display it and figured I'd always be carrying it while trooping. It was a bit of a dilemma to make that decision, but I'm not really having any regrets. I'm sorry I don't have advice for that part of the build.
-
I ordered 3D files from Galactic Armory. I friend of mine printed them for me, mostly in back, but the bipod was grey. The bipod legs and the main housing were too big for the printer so they had to be printed in two separate parts. I sanded everything down. The print lines were vey fine so the sanding wasn't overwhelming. I used some scraps from my RO TK build to make inserts that I put inside the bipod legs in order to support them when I cemented them together with J-B Weld. I also cemented the main housing piece together. For both of them, I used some Bondo Spot Putty to fill the small seam. Once sanded, I first primed the inner barrel with Rust-oleum flat gray. I then painted them with Rust-Oleum flat black. I knew that once the barrel was built, it would be difficult to fully paint those inner barrels. I then primed all the pieces of the outer barrel and the main housing and stock. I built the two pieces (front barrel and housing/stock) and painted them flat black. I then used pure graphite powder and brushed it onto all the "metal" parts except the stock. I left that flat black. In order to make travel easier, I left the two main parts as separate pieces. I used two pieces of 1/2 inch aluminum tube and a 3/8 inch solid aluminum rod to make an insert to stabilize the blaster and to give it a little more weight. I put a rubber stopper down the front of the barrel so the aluminum rod would not slip out. I also made the rod into two parts, one with the aluminum rod glued into the tube and an additional tube that slid over about 7 inches of exposed inner rod. Together they fit into the inside of the blaster. The completed DLT19 was approved for use by my GMLs. It's good to go for New Hampshire Comic Con with the New England Garrison this coming weekend!
-
 Link updated. Sorry about that.
 -
Requesting 501st access TK 26690 https://www.501st.com/members/searchresults.php?searchfield=26690&criteria=tkid
-
TK-26690 reporting for duty! Thanks for everyone's help and advice along the way!
-
Thank you, JBar. It's been a very fun build. I followed Dark PWF's How to Join the 501st post and completed my Member Application today, and I submitted my pictures to the New England Garrison GMLs! Now I wait.
-
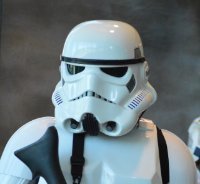
I used some open cell foam to pad the top of the helmet. I measured and cut it to size. I fitted it a few times and eventually trimmed it to the right depth. I use the velcro on hand and applied it to the helmet and the foam to set the padding in place. I purchased some helmet replacement pads and fitted them loosely to find the right placement for snugness and comfort. I used the velcro to attach those as well. The helmet is snug enough that I won't need a chin strap, although at some point I might still add one.
-
In thinking about shortening the distance between the brow trim and the eyes to closer to a 1/4 inch, which is in the description for the CRL Level 2, I came across some rubber edge trim. It was the right size to cover the brow trim the helmet came with, and it didn't force me to rebuild the edge of the helmet for an entirley new brow trim. The edge trim I purchased is also closer to the width of the brow trim in the gallery images. I purchased the rubber edging and then measured and trimmed it to fit the helmet. The longer side covered the wider, visible side of the brow trim. The short side covered the underside and also covered some of the overspray from painting the helmet. I used a small amount of J-B Weld to glue the new edging over the original brow trim. I did it in three sections. My magnets wouldn't hold through most of the trim so I used painter's tape to keep the new trim in place. The change in size is not overly noticeable, but there is enough of a change to make the distance between the brow trim and the eyes closer to a 1/4 inch. Original brow trim: New brow trim: The exterior of the helmet is now complete for Level 1. I will work on padding and possibly adding a chin strap next.
-
Oh gosh! First, thank you for the compliment on the vocoder. Second, I'll wait on the upgrade of the hovi tips...I need to get this kit completed and I can see the end in sight! Really, though, I love the attention to detail I get in your comments. Thank you.
-
I attached the vocoder by inserting the rubber tubing I made. To install them, I first cut the edges so I could more easily thread them into the holes I had drilled. I started with the center tube and worked towards the edges. The wire on the inside certainly helped them keep their shape, and I was happy with the uniformness of each tube. Although the Level 1 CRL doesn't call for it, I made the tubes so they had a gap between them and the helmet. Once they were all installed, I leveled them so they all protruded the same distance from the helmet. I then glued them in place with J-B Weld and then cut the extra length. I'm happy with the final outcome and the look of the vocoder.
-
I replaced the hovi mix tips back into their original slots and used J-B weld to hold them in place.
-
I cut two scrap pieces to fit under the tube stripes. I chose pieces that had some curve to them but needed to curve them a bit more with a hot water bath. I then primed and painted them a medium blue and used J-B Weld to put them in place. I did a little at a time and held them in place with magnets so I could get a tight fit to the helmet. I wanted to cover the interior of the ears so I cut two scrap pieces to fit and cover the area. I then glued them in after I had done the blue pieces since the ear covers overlapped the tube stripe area. I put the original eye lenses back in (which I had darkened with a layer of green film). I decided to replace the lens cover as well but removed the side pieces first. I left only the brow area.
-
I used the edge trim I had purchased, and based on the image of the trim on the helmet reference on the R1 TK gallery page, I started the trim on the back of the neck side and overlapped it in a similar fashion as the image in the gallery.
-
For the mesh in the frown, I bought a metal screen patch, cut off a portion, and then trimmed it to fit the frown. The screen mesh was too silver and according to the Reference Library, it should be black or dark grey. I chose black and spray painted it. I then used magnets and J-B Weld to set it in place.
-
I sprayed the helmet with the Upol Gloss Clear coat and let it dry for about 48 hours. I then used Meguiar's polish to buff the white areas with a sponge and then wiped off any remaining polish. While I was working on the helmet, I got after the gap gmrhodes13 pointed out on the pre-approval feedback forum. I ordered a replacement rectangular plate from 850 Armor Works. It only comes in black so I timed the work so I could paint the helmet and plate at the same time. I needed to take about an inch off the width. I started by cutting it in half and then trimming each half to the right size. I glued a strip along the back of one side and then glued the top pieces together. I then sanded and primed the plate. Once it was primed, I painted it with the Monaco White and then gave it the gloss coat as I painted the helmet. I'm hoping the size reduction will show less of a gap when the new plate is worn.
-
Since the Monaco White was a match, I returned to O'Reilly Auto Parts and was helped by Pat, who stayed beyond the end of his shift to mix my paint. Thank you, Pat! I left with two spray cans of the white and a can of gloss clear coat. I gave the helmet three light coats with the Monaco White. I painted the frown with Humbrol Pale Grey Gloss. I made the seven pieces for the vocoder. Using some electric fence wire, I cut and bent the seven individual pieces. They were a little loose inside the tubing so I wrapped just a bit of electrical tape around them then slid the rubber tubing over the wires. When fitting the curved pieces under the tube stripes, I realized I needed to remove some additional material on the inside of the helmet just to make their placement a little easier.
-
I dropped by a local auto chain, O'Reilly Auto Parts, to see what gloss white choices they had for the helmet. I learned that a different store location could color match and mix paints, and they could also put the paint into an aerosol spray can which was good since I don't own an airbrush or any type of sprayer. I went to the second location and was met by a super helpful salesperson, Jason. He took a picture of the white on the back armor plate which I had with me, but there was no auto paint that was an exact match. He then pulled out all the white color samples and we started to compare them. The best match was a Monaco White from Hyundai. Jason mixed up the paint and before putting it into a spray can (which costs a bit more), he gave me a sample 1oz bottle with brush applicator. I used a piece of scrap armor and did a test paint. The before and after pictures are below. Before, scrap armor only: After, Monaco White is in a square above the word "Test." The line above the arrow is a shade from the layer of paint applied to the armor. I'm very happy with the color match. Thank you, Jason!
-
Thanks for the tip! I've had a lot of live and learn moments on this build so I wasn't daunted by the redo. Good to know for future work. Before moving on to painting the gloss white, a was looking at all the final things I need to do. I noticed that the edge for the black trim around the neck opening had two places that were going to be difficult fitting the trim smoothly. I had purchased rubber edge trim for the neck opening and fitted it on to see where I needed to make adjustments. I trimmed one side of where the two helmet sides met which made the trim go on smoothly. I then re-primed the surfaces I needed to sand.
-
I taped off the areas for priming and used Rust-Oleum Automotive Primer. I layered on several light coats. Once dry, I noticed several spots that needed re-sanding. There were several spots where the chin extension and vocoder work was done and a little needed in the battery case.
-
Before putting the helmet together for priming, I re-sanded the edges of the yellow artillery paint to smooth them off. I reassembled the three pieces of the helmet and kept them in place with rubber bands. I then used J-B Weld to glue all the seams on the inside.
-
Thanks, gmrhodes13. I have some electric fence wire that fits the inside diameter of the tubing and will use that. I made a paper template for the blue strip under the tube stripes and then used some scrap to cut them out. I removed some additional material so they would fit better. After a hot water bath, they fit well and those will go in after painted and the helmet is primed and painted. With some extra material from the belt, I cut a piece to put into the back of the helmet to cover the rough cuts where the batteries and microphone were. After a hot water bath to shape it and a little trimming, I glued it in. To darken the lenses and meet the CRL, I bought some green window film. I made a template for each lens, cut the film, and adhered it to each lens. Lenses with no film, as they came: Adding the green film: The left lens without the green film and the right with the film attached, light behind in the first image and light in front in the second image:
-
I realized that in order to place the blue under the tube stripes, I'd need to remove some of the structure. I cut it away and then replaced the clamps that snap the front of the helmet to the back. I used only one screw and then some J-B Weld since the second screw couldn't be used. For the vocoder, I made a template based on images of the helmet in the R1 TK gallery. I traced the template onto the helmet, made some adjustments, and drilled pilot holes. I then used a larger bit to drill the final holes which are smaller than the tubing I'll be using. I ordered 1/4" outer diameter rubber tubing for the individual vocoder tubes. I plan to put wire inside to get the right bend.

