


Sawanator
-
Posts
106 -
Joined
-
Last visited
-
Days Won
1
Content Type
Profiles
Forums
Gallery
Articles
Everything posted by Sawanator
-
Matt and James's TK build thread - AM 4.5
Sawanator replied to Sawanator's topic in ANH Build Threads
No. I didn't hear about that. When I last checked ImperialBoots, they didn't carry my size (14 or 13 Wide). Thanks for letting me know about KeepTrooping, though. I'll check their sizes in their next wave. -
Matt and James's TK build thread - AM 4.5
Sawanator replied to Sawanator's topic in ANH Build Threads
Ya, I was worried about that. Sucks being so close and can't find footwear that works. -
Matt and James's TK build thread - AM 4.5
Sawanator replied to Sawanator's topic in ANH Build Threads
Alright. Back at it we go. We drilled out our rivets and patched them up. We are still playing with buffing them down so it looks right. I'll post some pictures in a bit. The main thing I want to focus on today is boots. I've posted before that I have rather large feet and don't fit the standard trooper boots. I tried Crowprops, but it just didn't work out for me (James' were fine). Anyway, I'm at the point of sources new boots and found some Chelsea boots that I want to have painted. I'm thinking if just using these for trooping as I'm sure they aren't up to snuf, but I wasn't sure how all the rules around that worked. Please let me know if these boots would pass for general trooping? I have a pair to wear for when I submit, I just can't wear them that long. -
Matt and James's TK build thread - AM 4.5
Sawanator replied to Sawanator's topic in ANH Build Threads
This is great, feedback. Thanks. I wore it for about 2 hours today. These are my take aways: -i need to fix straps for sure. My biceps and shoulders were too saggy -need padding in the forearms, bicep and thighs to prevent rotating. -my chest is pushing my helmet up, and I really can't see. Is this normal? -the cod piece really digs into my thighs at the back before it curves in. Are there any fixes for this? Other than that, it wasn't bad at all. No other biting armor anyway. -
Matt and James's TK build thread - AM 4.5
Sawanator replied to Sawanator's topic in ANH Build Threads
So I'll start this by saying this is a test run. I have lot's of issues to fix, but I was really happy to just get it to the point where I could wear it. Things I know I have to do: Fix rivet (they are the wrong spacing). Already practice patching a crack, so feeling better about this fix Fix my knee ammo belt (it's just on temporarily, but is upside down...it's a long story). a replacement is on it's way. Figure out how to adjust my should bells being so far away. The seems ok from the back, but haven't figured out how to close the gap at the front. Small gap between kidney and butt plate (easily fixed) One leg was sitting lower than the other Need to pull in my kidney and abs plate a bit better The last thing is my helmet, When I wear it without armor, it's fine, but with everything on, it doesn't come down far enough. Feels like it's hitting my chest armor and pushing it up. I was able to correct it a bit by shoving a small rag at the back of my head, which tips the helmet down a bit. You'll see it looks like I stand a little knock-kneed, which throws off the angle of my legs. Need to practice standing straighter. Also, I find my thighs rotate a bit, could someone help me with the orientation? How should those thighs be sitting? Anyway, please comment away. I know I have lot's of fixes coming, and I want to get it right. Thanks. -
Matt and James's TK build thread - AM 4.5
Sawanator replied to Sawanator's topic in ANH Build Threads
Thanks. I may apply for basic when I'm done and then fix it before I apply for Centurion. I'm sure there will be other fixes for sure. Still struggling with huge gaps between my shoulder bells and chest. Just the way I'm made. My shoulder bridges are gluing right now, then I will post some pics. -
Matt and James's TK build thread - AM 4.5
Sawanator replied to Sawanator's topic in ANH Build Threads
Ya, we could try that first I guess. Is it possible to remove the split rivets? -
Matt and James's TK build thread - AM 4.5
Sawanator replied to Sawanator's topic in ANH Build Threads
Ya, I was afraid of that. Crap. Guess we are ordering new abs and kidney plates. -
Matt and James's TK build thread - AM 4.5
Sawanator replied to Sawanator's topic in ANH Build Threads
So I'm trucking along doing my belt, and I read one post about how the bottom rivet is covered by the belt. We followed the standard rivet placement posted and once I placed my belt on, I can clearly see it's doesn't. I'm worried that since AM armor was bigger, we were supposed to space it out more, which would bring the other rivet lower. Is this a deal breaker? Does this mean I have to redo the ab and kidney plate? Feel like it's kinda permanent with the rivets set already and we would need to order replacements.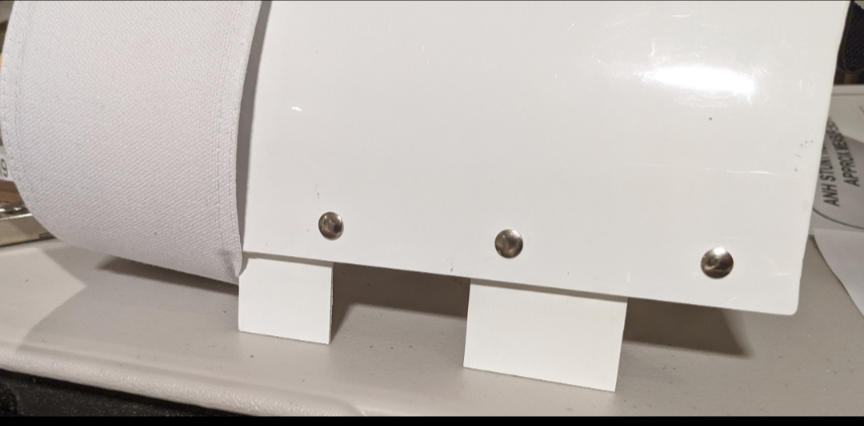
-
Matt and James's TK build thread - AM 4.5
Sawanator replied to Sawanator's topic in ANH Build Threads
I'll give it a shot and see how it looks. Thanks.Nice thing is I can just add an extra snap connector, leaving both if it works. -
Matt and James's TK build thread - AM 4.5
Sawanator replied to Sawanator's topic in ANH Build Threads
Any tips on what to do here? Do I need to trip the should bells or adjust them at all? Because my chest is bigger than the chest piece, I'm not sure how best to bring the should bells to minimize tha gap. -
Matt and James's TK build thread - AM 4.5
Sawanator replied to Sawanator's topic in ANH Build Threads
This is really cool. Simple too. Thanks for sharing. -
Matt and James's TK build thread - AM 4.5
Sawanator replied to Sawanator's topic in ANH Build Threads
Alright, So, I had major issues with imgur (in fact I still am). Having such a hard time shrinking and cropping. As a result, I couldn't upload during the build, which was problematic. I also have been guilty of not taking enough pictures in this journey. Been hard since we only work on this like 2 or 3 times a year, but I definitely should have done this more as a journal, and I regret not doing that. Anyway, here are the updates so far. I'm about 80 to 90 percent done. Lots of little things. James is further behind, and I will post his stuff later. I'm having "larger guy" issues. My ab sides are bursting open, and I need to fix this. Been doing lots of reading, and I like the nylon fabic hinge idea I saw in AJ's AM build thread. He used his rivets to support them, but I've already got mine set, so I'll work around that somehow. I also like this idea of a shim on the open side. I will rig something up there as well, and I hope this helps. I noticed that my kidney's reallly push things out. It's almost like I need some padding on my gut (except I have enough) ;-) the push the bottom part our a bit. I'm hoping between the shim, and the new joint, plus wearing the belt, things will "shape up". I can see some other issues here, such as my large chest is making a large gap between my shoulder bells (see main pics below). I really don't know how to proceed here. Do I trim them? Do I need to shorten the strap to the shoulders? Onto the pics main pics. I have to admit, I got excited, and I just threw things on, even though I don't have many pieces done (including my thigh belt system yet (hence me holding my thighs up). Please let me know if there is anything else you think needs fixing. I'd be happy to post more pictures or better angles (I didn't realize James took so few). Other issues that came up. I think I made my thighs too tight.I gained a bit of weight. When we were cutting and measuring, we didn't realize there was a belt system, so we went a little tighter than we were supposed to. Think I need to open them up a bit as I cant seem to get them high enough now. Plus, I keep pinching my skin from my inner thigh on the cod piece. The last one is that I noticed I couldn't get my helmet down enough, but it may have been because I was holding my legs (which caused me to shrug my shoulders a bit(. I'll have to test that out next time/see if I can tip my helmet forward a bit. Anyway, I'm very happy with the progress so far. Got a long list of things to fix. Annoyingly, several snaps started coming off from the abs, so I have to re-glue. This works out ok in the end, so I have to kind of re-jig things there anyway. I will make more posts in the next few weeks as I make adjustments to things. I'll sure I will have some questions. Looking forward to hearing tips on how to proceed with some of these issues. -
Matt and James's TK build thread - AM 4.5
Sawanator replied to Sawanator's topic in ANH Build Threads
Not sure if there are any early risers. I was hoping to fet my shins done yesterday, but was too tired to focus. I was having a hard time getting the fit. Any recommendation on the gap between armor and leg (both near the knee and the ankle)? I assume it's ok it my cut is angled, as in I have to pinch more armor at the bottom than the top. Lastly, is there a recommended height from the ankle? Obviously low enough the boot doesn't slip out, just just want to make sure I'm not missing anything. Thanks. -
Matt and James's TK build thread - AM 4.5
Sawanator replied to Sawanator's topic in ANH Build Threads
Alright. Down this rabbit hole I will go. Thanks. -
Matt and James's TK build thread - AM 4.5
Sawanator replied to Sawanator's topic in ANH Build Threads
With this, would it pass inspection for 501st, or is this more for comfort when trooping and wear the proper boots when needed? -
Matt and James's TK build thread - AM 4.5
Sawanator replied to Sawanator's topic in ANH Build Threads
So, I'm having a hard time with boots. The problem for me is I'm size 13 wide or size 14. These are a little hard to come by. I tried Crowprops because they said they did customer boots, but they didn't fit me at all. I gave precise measurements and everything. I saw the Imperialboots doesn't have my size. -
Matt and James's TK build thread - AM 4.5
Sawanator replied to Sawanator's topic in ANH Build Threads
Wonderful. Thanks for confirming. Last question for now (we're just packing up from today's session). The split rivets on the code piece. Was that supposed to be functional? We just put the split rivets in and will put snap and strap over it. Hope we did that right. We did the same for the side rivets. They are there, but not attached to any strapping. Thanks -
Matt and James's TK build thread - AM 4.5
Sawanator replied to Sawanator's topic in ANH Build Threads
This is great news. I have most of the nylon plates assembled. May I also ask what type of button needs to be showing on the butt buttons? I can't really tell from CRL. Should it been to smooth side of the button on the bottom side with the hole? I know the Han button shows the back side with the hole, but wasn't sure for the butt. Thanks again. Really helpful once again. -
Matt and James's TK build thread - AM 4.5
Sawanator replied to Sawanator's topic in ANH Build Threads
So we are trucking along, getting some nitty gritty things done, and we come to the butt buttons (on the bottom), and the mention of the Han snap being a male snap, and James and I did a double take. We realized that the nylon snap plates that we have built (but not glued yet) are female, and therefore the strapping was going to end up being male. Here are our snaps plates: Here are the straps: Our goal is Centurion, so is it any problem if our strap snaps are opposite of most as long as our Han snap and butt snaps are male? Or are we looking at redoing all of our snaps plates? -
Matt and James's TK build thread - AM 4.5
Sawanator replied to Sawanator's topic in ANH Build Threads
Ok, thanks. That's good advice. It doesn't bother me that much. Now that I took anything off, should I be concerned about the gap at the front or the back? I know the front will be covered by the ammo belt on the right left, but the left leg will be more or less exposed. Do people put a little cover strip behind it to strengthen or mast it a bit? Or do people make a paste to fill the gap? -
Matt and James's TK build thread - AM 4.5
Sawanator replied to Sawanator's topic in ANH Build Threads
So we got to a gluing backlog (sharing resources has its drawbacks). But we've decided to take the next while just to glue things and take our time. First off, the hot water bath worked like a charm. So happy with how my forearms look now. So easy and so awesome! I start my thighs and got the idea from a post I saw about doing them from the inside out (inner strips first). I actually quite like this method and broke it down by just gluing half the under cover strip to one side of the armor before merging the 2 halves and will probably keep this method going. It take way more time, but I'm in no rush. Here is my (almost) finished thigh. I just glued the front cover strip on last night, but I'm worried it slid a bit when I clamped (forgot to re-check...doh!) I can clearly see the ridge line on the left, and it is more or less non-existent on the right (especially in the middle). I'm thinking of redoing it, but wanted to get some input. I really don't mind the extra step of redoing it to get it right, but if it's not going to notice or matter when it's all said and done, I'll take that under consideration. Thank again for all the support so far, BTW. This forum is great support. -
Matt and James's TK build thread - AM 4.5
Sawanator replied to Sawanator's topic in ANH Build Threads
That is quite the setup. Glad it worked. May have to consider something like this too. I saw one post of someone gluing the inner strip first on one half only. Then proceeding from there. Might try that too. This will take a few extra days, but I'm curious if I will have any luck. Cheers -
Matt and James's TK build thread - AM 4.5
Sawanator replied to Sawanator's topic in ANH Build Threads
Good to know, thanks. Just wondering how a hot water water bath works? Does it melt the e6000 a bit? -
Matt and James's TK build thread - AM 4.5
Sawanator replied to Sawanator's topic in ANH Build Threads
Thank so much for the feedback, this is all really helpful. I'll look into white e6000 for sure. When we get back to it, I'll post more posterior pics. We will for sure trim, parts properly. Didn't pick up on that at all. Also found out about trimming the extra at the end of the cod piece as well as the posterior. Cheers, Matt
