
Mar2D2
-
Posts
115 -
Joined
-
Last visited
-
Days Won
1
Content Type
Profiles
Forums
Gallery
Articles
Media Demo
Posts posted by Mar2D2
-
-
Hey troopers,
I have recently finished my E-11 build and wanted to share it with the TK world to see what you all think. I took a lot of ideas and inspiration for my build from other troopers build threads on here so I'm am hoping to do the same in return for future TK's.
Sent from my SM-G920F using Tapatalk
-
 1
1
-
-
I've used the traditional strapping system on my RS TK. I found some areas didn't suit my build, so mixed it up with snaps as well. I love the fact that the original strapping can still be seen on the out side keeping to a more movie accurate appearance.Hey troopers,
Working on the torso: I’ve better trimmed and sanded the parts, and now started on the original strapping system. Using screen reference material, plus the RS videos, for reference.

3mm drill used for the holes. The bolts supplied by TM are approx 3mm threaded shaft with a 5mm, flat head.
As it’s my first time using this method, the chest went fine, however, I had to drill some additional holes in the top of the ab plate as the chest and ab brackets didn’t quite line up. Thankfully, these will not be at all visible.


It’s a slow build (as I’ve had the kit since Christmas), but it’s really enjoyable. :-)
Good work Dan. I think you will be really happy with the apearance once completed. As I have used this system please do not hesitate to ask any questions you may have.
Cheers,
Martyn. (Mar2D2)

Cheers,
Sent from my SM-G920F using Tapatalk
-
1
-
-
I thought that was the case. Just waiting to go through a few bits with my armourer and need to finish off my E-11 blaster. Then I will be putting in my application for basic.Hi martyn, you must have been approved in basic first and have your TK ID. Once you get that, you can apply for EIB .
Cheers


Sent from my SM-G920F using Tapatalk
-
3
-
-
Hi there,
I really want to be one of the last 30 in this FISD achievement!
Do I apply for EI as soon as I can clear basic approval? Or can I clear at EI level?
Cheers,
Martyn (Mar2D2)
Sent from my SM-G920F using Tapatalk-
1
-
-
I added an extra piece of plastic to help with keeping my shoulder bridges attached. Also keeping with the 4 ridges up sizing when attaching.


Sent from my SM-G920F using Tapatalk -
After trying it on for the first time. I found that the chest plate kept pulling above the abdomen making a small gap, and the butt piece kept flaring out.
I'm far from a slim guy and found that the openings on each side of my armour Sat about 1 to 2 inches apart.
I don't like the idea of removing my kidney plates return edges and them adding shims, so I spent hours reading other build threads and decided that; the Crl's do not mention how the strapping system should be, so I decided to go down this route to improve the overall fit of my armour.
I have used a mix of snaps and original brackets.
First pic: removed elastic from the chest and abdomen pieces and replaces using snaps. Instead of elastic I used black webbing to stop the chest riding over the top of the abdomen.
Second pic: I made 2 x really tight prices of elastic for the outer 2 bracket on the Butt plate to kidney, which has tightened it up and stopped a lot of the butt plate flare.
Third & fourth pics: I reinforced all of the bracket as well as added reinforcing pieces in curtain parts of the return edges on the kidney, as the plastic was bending when the sides were pulled together. I also spotted a small crack on the neck line of the chest plate, so glued a small strip of plastic behind the crack to hopefully stop it spreading.
Fifth & sixth pics: I choses to use snaps and elastic for the side connection so the elastic tension would aid in reducing the gap.


Sent from my SM-G920F using Tapatalk -
Hey troopers,
I wanted to add some of my build progress for anyone who is following my build thread.
Here is my armour strapping.
I decided to go with the original bracket and elastic strapping method.


Sent from my SM-G920F using Tapatalk -
Hi Adam,Thanks Martyn
I saw your build thread over at UKG. Like you, my thighs are larger than the originals. Your completed thigh pieces look really good. Are you able to let me know please how you approached the fitting and measuring of the thighs before you made the cuts?
I have seen a couple of YouTube videos where the two thigh pieces seem to overlap quite easily when being fitted and measured, but I don't think the kits are RS. I know that I struggle when trying to wrap the two pieces for fitting as the return edges at the top and/or bottom seem to get in the way of each other, making it harder to know when you have a good fit? That said, it could be just me!
Thanks
Adam
I will admit that I put these off for a couple of months before I felt confident enough to do them.
I followed the RS tutorials on youtube. They were making their kit to the original sizes. The forearms and biceps (with a little extra shaping to fit my arms) fit perfectly so I didn't give the sizes for the thighs a second thought. I cut the Right thigh to the RS sizes only to find a hugh gap in the back where the 2 halves wouldn't meet (First pic below). My heart stopped as I thought I had totally screwed them up. I emailed Rob from RS with pics and explained that I followed his tutorial only to find the thigh didn't fit my larger legs. Rob mentioned in his next tutorial that someone messaged to say the original sizes didn't fit (that's me), so he warned to cut away a little at a time from the back whilst trying them on until they fit. RS were great in supplying me a new thigh but as I said, this put me off continuing with my build.
I final gathered enough courage to try again (with extreme caution this time). Firstly, I cut, trimmed and attached my cover strip to the front of the thigh, as this doesn't change. I then taped the back together, one side over lapping the other until I felt it would fit. Then I cut away the excess plastic but leaving more then the original RS suit (picture 2). When I tried on the parts I had done, the thigh around the knee area was too wide, so I trimmed some more off, but not too much from the top (pic 3). I made sure either side of the bottom flat edge was about the same length before attaching the cover strip(pic 4). I can't stress enough about taking your time, cut a little at a time, then try on, then trim some more if needed.
The return edges are anything between 3 and 5mm. Again trim a little at a time until comfy.
I used the exact same process for the left thigh (pic 5).
I hope this helps.
Cheers,
Martyn.


Sent from my SM-G920F using Tapatalk
-
Hi troopers,
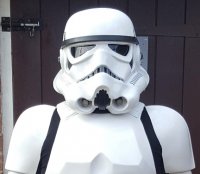
Just a few tweeks here and there and I should be ready to start taking my approval pics. Time and the opertunity to pose suited up has been a struggle, but I did get a couple of pics suited up.
Let me know what you think?

Sent from my SM-G920F using Tapatalk-
2
-
-
44 minutes ago, CableGuy said:Hi Adam,
Great progress, trooper.
Just to touch on something : there have been some suggestions in the thread to trim certain parts to remove the “offset” between certain inner and outer parts, in this case the arms and thighs. Personally, I’d advise against this - I’d say you’re doing the best thing and maintaining the beauty of the RS suit and it’s lineage to the original suits by NOT doing this.
Most other, idealised suits will lose this type of character and charm.
Keep up the good work.
I totally agree with Dan, your doing great.
I am currently finishing up my RS build. For the thigh miss-alingment as shown in your pics, this will be covered by the knee ammo piece.
Here is my RS thigh. Behind the ammo piece is the exact same miss-alignment as yours which cannot be seen. The cover strips hide the top miss-alignments.
Hope this helps ease any worries and remember. The RS armour is made from an original suit which were literally thrown together for the movie, so there is very little symmetry which in my opinion, adds to the charm of the original TK's.
Cheers,
Martyn (Mar2D2)

Sent from my SM-G920F using Tapatalk
-
1
-
-
Yeah. But had no reply.Did you try to ask RS directly on the button color already?
Sent from my SM-G920F using Tapatalk
-
I have also finished off making my E-11 holster.
I used 8oz veg tan leather dyed black using leather shoe dye and finished with a coat on neutral leather polish.
Apart from the snaps, I used Chicago screws on all the attachments.
I followed as many build threads and used my own blaster to figure out the final sizing.
What do you troopers think?


Sent from my SM-G920F using Tapatalk-
1
-
-
And after a little dip in hot water.


Sent from my SM-G920F using Tapatalk -
Hi troopers,
I had issues with having broad shoulders so needed to give my bells a little bath to widen them.
Here are the before pics.


Sent from my SM-G920F using Tapatalk -
Ab buttons have now been attached.
Do any of you troopers know the exact colour, make, number etc. of the blue RS Propmasters use for their ab buttons?
I have a couple of small chips on the bottom button from sizing up my ammo belt.Cheers,
Martyn.


Sent from my SM-G920F using Tapatalk
-
18 hours ago, TKSpartan said:
Amazing work Martyn keep it up !!!

Thanks TKSpartan really appreciate it. I'm trying so hard to keep to the original suit construction (Just with neater cutting and trimming etc.) as well as following as may build threads as I can, to get ideas on what other troopers are doing to improve the durability, personal fit and comfort of the armour.
There are some real Gems popping up the more I read the forums. The experience and knowledge from senior troopers, I feel, is essential to getting this right the first time around.
To any future troopers or newbies (like myself) following my Build thread. I have a few words of advice; Take your time, Do your research, Cross check your work with actual pictures from the movies or the movies themselves, Don't be afraid to ask questions as there is so much knowledge and experience within the FISD (Troopers helping Troopers) Remember everyone was "a long time ago in a galaxy far, far away...." a newbie. One of the best pieces of advice i was given at the start was; measure twice (or Five times), before cutting!
-
2
-
-
7 hours ago, Chemi said:
I recommend you to use self-locking nuts in this part, to prevent screws from loosening in the middle of a troop...Threadlocker, or a little hot glue also work...
That is really good advice, Thank you.
I found that when applying the E6000 to the re-enforcing strips, a little bit of Glue ended up on the thread of the screw when putting them back together so hopefully this will be enough keep the nuts in place? I guess only time trooping will tell if it actually worked!
Cheers,
Martyn (Mar2D2)
-
Whilst following other TK build threads, I decided to reinforce the holes for the strapping brackets as I have gone for the original screen accurate strapping method. I may convert to the snap style at a later date.
I used scrap off cut pieces of plastic rather than the left over cover strip pieces as I found that using the cover strip off cuts made the return edges slightly too thick for the small screws and nuts attaching the brackets, where the off cuts have been thinned out during the vac-form process.


Sent from my SM-G920F using Tapatalk
-
The shins were tricky! What's with the sniper knee plate not wanting to fit first time? I guess it's ment to look like that, as it's more screen accurate than the more idealised look. Dan "CableGuy" did a post about this which I found very useful and also reminded me that, the original suits were pretty much just mashed together and are all unique in their own ways.
I found that, because the RS Armour was made from Simon's original Sandtrooper. It had 2 right shins and when attaching the cover strips, the back opening was misaligned. I therefore decided to go for Velcro rather than the "bra hook" method for the rear closures. I know it's not screen accurate but solved the misalignment issue.
Sent from my SM-G920F using Tapatalk


-
Once I was happy with the forearms, I felt that the legs needed the same level of attention.
I wasn't happy with the back of the thighs as I tried to keep on some extra plastic to compensate for my wider legs.
Since then, I have lost a far bit of weight (intentional) and my legs are now a lot closer the the original sizes described by Rob at RS Propmasters.
Again, let me know what you guys think?


Sent from my SM-G920F using Tapatalk


-
I have also been working on some of the finer details, like tidying up the return edges and adding the elastic, connecting the biceps and forearms.
I removed all of the return edges on the wrist end of the forearms as per the Crl and for a more movie accurate appearance.


Sent from my SM-G920F using Tapatalk -
Here are some better quality pics.

Sent from my SM-G920F using Tapatalk

-
Morning troopers,
It's been a while, so I thought I would give you all a little update on my build so far.
I have found that the more I work with the materials, tools and plastic of the armour, the more confident i became and less worried about cutting and trimming.
I used single cap rivits to finally construct my TK main ammo belt. I followed Ross from RWA with regards to the blaster holster attachment so it can be removed or replaced.
I made the holster myself, but may swap out for a more rigid bought one.
Let me know what you think? Comments a very welcome.


Sent from my SM-G920F using Tapatalk -
Brian muir
Sent from my SM-G920F using Tapatalk-
1
-
Mar2d2 - ANH E-11 blaster - Doopydoos.
in ANH BlasTech E11
Posted
This is where it all began.


Once I received my Doopydoos resin kit, I watched a lot of E-11 build threads and gathered as much info about the movie used blasters as well as obtaining a copy of the Stirling SMG users manual.
I started by drilling out the filled hole on the underside of the barrel. I also made a spring from a wire coat hanger and the barrel inset from some black metal tubing I had on my garage.
Sent from my SM-G920F using Tapatalk