


davethedeal
-
Posts
21 -
Joined
-
Last visited
Content Type
Profiles
Forums
Gallery
Articles
Everything posted by davethedeal
-

Opinions on Ulkswraths TK Audio System?
davethedeal replied to Nada's topic in Electronics for Helmets / Blasters
As far as having an audio system with no wires coming out of the helmet, you do also have the option of having an amplifier (and battery and voice modulator) mounted in your chest plate along with a wireless mic mounted in the helmet. That way there are no wires running out of the helmet. Just throwing that out there as an option. -
TK-11275 requesting access https://www.501st.com/members/displaymemberdetails.php?userID=30356
-
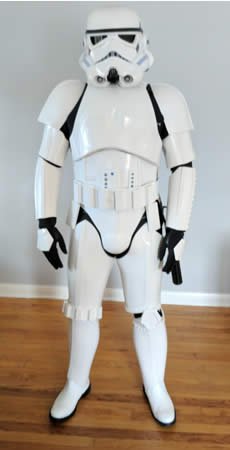
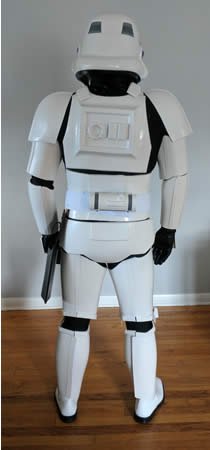
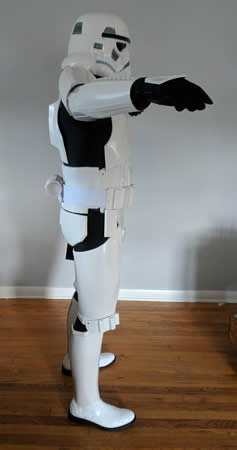
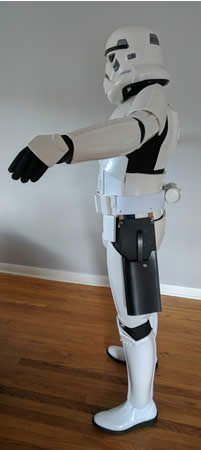
So I submitted my application and emailed photos to my GML, and now I'm just waiting to hear back on what tweaks I need to make. A big Thank You to everyone that has given me advice and answered my questions along the way! I feel like I've hit a milestone and started reflecting on it over the weekend. I started wishing I could go back to visit myself back in October when I first started down this road and give some advice. Here are the things I'd say: This is going to take a lot longer than you think. All the steps are fairly simple, but every one of them will take longer than you imagine, and that all adds up. The cost of the actual kit is only the beginning. Prepare to hemorrhage cash for the next few months buying all sorts of tools and equipment. The first time you put this armor on, its going to be incredibly uncomfortable. Don't get discouraged, just focus on the problem areas one at a time and eventually it will feel much more comfortable. You'll even be able to walk up and down stairs eventually, I promise. Even after you get approved, you're still going to be making modifications for months (I can see that coming!), so be prepared to continue to devote time and money to the project. Don't buy black boots and paint them white. Buy white boots, even if you have to go up a size or two to get them wide enough for your fat feet. Dying/painting them is a pain, and the paint will scratch off too easily, meaning you're going to be doing upkeep every time you troop. Don't swap out the Anovos belt for Kittell's belt. I know, and I agree, the Anovos belt looks like crap, but that swapping out of the belt is going to be the worst part of the build. It's also the only part of the build that will draw blood. Save that for an "optimization" project down the road. As strange as it may sound, some of your friends really are going to laugh at you for doing this. Idiots. Don't buy that one-piece undersuit. How are you going to pee? Don't just blindly follow that one tutorial you found that looks like it is all encompassing. The tutorials are suggestions. Take some time early on in the build to look at other build threads or watch youtube videos. You'll get some good ideas from them. When it comes to doing the actual work like cutting and grinding and gluing, don't stress about it so much. I know, the kit cost a lot and you don't want to screw it up, but it really is true that most screw ups can be fixed. Scratches in the armor are inevitable. Just call it battle damage and move on. I'm sure there's more, but that will do for now. Thanks again to all who helped me make it to this point!
-
David Deal Devastator Squad, Wisconsin Garrison Armor: Anovos Helmet: Anovos Belt: Kittell Neck seal: Anovos Boots: Silver Street, painted by me (https://us.asos.com/silver-street/silver-street-chelsea-boots-in-black-leather/prd/9108526?iid=9108526&custref=161837311&affid=14564&channelref=email&orderref=369212623) Blaster: haven't started on that yet Height: 5'8" Weight: 195lbs TK type: ANH Stunt Build thread: https://www.whitearmor.net/forum/topic/45948-newbie-daves-anovos-build/?tab=comments#comment-632117 (I removed most of the photos from my build thread so that I'd have enough available space to upload the photos below)

-
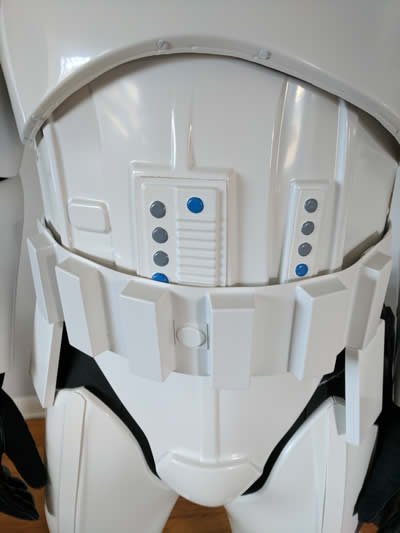
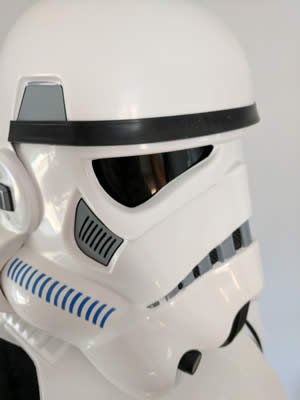
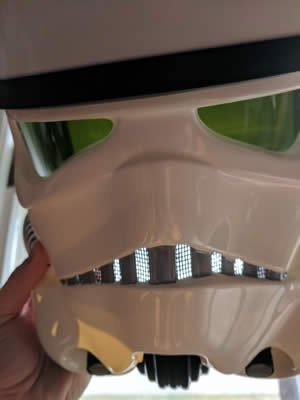
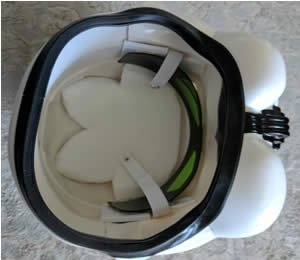
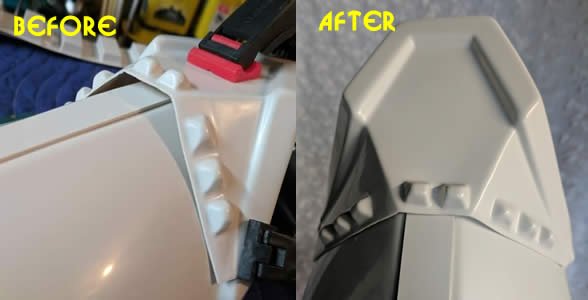
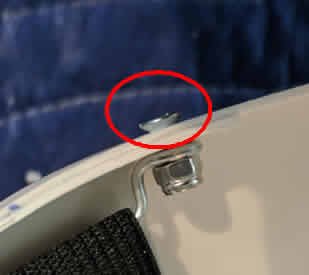
Time for my monthly update! Progress has been slow due to the weather and ongoing frustration with certain aspects of the build, but I'm almost ready to submit my initial application. I'm hoping to get the final details completed and application submitted by the end of the month. When I first started the build I was attempting to get everything built right off the bat to meet EIB and possibly Centurion standards. However, seeing as I really want to get approved before spring so I can start trooping, I've decided to cut corners with what is left to do, get the initial approval, then tweak it for higher level approvals down the road. My re-do of the Kittle belt rivets went much better than the first attempt. Gotta love the forgiving nature of E6000! If anything is wrong, it is easy to rip apart and re-do. Unfortunately, my belt has suffered quite a number of dings and scrapes during the process and looks about as weathered as one would expect after a tour of duty on Kashyyyk - it doesn't quite match the sparkling magnificence of the rest of my armor, but I figure it will all match up pretty soon after the wear and tear of a summer of trooping. I re-did the sniper knee. The mistake I made was ignoring Ukswrath's technique of securing the center of the knee and letting that completely dry before doing the sides. I gave it a go and tried to do it all at once, but as he states in his tutorial, there is just too much twisting of the material required to get it to sit properly. It was easy to re-do because E6000 and I are good buddies and work well together, and I'm glad I did because I expect that having that flush with the front of the shin will reduce the incidence of "knee under the thigh" syndrome. Question 8: I had to add shims to the kidney because I like to eat chips. Down the road I intend to cover the seams with ABS paste. Will these shims pass a basic approval? Question 9: I cleaned up the "return edge" on the helmet eyes because I thought it just looked bad. Removing the overspray on the frown is something I'm going to put on the back-burner, but will be adding the 5th tooth. I'm also delaying any modification of the hovi tips. That said, is there anything obvious I need to do to the stock Anovos helmet to get the basic approval? From what I've read, it seems their helmet is good-to-go for basic approval, but maybe I'm missing something. Question 10: This is difficult to show in a photograph, but is pretty obvious with the naked eye. I added a red oval to the photo to try and accentuate what I'm talking about. My helmet, when viewed from the bottom, is not symmetrical. It looks like somebody sat on it for a while and warped it, and I'm wondering if Anovos helmets are all sort of lop-sided, or if it is because mine sat in a BBB for several years with other armor on top of it before I acquired the kit? So much of this kit is non-symmetrical that I'm really not sure if that is on purpose or not...
-
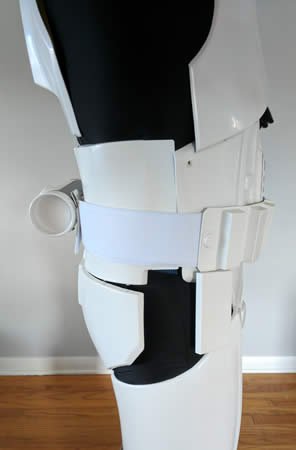
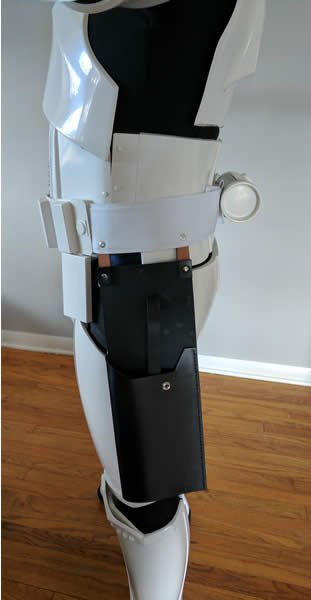
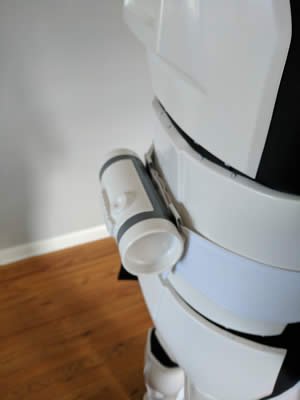
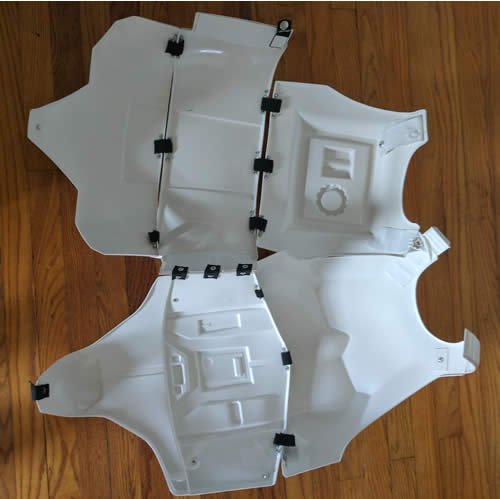
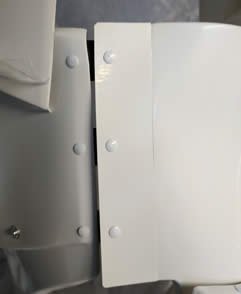
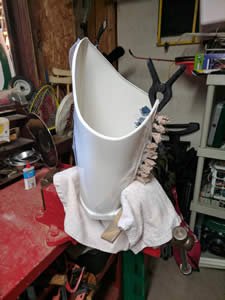
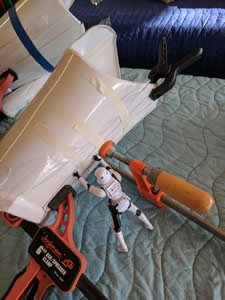
Its been a while since my last update, but I'm still at it. I ran into a bit of trouble over the past couple of weeks wherein the temperature in my garage dropped below freezing - that makes it tough to get much done in one push, and then I discovered that E6000 doesn't like working at those temperatures either. I was able to move parts of the operation requiring gluing into the basement and keep things moving along. It is fun to finally reach the point in the build where I'm installing the strapping and its actually looking like a suit of armor, rather than a haphazard pile of plastic. Yesterday I tried on the upper portions, mostly so I could figure out how low to hang the thighs, and that was quite an experience. I think I'm going to need a squire to help me in and out of this! In any event, there is still a lot of little things to do: Adjust strapping so things fit correctly. I see in my photo that my right shoulder bell is out a bit and my right forearm needs to be lower, things I didn't notice when I had it on. Painting screw heads and rivet heads Install velcro into calves - I'm going this route until I know for sure if I need shims or not Finish painting shoes - I used up one can of white leather paint on them, but they still look a little cloudy The damn belt - I mentioned above that I had a whole host of issues switching over to my Kittle belt, and when I put this on one of the rivets pulled loose. For the photo I grabbed that loose hanging end (my left side) and shoved it under the elastic of the drop box, that's why it is not lined up right with the ab buttons. I had lots of trouble when putting the belt together due to low quality rivets where the shanks kept ripping in half. I'm going to just pull it apart and re-do all 3 rivets with better quality ones. Not looking forward to that, but at least this time it is glued with E6000 and not that hard-as-nails epoxy Anovos used. I'm going to attempt a re-do of the sniper knee Figure out what I'm going to do for gloves I haven't even begun to start on the helmet....
-
I've got some progress to report, and a question. I went ahead and followed JustJoseph's advice and installed interior cover strips in the calves. I also cut out some material to reinforce the chest piece, but have not yet installed it. Trying to get a flat piece of material to follow the contours of the armor so I could glue it down was giving me issues, so I've set that aside as an "optimization" project once the initial build is complete. After a whole host of things going wrong along the way, I finally finished swapping out the crappy Anovos cloth belt for the stiff one I bought from Rob Kittel. This was something I was dreading from the outset, and it proved to be every bit as troublesome as I'd feared. I won't go so far as to say everything that could go wrong did, but I definitely had issues at pretty much every step. I'm glad its over, and am pretty happy with the result. The only thing left to do is to glue the drop boxes to the belt. I also got my buttons painted and glued to the abdomen. Not the best paint job, but serviceable. For a quick win, I mounted the thigh ammo belt. Actually getting the tools lined up to set the rivets was an interesting challenge. Lastly, I have glued on the sniper knee. The glue is drying and I hope it will hold everything together - the sides didn't have a lot of contact with the shin piece. Question 7: I've got the contours of the sniper knee lined up with the top of the shin piece, but in order to achieve that, I had to twist it to the point that there is this gap between the bottom of the sniper knee and the shin piece. Is that an issue? The CRL doesn't say it has to be flat to the shin, but that is what I was hoping to achieve. In the end I decided to get the contours right and hope this gap doesn't matter.
-
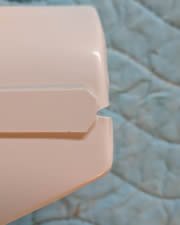
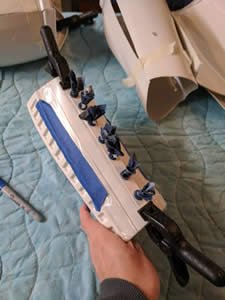
Progress has been slow due to life getting in the way, but I am just about finished gluing all the limb pieces together. One notable difficulty has been getting the backs of the thighs glued up. The two surfaces aren't flat where they join, and its especially bad on the right one. I wanted to try and glue it up all at once (rather than gluing one side, waiting for it to dry, then gluing to the other side) so I attempted to use my vice to compress the piece to make the surfaces flat and hold everything in place. That was a failure, mostly because I couldn't really see the area under the vice's jaw and things weren't really lined up like I thought. I think the technique has merit, but my execution was poor. One side glued up nicely while the the other side had a 1/4 inch gap between the cover strip and the thigh. Today I ripped that bad side loose, removed the glue, and re-did it using a variety of other clamps and tape to make the join flatter. I had another issue when attempting to fix the mismatch at the top of my right bicep. When I glued that piece up, I lined up the bottoms of the two pieces, and that made the top look like this: To deal with this, I clamped a piece of wood on the inside of the bicep so that the top of the piece of wood served as guide, heated up the misaligned part with a heat gun, then bent it over. That technique worked splendidly, but then the perfectionist in me decided to heat it up some more to try and make it even more perfect. Unfortunately when I did that, the two pieces shrunk a bit. I didn't know the ABS would do that - lesson learned. So now I've got this gap in my upper bicep. My first thought is that this will be concealed under my shoulder bell and I don't need to fret over it, my second thought is to use some ABS paste to try and fill it in. I've also experimented with using a bag of sand to hold down elastic that I'm gluing inside the armor - in this case where I'm attaching the bicep to the forearm. Its just another technique if anybody is interested. I figure it does a pretty good job of applying even pressure all over the surface of the elastic so it will glue down as flat as possible. Today I also hit a milestone - I finished off my first tube of E6000!! That has to indicate progress! This project has been taking a lot of time, but as I'm nearing the end of gluing the cover strips on I'm really starting to see it come together. I'm excited to move on to working on the straps and suspension.
-
Only a little progress has been made over the past 2 weeks due to a wedding last weekend and Thanksgiving yesterday, but I didn't want to leave you popcorn eaters hanging for too long. I'm finally seeing some progress! I've finished the gluing of the arm pieces as well as the long, arduous task of removing the excess glue. Today I glued up the fronts of the thighs. I've put in orders at Amazon and Ebay for the snaps and whatnot and am hoping to get started on the internal strapping soon!
-
The problem isn't really finding Chelsea boots with the seam in the center, its finding that in a brand that has sizing for wide feet. I'll keep looking.
-
I've been working on installing Mr. NoStripe's brackets. I've reinforced all the connection spots with an extra piece of ABS that I glued in place with regular superglue. One of those popped loose last night and I'm wondering if its because CA glue is like that, or if its because its about 30 degrees Fahrenheit in my garage and the cold is making it weak. But that's not my question. Question 5: When I went to install my first screw, I saw that I have this head hanging out in space looking stupid. I see the same thing in UKsWrath's tutorial so I know its not just me, but is that screw head screen-accurate? I can't tell on the reference photos of screen-used armor I've looked at. Did they use a machine screw like this and leave it sticking out like that? We aren't really working with enough material to countersink it, but maybe a pan-head screw would look better? Ultimately just an aesthetic thing, but its eating at me... Question 6: I have wide feet. I checked with TK boots and they don't have anything close to my size. Imperial Boots specifically says their boots are 'narrow fit' and it sounds like they take months to deliver anyway. I'd be just as happy ordering a wide-fitting Chelsea boot and fixing the color myself. My question has to do with the seam on the side of the boots. I'm having trouble finding any wide ones with the exact same seam as seen in the CRL. The CRL doesn't specify anything about the seam on the side. Does that side seam matter for Centurion approval? I'm looking at these boots: https://us.asos.com/asos-design/asos-wide-fit-chelsea-boots-in-black-leather/prd/8192254 Would those work a) for Centurion approval and b) are they tall enough that the shins would not get hung up in them?
-
Looking for wide TK boots
davethedeal replied to fulhair's topic in Boots, Soft Parts, and other Accessories
Andy, how have those imperial boots worked out for you? I'm the exact same size as you (10.5 2E), and facing the same dilemma. I'm concerned that the width will be a problem after a few hours on my feet... -
I made it to my first ever armor party this weekend, and am glad I did. I got some good advice, and also got to see other armor in various states of construction/repair. I did have a bloody mishap with a razor knife, and the propane heater was cranked up high enough to make me sweat under my layers, but there were no tears involved - so at this point I can at least say blood and sweat have gone into the construction of my armor. I was a bit concerned about all the excess glue on the parts that I have glued so far, and had read that the way to deal with that is to rub it with your finger. I thought that was a load of crap once I saw how tough this glue is, but a Bossk (sorry guys, I can't remember names too well) demonstrated for me and sure enough, it works if you rub long enough. While I doubt anyone will be clicking on this thread for tips on their own build, I have come up with an innovation to save your fingertips. A silicone spatula works just as well to remove the excess glue that is smeared over the surface, and doesn't leave behind any marks. Just rub vigorously. For the spots where there is thick glue, cutting some loose with a knife then pulling on that piece works well enough as the rest of it then peels away kinda like string cheese. I've got more glue curing now and 2 more cover strips to glue up tonight and then I'll have the arm pieces complete... except for a couple hours still to be spent removing excess glue...
-
I finally received some magnets I ordered from ebay and got started with gluing. I've started with the forearms, and right off the bat had trouble with trying to hold the two pieces together with one hand while applying clamps with the other. Also, the split between the pieces kept getting bigger when I put on the clamp. I figured out that part of the problem was that the clamps themselves were too wide and were pushing the pieces apart. Cutting down the clamps with scissors helped with that issue. Then I found that I could run a piece of stronger masking tape down the inside of the seam and that held everything together nicely, allowing me to use two hands for the rest of the operation. I bundled up my magnets in cloth sachets like I saw on a post here in the FISD forum, and glued my first piece together! I tried to clean up the excess glue that squeezed out of the joint, but I am a little concerned that my clamps are going to get glued to the armor...
-
Thanks for the reference photo. Seeing the amount of return edge on that real example actually makes me feel a lot better! I'll get that cover strip trimmed down before gluing - this was just one of my many test-fits to see how it looks. I'm hoping to start gluing later this week.
-
Rubber gloves and texture
davethedeal replied to davethedeal's topic in Boots, Soft Parts, and other Accessories
Thanks Joseph, that's what I wanted to hear! -
I've been struggling a bit with reducing the return edges on the front of the limbs so that they aren't too much wider than the cover strips. Question 4: Does this cover strip look about right? Or do I need to wrestle with those return edges a bit more to make them narrower?
-
I'm looking to get Centurion-approved rubber gloves, but am confused on the CRL where it mentions texture. All the gloves I'm seeing, even the ones in the CRL photo, appear to have texture on them. What exactly is that referring to? http://databank.501st.com/databank/Costuming:TK_anh_stunt Gloves Black in color, made of either rubber, nomex, leather, or leather-like material, with no visible straps or logos/designs. The fingers are enclosed, non-textured. OPTIONAL Level two certification (if applicable): Gloves shall be rubber or rubber-like chemical gloves, in black. There is set of latex handguards and gloves on Trooperbay (https://trooperbay.com/costuming-accessories/belts-straps-gloves/gloves-hand-guards-combo), but they have "texture" on the finger tips - are these not acceptable for Centurion approval?

-
I'm in the same boat and planning to order from Imperial Issue. Anybody have any input on the question of ordering "white" versus "off-white" for an Anovos OT TK?
-
Hello All! I'm a first time builder and wannabe 501ster from Wisconsin who just got started with my kit last week. I am already running into questions for which I don't know the answers, so I decided to start this thread to try and stay on track. I bought an Anovos kit from someone that had purchased it as a pre-order waaay back in the day but never started it. As such, I received it in the Big Black Box that it lay dormant in for all those years. Happy day! The only issues with the kit are a lack of any soft goods (easy enough to fix) and some scratching on one of the thighs. The protective coating is still on the ABS, but these scratches look deep enough to have gone through it. I'm hoping I'll be able to clean that up with some light sanding and Novus. First thing I did was the initial trimming, which was fun and went by quickly. I started out with the idea of using lexan scissors for the entire process to avoid any chance of slipping with a razor and causing unnecessary damage. That idea lasted through about 2 pieces, then I switched to the knife - so much easier! However, I did have one of those slips I was afraid of on a shoulder bell. I'm hoping to repair this by putting some scrap on the inside and gluing it up to support it and prevent that from tearing any further. After finishing the trimming and reading through ukswrath's tutorial a couple times, I've started working on trimming it to fit. This is where I now have questions. Right off the bat I should note that I am going to attempt to make most of the modifications ukswrath made to make his kit Centurion-quality, but am not necessarily planning to actually apply for that level of certification. My goal is to get this kit finished before the end of the year, so if I run into Centurion level modifications that are going to significantly slow things down, I'll be skipping them. Hopefully I can at least reach EIB. Question 1: The tutorials are saying to leave 1/2" gap between yourself and your armor to avoid it being too tight and constrictive. Does that mean I pull the armor tight against one side of my arm and measure the gap on the other side and it should be 1/2", or are we talking 1/2" of clearance all around between my arm and the armor? I'm assuming the former, and that's about where I'm at on my first piece. Is this what I'm aiming for, or should I be removing more return edge? Please ignore the fact that my ruler starts at 17"... its a cut-down yardstick. Question 2: When we say the cuff on the forearm should have no return edge, are we talking absolutely no return at all? Is a very slight lip like I have here acceptable for Centurion, or do I need to take this down until it is just flat plastic from the sleeve to my wrist? Question 3: I've read other threads where folks are concerned about how much empty space there is between the cuff end of the forearm and their arm, and I have the same concern. I'm thinking of trimming that end down a little bit, but am unsure if that is wise because I don't have the gloves and don't really know how much they will thicken up my wrist. How bulky are the rubber gloves around the wrist area? Thanks for any help anyone can provide!
