Mr_Fahrenheit
-
Posts
68 -
Joined
-
Last visited
Content Type
Profiles
Forums
Gallery
Articles
Everything posted by Mr_Fahrenheit
-
AP Armour - Trimmed - ANH Centurion - First Build Thread
Mr_Fahrenheit replied to Mr_Fahrenheit's topic in ANH Build Threads
Thanks, Suspend. So after crunching the numbers. To get the Classic 421s off of Imperial Boots, it's going to cost about $140 Canadian dollars, plus taxes. The description even reads that they are a narrow fit, and that I should order a size above. Does that mean a full size or a half size above? I'm a 10.5, and they have 11s but no 11.5. I'm a bit worried because I do have fat feet. The other next best option I can find are these boots plus this paint, which would total about $105 Canadian dollars, plus taxes. The boot seams look identical in every way, but my main concern is that the top is too wide, and may interfere with the shin pieces.. One option I was thinking was to buy them off amazon once my shin pieces are complete and try them out, and if they do interfere, I can always return them pretty easily... hmmmmm... decisions... -
AP Armour - Trimmed - ANH Centurion - First Build Thread
Mr_Fahrenheit replied to Mr_Fahrenheit's topic in ANH Build Threads
Okay great. I’m Going to weight the financial pros and cons of imperial boots vs these, vs any other suggestions I can get. So if anyone has experience shipping imperial boots to Canada, I’d love to know how much you paid. -
AP Armour - Trimmed - ANH Centurion - First Build Thread
Mr_Fahrenheit replied to Mr_Fahrenheit's topic in ANH Build Threads
Okay that’s good feedback. Thanks! Does anyone have experience shipping them from Canada? I can’t order them on their site now so I can’t see how much shipping will be. -
AP Armour - Trimmed - ANH Centurion - First Build Thread
Mr_Fahrenheit replied to Mr_Fahrenheit's topic in ANH Build Threads
Question about the boots: What do you think about these ones? They have a seam at the back, but there's nothing in the Centurion rules that mention it.. just that it can't have a seam on the front. https://www.amazon.ca/Requisite-Glendale-Riding-Jodhpur-Equestrian/dp/B01K2FFYKI/ref=sr_1_1?ie=UTF8&qid=1538378705&sr=8-1&keywords=Jodhpur+boots+men I just don't know which ones to get. TK Boots isn't selling them in my size anymore... and I haven't heard as many good reviews of Imperial Boots as TK Boots. Also, I have very wide feet, and apparently TK Boots had an option for people with wider feet. -
AP Armour - Trimmed - ANH Centurion - First Build Thread
Mr_Fahrenheit replied to Mr_Fahrenheit's topic in ANH Build Threads
Quick update - I touched up the paint on the tube stripes using a mix of toothpicking and mineral spirits. It took awhile, but it looks way better! I also then added the mesh to the frown. FOR THE MESH: I used hot glue on the inside, and it first it didn't work, but then I figured out how to fix it. Adding glue to the plastic and then sticking the mesh on won't work. But adding the glue to the ABS, then adding then mesh, THEN adding another layer of glue, basically traps the mesh in between the two layers. Now I can actually lift the helmet by the mesh inside of it. We'll see how long it holds! I'll update my main helmet post with this update, as now the helmet is pretty much done (on the outside). Just need to get the S-Trim. Thanks for any feedback! -
AP Armour - Trimmed - ANH Centurion - First Build Thread
Mr_Fahrenheit replied to Mr_Fahrenheit's topic in ANH Build Threads
Thanks for the feedback! I took some toothpicks to the edges and did some touch ups on the bars. I feel like it's looking much better. It was actually pretty easy, but lengthy to do it, and it just shows you that you can really fix anything if you mess it up. Here are some before and after shots: First attempt: After some toothpick-edging! (don't pay attention to the Tube Stripe stuff in these photos.. I have a section for that just underneath) TUBE STRIPES I also took a stab at the tube stripes. Still have some toothpick-edging to do once it dries, but here was what I've done so far: I started by taking the decals that came with the AP kit, then cut them out. I labeled them JUST in case I screwed everything up and wanted to actually use them in the same order. I also trimmed it down to only 14 tube stripes per side: I then stuck that on as the decal, making sure it was pencil width away from the cheeks, then painted over it with a thin coat of white paint: Once it dried, I did a light layer of the blue, then let it dry. Then I did a heavy coat of the blue. After it dried enough (maybe 2 hours), I removed the faux-stencils, and now I'm just waiting for it to dry completely. I thought that maybe I could toothpick-edge it while it was still wet, but, as you can see from the last image, it just smudges the paint. So once it dries I'll go over the edges with the toothpick and it should look alright! (I hope) Thanks! Any feedback is always appreciated -
AP Armour - Trimmed - ANH Centurion - First Build Thread
Mr_Fahrenheit replied to Mr_Fahrenheit's topic in ANH Build Threads
Just did the first layer of the black lines everywhere... Kind of a hack job, but it's the first layer. I'll touch it up over the next few days, then clean up the edges with some mineral spirits and I'm confident it will look alright when it's all done. Tell me... what do you see... Thanks for any feedback! -
AP Armour - Trimmed - ANH Centurion - First Build Thread
Mr_Fahrenheit replied to Mr_Fahrenheit's topic in ANH Build Threads
Hooray! -
AP Armour - Trimmed - ANH Centurion - First Build Thread
Mr_Fahrenheit replied to Mr_Fahrenheit's topic in ANH Build Threads
Thanks for the feedback! The picture with the bright green lenses was when it was held up against the overhanging light. Here is what it looks like in a normally lit room with the camera flash on: The film is still on the lenses, which, when removed, may make a little lighter. But I still don't think they'll be able to see my eyes. Thoughts? -
AP Armour - Trimmed - ANH Centurion - First Build Thread
Mr_Fahrenheit replied to Mr_Fahrenheit's topic in ANH Build Threads
I was away for awhile, and when I got back home I found my green welder's shield waiting for me so I had to throw it in the bucket to see how it would work and look! For all you Canadians, I bought this for $12 on Amazon and it ships with Prime. It's big enough to get 2, maybe 3 strips for the lenses out of it, but I'm using the other 2/3s for my Green Ranger helmet I'm also building. Here is the Green Welder's Shield item on Amazon. And here is the result: I copied Uswrath's ANOVOS TK build (stunt) thread to install them. Here is the shot from the inside: I left the film on because I'm going to be taking this thing apart several more times before it's ready. I will update my main helmet post above with this information. My next steps are to finish the paint! Thanks in advance for any feedback! -
AP Armour - Trimmed - ANH Centurion - First Build Thread
Mr_Fahrenheit replied to Mr_Fahrenheit's topic in ANH Build Threads
Quick update - I've done the second layer of paint for the gray and the chin. It's not perfect, but when I put the black outlines on, it should cover up the imperfections around the edges. I found the thin layer technique works much better, and also gives the satin black and less glossy end result. I'll add these to the main post above too. Thanks for any tips and feedback in advance! -
AP Armour - Trimmed - ANH Centurion - First Build Thread
Mr_Fahrenheit replied to Mr_Fahrenheit's topic in ANH Build Threads
Thanks so much for the info. I ended up just freehand painting it all for today. I updated my main post above with my progress! -
AP Armour - Trimmed - ANH Centurion - First Build Thread
Mr_Fahrenheit replied to Mr_Fahrenheit's topic in ANH Build Threads
Okay, next question about the decals in the AP build... Are they stickers? Or do I have to glue them on? because I tried to peel them off the sheet they came on, but there's nothing sticky. It just tears.. :| -
AP Armour - Trimmed - ANH Centurion - First Build Thread
Mr_Fahrenheit replied to Mr_Fahrenheit's topic in ANH Build Threads
Thanks for the help! Thanks for the tip. I can only find clear face shields on the home depot site. But I'll check Princess Auto online if possible. Thanks! I found several hits with that, and I actually think I found one that may work, and it can be delivered with Prime.. Do you think this one would work? ERB Safety 15190 8166 Dark PETG Face Shields, One Size, Green -
AP Armour - Trimmed - ANH Centurion - First Build Thread
Mr_Fahrenheit replied to Mr_Fahrenheit's topic in ANH Build Threads
Question for anyone out there: I'm trying to find the right lens material for Centurion. I know I can buy the lens material right from Trooperbay, but it's 2.5 inches tall by 15 inches wide. I was hoping that I could find a larger cut of it that's about 5-6 inches tall and maybe about 20 inches wide. The reason for this is because then I can use it for my Stormtrooper lenses, plus have room in case I screw up, but MAINLY because I'm also building a Green Ranger helmet and could use that as the visor material. I was hoping to cut costs and save on shipping and all that. Anyone know what search terms I should be using online? "Dark green lens material" only gets me so many hits, same with "welders shield material". -
AP Armour - Trimmed - ANH Centurion - First Build Thread
Mr_Fahrenheit replied to Mr_Fahrenheit's topic in ANH Build Threads
I had some time today, so here's where I got! Thank you everyone for the helpful hints and tips! There was another thread I was reading where the guy had troubles closing the gap between the helmet and the ears, but mine looks pretty good. AP's trimmed kit really works well and this only took me maybe 15 minutes (after hours of reading though). Thanks justjoseph63 for confirming that the Hovi mics shipped with my AP kit are already Centurion quality! Thanks for this tip! I'll be sure to remember that when I'm painting them on, or adding the decals if I mess the paint up I was planning on painting it last... but I kind of want to finish the helmet completely before moving on... hmmm we'll see what happens! -
AP Armour - Trimmed - ANH Centurion - First Build Thread
Mr_Fahrenheit replied to Mr_Fahrenheit's topic in ANH Build Threads
Thanks for looking into that. I was looking a thread from Darthanael who bought the AP kit in 2015, and he posted a pic comparing what he received in the kit vs. the Hovi mics that are required for centurion and bought elsewhere. You can see it here, the left one is what he received from AP, and the right one is what he bought for Centurion. AP may have changed the tips because looking at that pic vs what I have, it DOES look like my Hovi mics might actually be good for Centurion, but if someone can please confirm, that would be great! Here is the pic of what I have: Your reply was amazing and I almost quoted the whole thing. I'll look at that S-Trim, but I'm still going to see if there's any way I can get it in Canada. I hate paying duty fees. As for the decals, I'm going to leave those until the end, as I may decide to paint it instead, but thanks for clarifying that they'll work for Centurion. Biggest thank you goes to that link you sent me. That is definitely going to be my main research source now. Yeah, this makes total sense. I think I'll end up painting them as well, or maybe ask my girlfriend to do it as she is quite the arteeeste. It does really take it to that next level of badassery! I'll keep that in my back pocket as that's a great tip, thanks! YES! That is a great suggestion too, and makes total sense! And thank you everyone for the support already. This is already fun and I've done nothing for my build still heheh. As I'm going to try to keep my main progress posts contained to one post per part, I'm going to update that post with the information I've learned from you all. Thanks so much again, I really really appreciate this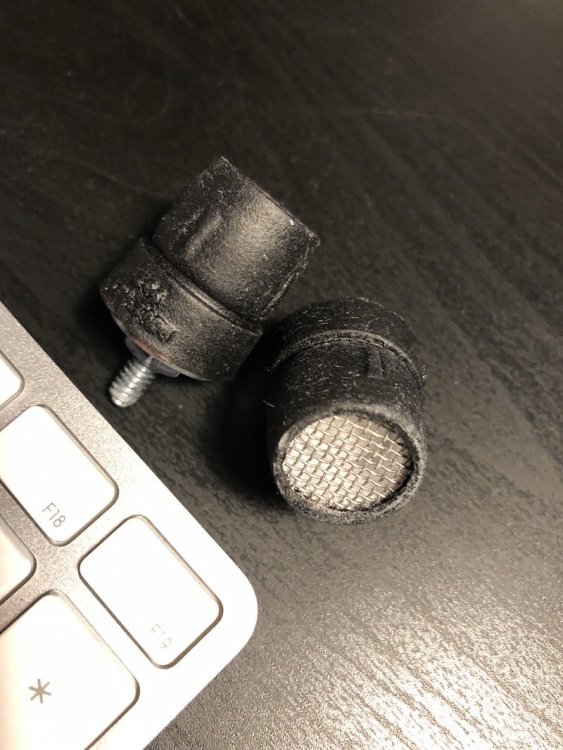
-
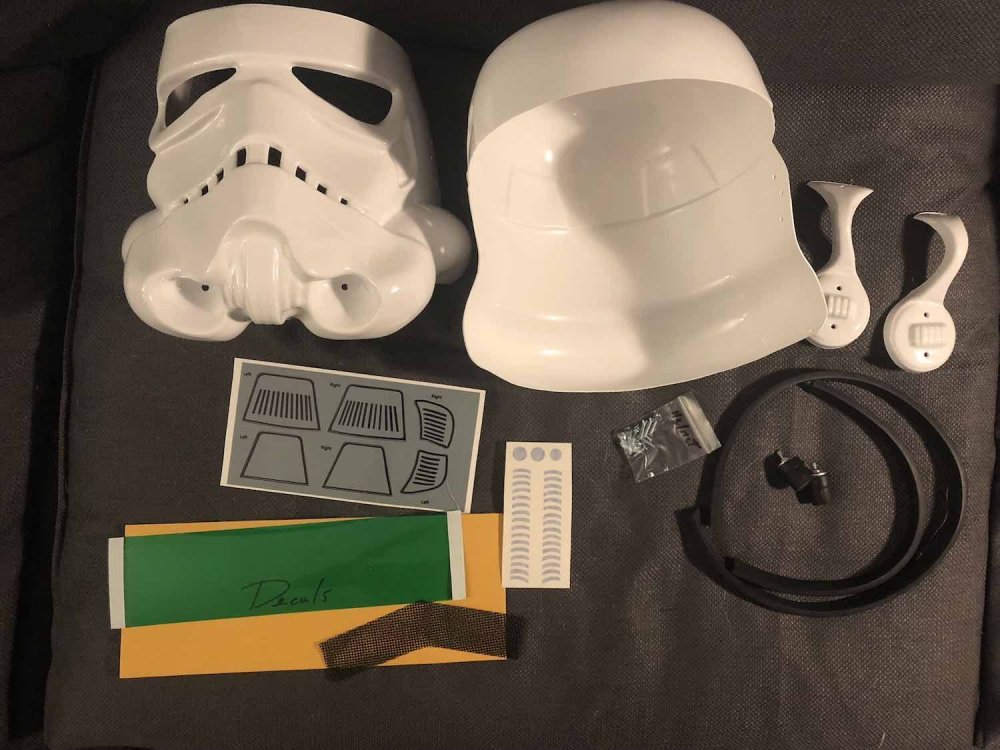
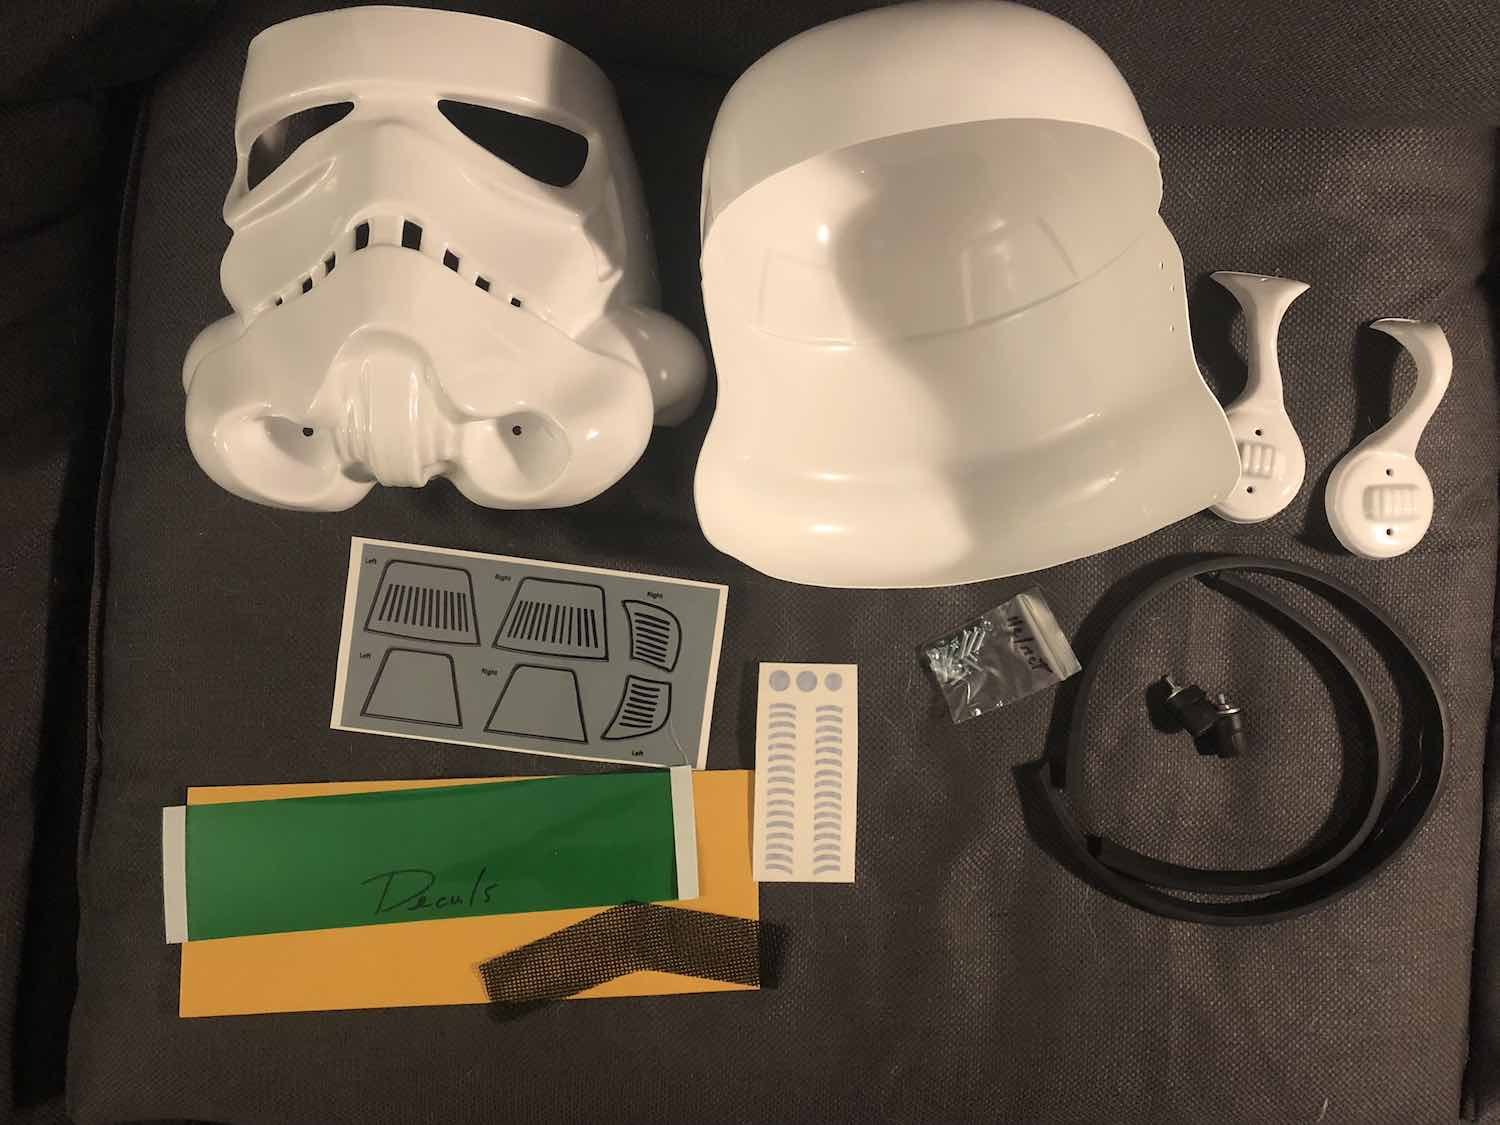
Hi everyone, first time poster here! As the title of thread sums up, I bought the trimmed Authentic Props build from Mark. This is my first build, and I've decided to go for the Centurion designation because.. well, it sounds awesome.. and if I'm going to put in a lot of work to get into the 501st, I may as well put in a bit more and go for the level 3 designation. I've been looking at a lot of build threads and trying to do as much research as I can to reduce the number of questions I have, but I also thought I should be documenting my questions as I go in order to help other newbs like me, and that I should probably still ask them because I may not know that I don't know the answer to them. I'm no stranger to costume and prop building, but I've never worked with a kit. I bought my kit in February 2018 and have only really had a chance to go through it now as I ended up moving places and have been trying to set this new place up. Anyways, life story over. Let's get to it, Mama needs a Stormtrooper! Thank you in advance to everyone who takes the time to help me out, I really really appreciate it MY STRATEGY Because I live in a tiny place right now, my strategy is to remove all of the pieces I need from the box ONLY for the specific part I'm working on, and just work with those. Once done, I'll do the same for the next piece, and so on and so on... I'll unbox all of the pieces that came in the box for that part, then I'll point out which ones need to be modified/removed/ignored. I'll also point out what additional things I bought for them. Hopefully it makes it easier for people to follow along, and to also point out if I am doing something wrong. I'll do my best to keep my main posts organized, and I'll edit them to include all of the best information I learn at each step, either as I learn from my mistakes or from all of you. PART 01 - THE HELMET I already know that if I'm going for Centurion, I'm going to need to make some modifications to the helmet, and will have to order a few different pieces, BUT, I believe I can still assemble the main bits of it. ... So here is what I THINK are all of the pieces I'll need for the helmet from the AP Armour kit (excluding the stuff that goes in the inside of the helmet): I'm using the Costume Reference Library - ANH (Stunt) as my checklist for the different levels of certification. As a newb, it's a bit confusing, but with all the other threads, this shouldn't be too tough. What I'm finding a bit difficult is if level 3 certification is something that happens on top of level 1 or 2, or if there are times when I skip certain items in the level 1 and 2 checklists and just jump to level 3. Here is what I think I need to do here, and please correct me if I'm wrong: Level 1 certification: - I believe I just need to put it all together with the materials I have. Level 2 certification: - I originally thought I didn't have the correct "Hovi mics" as I read some other threads from people using AP's kits, BUT, thanks to the help here, it turns out that I do. I guess I was reading some older threads before they shipped with the Centurion quality Hovi mics. You can see the post/replies below around this. Level 3 certification: - Other than some additional small bits of paint on a bump, I'm going to need to buy an S-Type next trim, and I guess, ignore the one shipped to me. - For those that don't know, the neck trim is that long black rubber thing curled in a circle in that photo. There's a smaller one for the brow, and a longer one for the neck. I guess the neck one needs to be a different style that looks more rounded in the end. I did some early digging and I can't seem to find it online at any hardware store here. I know many people order them at specific trooper sites, but I feel like this should easier to find. I've found "window seals" and "s-style rubber" that returns some decent search results, but nothing perfect and accessible. I'll update this once I make my decision and buy it. QUESTIONS 01. Just one for now; Level 3 certification says that "Tears/traps shall be hand painted or use decals that emulate hand painted (with correct ANH TK details)", and from the kit I ordered, it looks like the decals do just that, however, after looking at a few threads of those going for Centurion status using the AP kit, they all seemed to hand paint them. My question is "Are the decals for this kit adequate? or do I need different decals? or should I just hand paint it?" A. I was told that the decals will actually work for Centurion certification. Most people just paint them because that's how it was done in the films. I received a suggestion to try painting them, and if I screw up, then to use the decals overtop of it. That works for me! Update September 12, 2018 I want to keep all my main update notes in one post, to make it easier for others to follow along. Here is where I got today: Here is what I learned: - My Hovi mics shipped with the AP trimmed kit are already Centurion level - I still don't know the best place to buy the neck seal, however, the Centurion level submissions thread requires everyone post where they got their parts from, so I think I'll go through that and see what the majority of the Canadians did. - I'll paint the helmet and use the decals to cover them up if I screw it up. The decals are good enough for Centurion. - It was really easy to assemble this helmet! Only took about 15 minutes (and hours of research). I'm excited for the next step! Update September 16, 2018 This weekend I went out and bought the Humbrol paints (Suspend was kind enough to give me his extra French Blue!) and I did my first layer of paint on the helmet. I didn't end up doing the the tube stripes, as those seem the toughest, so I'll get to those after the rest of the paint on the helmet is finished. Here are some lessons from my experience: The decals that come with the AP build are really hard to peel off. I even had to post about it below because I thought maybe I had to glue them on. Thanks again to Suspend for clearing that up. I also realized afterwards that it is because they are vinyl stickers, so they are VERY thin. If you do wet the back of those stickers, the paper comes off more easily, but just be careful. Second thing about the decals is that I found them to be too large for the traps. The tears were well sized, but the traps seemed to run over the grooves. I originally wanted to create a stencil out of those decals, but because it all didn't add up, I just looked at the Centurion submissions and then freehand painted it.. which brings me to lesson number 3.. Freehanding it is way easier if you don't try to put painters tape around the edges! I tried putting tape around the edges but it all bled underneath it. Below you can see a freehand example vs the taped example. Mineral Spirits is amazing! If you're at all worried that you're not good at painting, just buy this stuff and some precision q-tips and you can fix anything! I accidentally put too much on the vocoder and it ended up running down the chin on the side. Trying to clean it up with paper towel smudged it, so I used Mineral Spirits and it was much better. I ended up cleaning up all of the traps too. This is what happened when I used tape around the edges - I recommend you don't do this: And this is what it looked like when I just freehand painted it. I actually used a pencil to feel the grooves out, and only painted to the pencil lines: You can see here that some paint got away from me and I smudged it, trying to clean it up: Mineral spirits fixed that up no problem! Get some, and get some precision Q-Tips: Tomorrow I'll do my second layer on the traps, tears, and vocoder. Thanks for reading! Update September 19, 2018 I've done the second layer of paint for the gray and the chin. It's not perfect, but when I put the black outlines on, it should cover up the imperfections around the edges. Here are some lessons from my experience: I found the thin layer technique works much better, and also gives the satin black and less glossy end result. It also dries much faster. Freehand is still better than stencil, in my opinion. Update September 25, 2018 - The Lenses! The moment I got my green welder's shield, I had to throw it in the bucket to see how it would work and look! For all you Canadians, I bought this for $12 CAD on Amazon and it ships with Prime. It's big enough to get 2, maybe 3 strips for the lenses out of it. Here is the Green Welder's Shield item on Amazon. And here is the result: I copied Uswrath's ANOVOS TK build (stunt) thread to install them. Here is the shot from the inside: I left the film on because I'm going to be taking this thing apart several more times before it's ready. Here are some lessons from my experience: Use Uswrath's thread to see how it's done! It takes some time to mark the drill holes, but be patient. If you buy this product from Amazon, you'll have extra material in case you screw it up. Just go for it! Thanks for reading!