RageQuit
-
Posts
90 -
Joined
-
Last visited
-
Days Won
1
About RageQuit

-
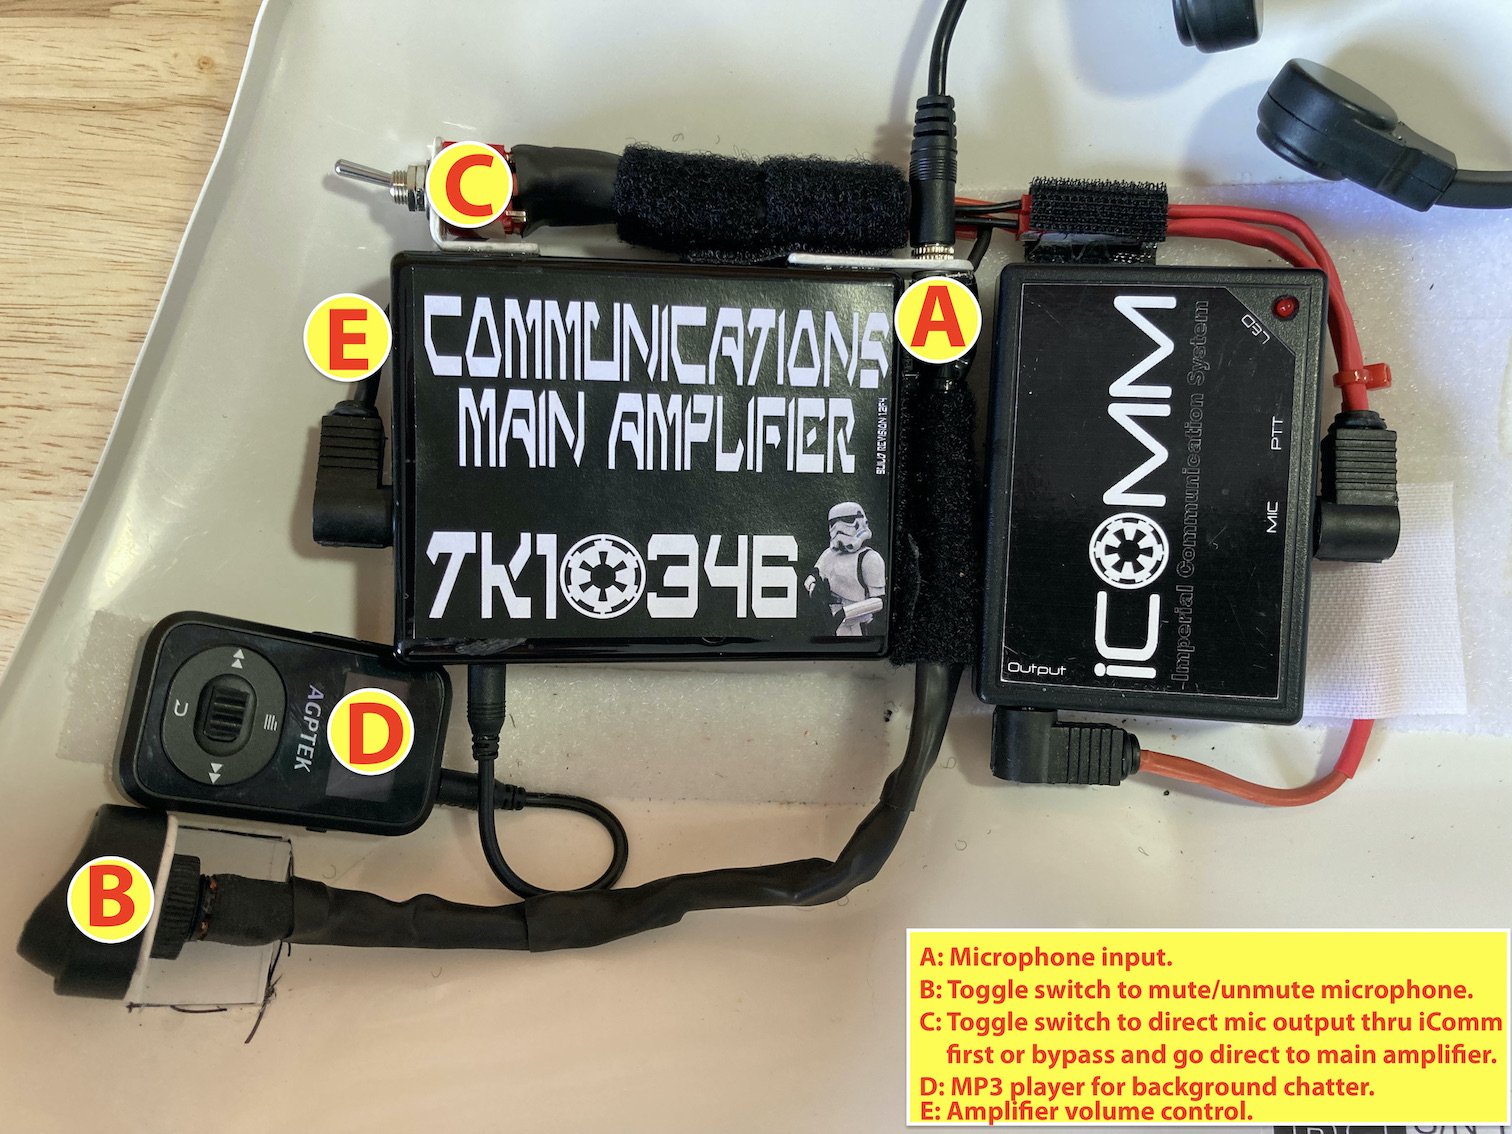
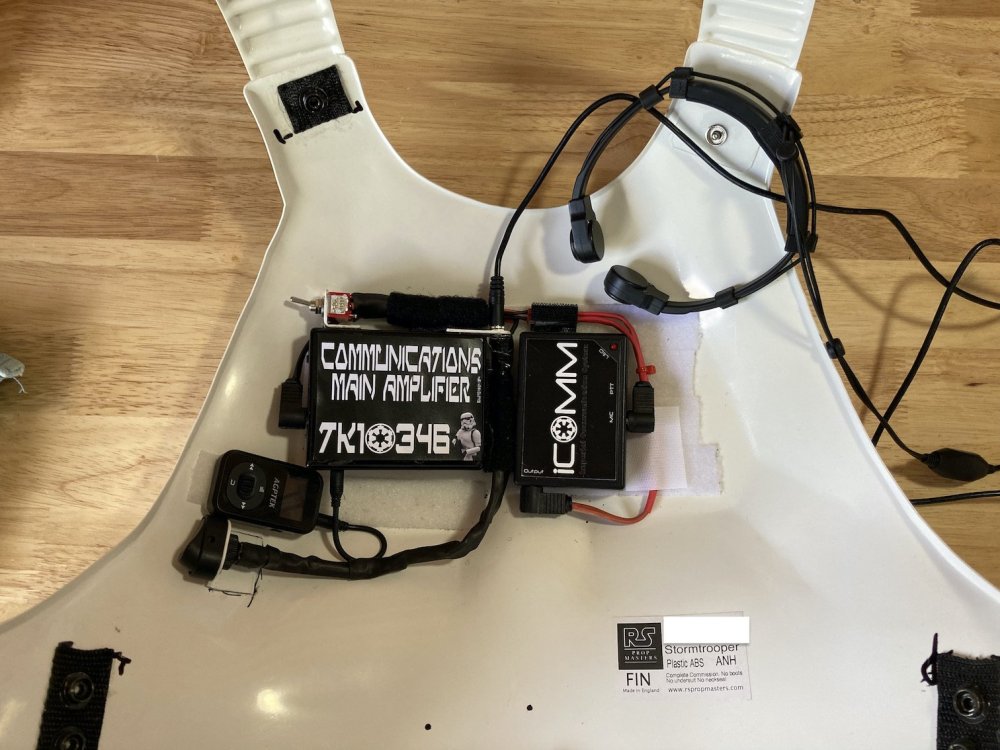
Hey troopers, I'm currently using a throat microphone as per the attached photos. While this configuration works very well, as attested to by my fellow troopers - if I have the Aker volume up just that wee bit too much I get some pretty harsh feedback. The throat mic manufacturer did say that it is still susceptible to feedback, so with that in mind I am not disappointed with the overall performance, I JUST NEED a bit more volume without feedback. Testing with a head mounted uni-directional microphone I can wind the volume up to almost maximum with zero feedback, this is great however with helmet on/off all the time this mic positioning is a royal pain in the butt. Have been researching 2.4ghZ wireless micr/transmitter and receivers used by professional photographers, vloggers, etc - there is some really cool hardware out there. I have been comparing pricing and features for the below: Saramonic Blink900 / love all the features but AU$600 is too much Saramonic Blink500 / previous version than Blink900, from AU$280 Boya BY-XM6-S2 / from AU$180 Rode Wireless GO 2 / from AU$254 I like the longer thinner dimensions of the Boya & Saramonic Blink500 as they both would suit my TK-Helmet which already has UKSWrath Hearing Assist [which is awesome, I replaced the small headphone patches with Sony $20 headphone cut down to fit]. That along with my helmet fans and batteries consumes a certain amount of space prompting me to look for a space conscious wireless mic system. Just about to pull the trigger on the Boya unit [plus it has a listed run time of 7 hours ], just need to confirm that the dimensions of the TX mic unit will fit nicely inside my bucket. Have read a few posts with guys using bluetooth mics, etc - couldn’t find anything regarding the setup I’m looking at.
-

Slight misalignment in left ribbed shoulder strap
RageQuit replied to RageQuit's topic in Assembly, Mods, and Painting
Thanks everyone for your input, will be trooping the weekend for a number of hours so will see how my rest rapping works out. Not aiming for a higher clearance level for my kit, am happy being a bog basic trooper having fun with the crowds -
Slight misalignment in left ribbed shoulder strap
RageQuit replied to RageQuit's topic in Assembly, Mods, and Painting
Backtracking a bit, I found the original ANH shoulder strapping method made it hard for me to fix the shoulder bells snaps in place by myself - somedays I could, other days no. One troop I had to waylay a passing stranger to do this for me during a carpark change. With this in mind I mirrored the strapping design I used in my Death Trooper build which enabled me fully kit up by myself. Photos 1 & 2 show the lateral shift induced with my amended strapping [ignore the velcro]. Photos 3 to 5 show strapping realigning to ANH external using velcro. Happy now the realignment works is correct. -
Slight misalignment in left ribbed shoulder strap
RageQuit replied to RageQuit's topic in Assembly, Mods, and Painting
Thanks guys, I took a few days to think about the mechanical changes I made with my shoulder re-strapping - had a watershed moment this afternoon and realised my current problem was due to the way I redid my new shoulder straps which induced an unexpected lateral shift - quick amendment today rectified my problem. Will pop my solution into this post and link to my my build thread in next couple of days. Thanks for your input - all this info goes towards making a build easier for future troopers -
I redid my shoulder straps with the red lines indicating were they run under the armour. I am getting a consistent shift of the left ribbed shoulder strap as per the photo. The elastic is hooked under the new shoulder straps so that should keep the ribbed straps aligned, alas to the case. Hoping I can get some advice what to look for to solve this problem. I have thought of some velcro, was thinking if I did that it would not allow the ribbed straps to move around and may induce a stress crack somewhere over time. Thanks.
-
Thanks for your input Thanks for your input robojoe, I will most definitely keep your solution in mind - JB Weld is an awesome bonding agent. I will now end up checking over my kit after every troop to catch any cracks - my previous TX was 3d printed and kinda bullet proof - PVC being thinner and more flexible warrants ongoing maintenance I think.
-
Marked the inside of the armour to show where the crack is, used a heat gun to make the 10mm x 20mm pic patch malleable, pushed it into place with a heat proof glove. It was pretty finicky to get into place being so small. Give it 24 hours to dry - not the prettiest fix but hopefully will provide sufficient strength to stop the crack increasing.
-
RageQuit changed their profile photo
-
Hi, Just found a small crack as per photo. Am thinking of cutting a small piece of PVC, heating it to mould to desired shape and ES6000 gluing. Is this the best method for repair? Thank.
-
Thanks, for the info I have just completed a second hot water bath of 20 minutes each time, primarily to soften the leather and mould it the E11 shape making for easier removal of the blaster when trooping. The first bath had a reasonable amount of dye leech out into the water with not as much visible 2nd time around. I expect that will help reduce transfer to the armour. I have some auto polish, will do a small test area and see how it goes.
-
After a couple of troops the E11 holster is leaving a reasonable amount of black transfering from the leather onto the left thigh. I don't mind the weathered look, but am wondering what is the best way to clean some of the black off. Rubbing a moist cloth removes some of the black but not a large amount, want to ensure I don't use a chemical that will damage the PVC. Thanks.
-
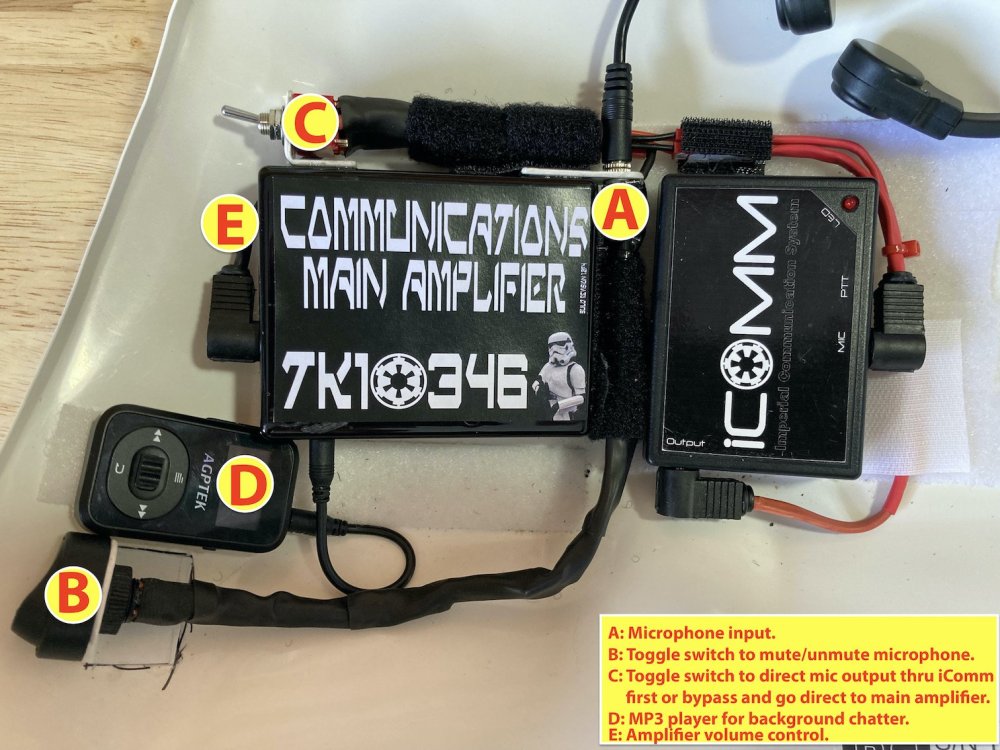
Glad I could provide some assistance I read that the Aker M1506 amp is required if you are planning on installing an iCOMM unit as well. That's what I bought, con-costs more for the Aker M1506 - pros-much smaller footprint which allowed me to line the volume control side up closer to the edge of my chest plate allowing access during the troop to adjust volume.
-
Oh and forgot to mention, I took the Police Chatter mp3 that CallMeMrTibbles mentioned he used, added about 20-30 second pauses between chatter, then copy and pasted till the mp3 was about 4 hours long. Worked well when moving thru the crowd, the police background chatter really caught peoples attention, aded an audible sense of realism to the kit.
-
Oz Comic Con weekend was a blast. Few photos below, trimming the 20mm off the thigh tops made a big difference for knee clearance - still tempted to take 10mm more as the thighs were still banging into the codpiece and butt plate [more slightly annoying than restricting movement]. You can see the colour difference between my PVC and the purer white of the ABS kit.
-
Hi Joseph, I was on the fence line as to how I would trim the armour and what to do about the returns. Your post was extremely helpful, thank you very much. With the returns gone the additional benefit is the 2 drop plates on my belt sit flatter due to the thighs coming in about 10mm which was the return edge depth roughly. We are doing Oz Comic Con next Saturday [11/12th Dec]], I will put up some photos from this event showing the altered thigh heights, etc. Have also passed on your post to another TK in our group who needs to make quite a few changes to his kit. Cheers.
-
I need to reduce the length of my thigh armour, have already increased the moon-shape cutout and am still getting the back of my knee grabbing the armour, especially on the ammo belt side which reduces my ability to walk comfortably and also transverse stairs. From the photo [I have the Police stick] I can afford to loose some length on each thigh and still look symmetrical - looking at cutting about 30mm off the top of each thigh. I will loose the return around the top edges and am wondering how everyone else has gone re this - not perturbed if I keep the returns or not, just interested in how others have tackled this issue. Took a couple of hours this afternoon using a dremel with cutting disk and 400 grit sandpaper. Can now go up and down stairs with plenty of space behind the knees. Had a read of this post which was invaluable: