

Aradun
-
Posts
187 -
Joined
-
Last visited
Content Type
Profiles
Forums
Gallery
Articles
Media Demo
Posts posted by Aradun
-
-
Congrats Alex! Well done!
Sent from my iPhone using Tapatalk -
You can try connecting with him via his FB page.
https://m.facebook.com/ThePandatrooper/
Sent from my iPhone using Tapatalk -
Okay so I called TK Products this morning. They clarified that the MR2300 DOES work with the iComm. There are no issues. They work fine together. The only reason they have some verbiage on their web site that says otherwise is because there has been many instances in the past where 501st members purchase the MR2300 not realizing it's too big to fit in their TK so now they're stressed and have to go through the return process, pay extra to ship back, and purchase a new one taking up more time and money. It becomes a bad experience. So their warning on their web site is because of it's size fitting in our costumes. And has nothing to do with it the iComm functioning with the MR2300.
Side note, they said if you can fit the MR1505 (versus the MR1506) in your TK then go for it since it has a longer battery life and sounds a little louder.
There have been older posts on this forum mentioning the MR1505 not working with the iComm. They wanted to clarify that that was a very brief issue about a decade ago. The software was updated and so the MR1505 works perfectly with the iComm.
Also, maybe someone already covered this on a previous post but they clarified that we ARE able to swap out the battery inside these units. The units are not sealed and don't need to replace the whole unit when the battery stops working. In fact they sell extra batteries on their site. They mentioned this because they spoke to some 501st members who didn't know this.
Anyway, I just wanted to pass all this info along. Happy building.
Great info. Thanks for making the call and sharing your findings with the detachment.
Sent from my iPhone using Tapatalk-
 1
1
-
-
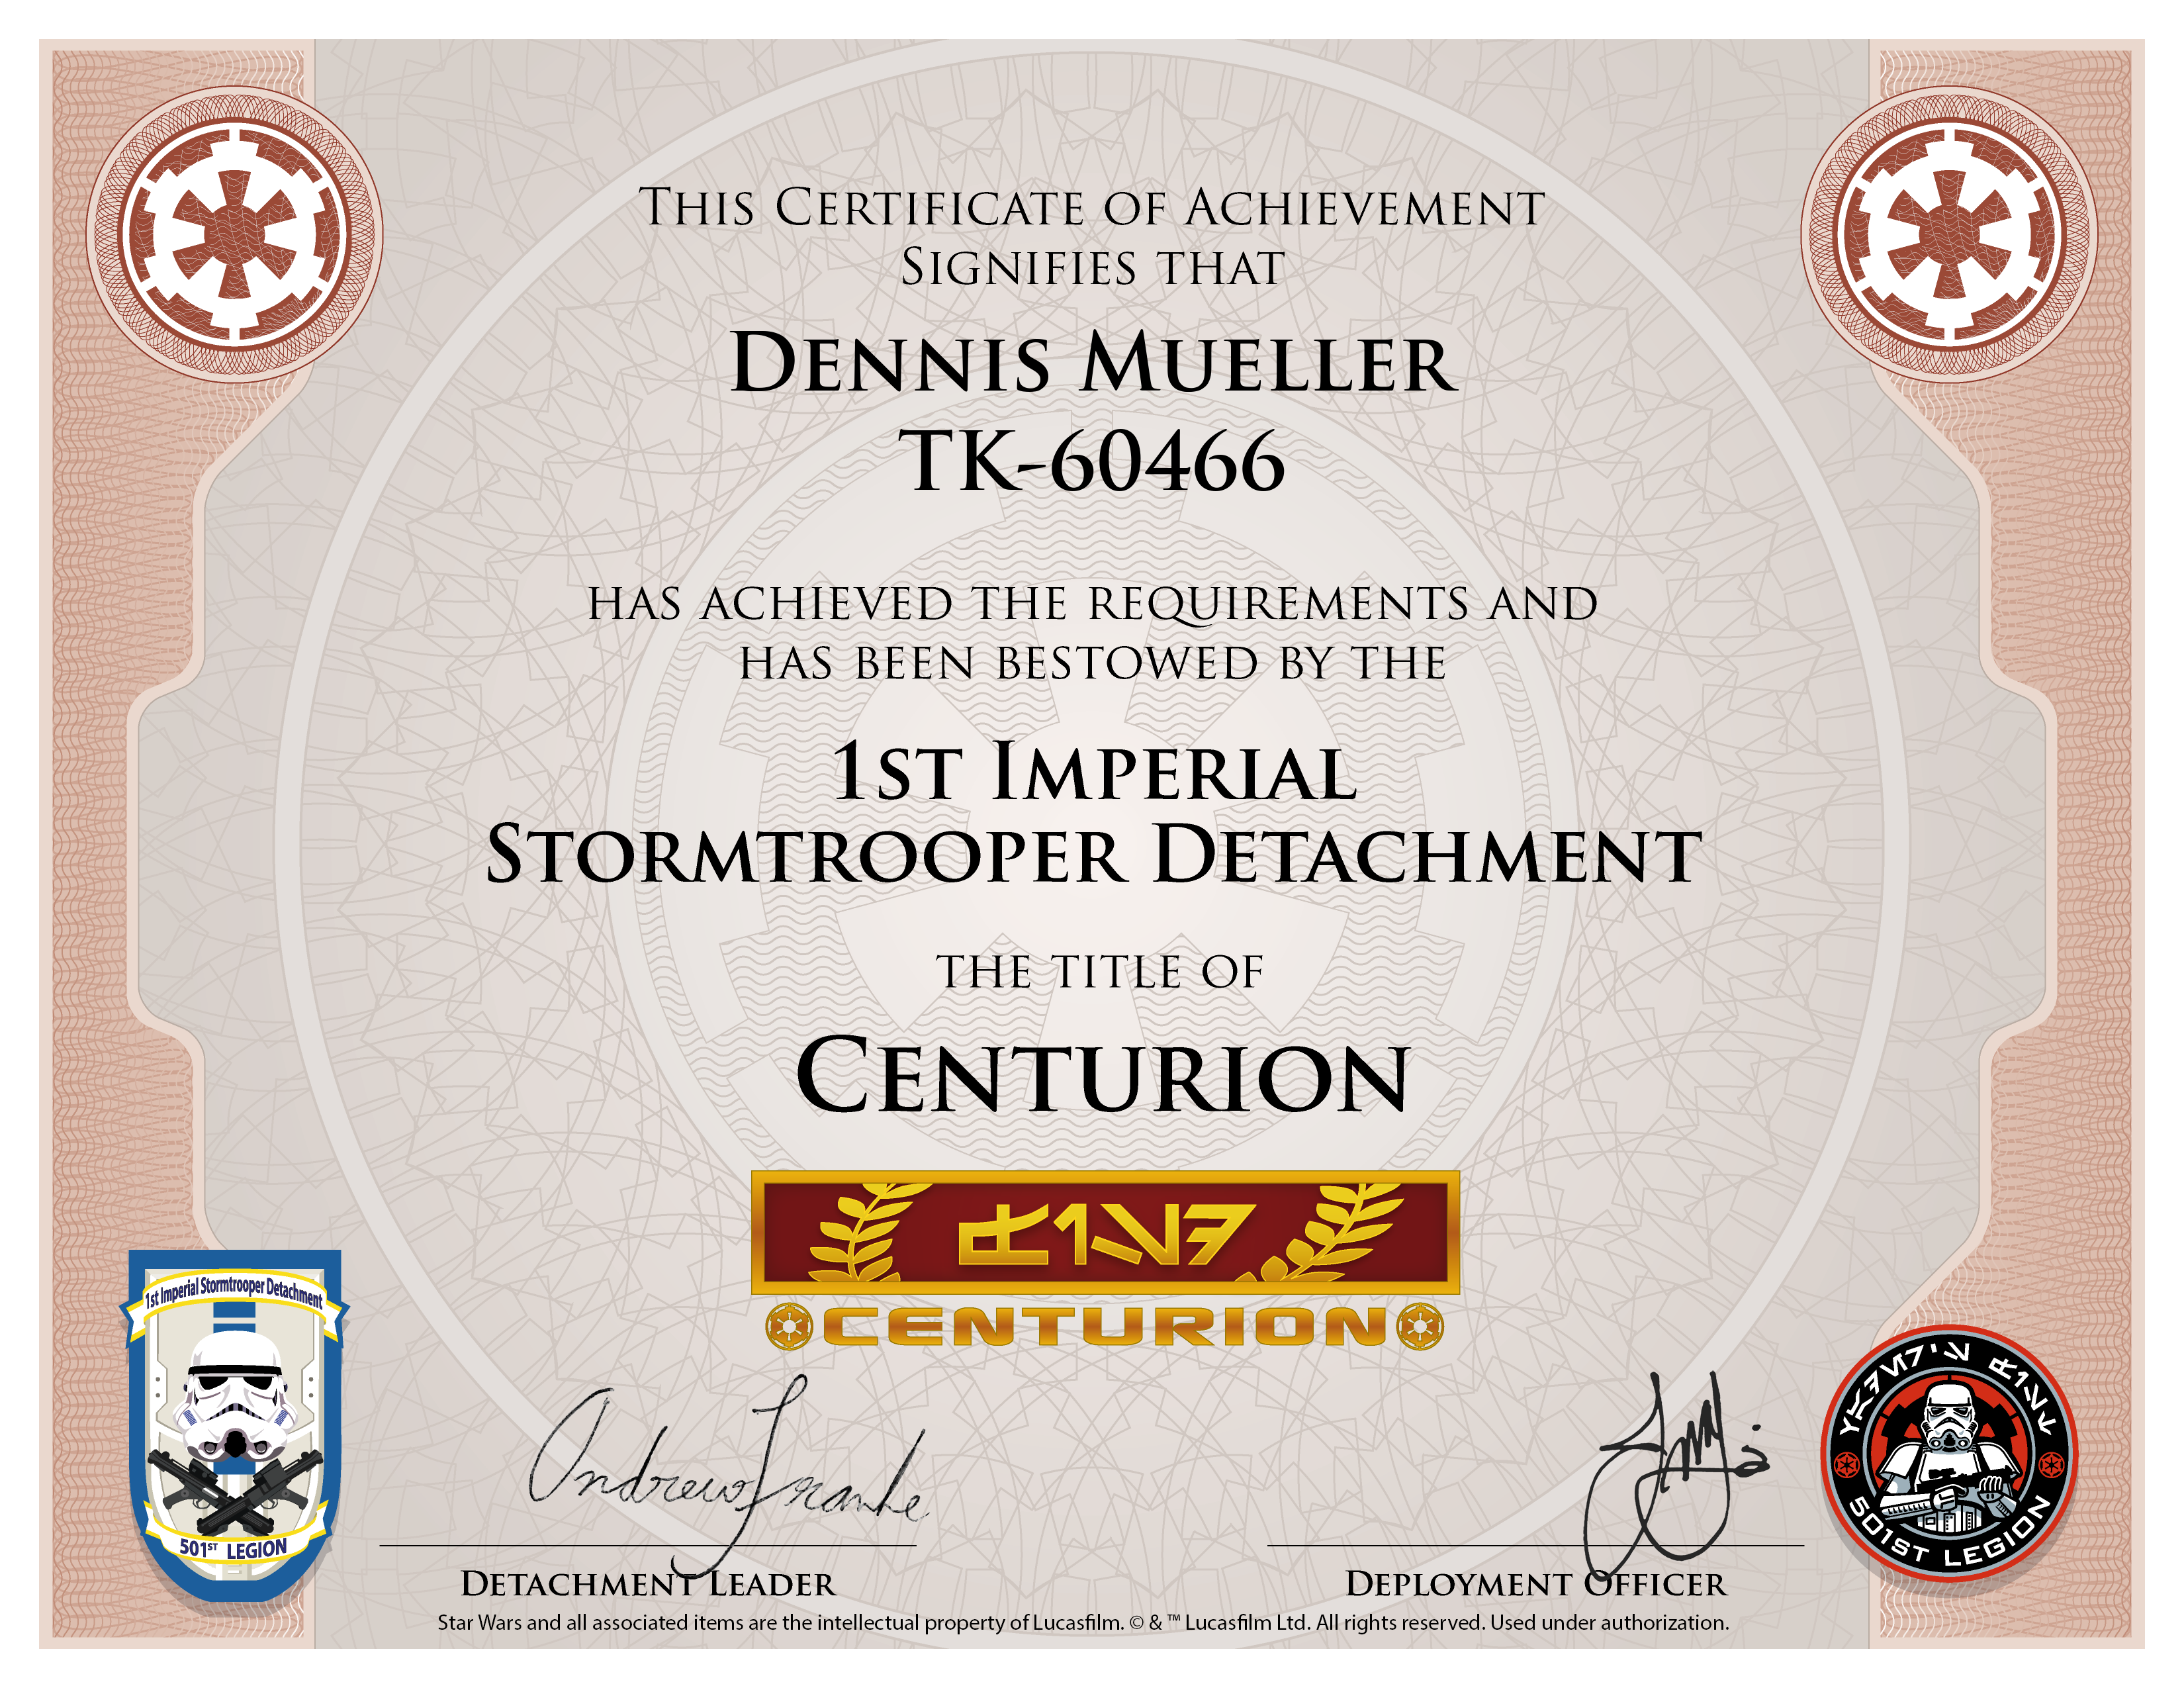
Dennis Mueller
60446
Centurion
Letter Size
justjoseph63
http://www.whitearmor.net/eib/certificates/60466-centurion.png-
2
-
-
Awesome!!! Thank you all very, very much for your outstanding expertise, guidance, and encouragement through this process. I have learned a great deal and have come to truly appreciate the level of detail to which EIB and Centurion require! I promise to do the detachment proud while trooping.
Just a little shout out to my fellow TKs in Carida for their support and to TK-14791 (Bill Blake) for his expert build skills.
Sent from my iPhone using Tapatalk -
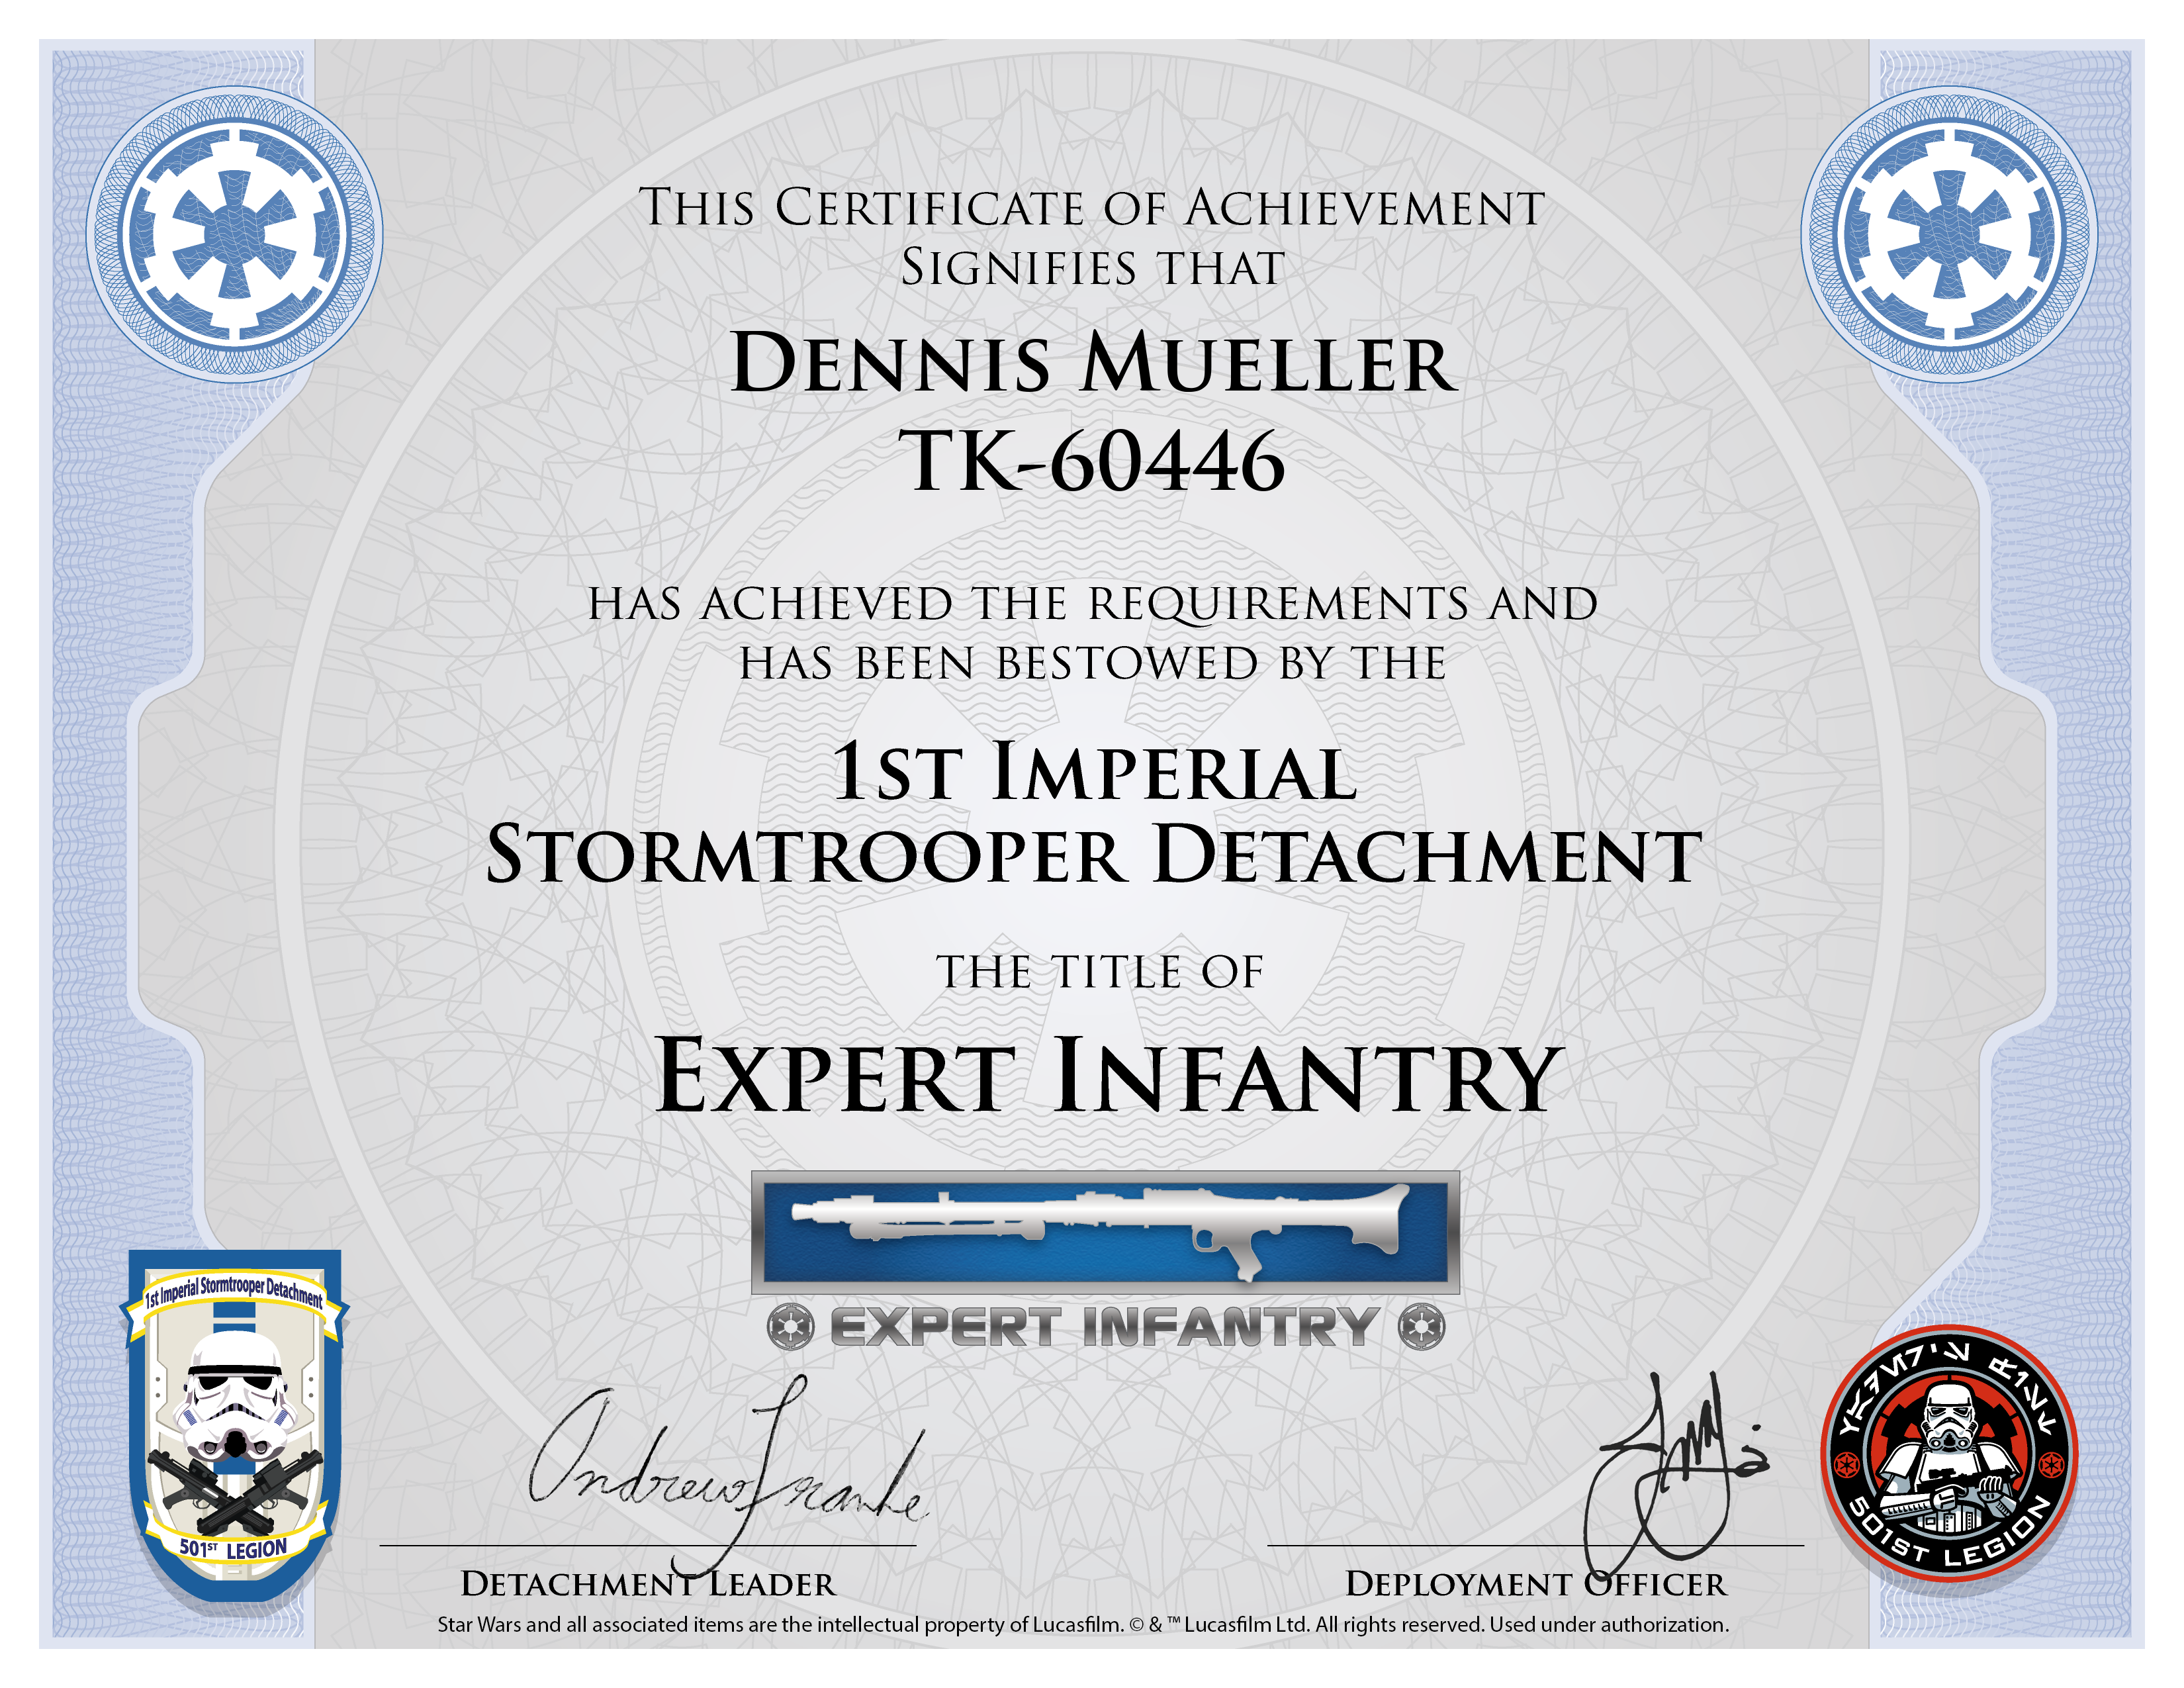
Dennis Mueller
60446
EIB
Letter Size
justjoseph63
http://www.whitearmor.net/eib/certificates/60446-eib.png-
1
-
-
It’s all for the Empire my friend. Here are the retakes with all of the suggested changes. Those little adjustments do make a world of difference.
Full Body Updates
Front
Rear
Right Full Body
Left Full Body
Sent from my iPhone using Tapatalk-
1
-
-
Thank you Glen.
There’s no weathering on the E-11 grip. I forgot to update that photo when I corrected the weathering for EIB.

Large Tabs Rrmoved

Voice Coder Gap Filled

Han Snap

Ab Rivets Close Up (Front and Back)


Sniper Plate Front

The belt was a dressing issue. I most likely shifted the one side while trying to adjust something else during my photos. Should I suit up again and resubmit my 4 body poses?
Sent from my iPhone using Tapatalk
-
1
-
-
You’ll be most pleased with RS. Their attention to detail and craftsmanship is phenomenal. I have an RS Scout and I know guys in my Garrison who have RS TKs. Worth every Penny!
Sent from my iPhone using Tapatalk -
I've just moved you into the correct thread can you check if you have access now
Glen thanks for the assist! As you can see I’ve been able to access and post. Danke Schoen.
Sent from my iPhone using Tapatalk-
1
-
-
TK-60446 Requesting Stormtrooper Access.
Dennis Mueller
Garrison Carida
https://www.501st.com/members/displaymemberdetails.php?userID=32825
https://www.501st.com/members/displaymember.php?userID=32825&costumeID=124
Sent from my iPhone using Tapatalk
-
1
-
-
Dennis M. Mueller
TK-60446
Garrison Carida - Eastern PA
EIB Submission
https://www.whitearmor.net/forum/topic/50379-tk60446-requesting-anh-stunt-eib-status-ata-1009/
Armor = ATA
Helmet = ATA
Blaster = Hyperfirm E11
Height = 5’10”
Weight = 178 lbs
Boots = Imperial Boots
Canvas Belt = Unknown
Hand Plates = JustJoseph
Electronics = iComm & Aker MR1506
Neck Seal = Unknown
Holster = Unknown
Note: All armor and accessories were built by and previously approved for Bill Blake TK-14791.
Full Body Photos
Front

Left

Right

Rear

Left Side Detail

Right Side Detail

Action Shot

Armor Details
Shoulder Bridges
(Photos updated 11/28 with better image)


Abdomen Button Details


Cod & Posterior Plate Connections


Wrist Openings

Sniper Knee Plate (L&R)


Thigh Ammo Belt
(The ends were trimmed slightly in front of the rear ridge corners at the bottom of the thigh per EIB Feedback)


Interior Strapping
(Suggestion in EIB feedback to add additional strap to right abdomen closure done. Button snaps on outer edge of posterior plate removed and replaced with industrial hook and loop to address alignment and corner sag issues)

Helmet Details
Front

Left

Right
(Excess Material Trimmed per suggestion in EIB Feedback)

Rear

S-Trim

Close up of Hovi Tips

Ear Screws Left


Ear Screws Right


Accessories
TD Front and Rear
(New clips fashioned and screw position adjusted per EIB feedback)


Holster Attachment & Rear Drop Boxes


Canvas Belt


Boots

Gloves

Hand guard flexibility

Blaster Details


If any additional photos are required, please let me know. Thank you for your time and consideration.
Respectfully,
Dennis Mueller
TK-60446
Edit 11/28:
1. Better images of shoulder Bridges provided.
2. Old photo of interior strapping was mistakenly posted and replaced with current photo of strapping revisions.
-
Gentlemen, I thank you very much for all of your assistance and encouragement! It has been a very edifying and rewarding experience. I will work on these suggested adjustment today and submit my Centurion app by tomorrow. And I won’t be touching my wife’s kitchen shears
 . I’m still getting the stink eye over the strainer lol.
I also want to thank fellow Garrison mates [mention]David G [/mention] and [mention]A.J. Hamler [/mention] for their inspirational EIB submissions. I’ll be using there Centurion apps as a guide as well. And fellow Garrison mate, [mention]gatetrooper [/mention] . Andrew was instrumental in guiding me through this process and helping me bring my kit up to snuff prior to submission. Thank you Gentlemen!-
1
-
-
Thanks Mario!
-
Sounds advice gentlemen. Will do.
-
1
-
-
I need a little advice for a Centurion requirement. I bought my armor from a retired Garrison mate. He did an incredible job on his build and built most of it to L2 and L3 specs, but I’m concerned about the following requirement for Centurion:
“The corners of the plastic ammo belt shall be trimmed at a 45 degree angle that that meets the outer edge of the cloth belt.”
As you can see from the photos below the corners as currently trimmed fall just short of meeting that requirement.


You can see in the photo my pencil line, which marks where I’d need to trim the ammo pack in order for it to meet said requirement.
Would this solution work or is there another work around?
-
Thank you Joseph. Looking forward to joining the ranks. Enjoy your Thanksgiving.
-
Thanks Tony. That’s exactly what I was looking for!
-
1
-
-
Would someone please tell me if there are certain measurements for the placement of the mounting screws for the TD bracket?
I’ve seen pics and info on the size of the screw head, overall length of the TD, greeblie, and end caps, but I can’t seem to locate where the optimal placement of the screws should be. All I find is reference to the first screw being “close to the greeblie.”
1. How far should the screw be from the edge of the clip? and,
2. What is the optimal distance between the two screws?
Thanks in advance for the assist. I’m fashioning new clips for my Centurion app. Got the clips done but don’t want to drill anything until I get confirmation.
-
[mention]TKSpartan [/mention] Mario, thanks for that tip with the highlighter cap. Ingenious! It made the swap out incredibly easy.
-
I saw a post in our Garrison Facebook page with a guy selling Jeans Guy for $6k. Whoever the guy in the photo was he’ll become a cult classic like Willrow Hood and his ice cream maker
 .
. -
Here’s the hovi with proper screen. Should seen my wife’s face when I ran into the kitchen on the eve of Thanksgiving to grab the strainer out of the drawer. Told her was all for the Empire. The look I got...would have rather faced an angry Vader lol. Thank the force we had a newer one we just bought a few months ago.

-
3
-
-
Thanks Gentlemen. I’m on it.
-
2
-
-
Here you go Sir!

-
1
-
Sea_Marshall: Captain Phasma TFA
in Captain Phasma Build Threads
Posted
Phenomenal job Chuck. Looks fantastic.
Sent from my iPhone using Tapatalk