Tristepin
-
Posts
5 -
Joined
-
Last visited
About Tristepin

-

arduino: a cheap board for E11 blaster effects
Tristepin replied to skyone's topic in Electronics for Helmets / Blasters
Well, it was easier to swap the LED Bargraph connection pins instead of messing with the code At the current moment everything is working properly, even the welcoming speech by Lord Vader. I'll simply have to re-check the sorting of the audio-file's and otherwise i'll just have to learn to live with it. It's just a shame that i don't have the space required for the installation of the smoke-generator. -
Good Evening Haui, Small question : In your Schematic you've used 1K Ohm resistors for the fire-, reload- buttons but you are stating in your Arduino code that 10K Ohm resisters should be used? Uhm, so...i would've like to ask you if you would be willing to tell me what the correct resistor value should be? Kind Regards, Martijn
-
arduino: a cheap board for E11 blaster effects
Tristepin replied to skyone's topic in Electronics for Helmets / Blasters
So, question here : currently i've noticed that the "start-up sound" doesn't work at every start-up.... When i've uploaded the code in the Arduino and turn it then it works. I turn it off, back On again... no startup sound? When i reset the Arduino it'll work again... And i've noticed that the LED bargraph is starting the count-down from the bottom, so Red turn's off first. I've checked the connections between the Arduino-pins and the LED Bar-graph and they are as stated in the scheme with the WT5001M02. Anyone here who could point me in the right direction? -
arduino: a cheap board for E11 blaster effects
Tristepin replied to skyone's topic in Electronics for Helmets / Blasters
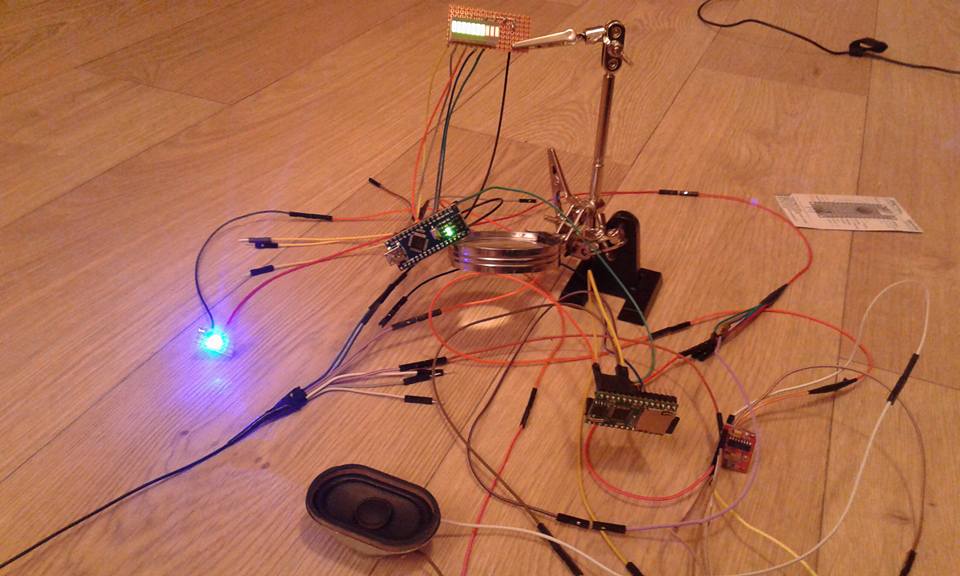
You're not wrong, i had the 3W RGB LED with the drivers disconnected for this shot. Appearently i "blow" the Green LED so had to dubble check. Currently waiting on a few replacement RGB LED's, to be on the safe side. I've reconnected everything again and re-uploaded the coding. Don't know why, but it took me a few days to get the code uploaded right. At the current moment i have sound and light, just have to switch my "FIRE" and "RELOAD" button from position. Next up : Re-connecting the repaired RGB LED + drivers and uploading all the MP3-files for a complete test. In the mean time, i'm working on putting the On/OFF switch in the Hengstler housing and operating it with the Original "Reset"-button". Would be one button less on the E-11 PS : Thanks again for sharing this project Manuel And a thank you to all the other Troopers here, who's input has been helpfull -
arduino: a cheap board for E11 blaster effects
Tristepin replied to skyone's topic in Electronics for Helmets / Blasters
Good Evening fellow troopers! When i saw the project that Skyone has invented, i just knew i had to give it a try myself. Just, Awesome! I'm hoping to install this into my Sterling AEG -to- E11 blaster modification. Recently i've finished the wiring etc.. and checked if it would work.......nothing! Currently unplugged everything and reïnstalled the components one-by-one. This time, the Arduino, MP3-player, amplifier+speakers, LED-Bargrapgh and status LED are functioning (kinda) Thinking i might have made an mistake the first time, making connections that simply can't work. No "magic smoke" so far so, how bad can it be?