FarEast
-
Posts
116 -
Joined
-
Last visited
-
Days Won
1
Content Type
Profiles
Forums
Gallery
Articles
Everything posted by FarEast
-
So it's been a while since I've built anything - I got hit by a car while riding home from work and sadly my left hand was pretty badly broken, crushed little finger, 4 out of 5 metacarple broken! the hand was in a pretty bad way and I was sporting more metal in my left hand than a Skywalker! So i'm well on the mend now with 4 sessions a week of physiotherapy and to get my mojo back I bought a Prusa i3 MK2s kit with the full intention of putting it to good use! The original plan was to build either a 1st Order Stormtrooper or a Death Trooper but having seen Sean Feild's amazing 3D files I decided to build this. So first of all, Thank you Sean for these files, utterly utterly beautiful! So first the 3-D Printer - this is an official Prusa i3 Mk2s kit build, yes I know there are clones for cheaper but as I was new to this I wanted and needed any support from a dedicated community. Obviously I got the black edition - it's an imperial droid after all! So I decided that I would print off the small detail parts first to get a feel for the printer - after reading several forums and talking to a few people that 3D print for a profession I decided to use PETG for the build. The greeblie came out perfectly so I then decided to move on to the more complex snout. So far so good! (everything dry fitted nothing bonded)
-
 Thank you so much for this! It's going to be a huge help on my current build!
 -
Mr Pauls Shoretrooper Build
FarEast replied to mr paul's topic in Build Threads Requireing Maintenance
Where did you source the soft parts from as I've just started my Shoretrooper build. -
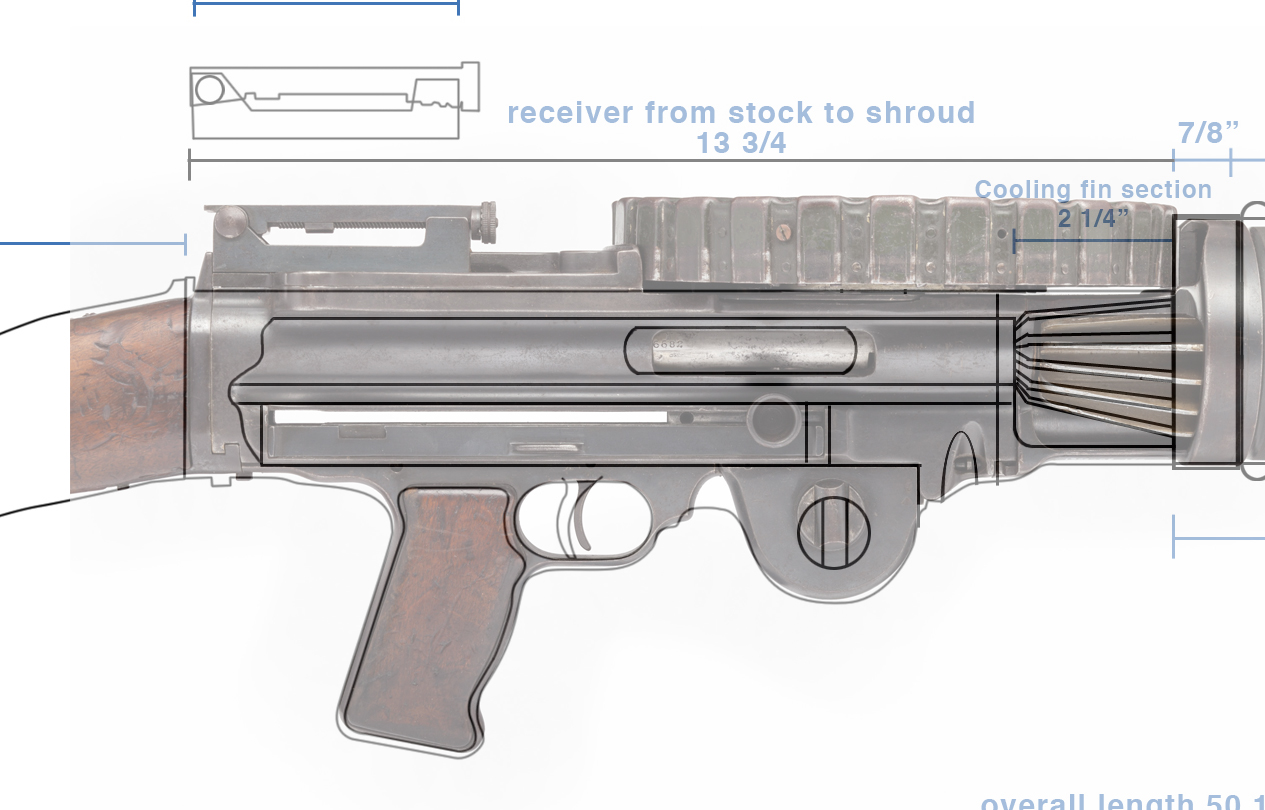
T-21 Light Repeating Blaster Build
FarEast replied to FarEast's topic in MiniMag PTL Missile Launcher, T-21, RT-97C (MG-15)
Next up was the gas recoil tube and the outer barrel section on the receiver. I marked off the visible area and removed it - then cut a matching section of tube and bonded. The outer barrel that the cooling fins would be attached to was just down to size and then the receiver detailing around the two was constructed. Next up was the cooling fins that extend out along the barrel. This was a real labor of love. These were bonded to the outer barrel using carbon epoxy - when this cures the bond is incredibly strong and its very difficult to break it. I used a hairdrier to speed the chemical process along a little. The fins totally surround the barrel so again I continued the process around the the inside of the cooling jacket. Two fins were left off for access that I will need for sanding and cleaning the finish of some of the fins. -
T-21 Light Repeating Blaster Build
FarEast replied to FarEast's topic in MiniMag PTL Missile Launcher, T-21, RT-97C (MG-15)
So on reflection I really didn't like the thickness of the barrel end so I decided a rebuild was in order. This time I tapered the end of the cooling jacket and measured the overlap so that I would only have the thickness of the bracing ring at the end off the jacket which matches the original. Much happier with the overall finish here. -
T-21 Light Repeating Blaster Build
FarEast replied to FarEast's topic in MiniMag PTL Missile Launcher, T-21, RT-97C (MG-15)
-
T-21 Light Repeating Blaster Build
FarEast replied to FarEast's topic in MiniMag PTL Missile Launcher, T-21, RT-97C (MG-15)
So next up is the final piece of detailing on the upper receiver which has basically resulted in my thinking that I may need to recut the barrel again due to scaling issues - no biggie, just if I don't its going to bug the hell out of me! This is a really quick and easy way to work on parts - lay some heavy 3M masking tape, draw directly on to it, transfer tape to PLAPLATE, cut and appy. The part requires it to be bent around and down and slightly covers the cooling fins - these were bent using Tamiya Poly Cement on the back of the piece, this causes a chemical reaction and basically melts the plastic, while its going through this reaction you can bend it which is whats going on here. If it snaps, no problem we can just use filler. -
T-21 Light Repeating Blaster Build
FarEast replied to FarEast's topic in MiniMag PTL Missile Launcher, T-21, RT-97C (MG-15)
Yeah, I saw his parts but I'm not sure how accurate those two pieces actually are to the ones seen in ANH and RO. Thus the question about referencing. I will continue to burn the diode out on my blueray!! Haha! I pretty much plan on building the entire thing from scratch as I have a huge amount of reference material on the Lewis Gun from other works WWI Aviation related, the hunt is still on for the reduce diameter section of the cooling jacket! -
T-21 Light Repeating Blaster Build
FarEast replied to FarEast's topic in MiniMag PTL Missile Launcher, T-21, RT-97C (MG-15)
Many thanks for the kind words, I kind of break down each part in to its own separate project and only jump to another part if the fitting or build requires it. I have to admit 1:1 scale is a whole lot easier then my usual medium of 1:32 or 1:16 I have a few options for the ribbing on the cooling jacket but I want to complete the Lewis Gun before modifying it into the T21 Blaster as this gives me a much more solid foundation to build on. Also I'm wondering where those additional parts above and below the cooling jacket come from are there any reference photos of them? -
T-21 Light Repeating Blaster Build
FarEast replied to FarEast's topic in MiniMag PTL Missile Launcher, T-21, RT-97C (MG-15)
Today I broke out the flex cable for the Dremel so I could start carving the detailing. -
T-21 Light Repeating Blaster Build
FarEast replied to FarEast's topic in MiniMag PTL Missile Launcher, T-21, RT-97C (MG-15)
So last night I decided to mark out the detailing at the end of the cooling jacket just before it attaches to the upper receiver. As well as mark out all the detailing on where the stock joins the receiver. -
T-21 Light Repeating Blaster Build
FarEast replied to FarEast's topic in MiniMag PTL Missile Launcher, T-21, RT-97C (MG-15)
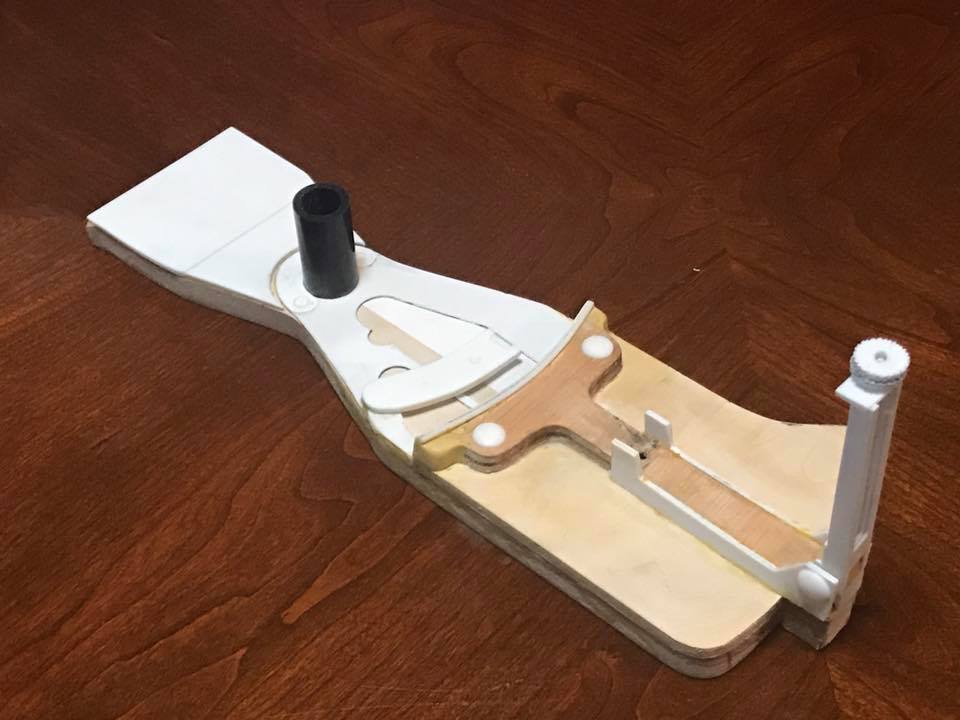
So Yesterday night I cut the cooling jacket for the T-21 and laid everything out on the master plans. So the first job of the day was to sand the stock in to shape, the new sander really helped out, remember use a respirator and eye protection! # Once done I made a butt plate out of 2mm plasticard - to get it to retain its shape you can leave it to sit in boiling water for a minute or two then once cooled it will retain its shape. Having gone over my references I will be changing out the round headed screws for flat head. From here it's time to assemble the Upper and Lower Receiver and the Cooling Jacket. -
T-21 Light Repeating Blaster Build
FarEast replied to FarEast's topic in MiniMag PTL Missile Launcher, T-21, RT-97C (MG-15)
Also it seems that Photobucket has finally decided we all need to pay, so the new forum update couldn't have come at a better time. So for those that haven't seen the build so far here are the latest shots. - The magazine mount has had the locking wedge glued on so technically its all done, although I'm a little tempted to sculpt the bullet feed on the upper receiver!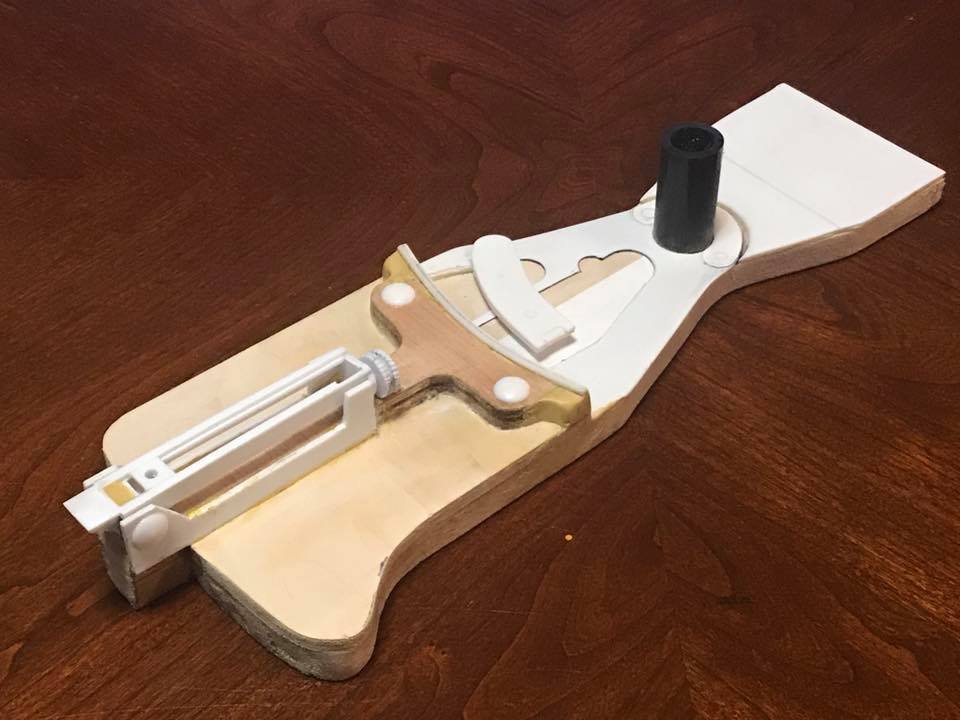
-
T-21 Light Repeating Blaster Build
FarEast replied to FarEast's topic in MiniMag PTL Missile Launcher, T-21, RT-97C (MG-15)
That's awesome - Bought a sander today and a few other bits of hardware so this weekend I plan to get the cooling jacket cut to size and then start on the receiver set. I have some great photos of the Lewis gun courtesy of Sir. Peter Jacksons collection of all people which I overlaid on to PandaTroopers template at 1:1 scale - Think I may need to make some changes!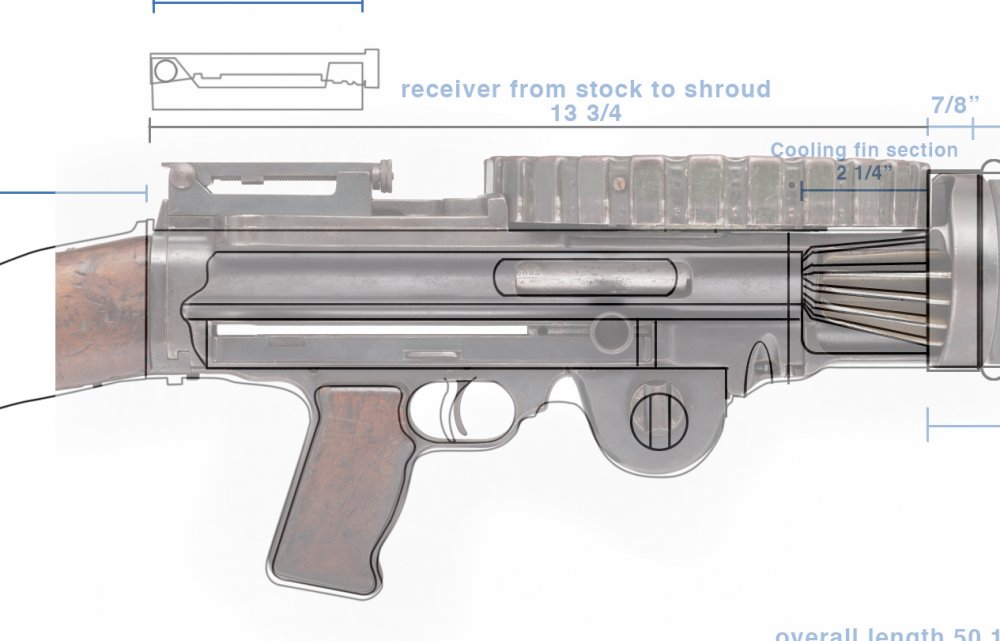
-
T-21 Light Repeating Blaster Build
FarEast replied to FarEast's topic in MiniMag PTL Missile Launcher, T-21, RT-97C (MG-15)
Well I got the upper receiver finished tonight! -
T-21 Light Repeating Blaster Build
FarEast replied to FarEast's topic in MiniMag PTL Missile Launcher, T-21, RT-97C (MG-15)
Thanks, hopefully you'll get to see it soon! -
T-21 Light Repeating Blaster Build
FarEast replied to FarEast's topic in MiniMag PTL Missile Launcher, T-21, RT-97C (MG-15)
-
T-21 Light Repeating Blaster Build
FarEast replied to FarEast's topic in MiniMag PTL Missile Launcher, T-21, RT-97C (MG-15)
-
T-21 Light Repeating Blaster Build
FarEast replied to FarEast's topic in MiniMag PTL Missile Launcher, T-21, RT-97C (MG-15)
I'm still ill but no point laying in bed. Today I decided to detail the receiver. Now that's set aside to cure I can start work on the sight. I need more images of the original 1916 flip up sight but very happy with the results so far. -
T-21 Light Repeating Blaster Build
FarEast replied to FarEast's topic in MiniMag PTL Missile Launcher, T-21, RT-97C (MG-15)
So already I've found several items that aren't in the original walk through and I will add them later. Wife said I was looking a little peaky this afternoon, I guess she knows best - calling it a day and taking an early night! -
T-21 Light Repeating Blaster Build
FarEast replied to FarEast's topic in MiniMag PTL Missile Launcher, T-21, RT-97C (MG-15)
Chop chop chop!! -
T-21 Light Repeating Blaster Build
FarEast replied to FarEast's topic in MiniMag PTL Missile Launcher, T-21, RT-97C (MG-15)
So today I went shopping! It's not everything needed for the build but enough to get started on the maint receiver and some of the other parts. Using multiple copies of the template I glued them directly to the wood, time to get cutting!! -
T-21 Light Repeating Blaster Build
FarEast replied to FarEast's topic in MiniMag PTL Missile Launcher, T-21, RT-97C (MG-15)
Yep she's big! -
So looking over the different types of Imperial Storm Troopers I decided that I would build a Heavy Weapons Specialist, not the SandTrooper but a standard Imperial Storm Trooper, that way I would technically have two uniforms to wear trooping. Now having looked online for kits I was lucky enough to come across the incredible scratch build by PandaTrooper TK-2886 whom also went above and beyond the call of duty and made a template! So a very big thank you to him for sharing his build log and plans which were the driving force, guide and inspiration for my first 1:1 scale scratch build project in the Star Wars Universe. The build log and the template can be found here http://www.whitearmor.net/forum/topic/11017-how-to-t-21-blaster-scratch-build/ I tried several attempts to get the printer to get the correct scale but after several attempts both messing with the printer setting and the scale of the template I decided to go to Kinko and just have the print it out on a plotter roll, which cost me ¥2,116 JPY. The first attempt misprinted and missed out part of the barrel - they were very apologetic and printed a fresh version that was perfect and asked if I wanted the misprint - luck was in my favor as I can use the misprint as my templates that I will use to cut the wood and plastic parts while the good copy I will use for reference. Here are the materials I will be using; again this is pulled directly from PandaTrooper's original post with the metric conversion added for ease of use by myself. I will update the list and correct in red if there are better alternatives available or if I feel that I need. Materials 2cm – (3/4 “ inch) thick wood (I used pine shelving)for the main body / receiver 1cm (3/8” inch) thick wood for the stock (I couldn’t find any, so I used ¼”) 8.9cm (3.5”) diameter PVC pipe for the main barrel (I used 3” “Cell core” ABS pipe, which has an outer diameter of approx 3.5”) 8.9cm (3.5”) connector (you will cut rings from this) 6.35cm (2.5”) diameter PVC pipe for the barrel tip (I couldn’t find any locally, so I took some 3” PVC and cut it down to 2 7/8” diameter) 10.16cm (4”) corrugated drain tubing for the barrel (you can use D profile adhesive rubber trim for car doors for more accuracy) Sheet styrene for details (I used 2mm and 1.5mm a lot) 3.17cm (1.25”) piping (small section for the sight) 5cm (2”) PVC piping (for the chamber or whatever you call it that holds the bullets in the main body / receiver ) Tools Jig saw / scroll saw Saw for cutting large sections / straight lines Dremel Files Sandpaper Clamps (spring clamps like you used for armor) Rivet gun / rivets (1/8”) Craft / exacto knife Adhesives, etc. E-6000 Wood glue Plastic weld (styrene glue) Bondo Various screws / bolts (use what you have around the house) Tamiya Black Primer L Tamiya Flat Black Tamiya Gun Metal Dark brown for the stock - I intend to keep the stock wood and stain it brown to keep the wood grain or to paint a grain in. Gold or silver for the cooling vents Any other paints you want to weather the blaster (silver, gunmetal, bronze, etc..)