Mad Cow Rebel
-
Posts
46 -
Joined
-
Last visited
Content Type
Profiles
Forums
Gallery
Articles
Everything posted by Mad Cow Rebel
-
It's well established that TKs in ROTJ had bubble lenses. But did all have them? I was browsing SW helmets website yet again and scrolled past this photo of what appears to be a TK inROTJ with flat lenses Thoughts?
-
Hey Phill, thanks for the tip I've decided to take this kit the TD route which is why I haven't posted anymore updates here. I'm currently trying to find more info on how exactly original ANH armour was strapped as it seems most everyone does it the ESB "clam shell" way. If you have any more helpful info please let me know
-
I'm just about to begin assembly of my TE derived kit I've been doing a lot of research on building the actual armour (previously I've only seriously studied helmets) and I've been noticing that most everyone builds their armour the "ESB" way (torso clam shell) http://imgur.com/a/MBYcDQP I would like to build mine as close to ANH screen used armour as possible. How were they built (if they were built differently) for ANH? Thanks for any help
-
I've started on the armour! I'm following the RS Props tutorial series on their youtube channel The arms were the first done. If I've done anything wrong please let me know Merry Christmas as well!
-
After looking at the photos I took of them, I went back and fixed the ears to the best of my ability I'm really loving the look of this one so far
-
Ok the Hero is really shaping up The only real problem I'm having (as usual) is fitting the ears! I'm not sure what exactly I'm doing wrong but any advice is welcome
-
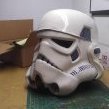
Plowing through Over the last week I've been making the best of a less than ideal situation (should sound familiar this year) I've improvised. I built up the DA stunt kit for a friend of mine - he wanted it dirtied up RO style and covered the cost of the kit; I didn't charge him for anything else. My payment was experience. I know that ear job is hideous but I did better on the right side. This 2mm abs is not the easiest to work with but regardless I am improving if slowly. After that I set out to work on the DA Hero helmet as I was in a helmet mode. The lenses suck. There is no way around it (It was like looking through a chunk of thick ice) so I cut them out, painted the back of them black (as they should be) and had resigned myself to having it a pure display piece as now I could see literally nothing through them. That was until I remembered I had built a small vacuum former a few years ago. Using the DA lenses as bucks, I vac formed a set of new lenses and they work very well (I can see well enough to actually walk now). All that's left to do is tint them using a synthetic dye and I'm golden. Now, On to the rest of that Hero helmet.
-
I would not pay the full price for this. I'm glad I got it for nearly half price considering the quality.
-
DA Props kits in! I have to say that was very fast shipping from France to Canada. Unfortunately that's all that was better than expected with these. Let me explain: First thing I noticed was that the ABS colour was slightly yellowed compared to my TE kit. This and the fact that there was what looked like black overspray from spray painting on the underside and dirt, hair etc on the inside of the faceplate makes me think this plastic has been sitting around in a shop for a long time. Upon further inspection I noticed that, especially on the hero kit, there were deformations in the ABS pulls from bubbled up areas to indents to a damaged and sunken tooth as well as an extra tooth on the hero! Moving on to the resin parts I found a few bubbles (not a huge deal) and a gaping hole in one of the Hovi tips! that, followed by the wrong size of S trim, look at this compared to brow trim It's huge and does not fit like it should at all. and then the bubble lenses softly molded out off very thick, very brittle green plastic Overall I feel disappointed and the experience of going through everything felt like I bought some recast ebay kits. I expected much better quality from DA props
-
yes I did the right side better. Like I said not going to win any shows but I've re worked a lot on this helmet and I don't want to risk ruining it again. This is actually the second time I've done the tube stripes on this one. I sanding the first set down and resprayed before doing the above
-
Some further progress: Tube stripes on Not going to win any shows but I did these better than my first bucket so I'm happy
-
Thanks, In the above photo you can see an issue with the frown (the gray bleed between teeth) that has been fixed
-
Success! As you can see I've started the hand painting. I'm a little rusty but I think I can pull it off with minimal touch ups We're back on track
-
Back to HDPE: The next post will be the final white. Here I go
-
Thanks, I'm not concerned about a few runs (I actually would like a few) it's just that what happened last time was far too much
-
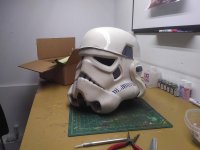
mail call: Trooper Bay box arrived I now have everything I need to finish this helmet to reasonable status. I've already started on the mic tips: (I know in this photo the white "wear" on the rims is a bit large. I have since fixed that) In the "restoration" department, things are going smoothly enough. After more sanding and a few shots of first, gray etching primer, followed by wet sanding, and then basic white, the patterns created from sanding as well as any evidence of my dripping disaster are all but vanished. So to quote the big boss -"everything is proceeding as I have foreseen" ...so far Once the primer is dry a quick wipe with super fine steel wool (or even a shop rag) to clean off the overspray and then it's time for round 2 of fake HDPE paint followed by the industrial oil paint through the spray gun CAREFULLY this time Stay tuned...
-
OK I scrapped off the drips while they were still soft and started sanding away. I did an initial rough pass with 80 grit sanded wet. It actually gives the helmet an interesting layered "Boba Fett" style weathering look that I may use on other projects in the future. More to come soon. My TrooperBay order is ETA this week or early next so I'll keep sanding and (CAREFULLY this time) repaint this bucket
-
Maybe you can help me with my build then, I'm having a hard time finding much information on hero helmets. I know the differences aren't that huge in construction but one thing that has me stumped is the mic tips. On the stunt helmets, evidently the mic tips were stuck on the helmets and painted white while on the helmets, then hand painted black afterward leaving the inside of the mics white. The paint didn't adhere well to the automotive painted surface and so there are many examples of the white showing through spots where the black has chipped off What I don't understand is why would an ABS hero helmet then have mic tips with white paint showing through when there was no need to paint them like on this famous original? The only explanation I can think of is that the mic tips used on all the hero helmets were "recycled" from other damaged stunt helmets. It's not unheard of for parts to be salvaged from other helmets no longer in use like the ears of the "move along" helmet that was found without it's ears in a garbage bin. Along with that, another factor that supports that idea is that the hero helmets were the last of the stormtrooper helmets to be produced in ANH and with a tight budget and even tighter deadline it's only natural that they would re-use parts. That's just my own theory though. If anyone knows the answer for certain I would appreciate it
-
Thanks guys. Yes it's a bit discouraging but I'm plowing forward. I didn't realize those were meant to be ground back that much on the ears. I figured that was just more detail but I guess I haven't spent enough time looking at ears. I'll definitely trim them back after the paint dries. I'm looking forward to getting my DA hero. Unfortunately (kind of) he only had 2mm kits on sale and the originals were all 1.5mm so details will be ever so slightly softer but, for the price of $150 CAD shipped I absolutely can't complain.
-
The title of this post is "a little too authentic" So. After trimming the teeth back a bit I noticed that the paint on the underside of the "chin" area still hadn't dried even after a about a week. I must not have mixed the paint well enough. So easy enough, I figured I'd just wipe it away with mineral spirits. It would reveal more of the "HDPE", which was protected by a clear coat, and I'd be done with it. Not so. The spirits ate right through the clear and khaki paint revealing the ABS again. No good. I set about repainting the chin with khaki and after applying a thick coat of clear I got ready to re spray the white. This is where things get really hairy. I mixed up the paint and begin spraying in my garage. By now, here in Canada, it's gotten quite cold; and cold and paint, as you may know, do not mix. The paint started to "fish eye" and glob out of my gun. In a panic I rushed everything into the furnace room and set up to try and salvage the job. I sprayed and sprayed while warming the helmet with a heat gun. It appeared to work! I got the helmet looking nice and glossy again. A few drips here and there but no big deal as that's perfectly scree accurate. All was well with the world. Until I came back down stairs a couple minutes later after cleaning up to find HUGE drips all over the helmet. the heat from the furnace room must have warmed up the surface fully making changing the paint viscosity allowing it to run freely everywhere. Originals had drips, yes but they didn't look like they were melting. What a disaster. a little friendly advice: DO NOT spray when it is cold even if you think you can get away with it. oh well, live and learn. What now? This stunt helmet will become a practice helmet. Maybe I can salvage it in a few months when the paint drips finally cure and I can try sanding and polishing them out. We'll see. In the mean time, DA Props on Facebook had a Black Friday sale and I bought a hero helmet kit (NO SPRAYING!) so that's what the plan is moving forward. Make this a hero build instead of stunt. Stay tuned...
-
yes I see that, I'll trim it some more
-
Well after spending a night in the sauna temperature furnace room, the helmet was 85% dry and so the ideal time to remove the masking. It will now cure for the next week or so as that's how long it takes this paint to fully harden. It is very important that the paint has fully hardened BEFORE applying more paint. I also took this time to cut away more of the frown to match the style of originals. This is how it stands now
-
I'm just noticing now that I haven't cut away enough of the teeth. I'll do that as soon as it's dry
-
Paint is on After masking off the "chips" with Vaseline (old trick for poor prop makers) I mixed up some very very very light gray paint to match the soft white of the original helmets used in the opening boarding scene. The paint I used was Tremclad industrial oil paint sprayed through my spray gun applied fairly thick creating small runs just like on original examples. Now it will sit in the furnace room for a week or two until it is fully cured. Then I'll remove the masking and take some photos of it in good light to show it off
-
for sure, I just found it odd because on my first helmet it was a very easy fit