TJisThatGuy
-
Posts
63 -
Joined
-
Last visited
Content Type
Profiles
Forums
Gallery
Articles
Everything posted by TJisThatGuy
-

Another ANH stunt build? Yes, another one.
TJisThatGuy replied to TJisThatGuy's topic in ANH Build Threads
Shins outer cover strips are clamped magnetized and drying. Minus a few touches of paint for the vocoder and screw tops, and the mic tip installation, the helmet is all but done. I did have a slight mishap with the stripes on the left of the helmet. Didn't quite land a pencils width from the cheek. Should I bother fixing it? I have new decals coming anyhow since I jacked up one of the rear trapezoids. Sent from my iPhone using Tapatalk -
Another ANH stunt build? Yes, another one.
TJisThatGuy replied to TJisThatGuy's topic in ANH Build Threads
Wow. Awesome photo, thanks. Even has a Hero helmet thrown in there. You can almost see through that guys ears. So I think I'm all set. Definitely saving this picture. Sent from my iPhone using Tapatalk -
Another ANH stunt build? Yes, another one.
TJisThatGuy replied to TJisThatGuy's topic in ANH Build Threads
So I thought my ears were trimmed properly, or at least close enough. But nothing looks as good once you screw it in. I know it's easy enough to unscrew them and try again, but the right ear is getting pretty slim. So I ask, are these ear gaps acceptable? Sent from my iPhone using Tapatalk -
Another ANH stunt build? Yes, another one.
TJisThatGuy replied to TJisThatGuy's topic in ANH Build Threads
I know those pictures aren't the best. But it's a little difficult to size, tape, and photograph all alone. I need a friend. Moving a little north, here's my best attempt at the biceps. Elbow side: Shoulder side: The shoulder sides seem perfect for me. Still just a bit of room when I flex. My question is, can I remove the return edge on the bicep elbow region? It's just a tad uncomfortable. Scraping and scratching. I'm sure that would be lessened by the wearing of the bodysuit. Sent from my iPhone using Tapatalk -
Another ANH stunt build? Yes, another one.
TJisThatGuy replied to TJisThatGuy's topic in ANH Build Threads
Here my attempt at getting the correct fit on my arms. I have pretty skinny arms considering my other dimensions. I took off the return edge on the wrist part of the forearms. This is as close as I could make the gap while still being able to fit my hand through. And here is the elbow side gap Are those acceptable? Sent from my iPhone using Tapatalk -
Another ANH stunt build? Yes, another one.
TJisThatGuy replied to TJisThatGuy's topic in ANH Build Threads
Thanks. I remember reading somewhere about removing the return edges on the shins and/or forearms. Couldn't remember if it was one or the other or both. I'll start here. -
Another ANH stunt build? Yes, another one.
TJisThatGuy replied to TJisThatGuy's topic in ANH Build Threads
Just bumping because I'm still wondering about these shins. And I'm a poor multi-tasker Sent from my iPhone using Tapatalk -
I have been led to believe that they are pre recorded sound bites. Which is why they sound authentic but sometimes have very awkward timing. Sent from my iPhone using Tapatalk
-
Another ANH stunt build? Yes, another one.
TJisThatGuy replied to TJisThatGuy's topic in ANH Build Threads
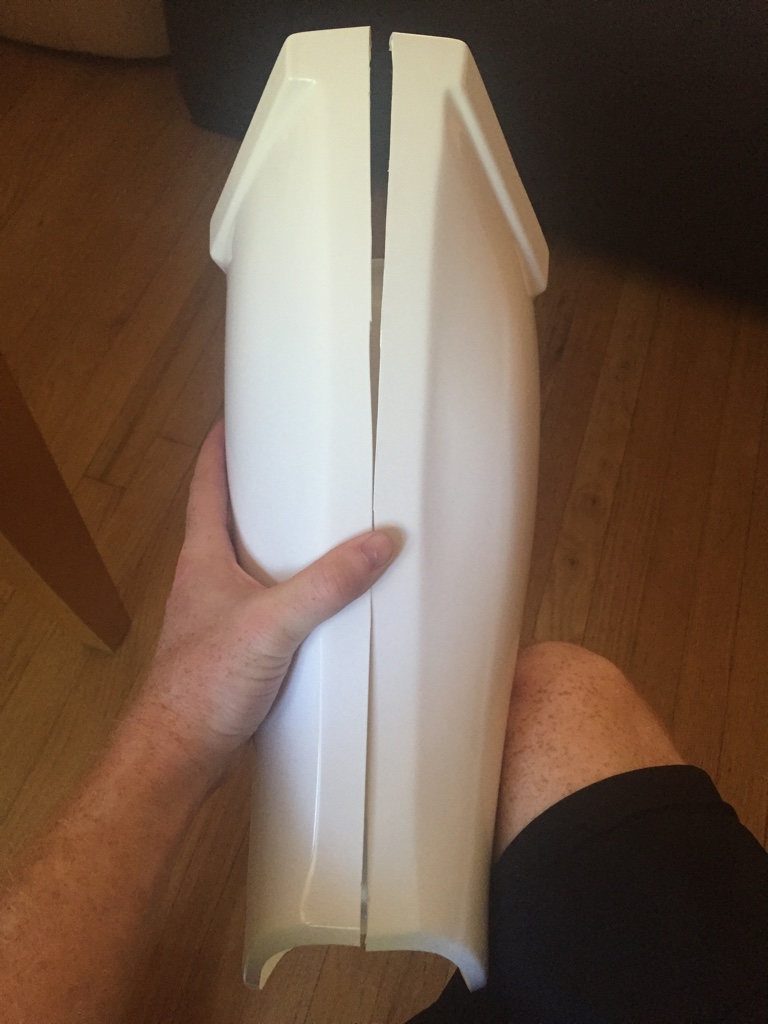
So here are the much improved shins. Before I trim the backs to fit, and start gluing everything together, is this the correct configuration? Do I have the correct halves together? Sent from my iPhone using Tapatalk -
Another ANH stunt build? Yes, another one.
TJisThatGuy replied to TJisThatGuy's topic in ANH Build Threads
I realized that I doubled my measurements for each side of the shin plates. So those wonky scoring lines are going to be a thing of the past as I have to chop another 10 mm off of that edge. Hooray. Sent from my iPhone using Tapatalk -
Another ANH stunt build? Yes, another one.
TJisThatGuy replied to TJisThatGuy's topic in ANH Build Threads
Here comes some shins. My score and snap method leaves a little to be desired. I think I was applying a little too much pressure on the knife. A little sanding will fix that, I hope. And I've learned for the next leg. Sent from my iPhone using Tapatalk
-
Another ANH stunt build? Yes, another one.
TJisThatGuy replied to TJisThatGuy's topic in ANH Build Threads
Thanks. Sorry it's been a bit since I've had time. I'm getting back to it now. I'm going to step away from the helmet for a bit. I find my lack of progress disturbing. I'll attempt some of the limbs. They seem much easier than the helmet, and as this is my first build I could use the confidence boost. Sent from my iPhone using Tapatalk -
Another ANH stunt build? Yes, another one.
TJisThatGuy replied to TJisThatGuy's topic in ANH Build Threads
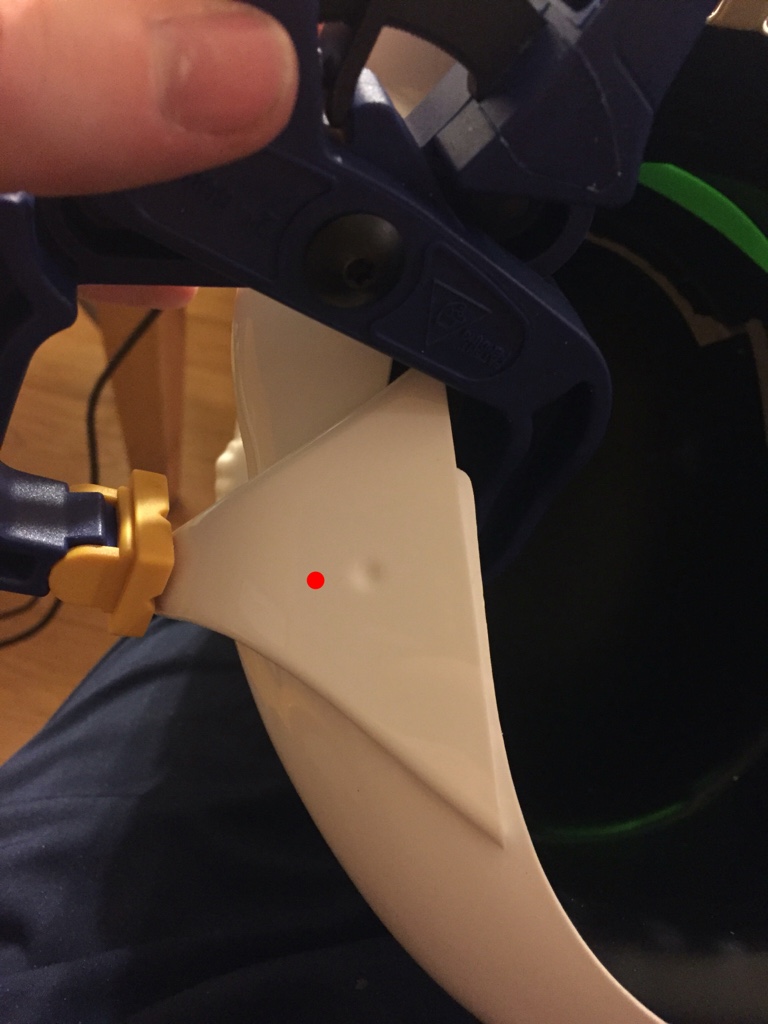
So if I were to drill through the pre made indent to attach the ear, it would miss the face portion of the helmet. I've approximated with the red dot where I should drill to catch all three layers of helmet. The s-trim, I think, wouldn't reach the indent to hide it. Is it a big deal if both the screw and the indent are visible? Sent from my iPhone using Tapatalk
-
Another ANH stunt build? Yes, another one.
TJisThatGuy replied to TJisThatGuy's topic in ANH Build Threads
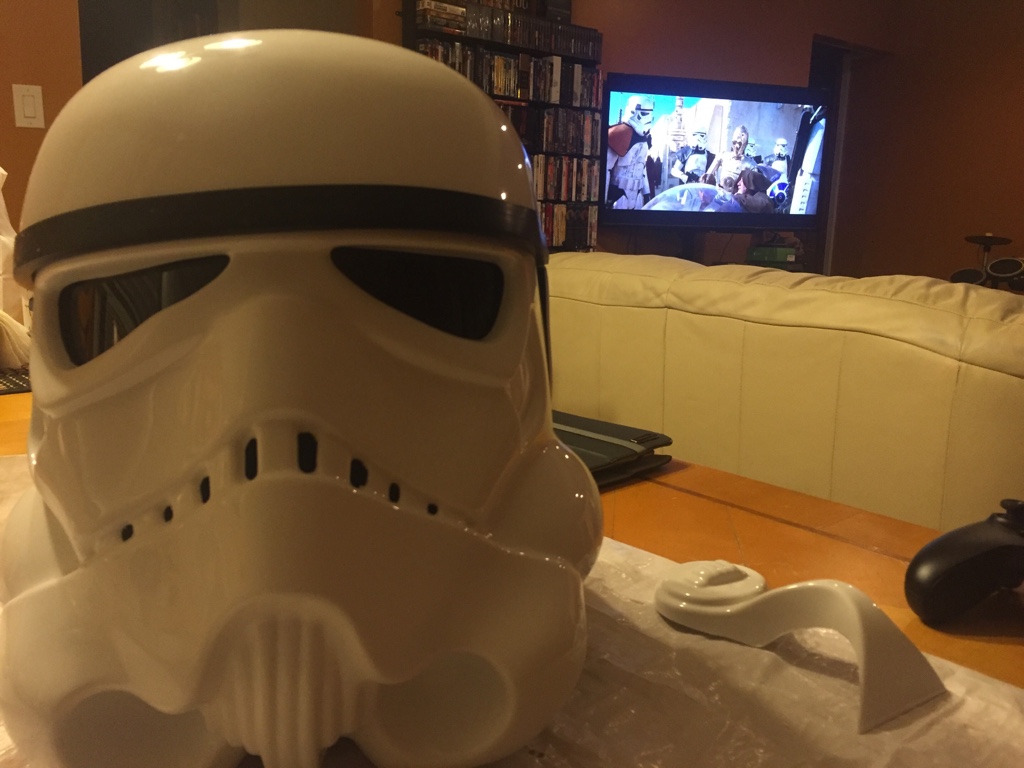
Finally getting back to it with a little inspiration on in the background. Going to try and finish up the ears tonight. Just a wee bit more sanding and shaping, a touch of paint, and I can wear this bucket to my hearts content. Sent from my iPhone using Tapatalk
-
Another ANH stunt build? Yes, another one.
TJisThatGuy replied to TJisThatGuy's topic in ANH Build Threads
I used this guys tutorials for the helmet build. It's specifically for AM 2.0 which is right up my alley. But I'm sure his tips could help any helmet build save for a few of the specific AM details. https://youtu.be/vXMCJh9Wm2A Sent from my iPhone using Tapatalk -
Another ANH stunt build? Yes, another one.
TJisThatGuy replied to TJisThatGuy's topic in ANH Build Threads
Sounds like you're saying "stick with stunt." And I agree. Thanks for the breakdown. Sent from my iPhone using Tapatalk -
Another ANH stunt build? Yes, another one.
TJisThatGuy replied to TJisThatGuy's topic in ANH Build Threads
Alright. I lowered the brow a tad. And although I was able to do it with out making any more visible holes, it was an exceedingly frustrating process. So this will end my work for tonight. You need calm and patience for this work. And a frustrated TJ is neither of those things. Sent from my iPhone using Tapatalk -
Another ANH stunt build? Yes, another one.
TJisThatGuy replied to TJisThatGuy's topic in ANH Build Threads
Perhaps I should go hero. There's so many poorly made stunt helmets in the movies. And I definitely prefer the lower brow. Sent from my iPhone using Tapatalk -
Another ANH stunt build? Yes, another one.
TJisThatGuy replied to TJisThatGuy's topic in ANH Build Threads
Ok, so I popped the rivets. Before I set them again,is this where the brow should be? Sent from my iPhone using Tapatalk -
Another ANH stunt build? Yes, another one.
TJisThatGuy replied to TJisThatGuy's topic in ANH Build Threads
Hey, thanks for reading. And I appreciate the assistance. I read that the brow would get pulled down a bit when I set the rivets, so I put it slightly higher than I wanted it. Unfortunately, it didn't lower. And I've drilled the holes and riveted it. Would that be a tremendous pain to fix? I know AM is coming out with a new 2 piece bucket soon. So I was thinking this could be my trial and error helmet until I get the new one. Sent from my iPhone using Tapatalk -
Hello all. This will be my first, and judging by my progress so far, my last build ever. I kid. I hope to be doing this forever. The ol' BBB arrived no too long ago and I finally had a chance to get started. I was so excited to begin that I didn't take any pictures. I figured I'd start with the most iconic piece, the bucket. It's almost done. I'll post some pics when I get home, all I have left is to trim and attach the ears. And a little paint here and there. Sent from my iPhone using Tapatalk
-
Thanks for the replies everyone. This community is awesome. I'm so glad I'm finally getting involved with this. Sent from my iPhone using Tapatalk
-
Thanks for taking time out of your busy schedule of answering every single stormtroopers questions 24/7 to reply to mine. I think it goes without saying that I'll be using your AM build thread as my main inspiration as I bought an AM kit. I still need a few supplies, but plan on starting next week. May your first child be a masculine child. Sent from my iPhone using Tapatalk
-
I'll probably put it off for now as I just got the BBB on Monday. And I'm so excited about building it that I'll leave out the unnecessary bits for now. Though, I suppose it's easier to paint it before assembly. I am stuck between a Sarlacc and a hard place. Sent from my iPhone using Tapatalk
-
Thanks. I'll probably end up doing it because it looks cool. But it's nice to know I have the option. Sent from my iPhone using Tapatalk