

count chocula
-
Posts
93 -
Joined
-
Last visited
Content Type
Profiles
Forums
Gallery
Articles
Media Demo
Posts posted by count chocula
-
-
Nicely done!Thanks for your advice.
I moved the snap to the correct position.
How about this?


-
I have finally had a chance to really review everything, as a result, I have 2 more questions.
1. Upper left box: The original picture in the CRL shows 4 screws (or pop rivets) at the corners of the box. The picture on this thread does not show any. I currently put these on all HWT packs I build. Is this going away or will it be added to the updated CRL pack picture?
2. Same thing for the bottom right box.
Thank you. I am building 6 of these right now, so I want to make sure I am good with the future requirements, also.
The screws are present on the bottom right box in the diagram, they are just dark black and tough to make out. I probably should've made them stand out more... And looking at Tony's build, you are correct about the top left box, I should've included screws around the corners there as well. I can send Joseph an updated version to correct this
-
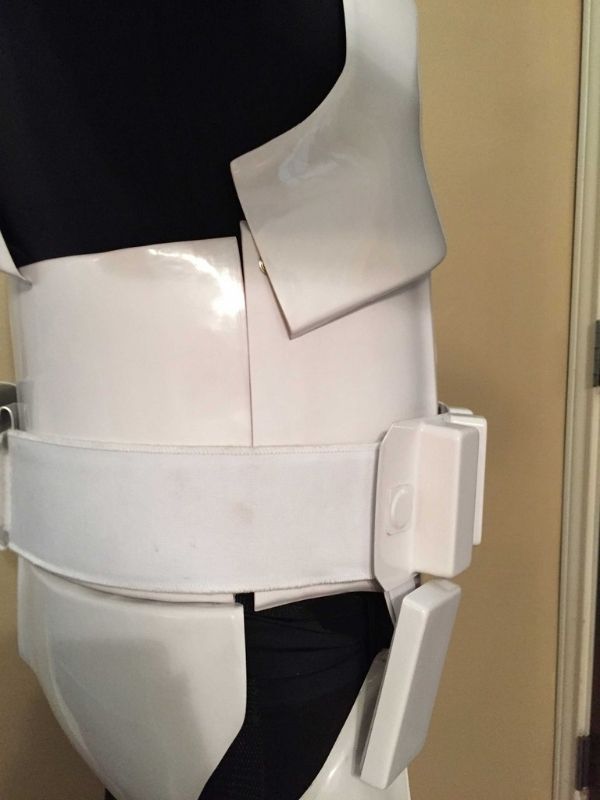
Looking good fellow MTK guy! Just an fyi, I think that male snap on the upper right side of your kidney piece is supposed to be on the upper right of the ab plate (for centurion).
Oh, and you might want to post pictures using direct-embedding links from an external photo-storing website, e.g. photobucket or imgur. This will fix the data/size limitation you're having.
-
Nice! What kind of blasters are those? Must be old republic era

-
I have Adobe illustrator (also vector-based) and would be happy to help. PM sent
-
Sweet blaster and helmet, man! Now you need some armor to go with it


-
 1
1
-
-
-
You can't join the star garrison forum until you are approved, but you can join the "recruit" page while building your costume. This way you can find out about armor parties, etc. https://www.facebook.com/groups/296336407050926/
-
I'm in midtown, Jay. A stones throw away. Happy to help if I can. You should also get plugged in to the Star Garrison facebook recruit page (if you have facebook) and maybe get to an armor party.
-
1
-
-
Thanks, Markus

-
1
-
-
Thanks, Christian! We all put so much work into these builds, it's nice to finally see the finished product (although I suppose one's armor is never really finished). I can finally tidy up the garage a bit and put all those random snaps and things away lol
-
Awesome! Thanks Tony and Sly for taking the time to review.
-
Have you tried these guys?
http://www.optocity.com/prism-reflective.htm
They have an inquiry form to see what it would cost for them to be made and it looks like they may be U.S. based. But custom usually = $$$
Sent from my iPad using Tapatalk
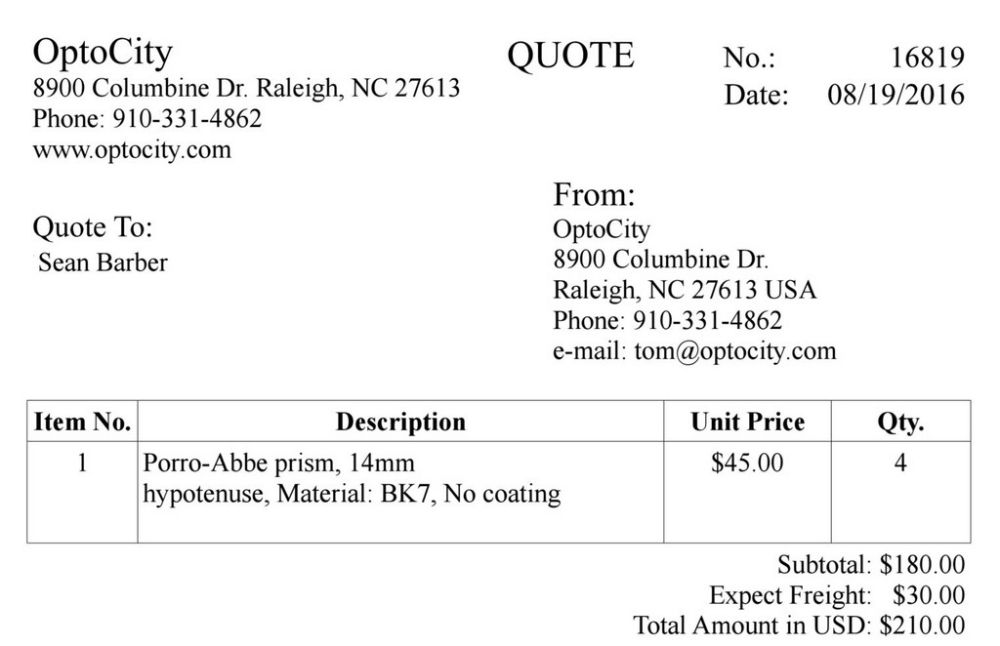
I did, actually. Here's what they sent me when I asked for a 12mm hypotenuse Porro-Abbe:
~~~~~~~~~~~~~~~~~~~~~~~~~~~~~~~~~~~~~~~~~
Thank you very much for your inquiry. We have Porro-Abbe prism, 14mm hypotenuse, also we can custom make Porro-Abbe prism, 12mm hypotenuse. Please let me know what qty. are you looking for? Material BK7 or Fused Silica, coating?
Best Regards,
Tom Zhang
Manager
Optocity
8900 Columbine Dr.
Raleigh, NC 27613
~~~~~~~~~~~~~~~~~~~~~~~~~~~~~~~~~~~~~~~~~~~~~~~
I asked for a quote for the 14mm hypotenuse Porro-Abbe prisms they had in stock (I figured it would cost more to have them make 12mm prisms). They quoted $45 per prism.

-
1
-
-
I am reading some stuff that calls the two prisms in the M38 a Porro Prism. This might help in the research.
Porro prisms are similar to right angle prisms. Porro prisms are used for a 90° light path bend by using the hypotenuse face of the prism rather than the leg faces. This configuration produces a right-handed image since two reflections occur. The incident ray's direction is reversed when using a porro prism since the object enters and the image exits the same face.
I've searched extensively for these prisms. They are sometimes called Porro-Abbe prisms. They seem to be nearly impossible to find. Several websites formerly sold these (e.g. edmundoptics), but have recently discontinued them.
Some Russian company still has them on their inventory, but they haven't responded to my emails...
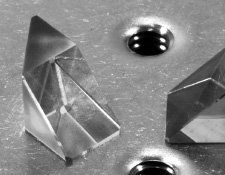
I even went so far as to design a 3-d model of the prism that is needed for this scope (a "12mm hypotenuse Porro-Abbe prism"). I had them printed in an "optically-clear" resin by a 3-d printing company for only 10 bucks, but even after lots of polishing, I'm not sure they are really clear enough to work properly. They fit very well into the scope I bought from Brian, but the image seen through them is a bit blurry. Also, the prisms used in the moisin nagant scopes must have had mirror coatings on the hypotenuse (maybe on other surfaces, too). I've not been able to find a good way to coat a single surface of a resin prism. If anyone wants a copy of the stl file you are welcome to it.
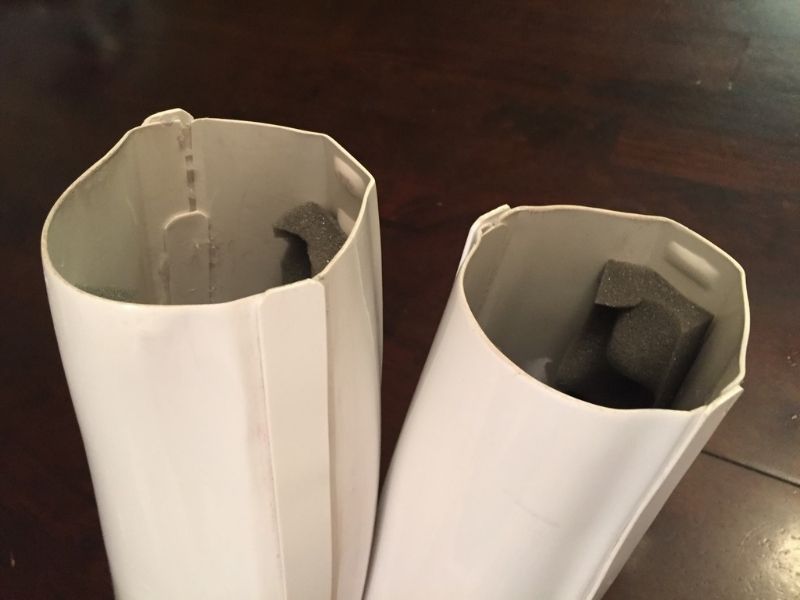
Here's a picture of the 3-d printed clear resin prisms before polishing.
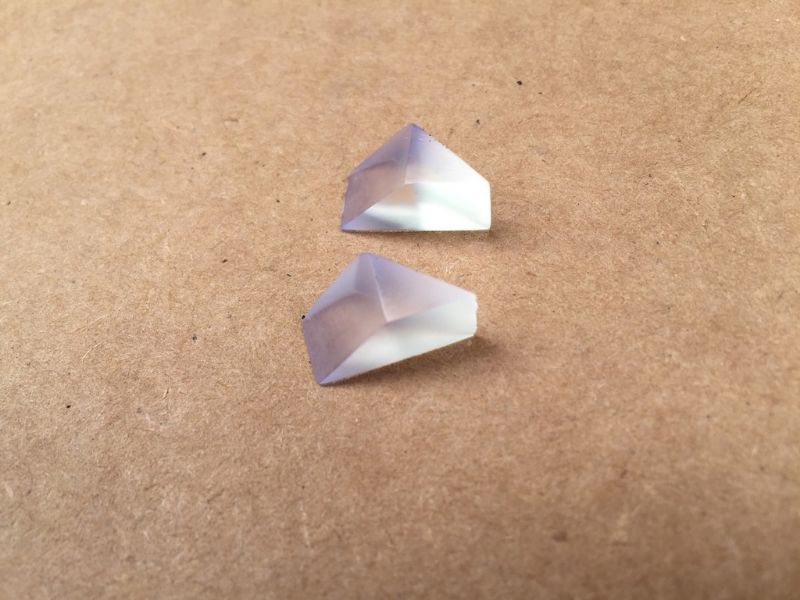
I really wanted this to work, but this is going to take a lot more effort, I think. If anyone finds a good solution, I will take two, please.
-
3
-
-
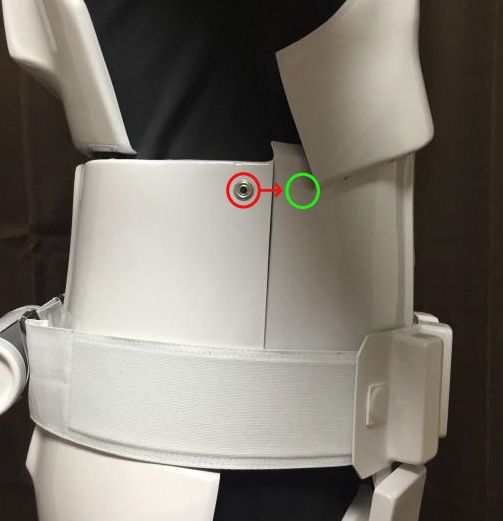
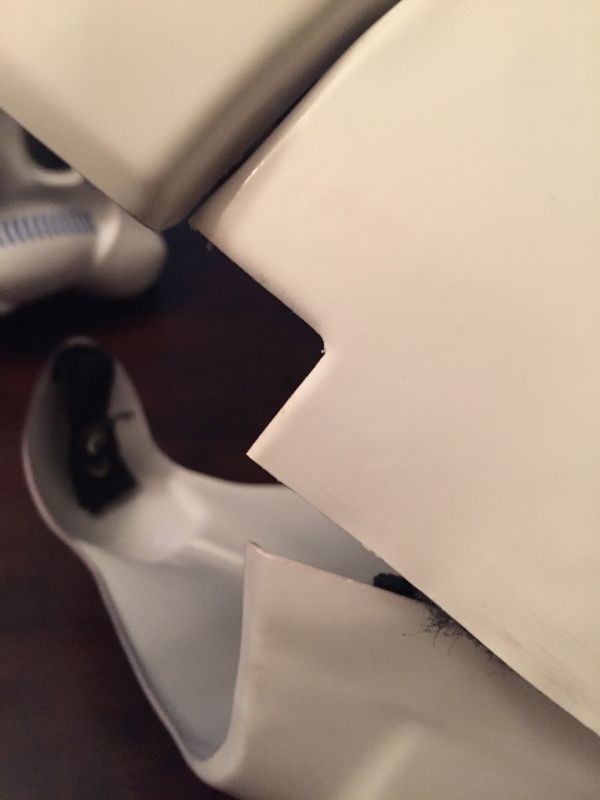
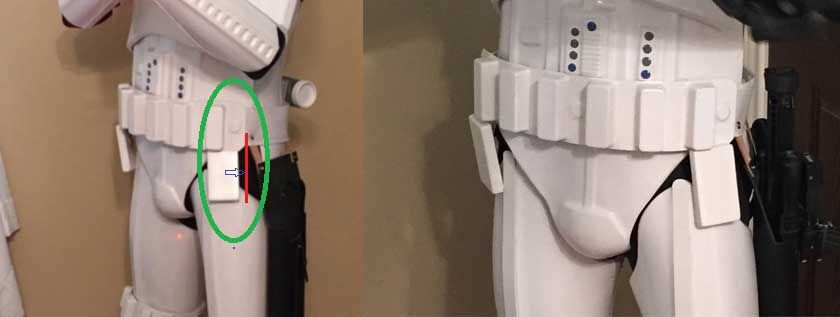
Looking GREAT, Sean, and really nice job on this build! It may be the camera angles, but it looks like your drop boxes may need to come out just a bit to be even with the end of the belt. Adding a photo like the one below to your application to show the alignment might help.
Thanks, Joseph. I've added this pic to the original post, now:
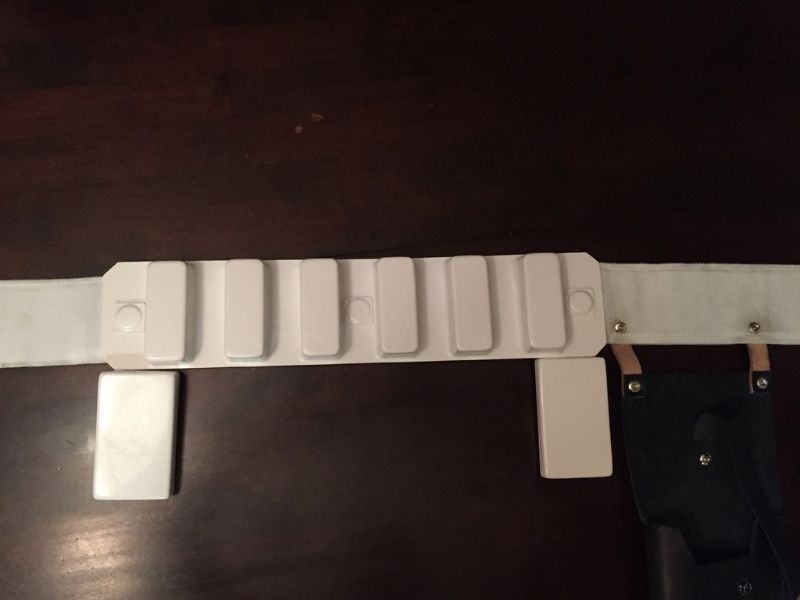
Also added in the wrist side of the forearms, which I forgot about initially.
On a side note, you can remove all the return edge on the top of the thighs if you find them uncomfortable... (mine chafed the heck out me until I got rid of them).
The thigh tops don't bother me. I can lower them a bit or remove the return edge though, if needed for accuracy.
-
Please consider the following build for Centurion status. Thanks for taking the time to review!
Name: Sean Barber
Forum Name: Count Chocula
Garrison: Star Garrison [sTX squad]
Height: 5' 9"
Weight: 165lbs
501st profile: http://www.501st.com/members/displaymemberdetails.php?userID=21742
EIB app: http://www.whitearmor.net/forum/topic/38662-tk77019-requesting-anh-stunt-eib-status-mtk-635/
Eye color: blue
Hair: brownish
Zodiac: Scorpio
Hobbies: Long walks on the gold beaches of Corellia
Armor: MTK
Helmet: RT-Mod
Boots: Imperial Boots
Canvas Belt: TrooperBay
Handguards: TrooperBay
Neck Seal: Darman
Holster: Darman
Electronics: none
Blaster: doopydoos pipe custom (thread)
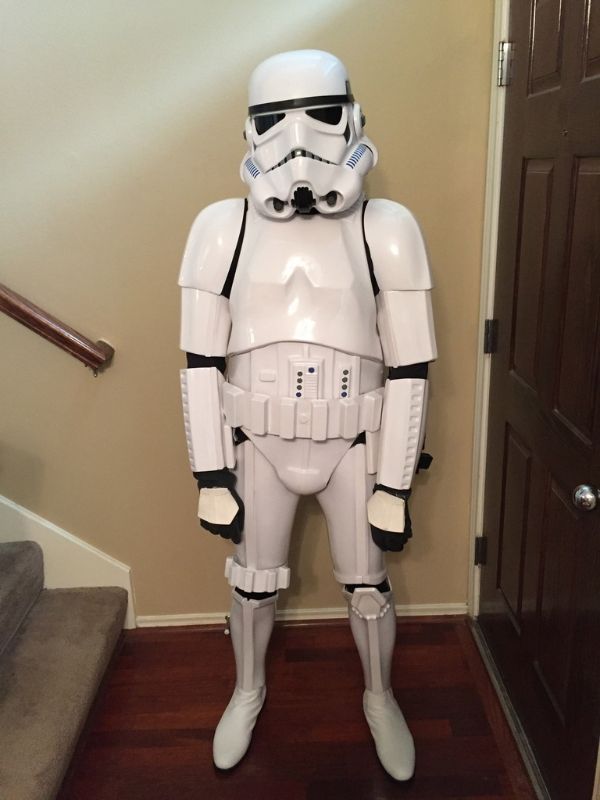
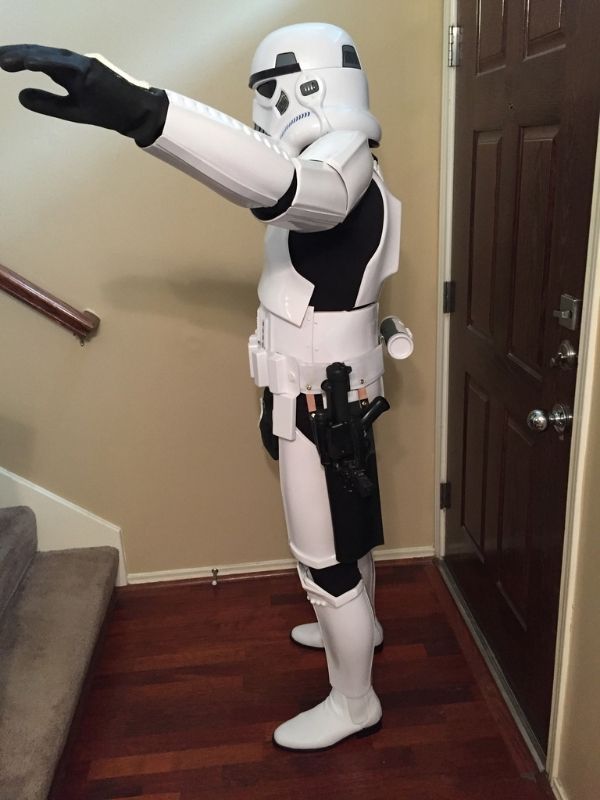
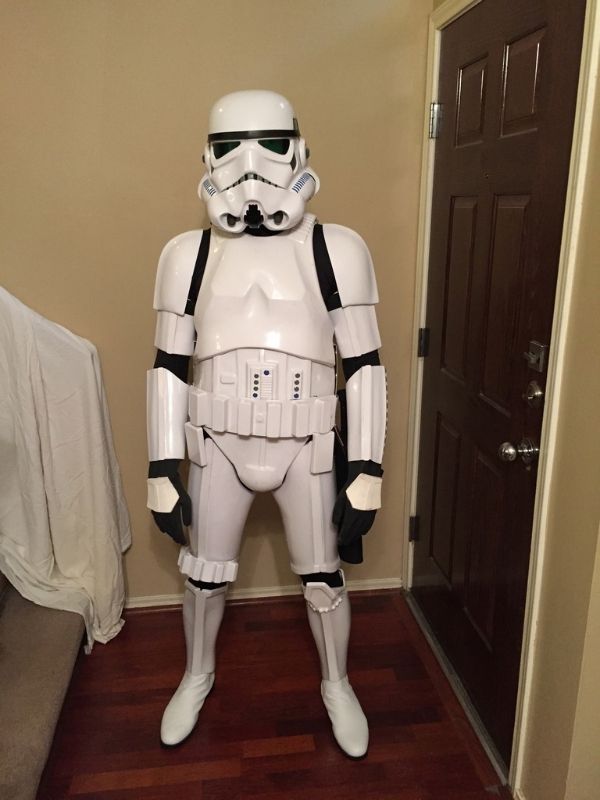
Front - Arms at side
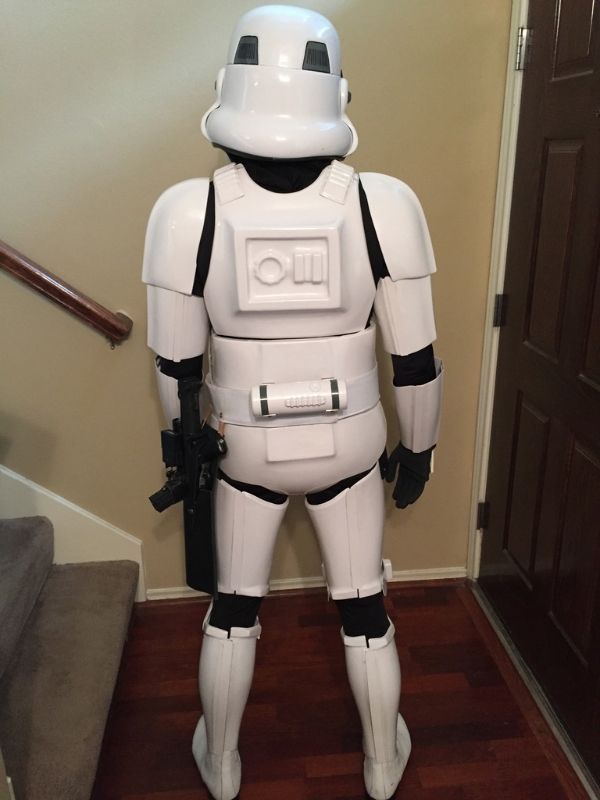
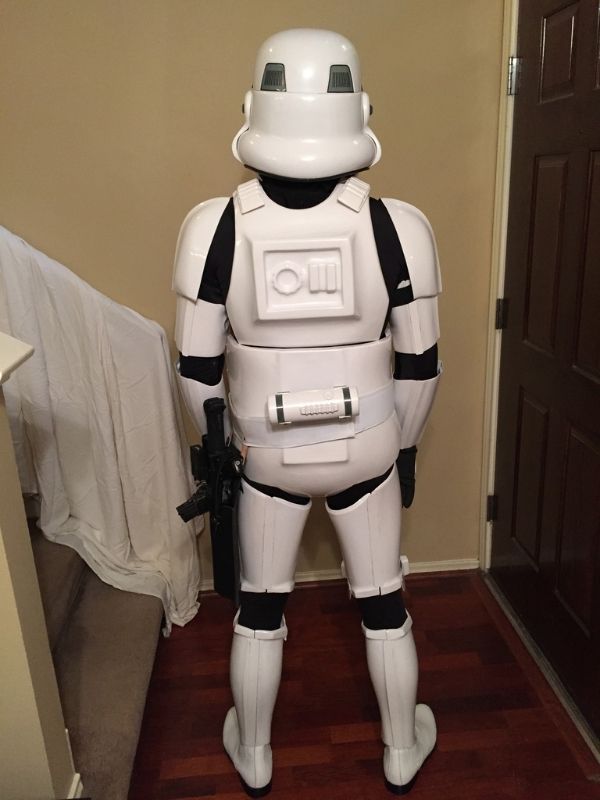
Back - Arms at side
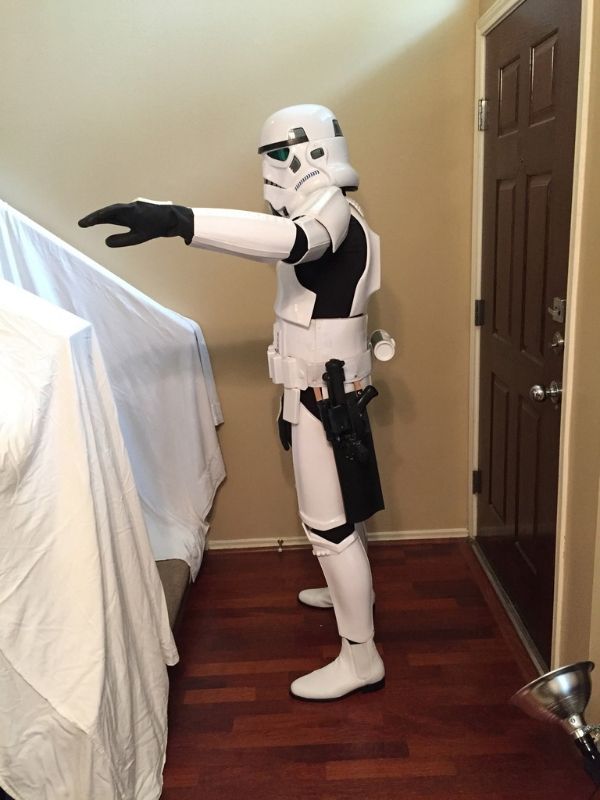
Left - Arm raised
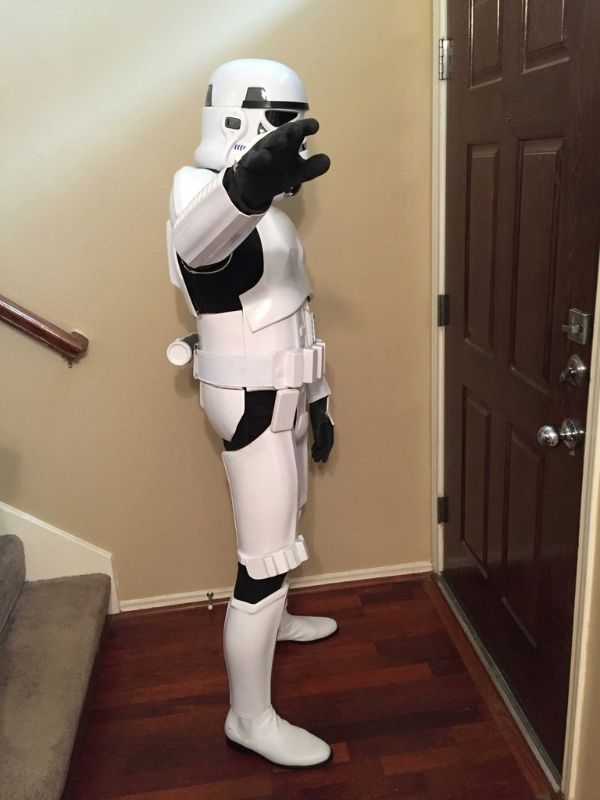
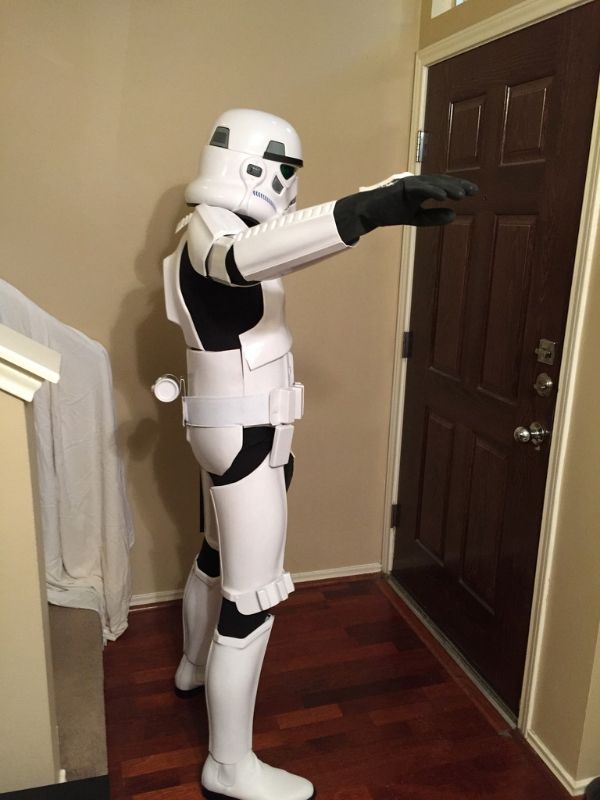
Right - Arm raised
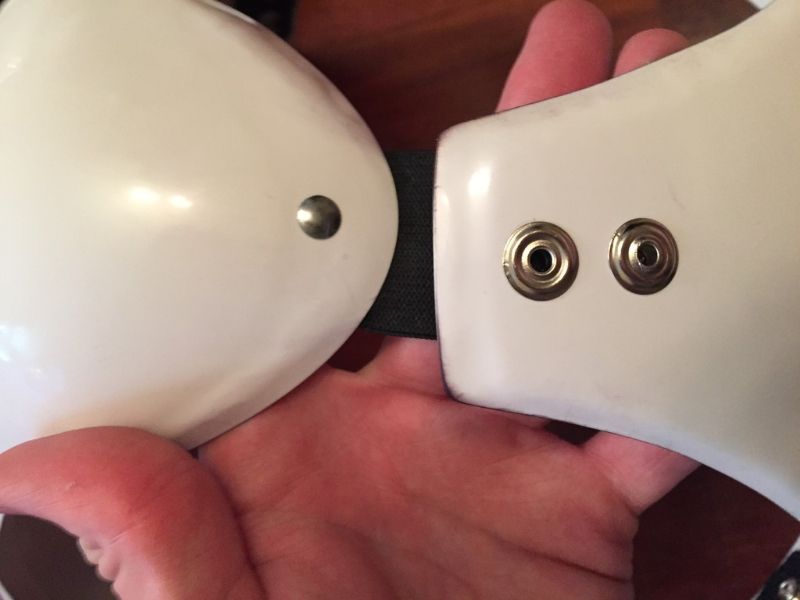
Ab-kidney Attachment - Left
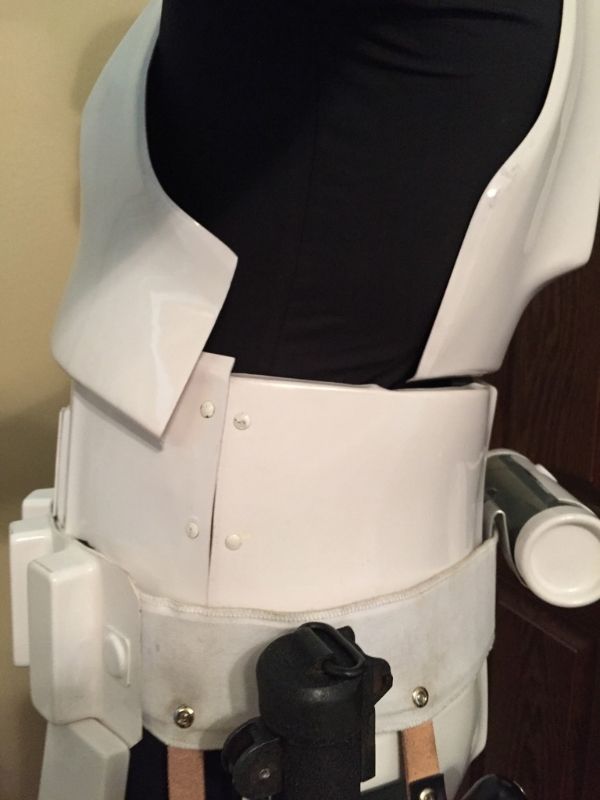
Ab-kidney Attachment - Right
Ab Detail
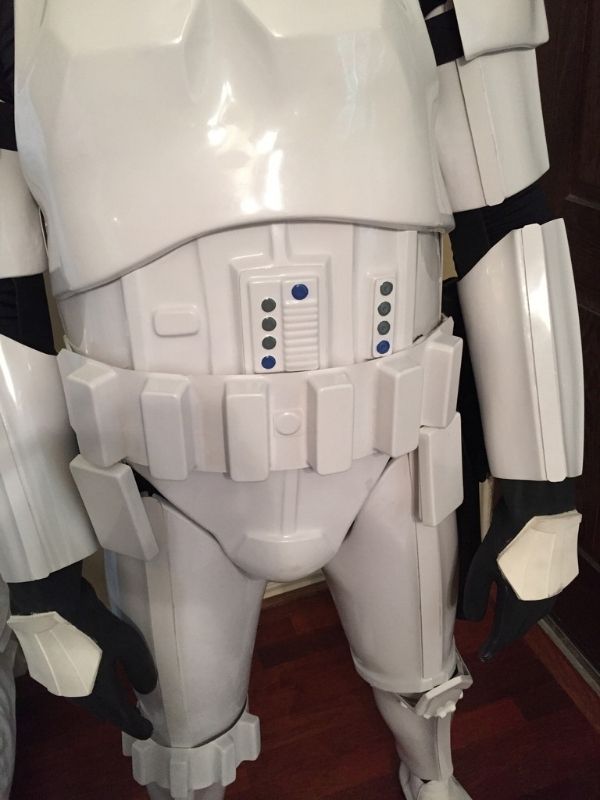
Ab Button
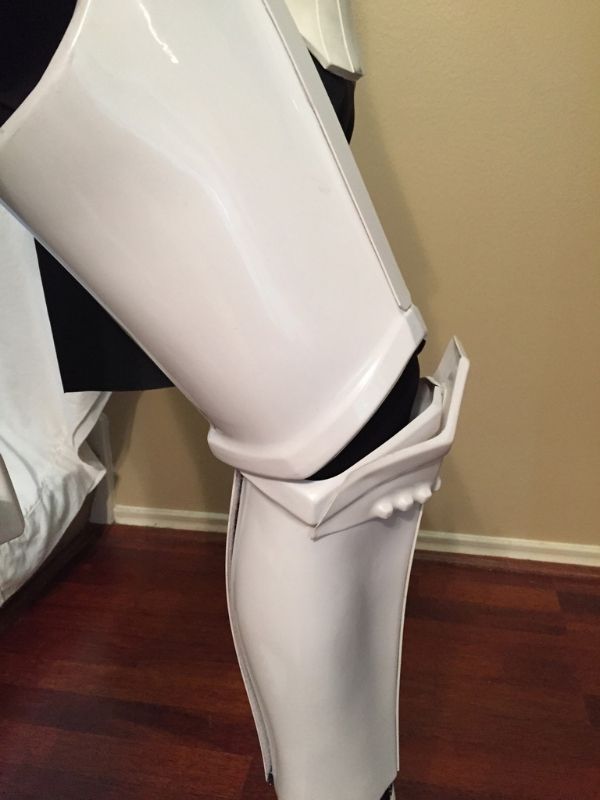
Kidney Notch
Hand Plates
Shoulder Bridge Back
Shoulder Bridge Front
Back/Chest Connection
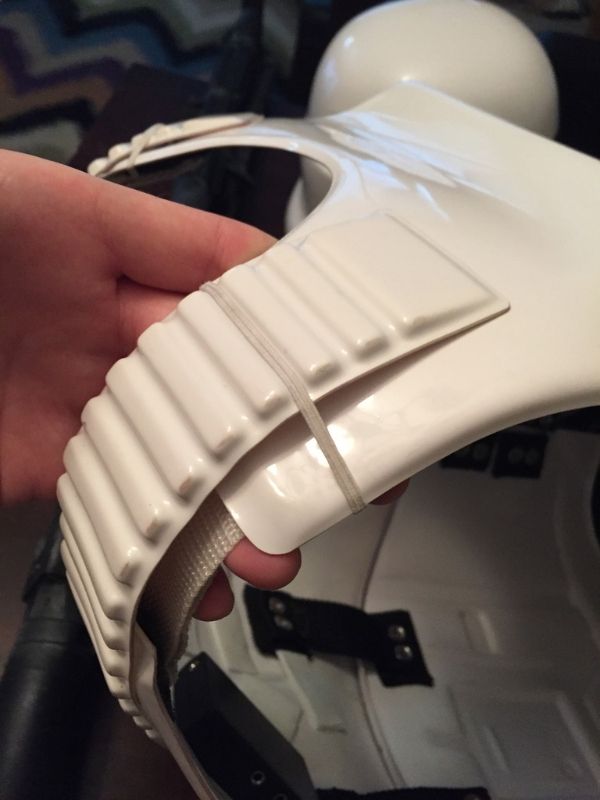
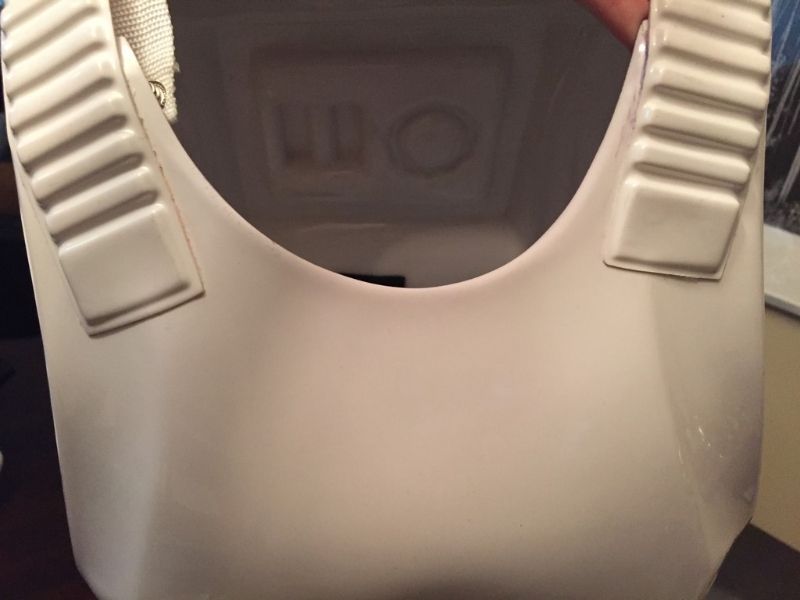
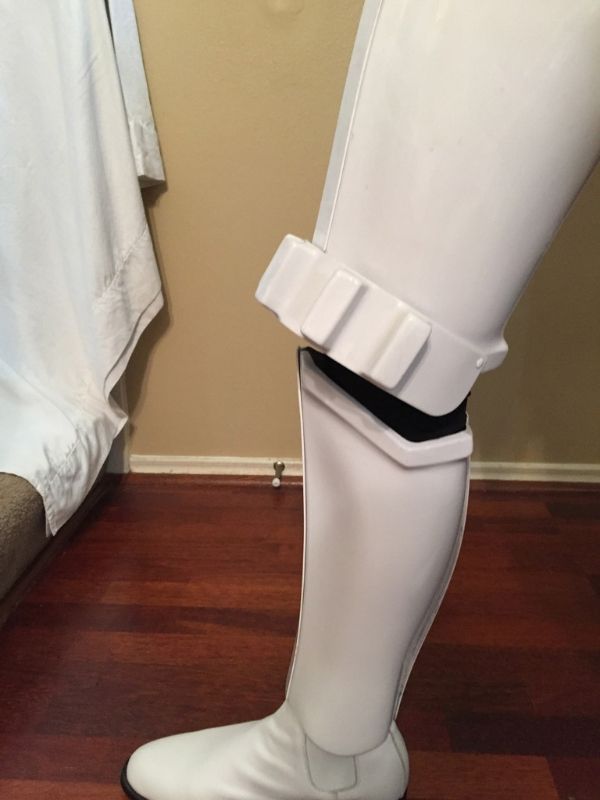
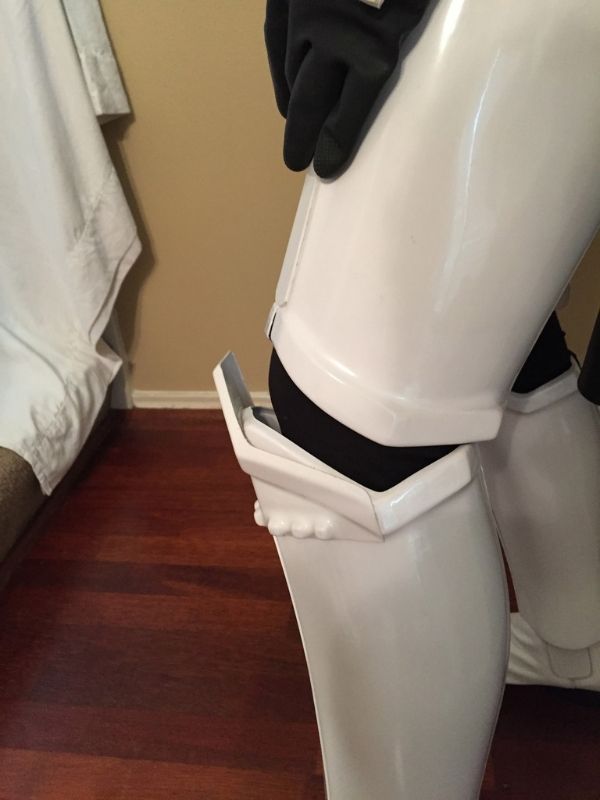
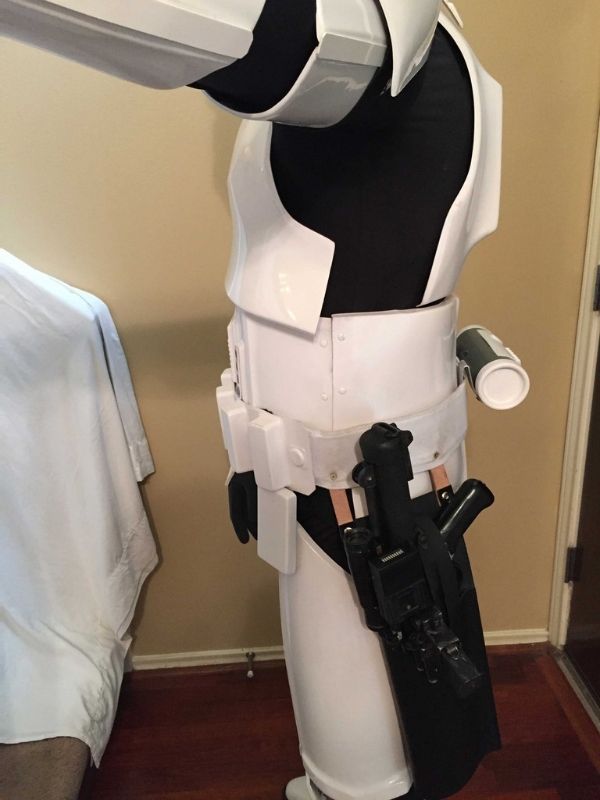
Thigh Pack Attachment - Right

Thigh Pack Attachment - Left
Sniper Plate - Right
Sniper Plate - Left
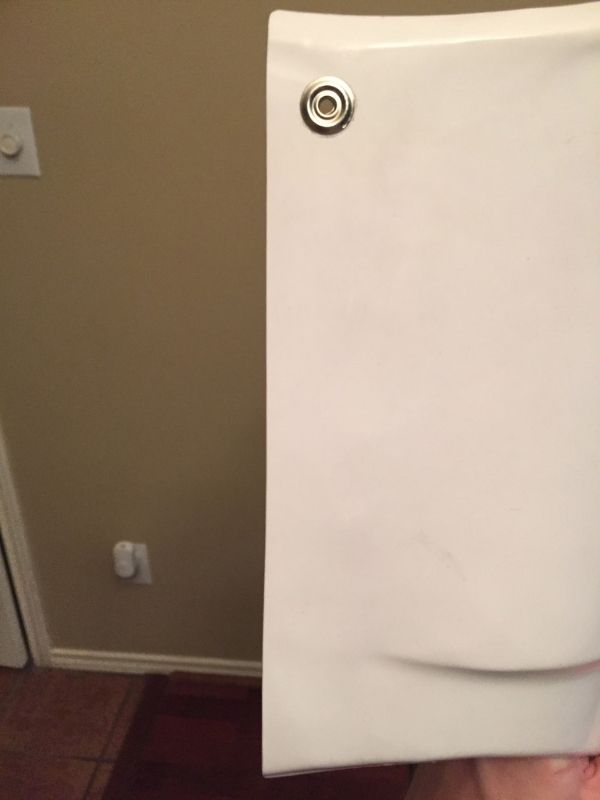
Drop Box Back

Cod-Butt Attachment
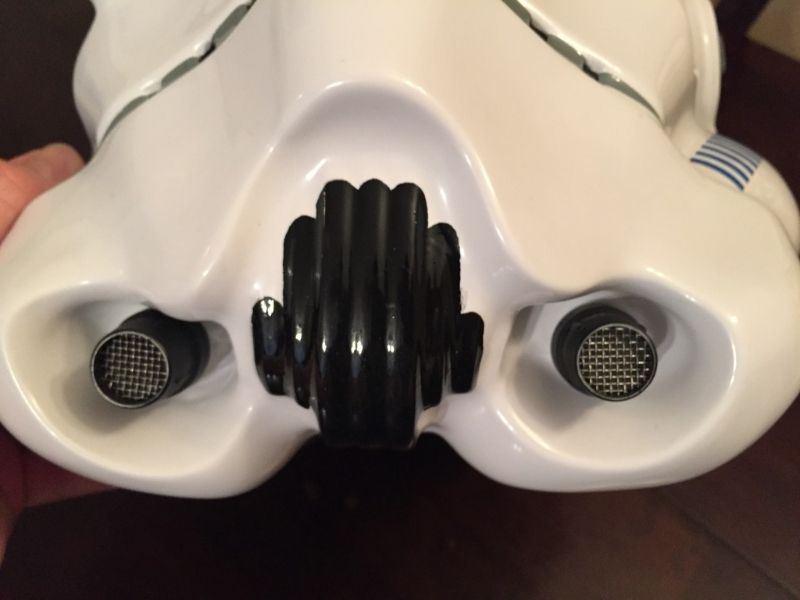
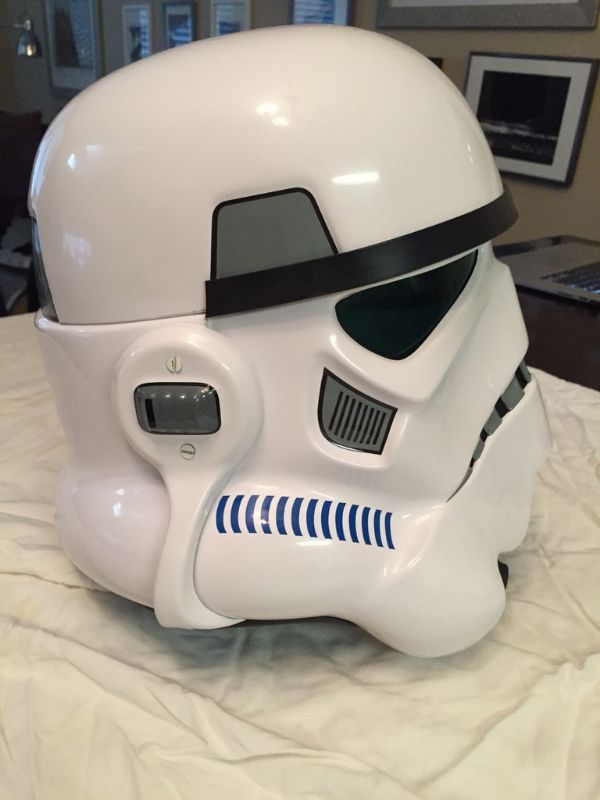
Helmet: Now with hand-painted decals
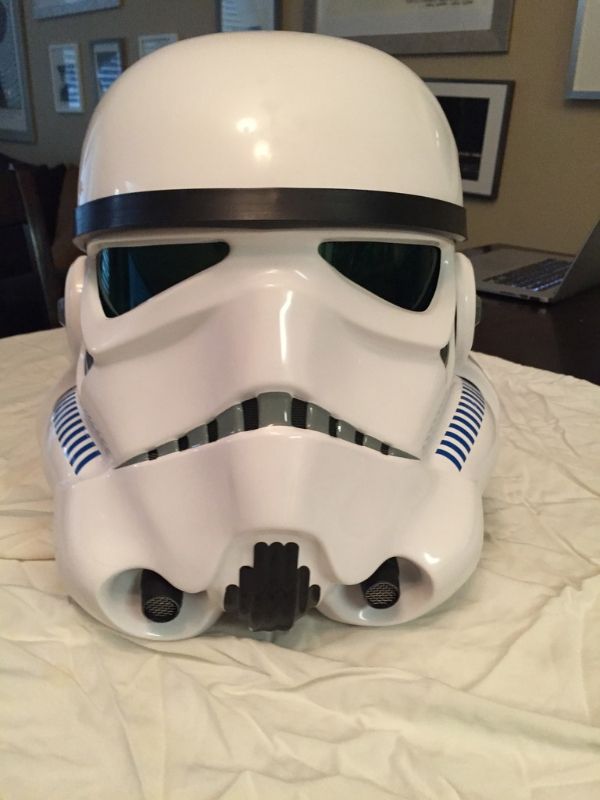
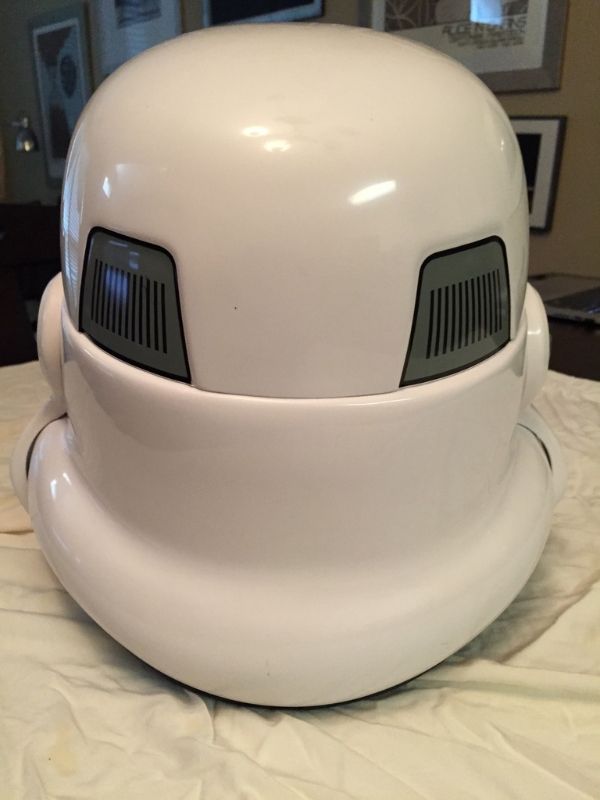
Helmet - Front
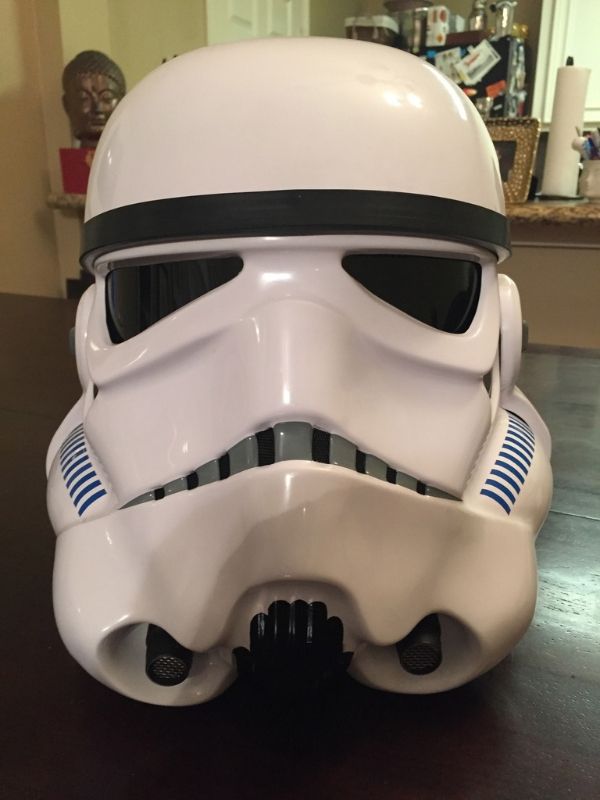
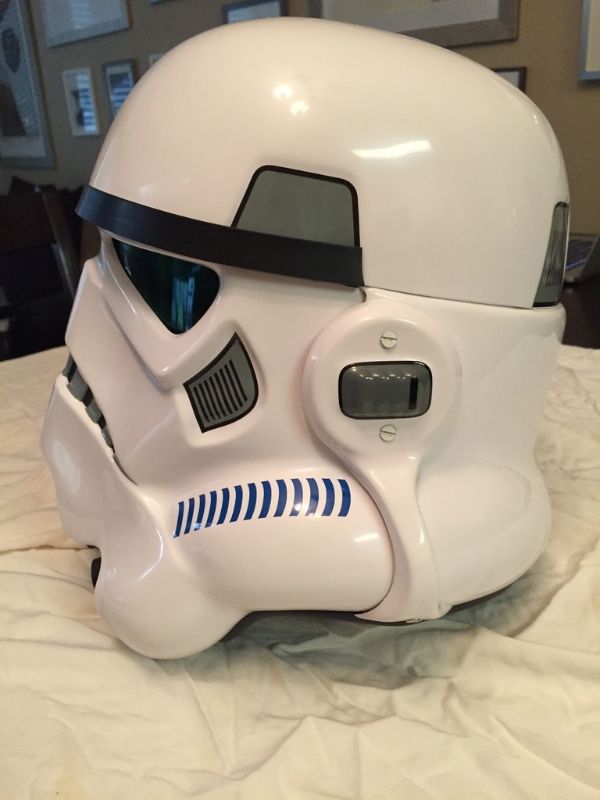
Helmet - Left
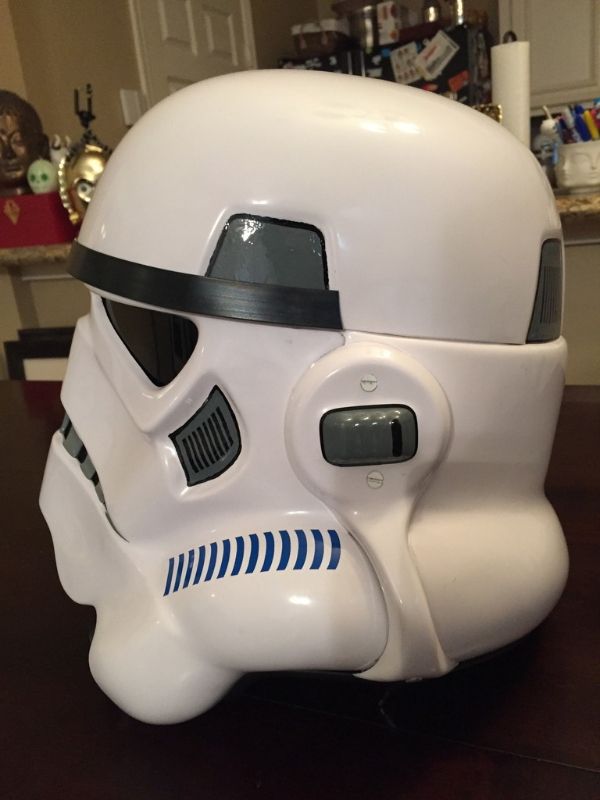
Helmet - Right
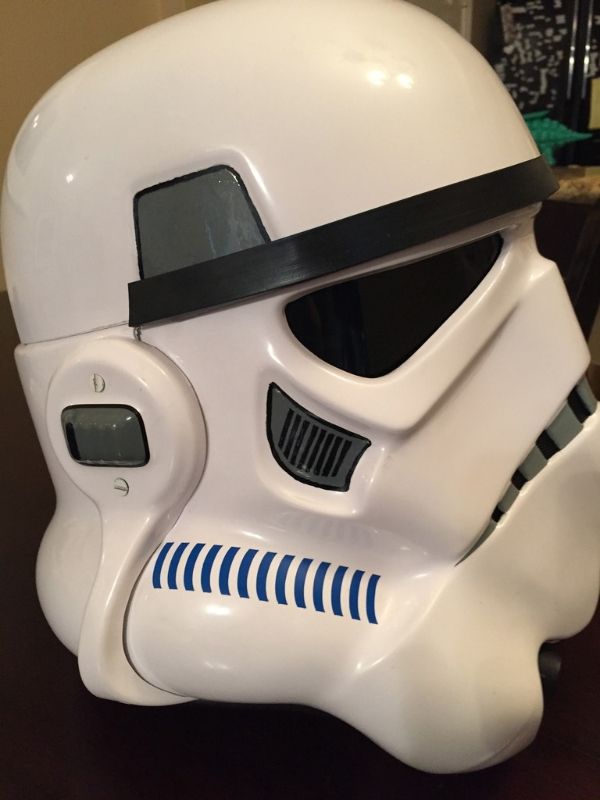
Helmet - Back
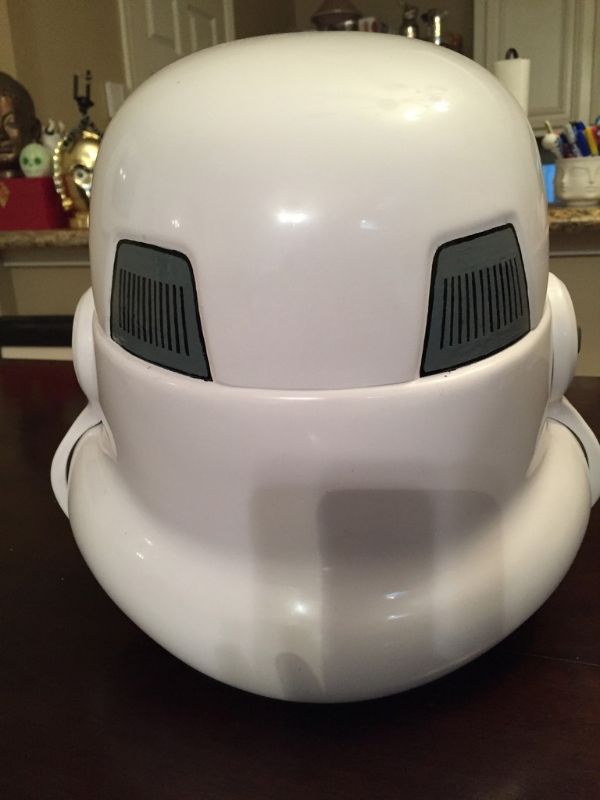
Hovi Tip Detail
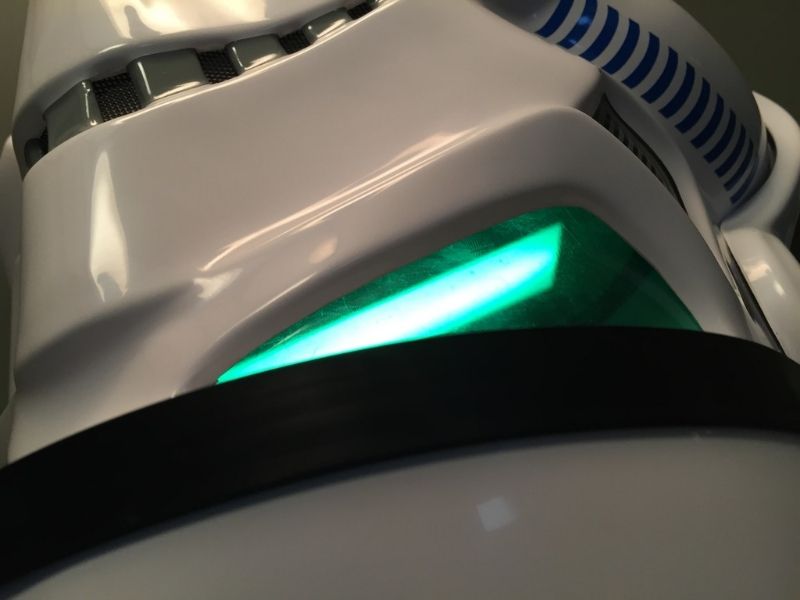
Lens Color
S-trim
Blaster Right
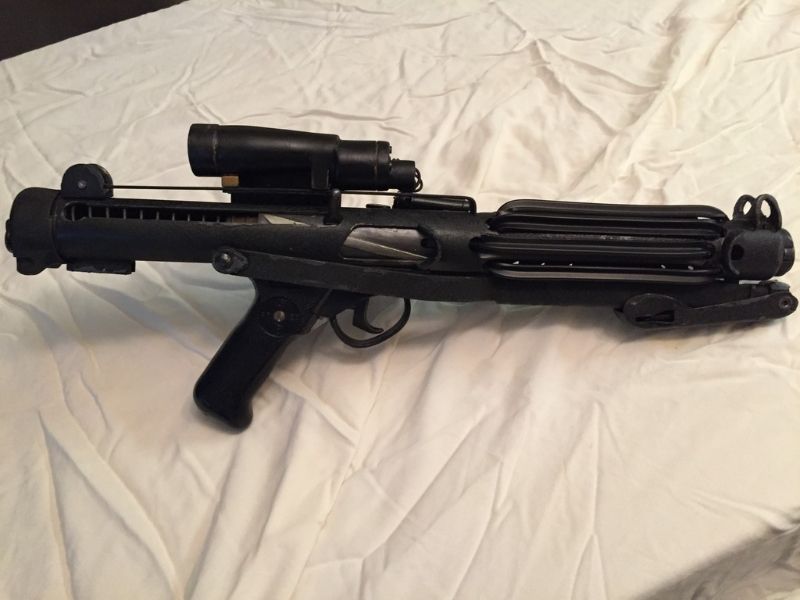
Blaster Left
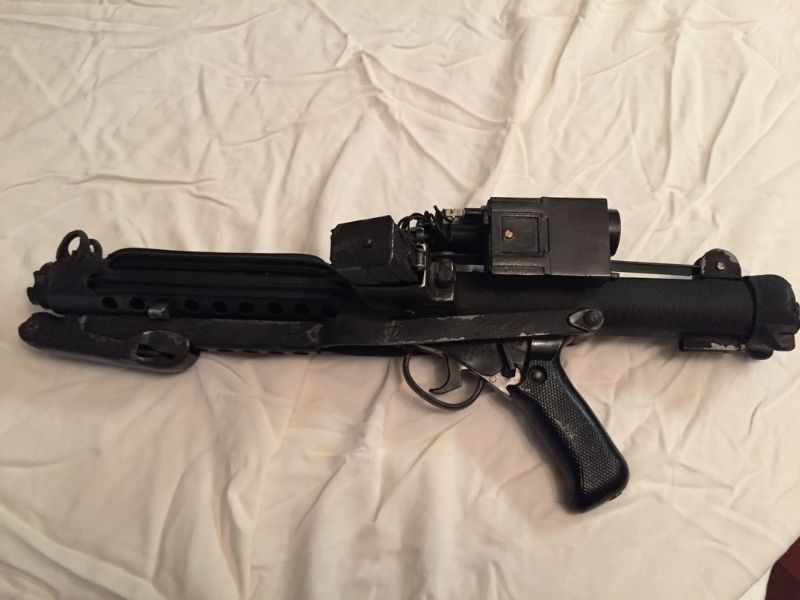
D-ring

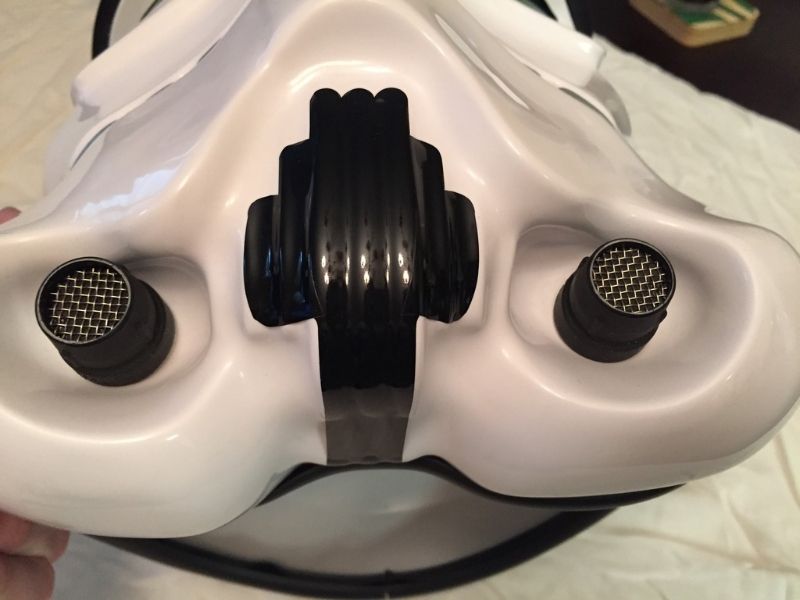
Neck Seal
TD
Holster Attachment
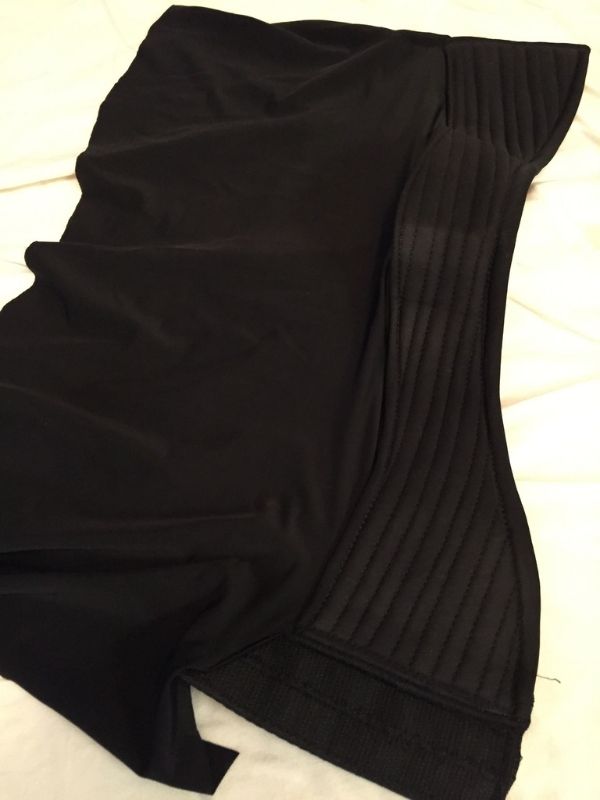
Wrist Side of Forearms

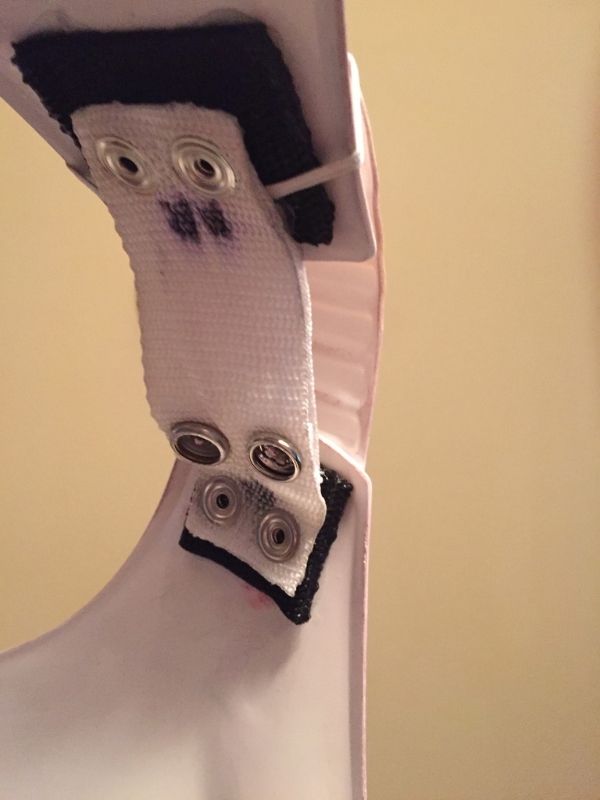
Interior Strapping

Boots
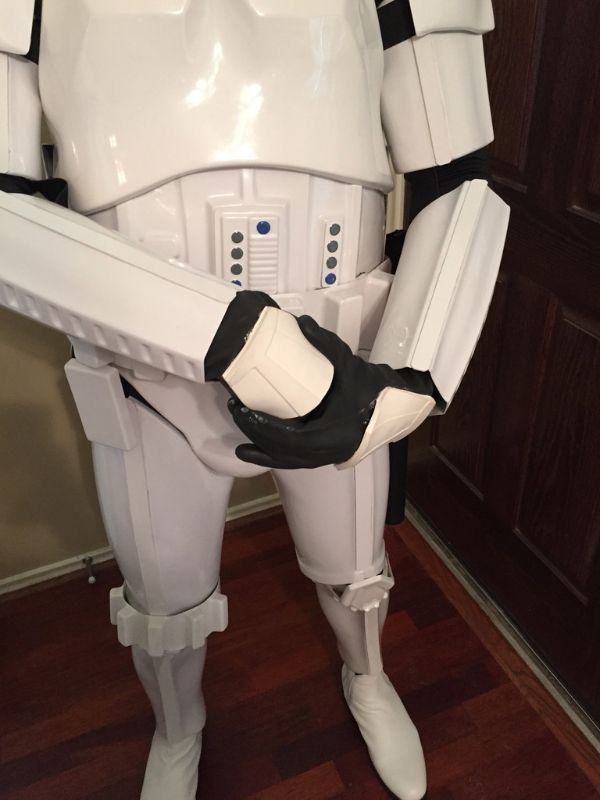
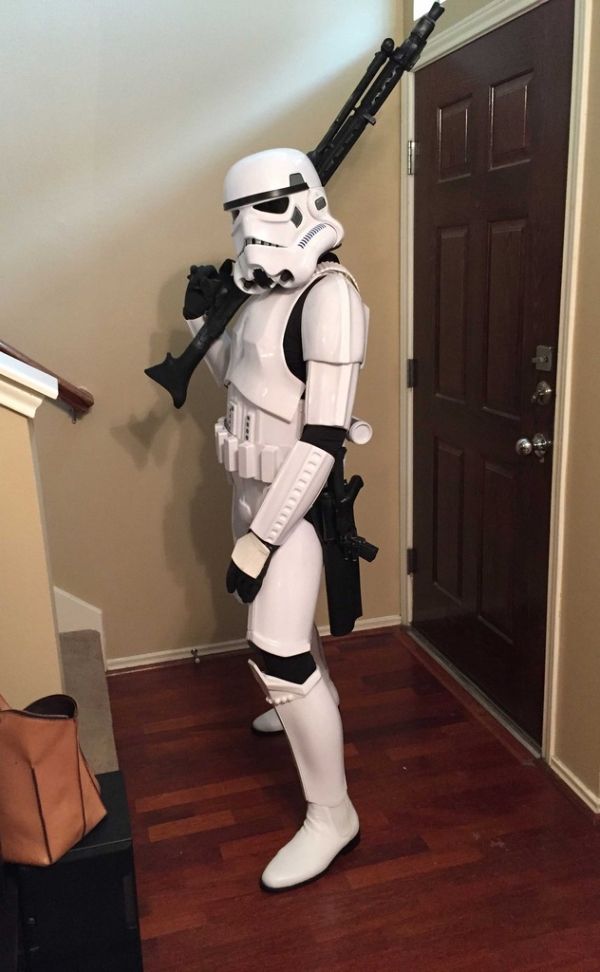
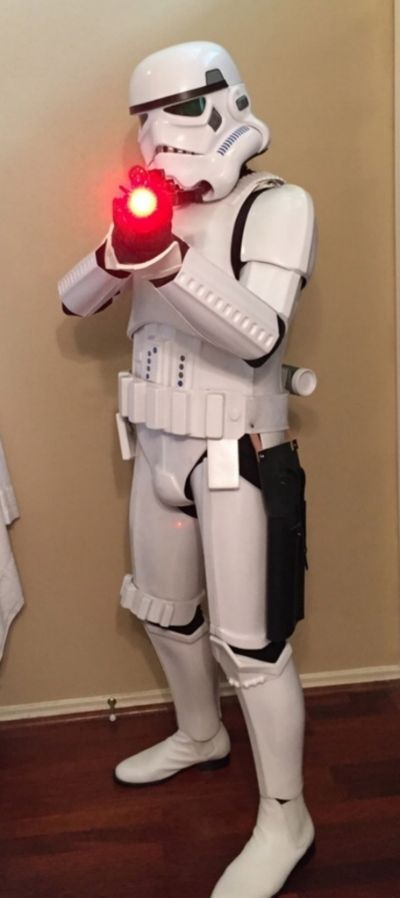
Action Pic
EIB adjustments
I shaved most of the return edge from the shoulder bells and tightened the straps between the shoulders and shoulder bridge to try and bring the bells in towards the chest.
I also lowered the biceps as much as I could and let the forearms out a tiny bit. My arms are unnaturally long, so there are still a few gaps here and there.

I also moved the drop boxes more towards the edge of the plastic belt and glued them in place
-
Looking good!
Tino has a great t-track tutorial in this thread.
It might be tough to paint the joints (after filling) while leaving the rest of the original finish in place, as whichever paint you use may not match the original finish well. If it were me, I would just try masking off the original finish and painting the joints with wrinkle paint. Let it dry and see how it looks. if you dont like it you can always sand the whole thing down and repaint it all. Best of luck
-
1
-
-
Beautiful Build! I love the weathered and chipped crinkle finish! It looks just like the finish on my original Sterling parts, only even more weathered.
Fantastic job on the electronics/wiring too, that must have been a real challenge, but it came out amazing.
Well done!
Thanks, Jon. It looks like you're gearing up for a nice sterling parts build yourself!
-
Awesome. Thanks! I'll work on these things before I submit for centurion.
-
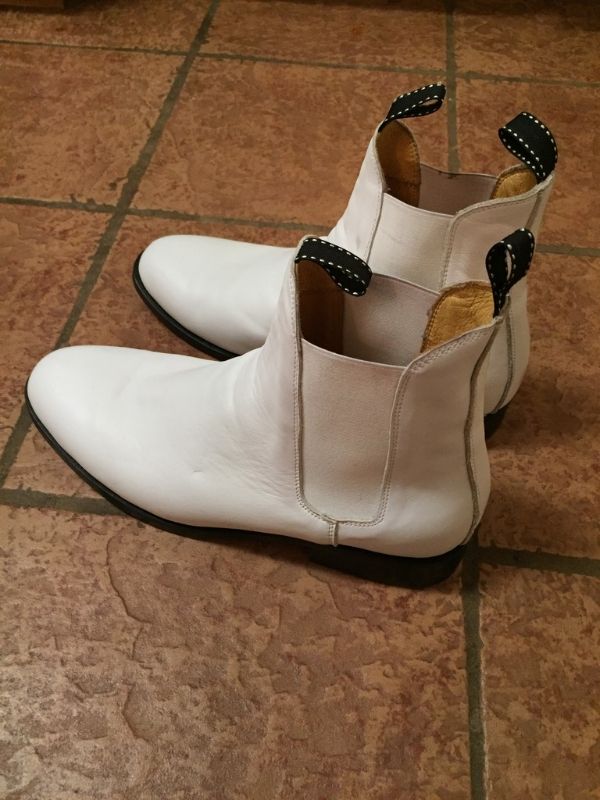
Added boot pics, too
-
I've added in the code/schematics for posterity (page 3). This thing is fun to troop with! A bit heavy though.
I'm really wanting to do make some BFGs in the near future (T-21? RT-97c?) I think I may have to go sandy/HWT at some point. Cheers
-
Here's the D-ring. Also added to the original post. Thanks.
-
Great looking build, Sean, and glad to see you went with the double-snap system! (You won't regret that extra work, I promise). If you find that the tops of the thigh armor are too high and rub on the cod piece (or tend to chafe), you can remove all the return edges (front and back) and lower the front. This will make things a bit more comfortable. Also, fantastic work on that blaster!
Thanks, Joseph. Good idea on the thigh tops.
-
Name: Sean Barber
Forum Name: Count Chocula
Garrison: Star Garrison [sTX squad]
Height: 5' 9"
Weight: 165lbs
501st profile: http://www.501st.com/members/displaymemberdetails.php?userID=21742
Armor: MTK
Helmet: RT-Mod
Boots: Imperial Boots
Canvas Belt: TrooperBay
Handguards: TrooperBay
Neck Seal: Darman
Holster: Darman
Electronics: none
Blaster: doopydoos pipe custom (thread)
Front - arms at Side
Back - arms at Side
Left - arms raised
Right - arms raised
Right Side Detail - arms raised

Left Side Detail - arms raised
Abdomen Detail

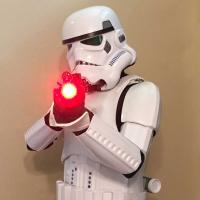
Action Shot
Cod-Butt Attachment
Interior Strapping
Helmet - Front
Helmet - Left side
Helmet - Right side
Helmet - Back
Hovi Tip Detail
Lens Color
Blaster - Left
Blaster - Right
Blaster - D-ring
Neck Seal
Thermal Detonator - Front
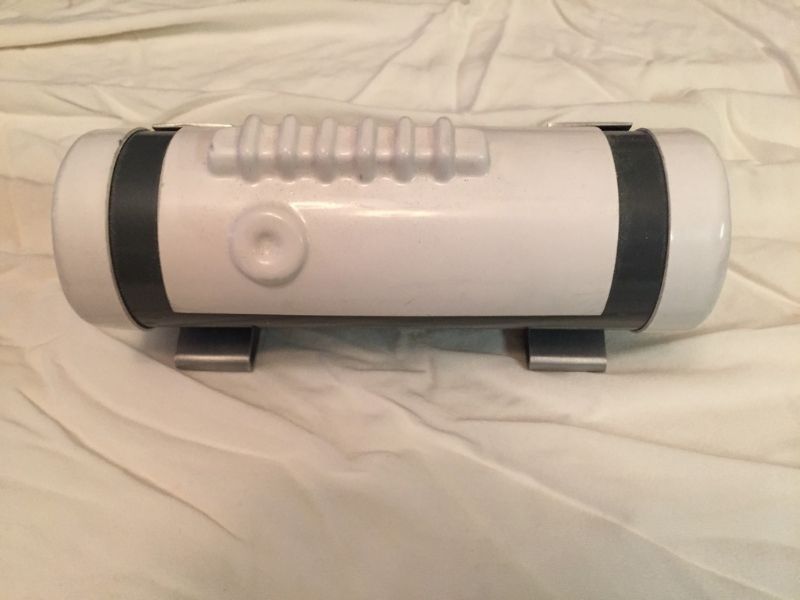
Thermal Detonator - Back
Holster Attachment

Boots
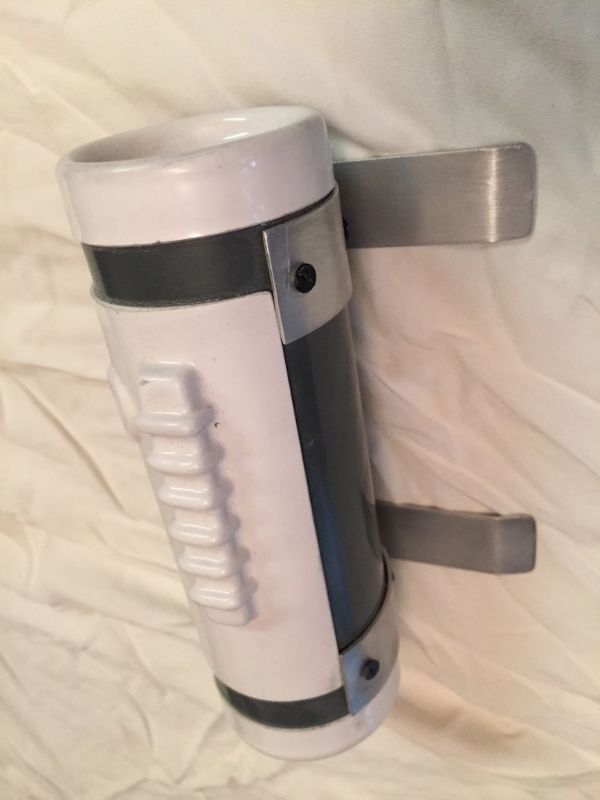
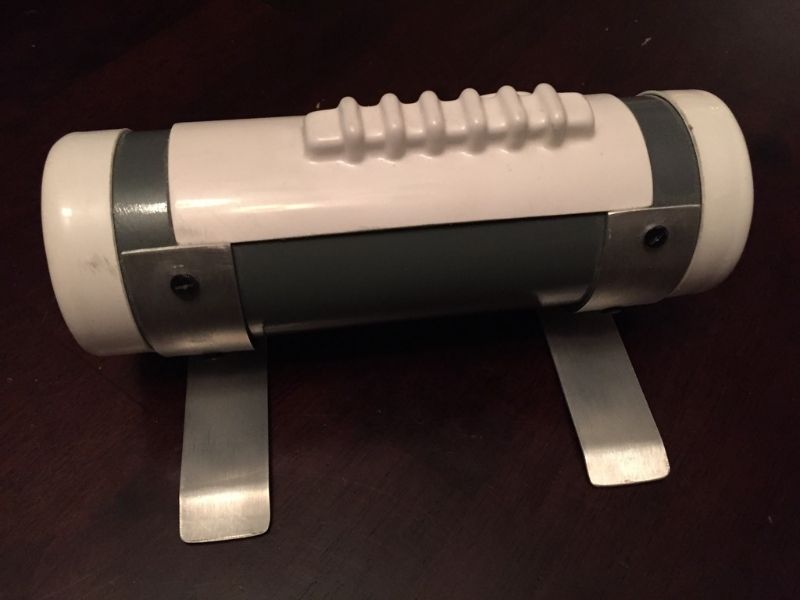
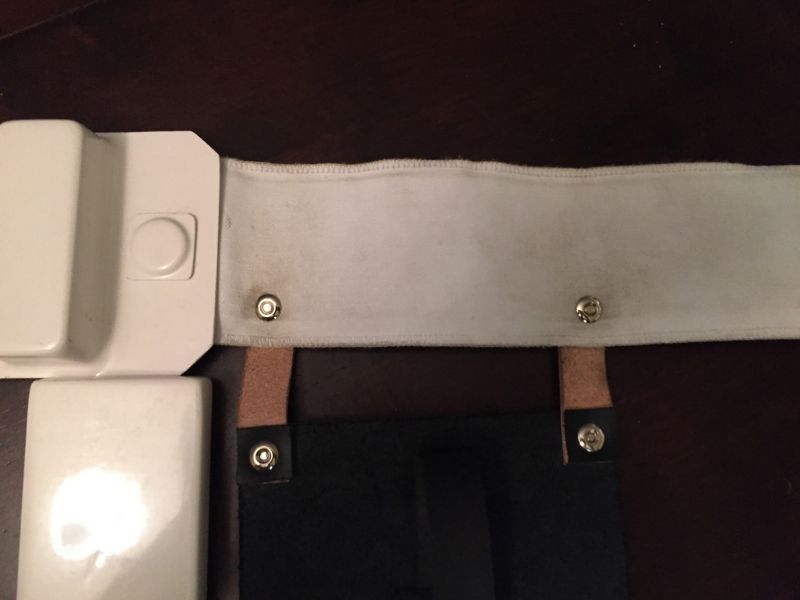
Wireless Microphone Headset
in Electronics for Helmets / Blasters
Posted · Edited by count chocula
I've been trying for months to get a reliable wireless setup going but to be honest I'm considering going wired. I have one of the units from this thread (and have tried several other wireless setups, some pretty costly), and when it works it works well, but the attachment from my romFX to the wireless receiver in my chest is VERY touchy. I have to fiddle with it (rotating the cable input to the receiver/removing and re-inserting it) for 10 min before every troop to get it working, then try to tape it down in that position. I may just have a shoddy unit. I should probably just find a spot that works and glue them together...
Also, it seems like my mouth needs to be as close as possible to the mic to get any output. Sometimes the only way I can get audio is if I actually put it partially in my mouth. This is with the mic volume all the way up. Not sure what I'm doing wrong. I may just need to try fiddling with the settings more. I really don't want to go wired, but I hate worrying about whether I will have a mic or not on troops.
Oh, and for anyone getting hum from wireless interference, try wrapping the receiver in aluminum foil. It worked for me.