


Ruthar
-
Posts
282 -
Joined
-
Last visited
Content Type
Profiles
Forums
Gallery
Articles
Media Demo
Posts posted by Ruthar
-
-
Congratulations, sir! :)
-
 1
1
-
-
22 hours ago, gmrhodes13 said:
Very nice Kris, I ended up finding some pants of similar glossy material and cut them down to shorts which I wear over my two piece undersuit, I do find that the glossy finish can rub off over time so I don't wear them all the time, mainly for higher profile troops
")
Most definitely - my cod piece and tops of the thighs have pretty much destroyed the glossy part. It's all hidden beneath the plastic, but it doesn't look great on it's own!

Great method with creating the shorts, I might have to copy you there!
-
2
-
-
11 hours ago, Straycatt said:
Thank you for posting such a detailed build. Reading through your build gave me the confidence to start cutting on my KB FOTK armor ...
You're very welcome!
") If you have any questions as you dive in, don't hesitate to ask!
If you have any questions as you dive in, don't hesitate to ask!
-
1
-
-
Awesome work! Congrats on the approval - well deserved!
-
1
-
-
18 hours ago, Cpt. Phasma said:
So much information! Thank you for providing such a detailed overview of the process, with pictures too! I'm a costume newbie looking to build a lv3 Captain Phasma for 501st approval as my first ever build, so any highly detailed information about the actual building process is MUCH appreciated. Definitely worthy of a bookmark!
You're very welcome, happy to help!
That's quite a tall order for your first build, but I hope you have a blast getting it all together!
-
7 minutes ago, Daetrin said:
You also look vaguely familiar ;-)
http://databank.501st.com/databank/Costuming:TK_anh_hero
If you guys weren't aware, Gareth did such an outstanding job that we asked him to be the new CRL model.
Well done Gareth!


Fantastic - certainly well-deserved!
-
8 hours ago, Peregrinus said:
Was planning to. And thanks for the advice.
Of course - always happy to answer any and all questions! That's what we're all here for, after all.
-
8 hours ago, Peregrinus said:
Have you checked out Scorpion's EXO helmet size chart? I'm on the cusp of M and L, depending on how things fit.
I don't think you need to be as concerned as you think - you're going to be stuffing the liner into a helmet, so the shape and fit will not be nearly as accurate as it would going into an actual motorcycle helmet.
4 hours ago, Harbinger said:I need a liner for my forthcoming FOTK too. May be time to start a new thread?
Yeah, I would definitely prefer that if you guys don't mind just so we can keep the thread on track.
-
Hi, Jonah;
Those were the liners I originally used on a few of my kits - they are great liners! I actually found the ear caps to be especially useful for getting a firm fit.
I don't actually need any right now myself, but if you were to buy the lot I would definitely buy some off of you as I am sure other troopers would! By my math, each liner would come out to $2.85 (total cost divided by 42), but I'd be happy to pay at least $10 per liner which is still significantly less than Amazon.
Great find!
-
1
-
-
Marvelous work!
I've always enjoyed the look of the promo trooper - so cool to see it come to life.
-
1
-
-
Yeah, other than 3D printing, waiting is all you can do I’m afriad. :/
-
6 hours ago, lucnak said:
That is super helpful and exactly what I was looking for! You're the best!
No problem - happy to help!
-
1
-
-
2 hours ago, lucnak said:
Hi Taylor, I may have missed it though I looked through the thread for it, how did you trim the belt boxes? KB's boxes insert into each other, so how did you decide how deep to make them? There's no visible mould line, unfortunately. Measurements of depth/photos would be suuuuper appreciated! Thanks.
Hi, Luc!
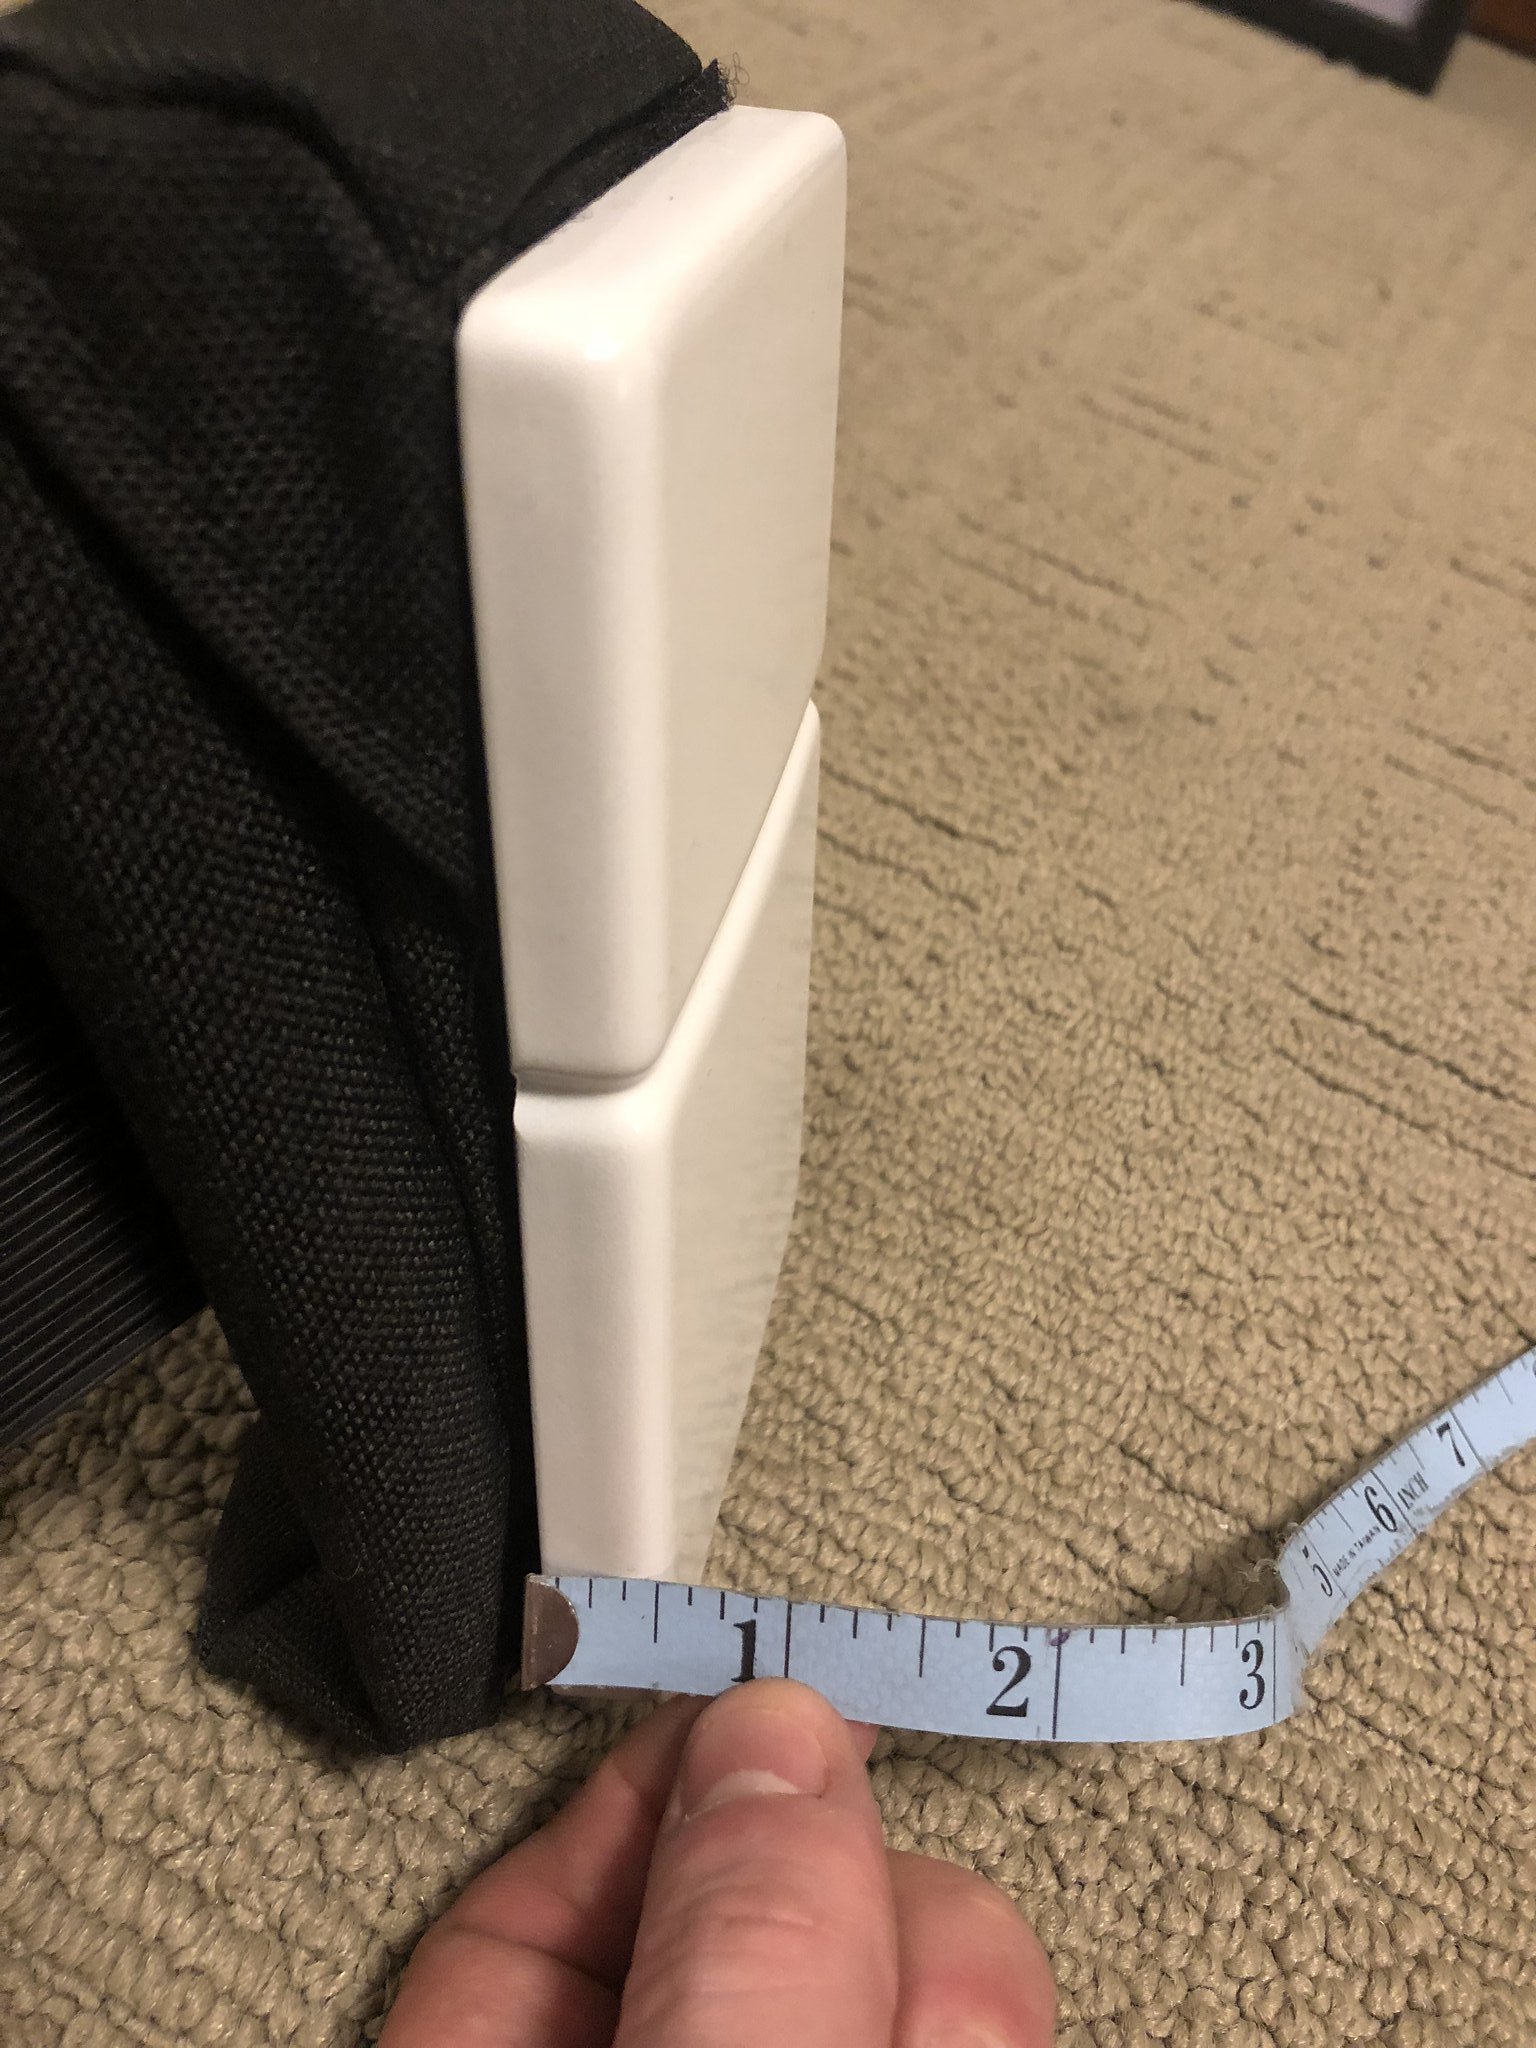
I just looked through my posts again and noticed that this information is missing - sorry about that! Here are the belt box measurements that I went with.
The plate that is velcroed to the large pouch is 1/2" thick.
Untitled by Taylor Goodson, on Flickr
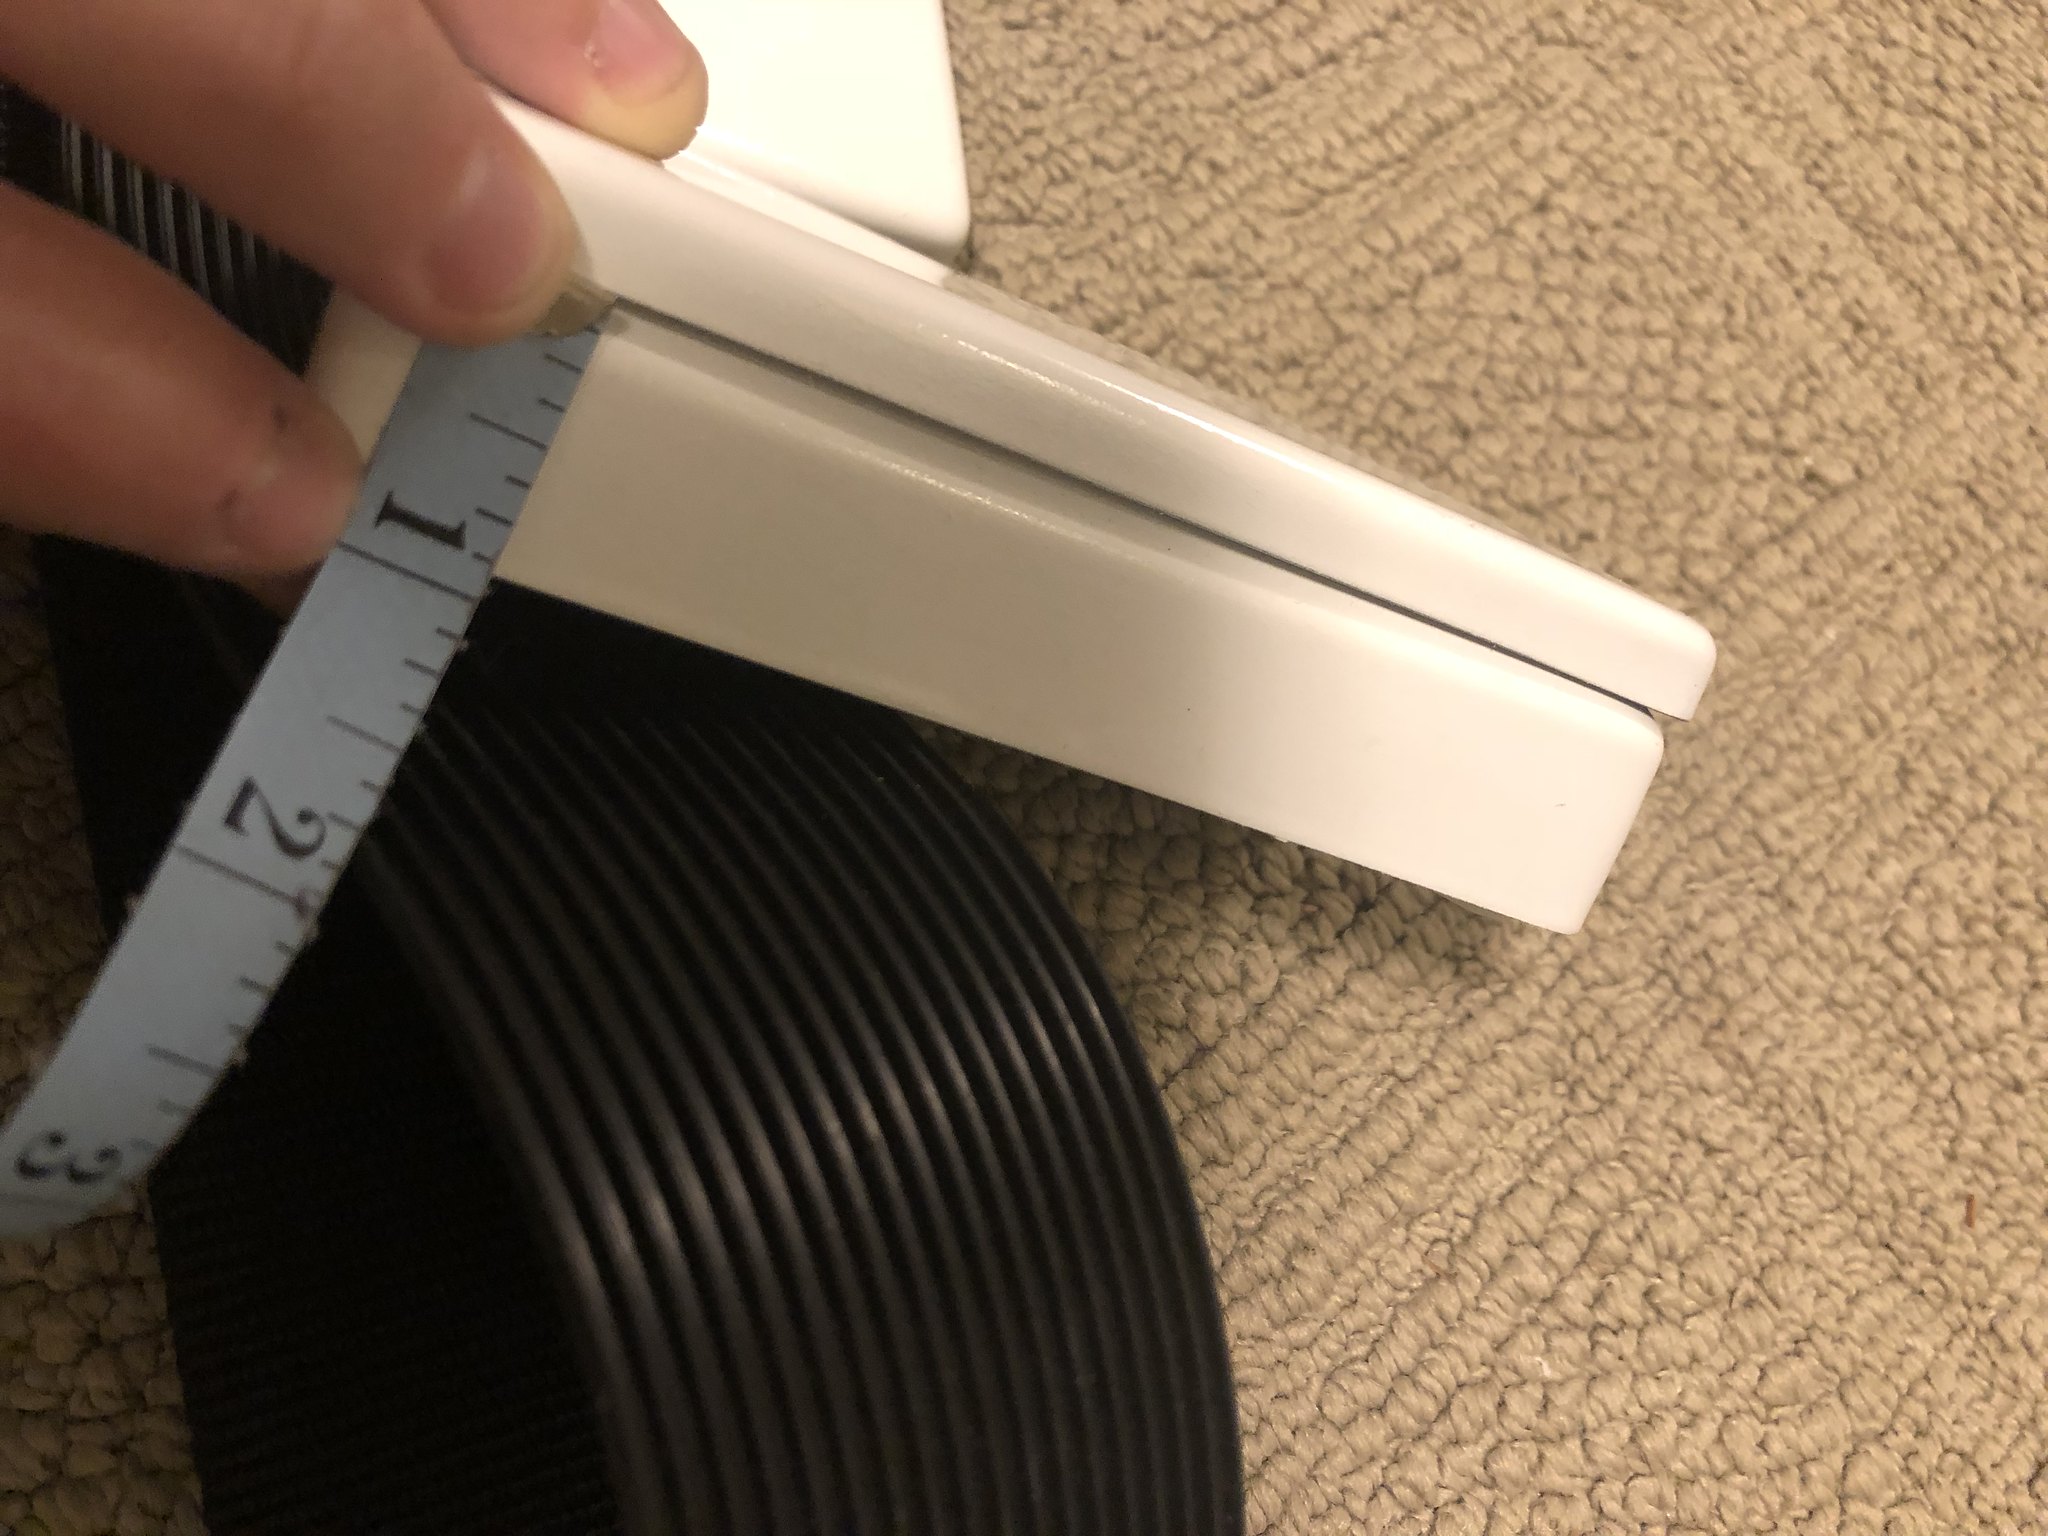
The three-piece box has a base of 1" thick.
Untitled by Taylor Goodson, on Flickr
The top/faceplate of the three-piece box is 3/8" thick.
Untitled by Taylor Goodson, on Flickr
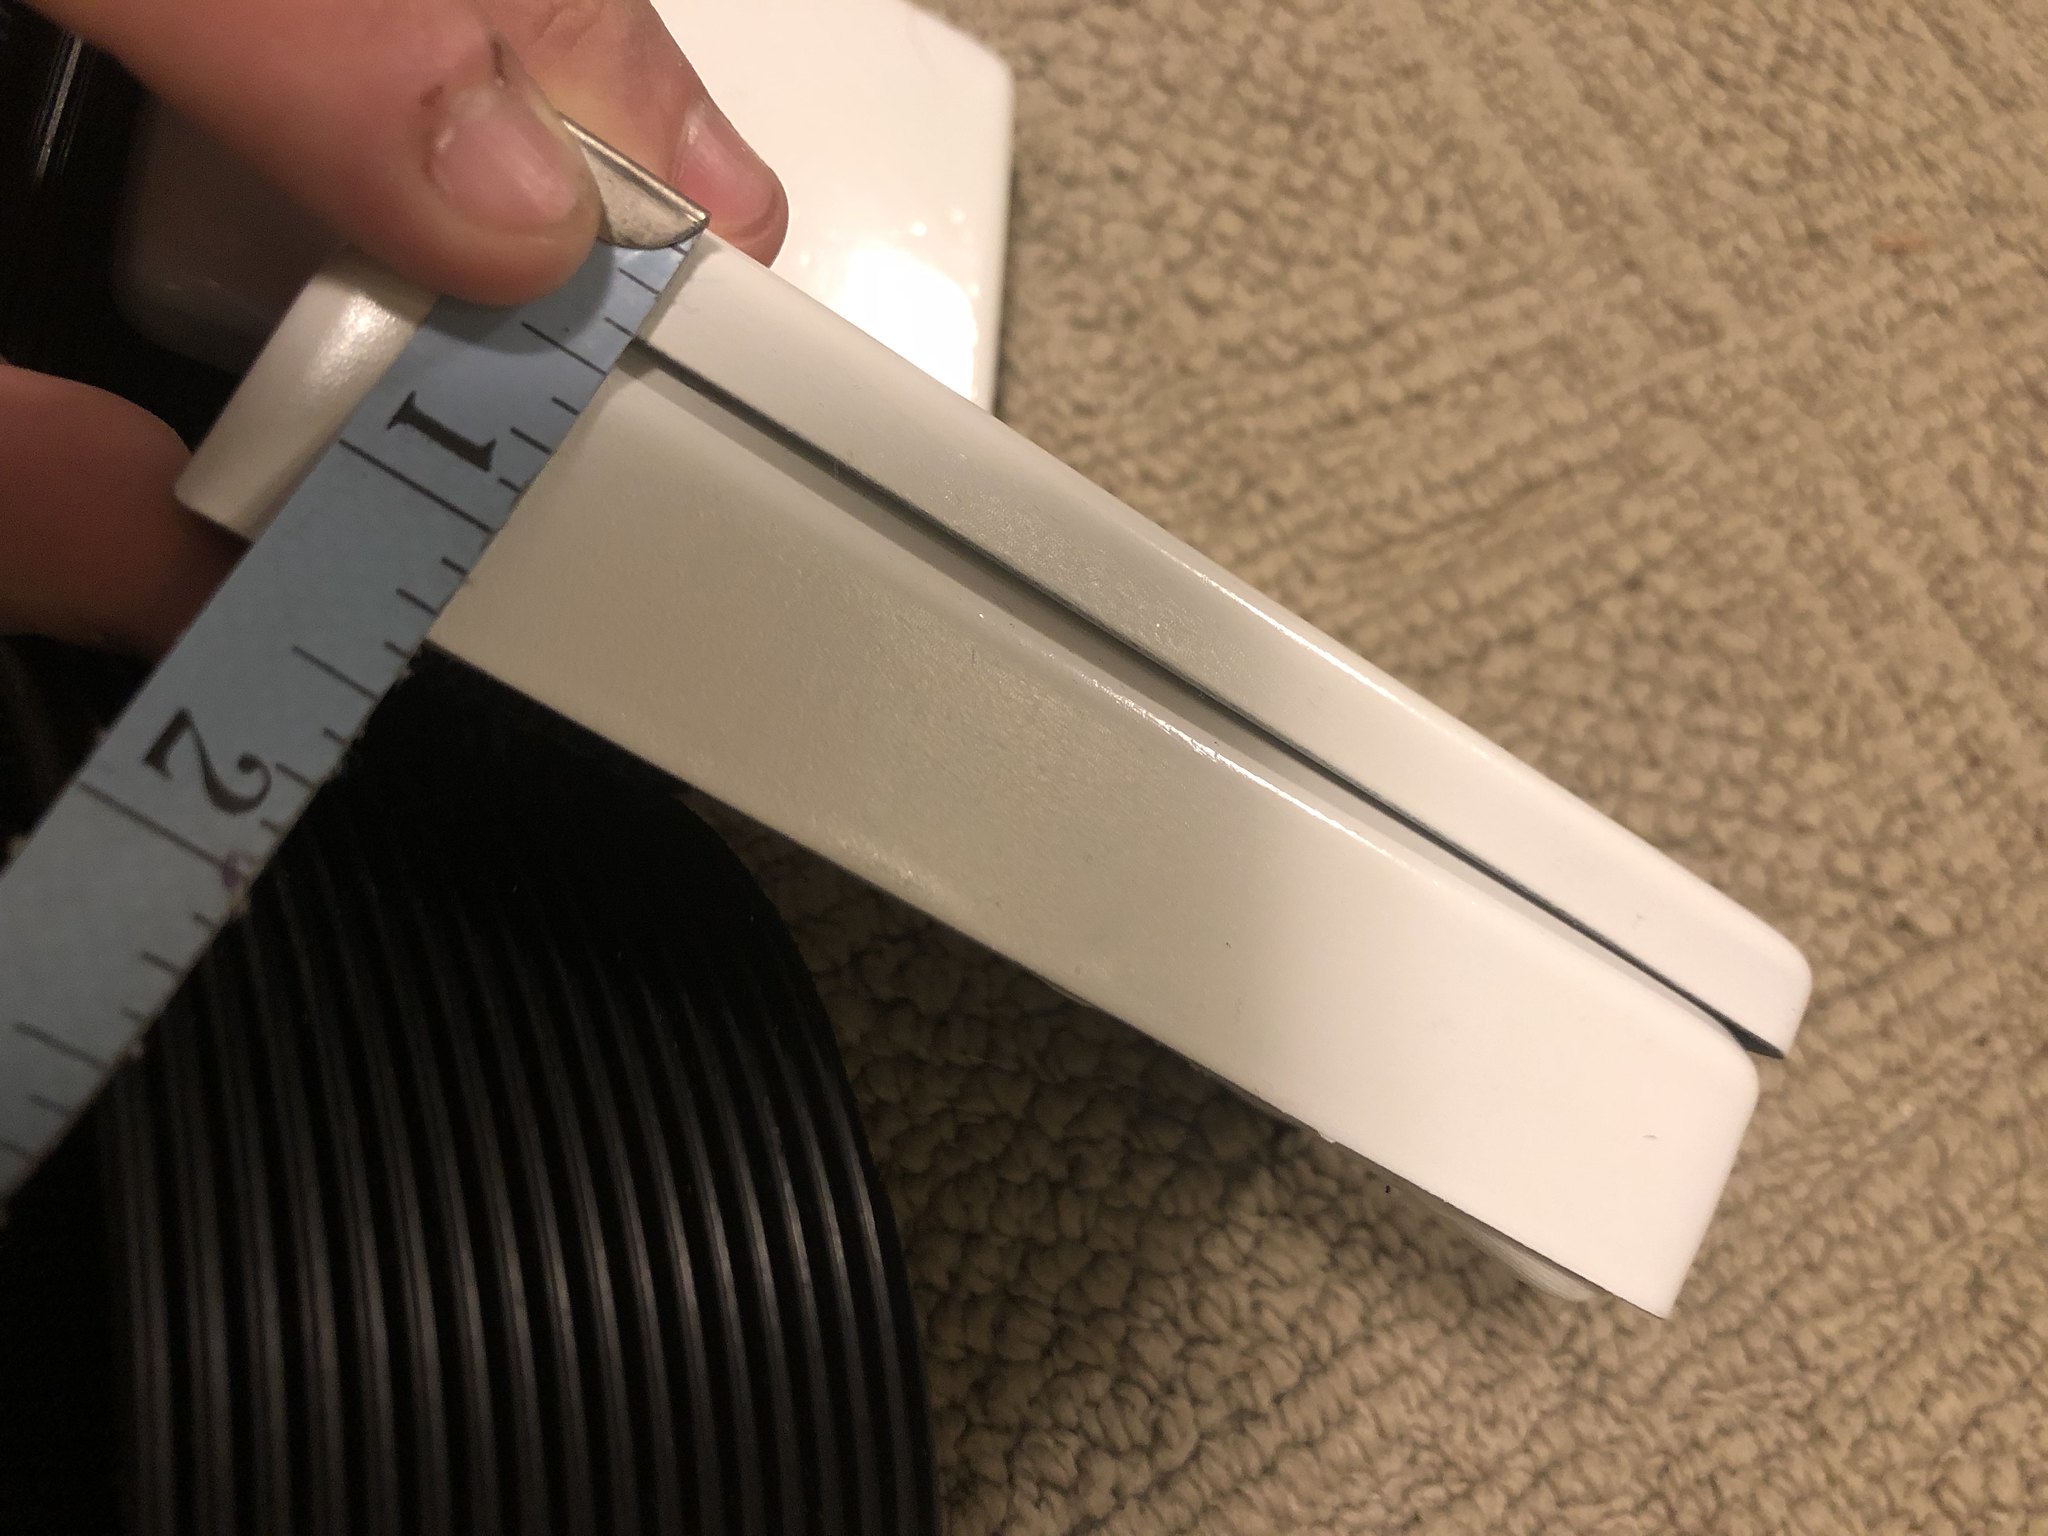
The smaller, squarer box next to that is 1/2" thick.
Untitled by Taylor Goodson, on Flickr
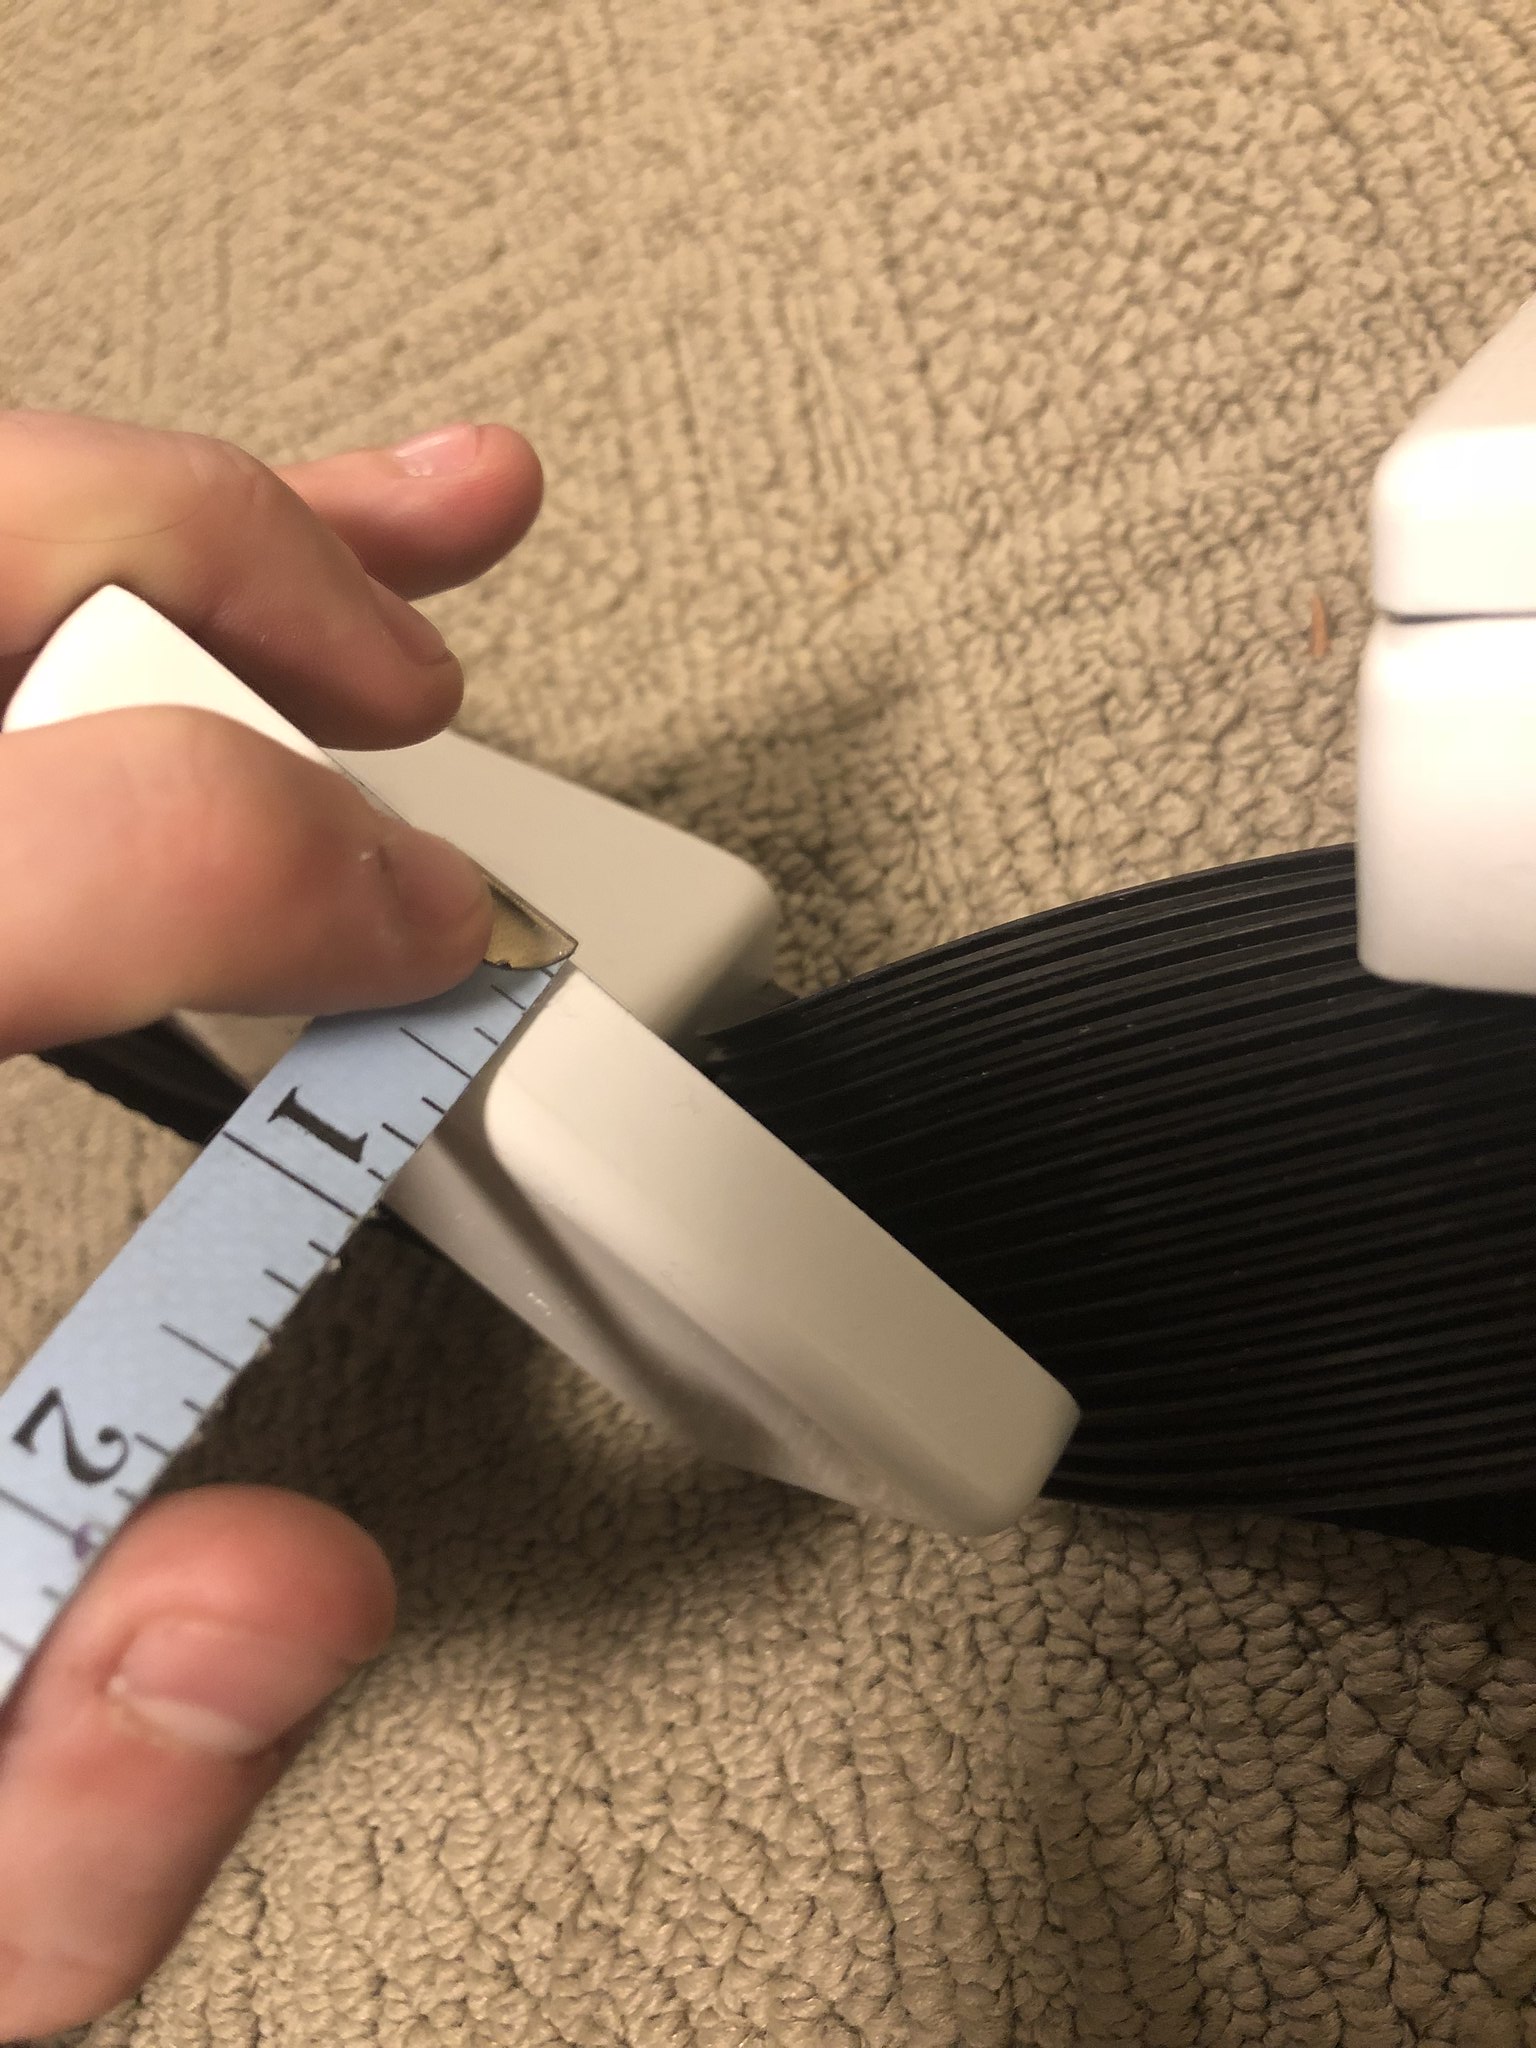
The front boxes are 1" thick (on the ends, thinner in the middle thanks to the curved backs) in total width including front and back pieces.
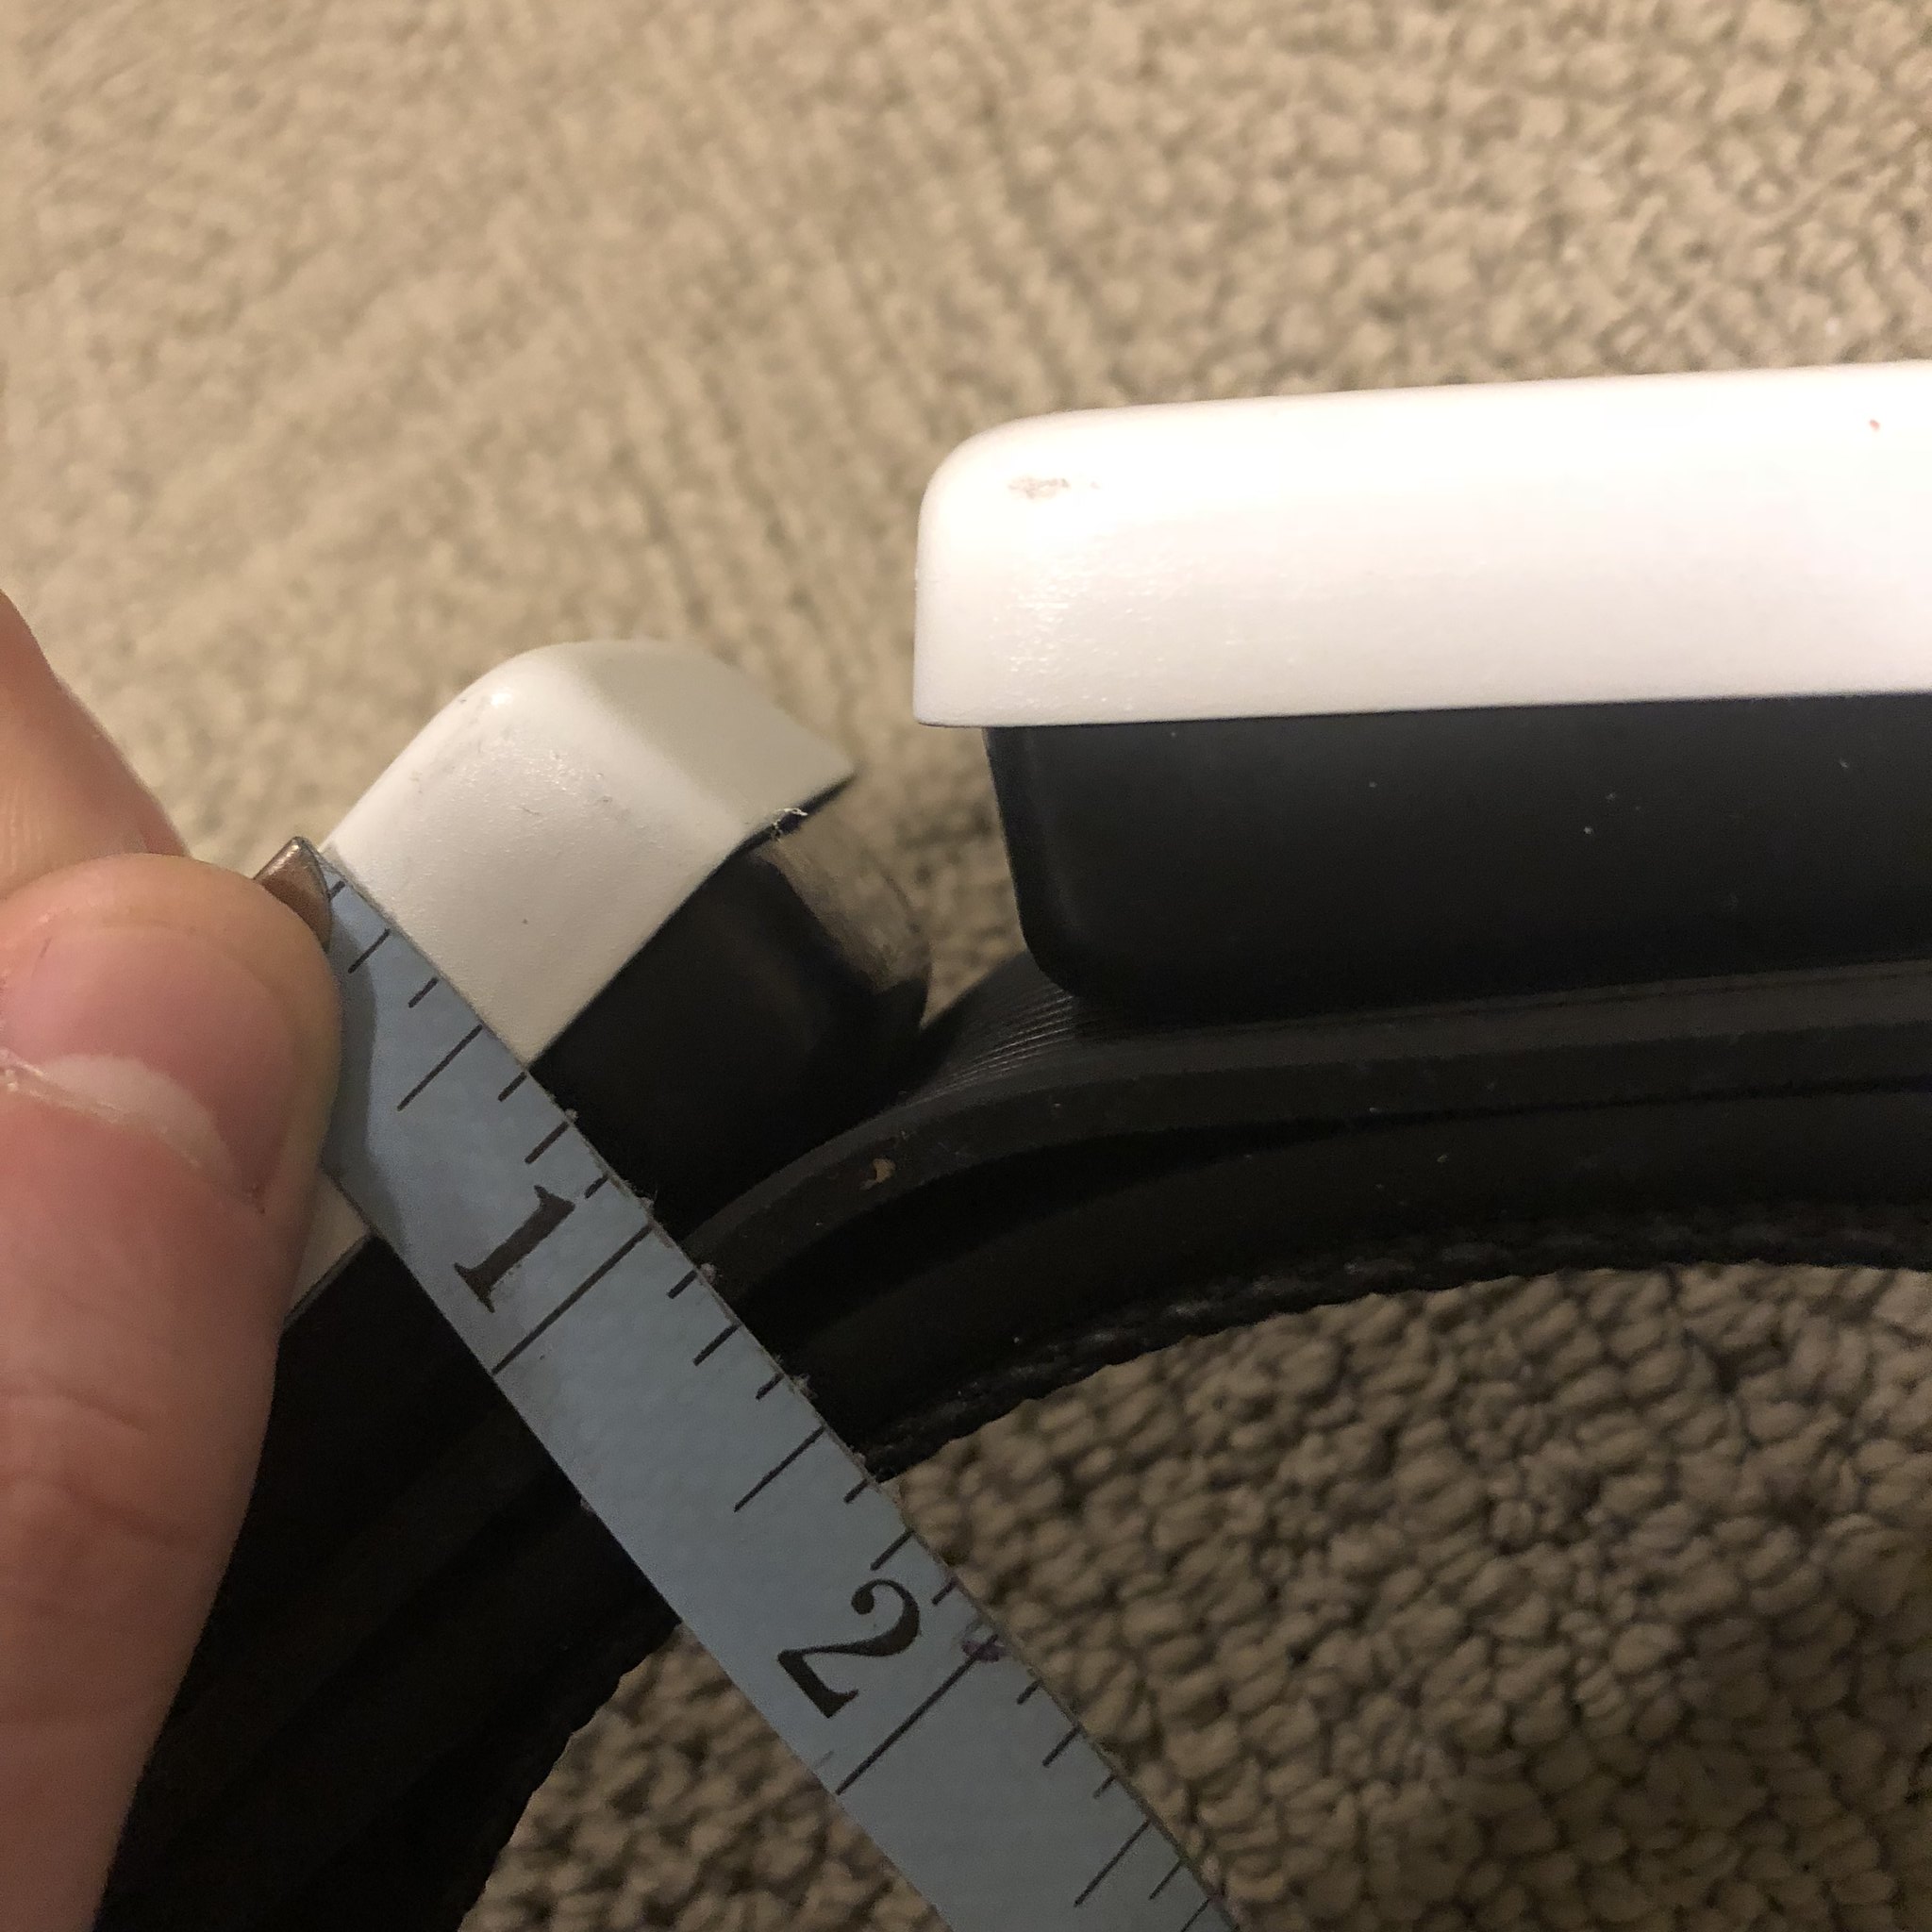
Untitled by Taylor Goodson, on Flickr
Finally, the two front/faceplates of the middle two boxes are 1/2".
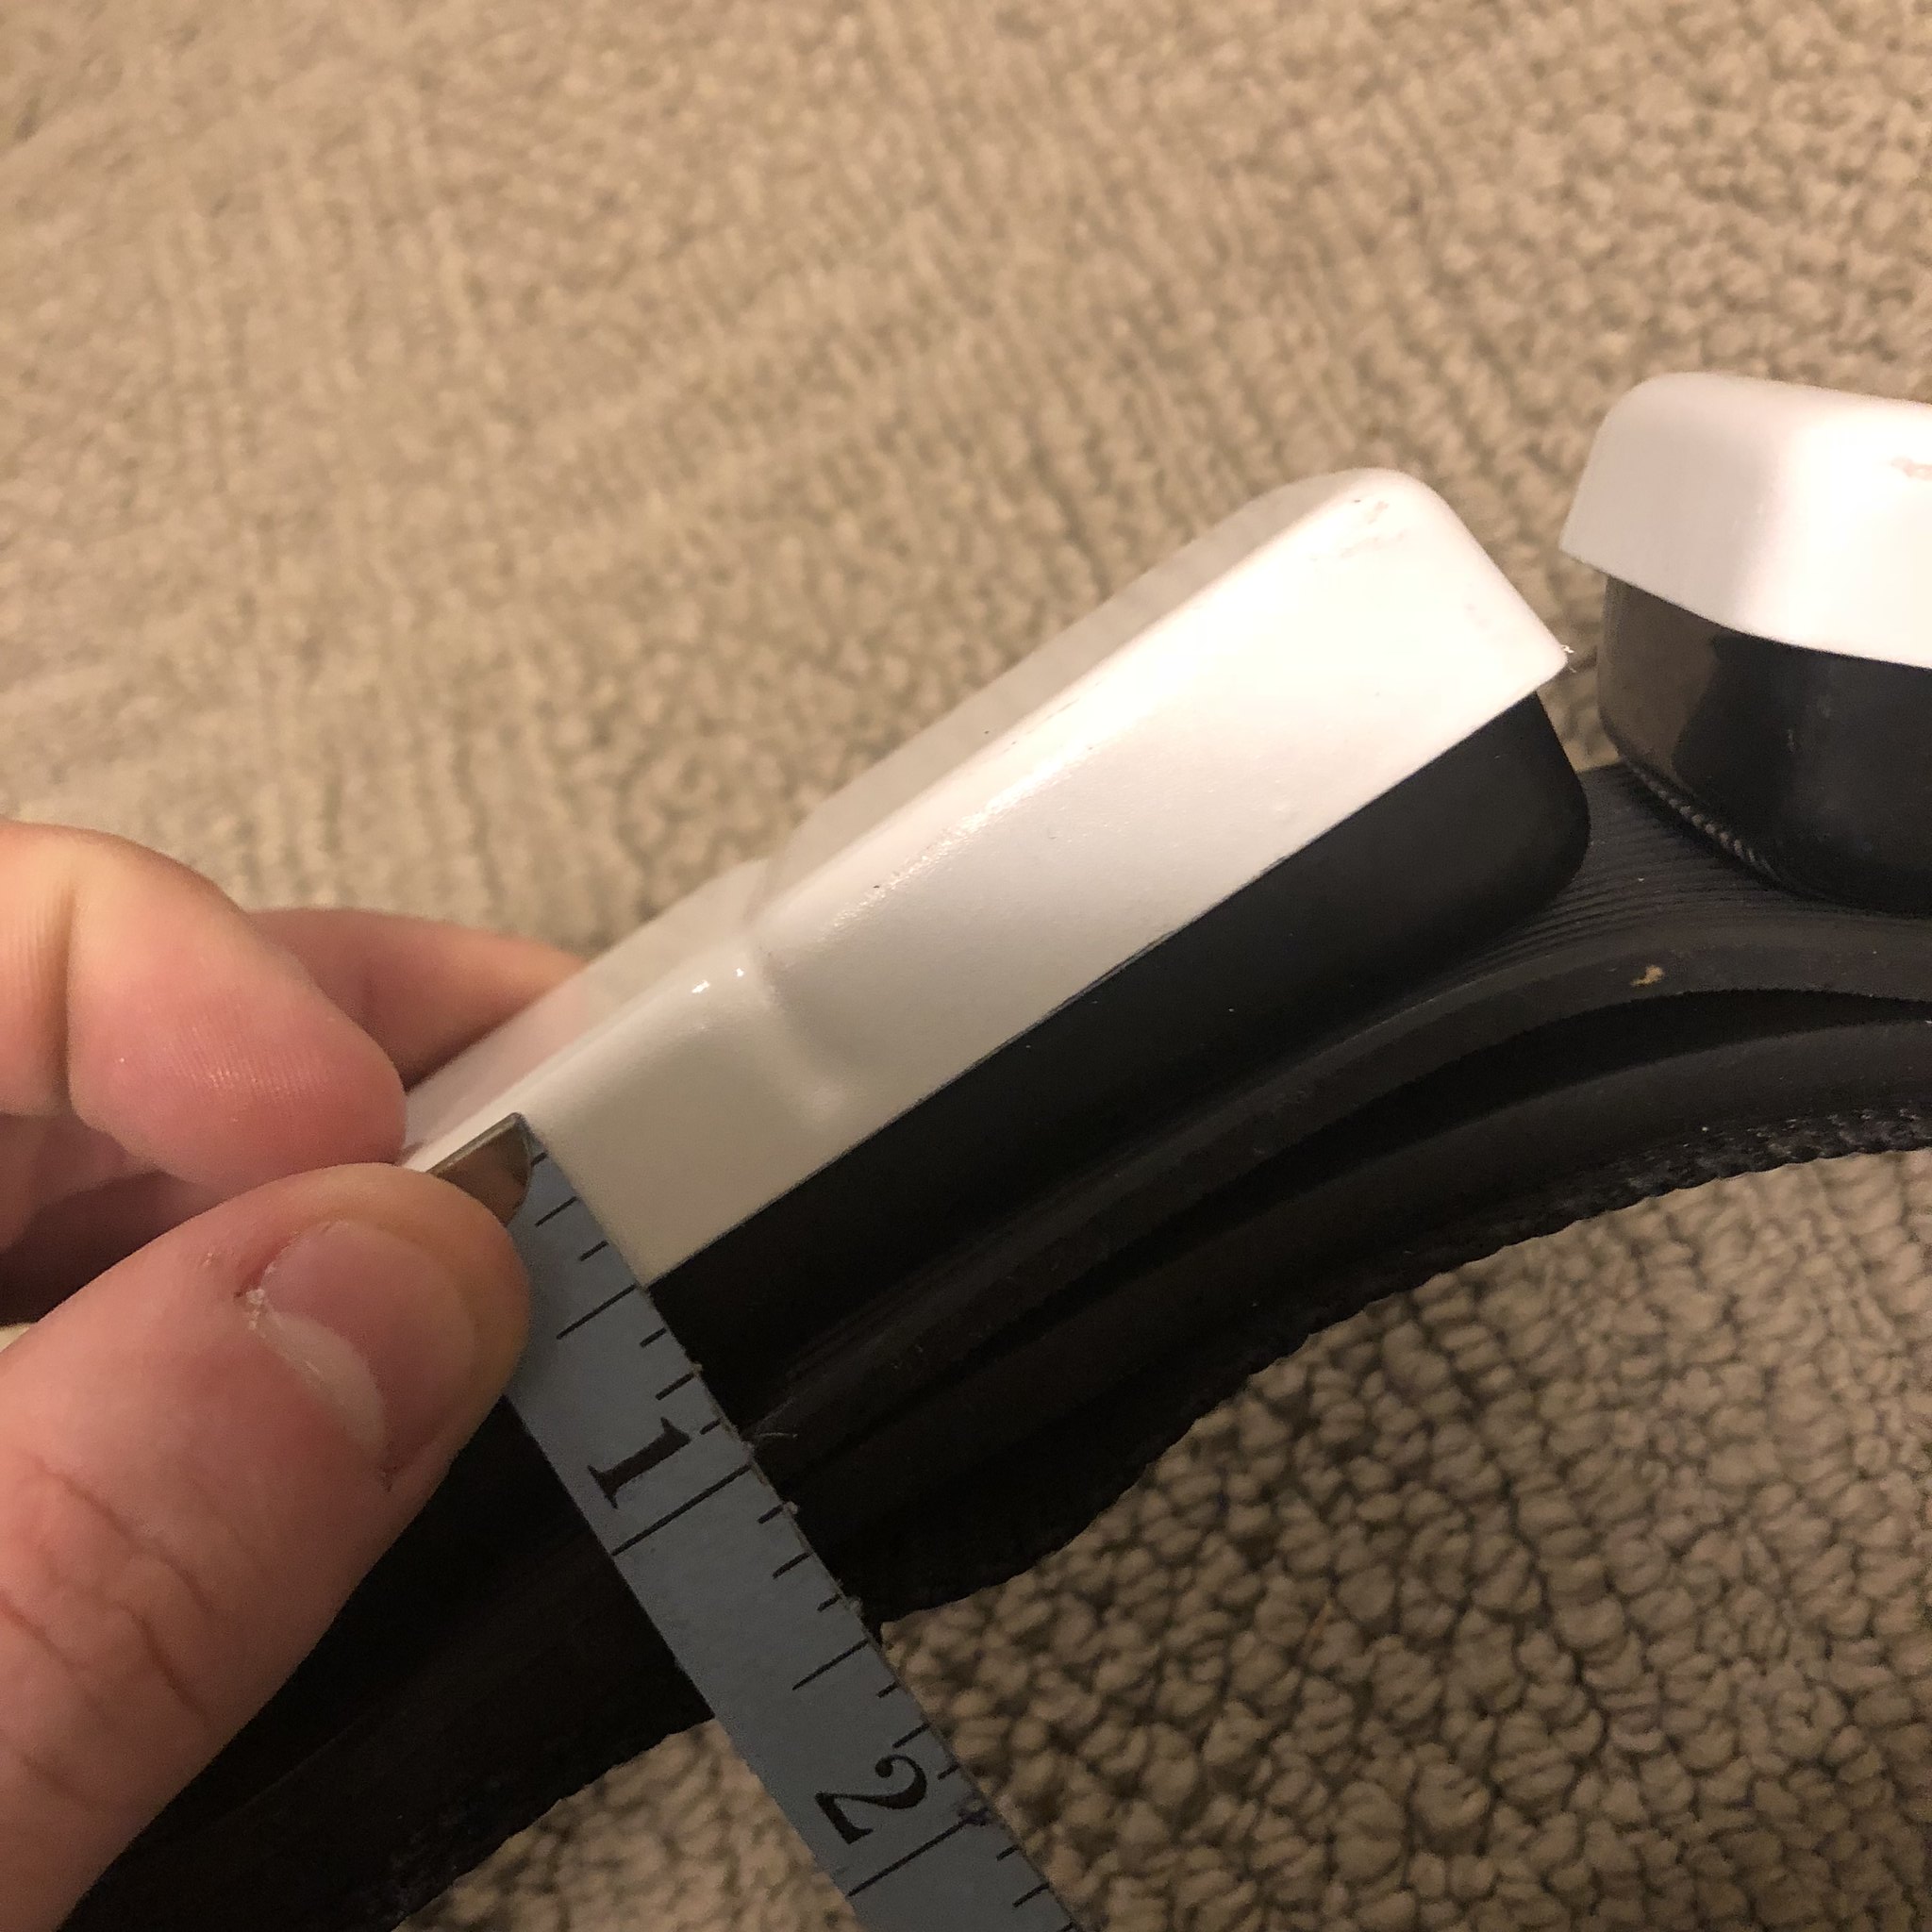
Untitled by Taylor Goodson, on Flickr
Sorry I didn't clearly outline that during the posts in the build itself. I will link this reply to the main index thread so it's officially in the mix. Hope that helps!
-
2
-
-
6 hours ago, Anzo said:
@Ruthar I measured the biceps again and yes, the left one was about 12 mm wider than the right one. It was on account of the bicep shim I had made previously. So I removed the shim and reglued and they are equal in size now. Thanks again for the input!
No worries, glad it was a simple fix!
-
Wow, you're really getting somewhere now!
The belt holds the posterior in place in tandem with the elastic/snaps that will run between the kidney plate and the posterior plate. If you are still having problems with the posterior plate flaring out after the belt and snaps are in place, you can run a strap between the cod piece and the posterior piece between your legs that will pull the posterior plate in more snuggly. I cut my thighs down significantly to allow room between the cod/posterior plates, but I didnt make those cuts until I had the suit strapped.
To my eyes, it looks like your left bicep is pretty wide - you might want to consider tightening that up as it stands out to my eyes. Other than that, definitely a very strong first fitting!

-
1
-
-
You're really cranking along with this - excellent work!
-
1
-
-
You've got some fabulous information from gmrhodes up there!
1 hour ago, gmrhodes13 said:Lots of tutorials online for automotive body work, pretty much the same process on armor
That's a pretty important point that I just wanted to highlight.
There are tons of methods for gap filling/sanding/painting, you just have to find one you like. If you've never used filler/bondo/etc. before, I suggest testing on some scrap first as you definitely don't want to be diving into your armour without any practice.
Regardless, to answer your question specifically, the epoxy putty I used was from Home Depot. All in all, I probably used 5 or 6 tubes of it total. I found it easier to get into tight spaces (using a little bit of water goes a long way, too) whereas Bondo can be a little more difficult to work with due to the fast drying time. Yes, it definitely is a bit of work to sand down, but I did find it less prone to bubbles and divots than Bondo during the sanding process.
The Devcon Plastic Weld is an amazing product, but I stay away from it only because the price is so much higher. If you need something fused within minutes, however, it is impossible to beat the Devcon!
-
1
-
-
For what it's worth, I got nothing but love while documenting my FO build. I didn't get even a hint of negativity during the lengthy process - in fact, it was really nice to hear so many other folks excited about using some of the info and discussion for their own upcoming build projects.
To me, the feelings of negativity seem to be an artifact from a slightly older time - feelings that I only first heard about during the Q&A.
Regardless, it's great to see no time lost addressing the issue head-on. I have nothing but love for both my OT TK and FO TK (as clearly you guys do, too!), so hopefully we can continue to bring any migrant FO TK's back to their home here.
And, of course...bring on the merch!
-
1
-
-
2 minutes ago, trond1138 said:
the sides on my kb_back is paperthinn where back and front meet on sides .any idea

I had the same issue. I just reinforced the area with spare ABS glued to the inside to thicken it up. I went edge to edge on the top and bottom so the area couldn’t flex as easily and crack.
-
1
-
-
Glad the method worked for you, too!
Coming along wonderfully, AJ!
-
1
-
-
11 minutes ago, Daetrin said:
Fixed my friend. Thanks for your patience and understanding.
Thank you very much, Paul - no problem at all!
-
I'm still marked as pending. Thanks for all your attention on this matter during this busy time of year - it's much appreciated!
-
Great work - coming along very nicely!
-
1
-
-
2 hours ago, shashachu said:
Just bought a KB kit from a Garrison buddy and will be studying this thread carefully. Thanks for taking the time to put so much detail in!
My pleasure - if you have any questions, don't hesitate to ask!
1 hour ago, HellyTK1111 said:I just re-built my little brother’s botched TK a couple of weeks ago as well, and at the moment I am waiting for my own First Order Stormtrooper armour in the mail. Are there any important tips that come to mind that you would share with an aspiring costume maker? Anything specific that comes to mind?
The one piece of advice I always give out is that no mistake is beyond repair. Take time, have fun, and be creative! If something doesn't go as planned, don't sweat it - there are always a handful of ways to fix it or make it work. But you probably already know that having recently dealt with a 'botched' TK.
Ruthar's First Order Stormtrooper Build
in TFA Build Threads
Posted
First Order Adventures!
It's been a long time since I've updated anything in this thread, so I figured I should share some of the fantastic First Order adventures that have happened with this kit! Happy to say that the build has held together very well against the test of time.
From Good Morning America in 2019
Good Morning America Rise of Skywalker Release 2019
Macy's Thanksgiving Day Parade 2021
Updates
There is only one upgrade to the suit that I've made that is worth mentioning, and that is my switch to the Anovos Premiere Line helmet. It's a heavy piece, but I think it works great with the suit (and I really like the fully lined interior). The paint match was perfect, so it was a worthy upgrade.
Moving forward, I'd like to take the suit to EIB/Centurion, so that might be coming up next in this thread. I've got a handful of projects already on the workbench, but I think that would be a worthwhile goal for the near future. More to come!")