

Darkpain714
-
Posts
67 -
Joined
-
Last visited
Content Type
Profiles
Forums
Gallery
Articles
Everything posted by Darkpain714
-
 Slowly saying goodbye to that cheap Velcro. Sent from my SM-G930V using Tapatalk
 -
Oh... I hadn't considered that. Thanks for the input. I'll make the next batch that way.
-
Quick update. Didn't get much done as it's hot as blazes in my garage. Just made a batch of snap plates. My webbing is on the thin side, so what I've been doing to add some additional stability to the plate and a layer of protection to the inside of the armor is folding it over on itself and gluing them. Finished: Sent from my SM-G930V using Tapatalk
-
Yeah, I have that ready to go, I just don't think it will pull it in enough. I'll keep installing the snap plates and see how it looks once there is some weight pulling the front and back down and decide what to do from there.
-
Well, two steps forward, one back. Snap plates installed for chest to back strapping and they seem sturdy and functional. But I forgot to take into account the white elastic will stretch and they were about an inch too long. Shortening them was no problem and it looks pretty good from the side. However, now from the back I have this: Rip off the covers and re-glue? Sent from my SM-G930V using Tapatalk
-
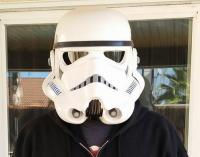
*Updates!* Rolling again <or> "Uh…had a slight weapons malfunction. But, eh everything's perfectly all right now. We're fine. We're all fine here, now, thank you. How are you?" So now that I'm physically on the mend, I can get back to work. During my downtime I couldn't just do *NOTHING* so I started to handle the sewing required for the new strapping I'm installing and boom. Sewing machine melt down! Thankfully, Amazon Prime day came along and.... 'Heavy Duty' We'll see about that ..... New strapping progress: Last bit of gluing done, aside from snap plates that is. SHINS! I'm pretty sure I got these right, but feedback is welcome. PLEASE Check me if I'm wrong before I finish them up. Little bit of comfort added to the bucket. Just taped in for fitting. I'm guessing industrial Velcro is the way to go? I see in the pic the visor is a bit miss-aligned. I'll probably convert that setup into secured, individual lenses as I've seen several others do. Looks nicer and I'll need room for the electronics. Fan rig is built and ready to install. Then will be the hearing assist setup. This truly is one of the most exciting projects I've ever undertaken. Technically, I could be ready for submission now as the Anovos Velcro is sturdy enough for posing for pictures, but I think I'll wait until I finish the upgraded strapping before I submit. If I can stop tinkering and changing things as I go that is... Thanks for all the support!
-
Nothing "inappropriate" like that happens there. That said, I'm not going to endorse the place here. If you want to know more just google the exact phrase I said above and you should be able to find it. There is only one, and it's pretty (in)famous.
-
I wish! No, I attempted an "Extreme Survival Horror Movie Bootcamp".... You'd think that title would've been enough to convince me it was a bad idea, but I thought to myself "How bad could it be right?"... .yeah, it was bad. REALLY bad. I'll be eating soft foods for awhile and waiting for my knees and elbows to heal up enough to start sliding things over them. On the plus side, the UnderArmor leggings I bought for my TK held up really well and kept me nice and cool.
-
So I was hoping to be submitted by now, but I had some fairly debilitating injuries over the 4th of July weekend that have delayed my progress. But I still have a set of completed thighs that just need the clean up and finishing work: Since the rest of the suit sat untouched on the mannequin display during this time, in the garage with temps in the mid 90's, this happened to the Anovos supplied velcro: Not a major setback as I am preparing snap plates to replace all that anyways, just more disappointing than anything. Thankfully, I'm on the mend and should be able to be back to work on this by next weekend.
-
Oh happy day! No shims needed for thighs. Gluing those tonight. Anovos strapping in place. But I'm about to start replacing with snap webbing plates. Side shim of about 4 inches needs to go in first. Should be done and ready for submission by the end of next weekend. The thigh backside glue. Lots of muscle to try to get the left one to stay in shape while the glue dries. The right one I'm doing the first side by itself as I'm intentionally leaving a little gap behind for that 1/4" of wiggle room I need to avoid shims. Have a decent No Parking sign I'll be cutting into internal strips to give it a bit more support. I can tell they're going to need it! Last weekend I hit up a few of the Sports Authorities and Sports Chalet's that are going out of business looking for mannequins for display. They wanted $150 for headless or $200 for one with a head. Found some on Amazon much cheaper and ended up getting two brand new for less than the broken, used ones from the liquidation sales. So while the legs are setting overnight I had some fun.
-
Thank you so much. Guess 3rd time is a charm. First two batches I purchased were wrong. 1st order were not sew in. 2nd order were sew in, but wrong size. All will find uses somewhere I'm sure. Sent from my SM-G930V using Tapatalk
-
Hey Ukswrath! Thanks SOOOO much for this tutorial. I've been following it each step of my build. Just one question (so far). Are these the correct size 10 sew in snaps for the shoulder to front/back white elastic strap? They seem....huge.
-
Been working on thigh shims today. I have some workable scrap cut to size prior to fitting with the undersuit on. Once I did that I found the knee area much better fitting than expected and I really only need about an inch up near the top. These pieces had a heavy return edge on them and I used a heat gun to flatten them out. Was a good first time experience working with a heat gun and I think I know the safest distance to hold it form the ABS. So I'm going to cut these down to a triangle shape to keep the knees where they are and open the top of the thighs by that inch or so needed. Flattened scraps: Flattened scraps inserted into thighs: Will spend more time tinkering this weekend. Argh shins! Do these look right? This is 25/28 for right leg (left of picture) and 24/27 for left leg (right of picture). 24/27 fits great on either leg but 25/28 is very tight. These are overlapped for fitting and not trimmed down to 20mm for front cover strips yet. I *think* I'm correct here, based on some of the feedback I've received. thanks!
-
Uh-oh. If nicknames are earned around here, I may be in trouble! Thanks for the welcome and feedback!
-
Ok, I'm a little late getting started on this build thread, so I'll backtrack a bit. First, I got a box! Ordered at Celebration Anaheim, received in Feb. Bought two kits, one for me and one for my Son in Law. He's deployed overseas at the moment, but we'll be continuing his on his safe return. We assembled a collection of tools and supplies and built a workspace in the garage: This changed rapidly once work began, but we pretty much had everything we needed to get started trimming. Lots of learning here! We used a combination of score and snap, lexan scissors, and a Dremel tool to get both kits safely trimmed with only minimal mishaps. Thanks to this forum we learned about an open Armor party hosted by the 501st Southern California Garrison. We picked up a lot of pointers, got some hands on with completed builds, and best of all discovered the amazing Belt Sander! Thanks to whomever took this picture of us getting hands on: After the armor party I immediately picked one up and I'll never regret it! Got busy shaping and fitting! There is a fine layer of white covering everything. Shop vac will need to be the next purchase. Another great take away from the armor party was Plastidip. Hands on with a bucket that had been dipped make a quick convert of me. Dipped the bucket a week later: Lots of clams, magnets, and glue later I have arms: Building on myself was getting a bit tedious for me, so to better eyeball my progress (and I admit it, impress the kids) I constructed a display rack of sorts: ...and first fitting of the upper body: Boy, selfies are not easy in this are they??? Oh yeah, TKBoots! Comfy. The wife loves to tease me about these. Added belt and first fitting of thighs: I've been using the Anovos strapping system for initial fittings and display, but have already run into issues/limitations with it. Just sitting on the display rack the velcro adhesive has given up on the shoulders and back. It was quite a bummer to come down and see both arms had crashed to the floor overnight. Will be making my own snap plates with webbing and line 24 snaps. I bought a hundred or so. In the mean time we're back to being disassembled safely on the table. I coerced the wife to help me fit by taking pics of the backside for me. I've removed most of the return edges on the the thighs down to about 1/8". But it's still too tight. I'm thinking about an inch of shim is going to be required in this area. Also not liking how the kidney fits. Going to strap it up fully then decide if a hot water bath to curve it in a bit more, shims, or BOTH are required. My wife was having too much fun getting home and seeing me like this. I had to steal this one from her facebook. Sorry about the hearts. Trying my hand at painting. I think I may pass these off to the wife to correct. More to come! (Shingate! *shudder*) ~Brian
