

Ryth_
-
Posts
290 -
Joined
-
Last visited
Content Type
Profiles
Forums
Gallery
Articles
Everything posted by Ryth_
-
Question about the side(ab) and butt snaps. I've got prym sport&camping, and the backside of those looks nowhere as good as everyone elses. What shoud I get? This is the kind of stuff you're not prepared for. Example taken from a cent thread (tk44678) Mine beauty
-
Shoutout to my fellow garrisoner TK 17113. Gotten a lot of help from him in these last stages of the build.
-
Doing rivets now. Cod next.
-
Adjusted the helmet "hinges" with a new drill hole... and now it's perfect! Ears next!
-
Used the slot screw as hinges, since I'm missing the washer.. and iiiit's sunday.
-
I'd go for One of those, but I'm in for Aker+icom setup. 😀
-
Thanks! I'll do my best on the ears. Got my mic tips from Keith today. The craftsmanship on these is impeccable.
-
That's a good reference! I've got some serious light issues here, so hard to see the "ditches". I did my best on the ab. Those buttons to the left is as good as they get. They were as stated earlier in this thread, a very thick pull. === Todays progress (13th of august) === Ah yes. I've done stuff. - Tore off and reglued elastic from bicep to arms. They were badly fitted. - Second stage of gluing shoulder bridges. - Last button cover onto ab. - Coverstrip on last shin.. only need to cut to fit, and add coverstrips on the back + velcro. - Trimming faceplate. - Roughly trimmed one pair of ears.
-
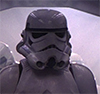
Ab blate is finally done. Only paint and rivets. So to the face, what do you think? Remove more edge? Grow back more?
-
Thanks mate!
-
Ahaa! No, I'm using them for reference for return edge in eyes and teeth. It's taken from starwarshelmets.com, and were the clearer pictures they had of an original. I'm also using a Gino v2 picture for further reference.
-
Weather, what?
-
Wow, that last picture was bad.
-
O'yes I did! So here's some pictures of the helmet.
-
Looks like you need more magnets and maybe bigger clamp on the ends.
-
Teekay YYC's ANH Stunt (AP) Build
Ryth_ replied to Teekay YYC's topic in Build Threads Requireing Maintenance
Looks great to me! Good job trooper -
Didn't do cover strips today. Tighs had a bit of a gap on the end, so I redid the left one since it's not covered by the ammo pack. But... I did the right one instead, so double the ammount of work. Hoooh! So todays deeds; - Shoulder bridges are glued on. - Ab main button cover is glued on. Didn't have lego so winged it with a big book. - Reglued wrong tigh - First cut on face...? The further the progress, the less time I've got for pictures. But they will come, I promise. The lid is the good bit, so will be flooding this thread with pictures from that stage.
-
Recieved belt and holster from Steve (gazmozis), and they were perfect! Glued together both shins (One side of course) and both tighs. They only need cover strips. I've chosen 23mm for my build. Today I hope I'll manage to glue cover strips, shoulder bridges, button cover for ab and finish trimming the belt. Pictures to come. Right now I'm at work
-
The sizes on this is tricking my mind. But I'll figure it out! Usually not that neat with measurements, but this is four pieces. Gah Added hooks to both biceps, and think I can manage to add strapping and button from shoulder bells to the rest of the arms. GF came back with the sewing kit. Also, holster and canvas belt is in the mail... but the postman ducked up the order, and put the slip in another mailbox. So I could've gotten it 3 days ago.
-
Thermal detonator trivial time. What's the color I'm using? Any codes, or brands I should look out for? Also, Ukswrath. Grabbed this picture from you - but having a hard time gettings things right. If the screen plate is 115 mm, there's close to no room left on the sides for the caps w/o extending the detonator over 190mm. What's wrong?
-
I've got some magnets. Didn't do both sides first - thought it would be easier to align the pieces in stage two. But here's some fusing done today. Fused the back with inside coverstrip. Note that 1/2 of inside coverstrip on the front side is done. Inside coverstrip on one shin done. Coverstrip on half a calf done. Cleaned my workstation, but it's messy again... 1 hour later. Sawed down the thermal detonator tube... it's now 190mm. Trimmed the caps to 20mm and the screen to 115mm. Also did some good removal of the return edge from the belt. Didn't touch the end there, since I want to have it on my canvas belt before doing some cutting there.
-
So here's what I've done so far. Attended armor workshop today, and there I've finished trimming the shins and thighs. Now I'm glueing the inner strips on two tighs and one shin. Didn't have clamps for more... SIGH Finished the drop boxes, and I'm currently working on the belt. The canvas belt is on it's way in the mail. Now I'm running out of things to do... Should glue the covers on the ab plate, paint them maybe. Make hooks for the biceps. And of course... that lid. Two weeks till deadline!
-
some say "plasti dipi" which sounds even more snappy. Thanks Joseph! I bought the spray one, and we'll see if I actually will use it. I bought the lenses from Imperial supply depot, and also ordered the darker lenses. If that hides my eyes enough - I'll keep it clean inside.
-
Did tons of work today. Will update tomorrow. Saturday I'll be attending another armor workshop.
-
Quick question; Cut out holes before applying plast dipi, or after it's applied. If I cut the holes before, I guess I have to mask the eyes and teeths. After - it will be harder to cut through, also finding mold lines, more mess? What do you do?
