
FISD E-11 Reference Team
-
Posts
53 -
Joined
-
Last visited
Content Type
Profiles
Forums
Gallery
Articles
Everything posted by FISD E-11 Reference Team
-

FISD E-11 BLASTER REFERENCE
FISD E-11 Reference Team replied to FISD E-11 Reference Team's topic in ANH BlasTech E11
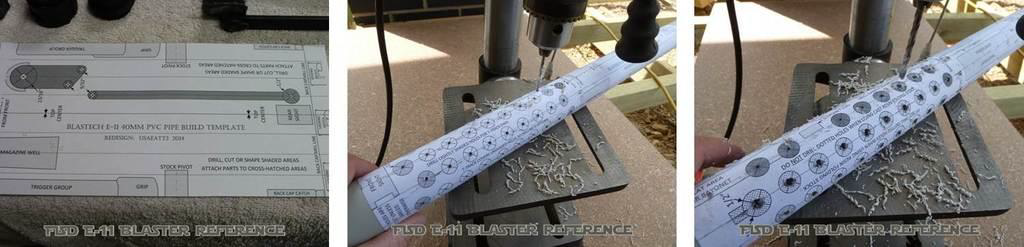
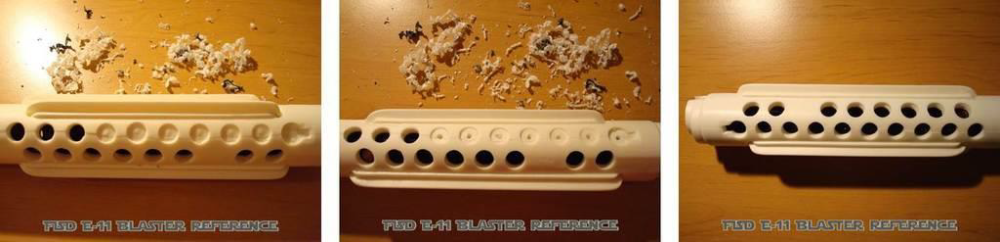
#04 - The Receiver Tube When running a "pipe build" (meaning you will have to drill all holes and make all openings to your receiver tube) please click here for accurate drilling templates in metric and imperial size. Be aware to follow the correct printing instructions and double check with the outer diameter of the pipe you will use. Mod A: Depending on your blaster kit, you might find some venting holes, being only implied. These can be drilled, beginning with smaller pre-drills. Do not forget the specially shaped hole for the locking mechanism of the folding stock. To provide more stability to full resin builds, the centre of the hinge (for the folding stock arms) should get drilled, to later receive some mounting screws. See last picture in next chapter. Better drill from both sides, instead of drilling straight through. The holes don't need to meet.
-
FISD E-11 BLASTER REFERENCE
FISD E-11 Reference Team replied to FISD E-11 Reference Team's topic in ANH BlasTech E11
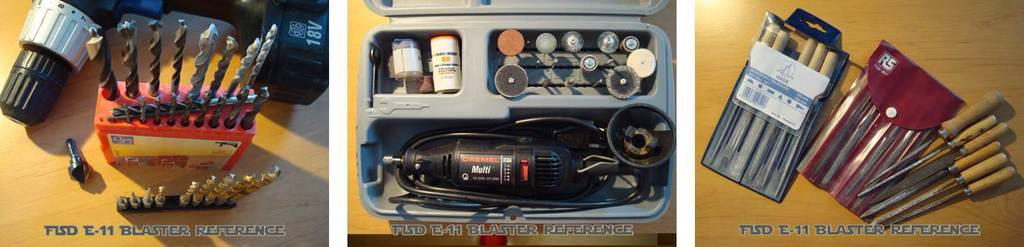
#03 - Tools For Resin Safety First: Whenever resin will be sanded, it is highly recommended to wear some form of respiratory protection, as resin dust is suspected to cause cancer. Further, if you will be using power tools of any kind you should wear eye protection, as resin dust is also an irritant if it gets into your eyes, and the high speed of the power tools can turn any part that comes loose into a dangerous projectile. The following list of tools is recommended to have available (not all mandatory but helpful): - power drill and/or battery powered screwdriver - set of drill bits (metal and wood drill bits work very well on resin) - rotary tool (like a Dremel for example, with a variety of bits - not mandatory, but the wider selection will provide more options) - sandpaper for both wet and dry sanding options are recommended (various grits) - set of files - set of small key files - glue or bonding agents such as super glue/CA glue, epoxy or E-6000 - cutter knife/exacto blade - small hobby saw (Tamiya Handy Craft Saw II) - small carving tools (like dentists use)
-
FISD E-11 BLASTER REFERENCE
FISD E-11 Reference Team replied to FISD E-11 Reference Team's topic in ANH BlasTech E11
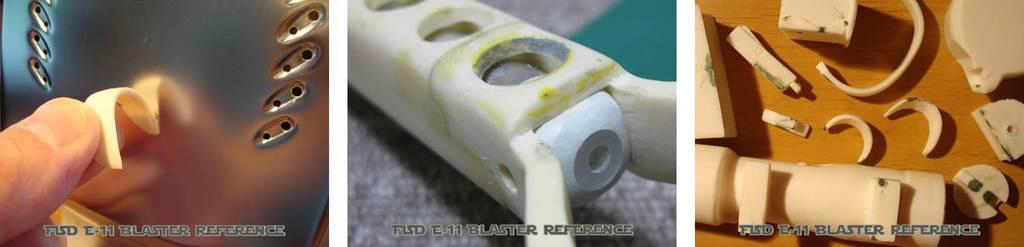
#02 - Resin Repairs If a part is bent or warped (for example the arms of the folding stock) you can heat it up and carefully bring it to the correct shape. You must ensure that it maintains the proper shape while it cools down. To heat the part, you can use an oven or hot water bath for larger parts. Hair dryers or heat guns are ideal to warm up a specific spot of a part. How you heat the part depends on the part's size, and the temperature and time required to make the correction. If you use heat to alter a part, the most important ground rule is to start at a low temperature, and increase it until you are able to make the correction and not any higher. If you receive a broken part, you can fix it using super glue/CA glue. For additional support you might want to add one (or more) metal pins to the part during the repair process. A close inspection of your parts will surely reveal air bubbles (or tiny holes) in some parts. These and other defects can be filled up or removed by using modeling clay (like "Green Stuff" or "Bondo Cream"). One (or both) will be used during your build if you are doing any modifications anyway, so it is best to have it on hand. The major difference is the consistency of the two, as the Bondo product is (as the name says) a cream, while the "Green Stuff" is a 2-component modeling clay. When you start to make these repairs, consider whether the defect could be used in your weathering process to indicate some battle damage or wear if you alter it and paint it appropriately.
-
FISD E-11 BLASTER REFERENCE
FISD E-11 Reference Team replied to FISD E-11 Reference Team's topic in ANH BlasTech E11
#01 - Getting Started After receiving your kit, conduct an inventory of all pieces and make sure everything is complete. Wash the resin parts with soap and water (like cleaning the dishes). This is recommended because the new parts will likely be covered with some fine resin dust and will still have release agent on the surface. Release agent is a chemical used to assist in removing the parts from the molds after casting. You want to remove all of the resin dust and release agent because they can cause problems with glue and paint. Washing all parts with soap and warm water will prepare the surface for your work.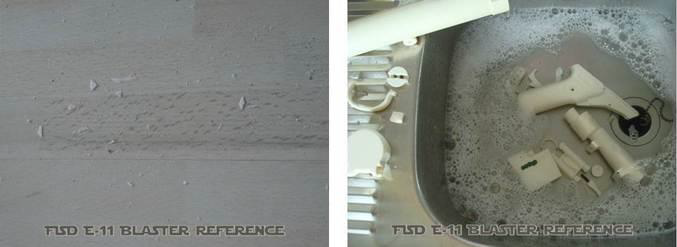
-
FISD E-11 BLASTER REFERENCE
FISD E-11 Reference Team replied to FISD E-11 Reference Team's topic in ANH BlasTech E11
Table Of Contents: (Just click a line to jump straight to that chapter) #01 - Getting Started #02 - Resin Repairs #03 - Tools For Resin #04 - Receiver Tube #05 - Grip #06 - Trigger And Guard #07 - Selector Switch #08 - Muzzle And Screws #09 - Front Sight #10 - Flash Guard #11 - Bayonet Lug #12 - T-Tracks #13 - Folding Stock #14 - Magazine #15 - Magazine Well #16 - Ejection Port And Guard #17 - Inner Bolt With Clearing Strip, Plunger, Extractor And Serial Number #18 - Charging Handle And Rear End Of Inner Bolt #19 - Recoil Spring #20 - Rear Sight #21 - End Cap With Lock And Ring #22 - End Cap Clip #23 - The Scope #24 - Scope Rail And Counter Arm #25 - Hengstler Counter #26 - Power Cylinders #27 - Assembling #28 - Painting #29 - Weathering #30 - Blueprints #31 - Measurements #32 - Downloads #33 - Gallery #34 - Greeblies -
A long time ago in a galaxy far, far away ... ... a small group of dedicated Star Wars fans and FISD members felt the time had finally come to create a one stop E-11 Blaster Build Reference. Working together from across the globe, the team collaborated online and worked hard to establish this collection of outstanding modifications to assist future E-11 builders. Designed for the popular and commonly used resin build kits, it includes modifications for the ANH version of the BlasTech E-11, however many of the modifications are usable in building both the ESB and ROTJ variants. All the content below will help you in selecting modifications for use in your own build, depending on your kit, skill level and personal preferences. Be aware to not use this document as a build guide! You always have to be sure about your next step. And we recommend to read the complete sub-section of a part before starting your work. To provide an overview, labelled blueprints are included, followed by an interactive table of contents to bring you straight to the relevant modification. Additional blueprints with even more detail are included in a separate chapter at the end. These really help to understand how a real Sterling works. Many thanks to the following FISD members for their work in compiling this reference: Bulldog44 (Brian) Dark CMF (Tim) Sith Lord (Ian) T-Jay (Tino) Usaeatt2 (Aaron) Full content as downloadable PDF document in DIN-A4 size Full content as downloadable PDF document in US letter size Sterling parts in downloadable PDF document Photo Compendium The PDFs are direct copies of this thread content, with only minimum changes to optimize some page breaks here and there. If you find any other substantive differences, please send a PM. Think before printing - please consider your responsibility to the environment before printing a PDF. Thank you.
- 187 replies
-
- 14
-