Bloodhound
-
Posts
32 -
Joined
-
Last visited
-
Days Won
1
Content Type
Profiles
Forums
Gallery
Articles
Everything posted by Bloodhound
-
 TK 66346 requesting clearance and designation of 501st and Detachment. https://www.501st.com/members/displaymemberdetails.php?userID=27701
 -
My First Build - ANH Stunt
Bloodhound replied to Bloodhound's topic in Build Threads Requireing Maintenance
It's been awhile since my last update, but due to work requirements I haven't had a chance to actually do much. But now that I somewhat have time, I have done some progress. Apologies for some of the poor picture quality. I did the belt before about a week ago, but forgot to take pics of it as I was doing it (bad me).... I do have a final completed pic of it. The forearms have been trimmed and started doing the cover strips for them. Then lastnight I did a rough trim and assemble of the Main body (Chest, Ab, Back, Kidney and Butt). And for everyone's enjoyment..... The job confused Trooper! -
My First Build - ANH Stunt
Bloodhound replied to Bloodhound's topic in Build Threads Requireing Maintenance
~~~~ Incoming Transmission ~~~~ Progress Report: Helmet The external works are almost done. Minor problems with painting and placing of tube stripes. All that is left is to get the lenses into place. (It is on wonky so I could see enough to take the picture ) The internal works are starting to come together, as the harness has been mounted and fans/batteries are in place. I have know idea how I've done it, but they way the fans blow is right across my face and the lens spaces. Admittedly it is a bit of an act to get it on, but once it's in place its good to go! Important notes: Huge Thanks to Kris (Haso) for the help that he has been providing me. My finger has mostly healed from my blade cut. ~~~~ End Of Transmission ~~~~ -
My First Build - ANH Stunt
Bloodhound replied to Bloodhound's topic in Build Threads Requireing Maintenance
After a long and I'll admit a somewhat impatient wait, I have finally received the coveted "Big Brown Box". I have already made a start on construction with the first Item being the bucket. I started with the eyes, by roughly shaping them. Next up I did the teeth. I started to use a file, but after about an hour of nearly no progress and a lot of dust....I pulled out the drill As you can see I just drilled out the spaces. I then proceeded to use a file and hobby blade to even and take more out. I then moved onto the ears. Now this is where I finally added the blood into the start of my build, with the blade of my knife coming loose and entering my finger...after clipping a knuckle on a different finger. Never fear it was bound to happen at some point in time. I mainly used a knife and the score and snap method to trim down the ears so that they fit. Aligned the pieces together and drilled the holes for the screws, which went in rather smoothly. Preparation for Plasti-Dip was next on the list (after adding the brow to give it some character). I used blu-tack to fill in the teeth and tape over the edges of the eyes then covering the space to prevent it from going further than needed. It is currently sitting about drying after 2 coats of spray. But during this time, I have trimmed the sniper knee plate and made a start on the forearm trimming. Overall rather proud of my progress considering I started lastnight -
My First Build - ANH Stunt
Bloodhound replied to Bloodhound's topic in Build Threads Requireing Maintenance
My Aker and icomm arrived the other day. Just waiting on armour now. -
My First Build - ANH Stunt
Bloodhound replied to Bloodhound's topic in Build Threads Requireing Maintenance
The motion was brought up and seconded (on Terror Australis Forum), therefore motion passed (It helped that I found paints). So I've done some detailing and weathering. The scope. The forward flash port. The barrel and stock. The ejection port. (It looks better from a distance....so not this close ) So I therefore declare this E-11 Blastech complete. -
My First Build - ANH Stunt
Bloodhound replied to Bloodhound's topic in Build Threads Requireing Maintenance
The grip is now painted. Once it is dry I'll add on the wires and this TK Cadet will have a blaster to defend the Empire with! -
My First Build - ANH Stunt
Bloodhound replied to Bloodhound's topic in Build Threads Requireing Maintenance
I have now corrected my error with one of the flash guards and put it in its rightful place. Putty has been used to fill in gaps. I didn't realize that it would be that sticky against skin, but it washes of with warm soapy water pretty easy. Painting has commenced!! -
My First Build - ANH Stunt
Bloodhound replied to Bloodhound's topic in Build Threads Requireing Maintenance
Now as promised here are the photos of yesterdays progress. Now for todays work. The scope and hengstler counter were mounted onto the rail. The rear site is glued and screwed onto place. The internals may not be the prettiest, but it will serve its purpose. This one is just because I thought it looked cool. :D All that is really left on this is to just fill in some of the small gaps will putty and then paint it. I have also changed the screws to pins that sit in where the screw was, to still have that rigid spike holding it in place. -
My First Build - ANH Stunt
Bloodhound replied to Bloodhound's topic in Build Threads Requireing Maintenance
Now I have been quiet for a small amount of time, but fear not as I was not lax in my building. I have been filling down the front sights to sit properly on the barrel, the trigger guard to fit in slightly better. The screw that sits on top of the mag housing and one of the toenail shaped things (the name escapes me) for the ejection port. I have also taped on the scope and hengstler counter to the mount and marked the spots to put holes onto it. I shall post pictures for you all when you can actually see them all properly....as they are hidden by the tape used to hold them in place. -
My First Build - ANH Stunt
Bloodhound replied to Bloodhound's topic in Build Threads Requireing Maintenance
Just a quick update. This afternoon was the attachment of the mag and mag housing onto the main body. -
My First Build - ANH Stunt
Bloodhound replied to Bloodhound's topic in Build Threads Requireing Maintenance
Some more progress has been made on the assembling of my E-11. A big thanks to Greg (CT Mac) for hollowing out the mag housing. Today's task was to attach the stock to the receiver and glue the mag into the housing. The screws on the hinge of the stock will have the heads removed and the space filled in with modelling putty. The magazine I had to remove roughly 1 cm to get it to fit properly inside the mag housing. To do this I mainly used the sanding attachment on my rotary tool, after scoring a line into the mag of where I was sanding down to. On a separate note: What is suggested to stop my rare earth magnets from cracking apart? -
My First Build - ANH Stunt
Bloodhound replied to Bloodhound's topic in Build Threads Requireing Maintenance
Well my undersuit is complete. My boots from Imperial Boots has arrived -
My First Build - ANH Stunt
Bloodhound replied to Bloodhound's topic in Build Threads Requireing Maintenance
Started working on the stock for my E-11. The hinge is sanded and prepped for the holes to be drilled, but I am not sure how I want to secure the front. So my question is; What are some ways that people have done that they have found good? I feel like having a screw or pins would be better than using straight glue. -
My First Build - ANH Stunt
Bloodhound replied to Bloodhound's topic in Build Threads Requireing Maintenance
Thanks for the tips. Most of it I've gathered and others I'm waiting on to arrive, but that said I had forgotten about the acetone. -
My First Build - ANH Stunt
Bloodhound replied to Bloodhound's topic in Build Threads Requireing Maintenance
This morning was rather productive. I have attached the grip to the receiver and the selector switch to the grip. To do this I used a screw and 2 pins from pop rivets. The pins are toward the rear of the grip about 2-3cm apart with the screw at the front going all the way though the grip. (The trigger guard will cover the top of the screw hiding it from site.) The pins/screw then got marked out on the receiver with a pencil and centred on the body. From there I drilled out the holes using a rotary tool. After that I was just a case of making sure that the parts sat as flush as possible, then giving it a light sand and glue into place. None of my clamps would grip to the surface due to the roundness of it, but I had a trusty zip-tie and masking tape nearby to do the job for me. The selector switch is held in by another small screw that is drilled into the receiver and switch then glued into place. -
My First Build - ANH Stunt
Bloodhound replied to Bloodhound's topic in Build Threads Requireing Maintenance
Some pictures of what I have done so far with my Doopy's E-11 build. I have filled and sanded down the trigger and guard so that they both fit in place. The trigger guard is only sitting in place, but the trigger is pinned and glued in. The trigger has a pen spring behind it so that it can be moved. The first lot of gluing was the Butt cap and D-ring. The mount for the ring had to be carved out a bit more to allow the ring to have a small amount of movement. My next step will be to mount the grip to the receiver, which I already have a rough idea on how I'm going to do that. I will be getting CT Mac's spare magazine replacement (from Gazmosis). He has also kindly offered to make the modification to the magazine housing, as I am nowhere near confident in my ability at this stage to make such a fine modification. On another note, My order from Trooperbay has arrived. Which contained 'S' neck trim, Dark green lens material, Split rivets and Chicago screws. -
My First Build - ANH Stunt
Bloodhound replied to Bloodhound's topic in Build Threads Requireing Maintenance
My Doopeys Resin Blaster kit has arrived an I have already made the first attempts at putting it together. Will upload pictures at a later stage, when my internet is working better. -
My First Build - ANH Stunt
Bloodhound replied to Bloodhound's topic in Build Threads Requireing Maintenance
I wasn't using photobucket, I just placed them straight in. Large pictures do show more detail which will more than likely be beneficial later on. Yeah, I took all the advice on board and raided Spotlights entire shelved stock for their E6000 (which is the clear version). I have 20 of the rare earth magnets coming in the mail, so hopefully they aren't causing anyone to much grief as the come. -
My First Build - ANH Stunt
Bloodhound replied to Bloodhound's topic in Build Threads Requireing Maintenance
Also does anyone know how to fix the image sizing? -
My First Build - ANH Stunt
Bloodhound replied to Bloodhound's topic in Build Threads Requireing Maintenance
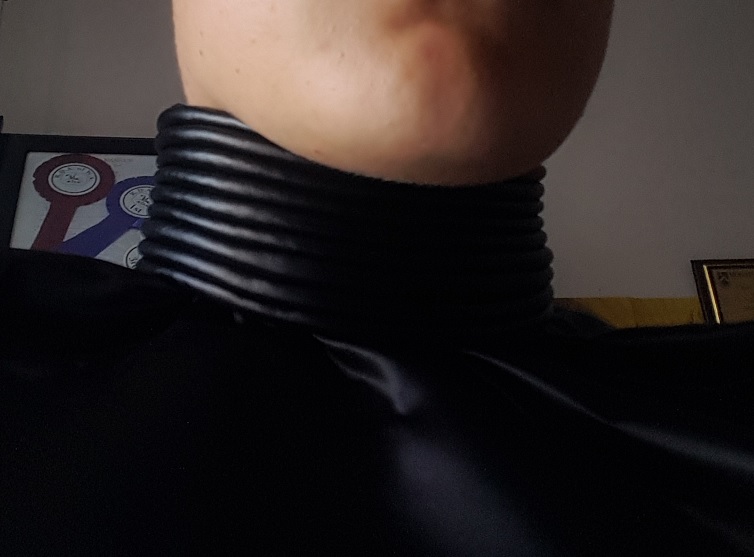
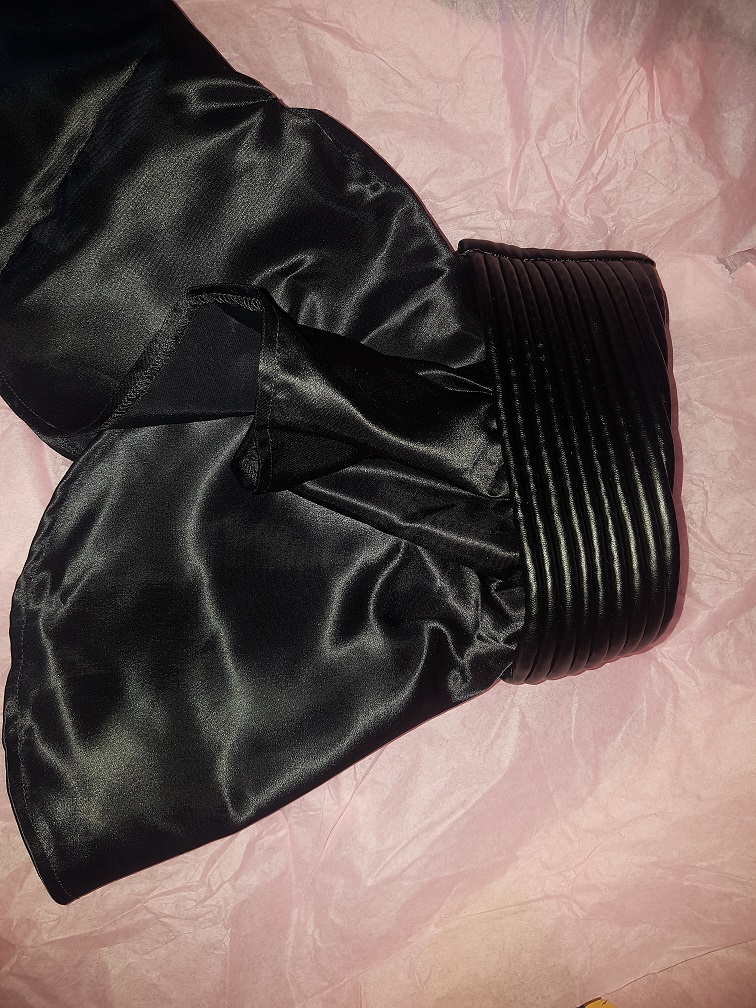
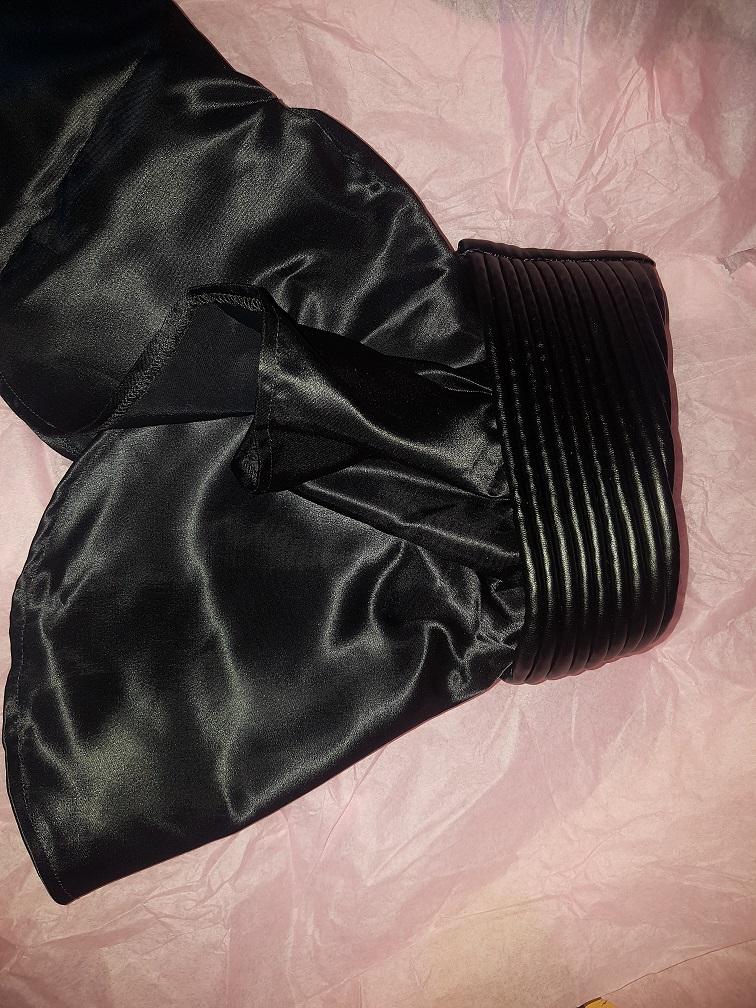
My neck seal from Veedox arrived today, and I'm very happy with the feel, look and quality of it. Also found and purchased the necessary Humbrol paints and some fine detailing paintbrushes. The rest of my undersuit has been purchased and will soon be another thing ticked on the list.
-
My First Build - ANH Stunt
Bloodhound replied to Bloodhound's topic in Build Threads Requireing Maintenance
Just another small update. Almost have all my supplies gathered or ordered now. Yesterday and this morning was spent gathering - Clamps (4 large and 8 small) - Painters tape (1 and 2 inch widths) - Black Plastidip - Black rubber gloves (Ansell, with textured palm and fingertips) - Cotton gloves (to go underneath Black gloves) -
My First Build - ANH Stunt
Bloodhound replied to Bloodhound's topic in Build Threads Requireing Maintenance
Not a huge update so far, but to a thanks to all those that have helped. My Doopey's blaster has been dispatched and is on its way. Also my Fan Bracket from Sly11 has arrived and looks great. Got a nice amount of supplies today from Spotlight and Bunnings. Spotlight: Elastic - Black 25mm x 2m - White 25mm x 1m - White 50mm x 2m E6000 (5 tubes...may have taken the stores entire shelved stock ) Cutting mat (cause my table is slated) Black Nylon - 25mm x 2m Velcro - White 25mm x 1m - Black 50mm x 1m Bunnings: Ryobi Rotary Tool (115W, 115 piece) Respirator masks Sandpaper (3M Sandblaster 220Grit) File (Hart, Half-round, 250mm 2nd Cut) Mini File Set (Trojan, 10 piece) Rivet Gun Set (Craftright) Retractable Knife (Craftright w/ 3 blades) -
My First Build - ANH Stunt
Bloodhound replied to Bloodhound's topic in Build Threads Requireing Maintenance
What do people think of Zap-a-gap glue and Zip kicker Vs E6000 glue? From what I've seen of the Zap-a-gap it works really well and doesn't need a long time for it to set with the Zip kicker. Also just as a planning point, do people recommend having a joining strip on the inside? -
My First Build - ANH Stunt
Bloodhound replied to Bloodhound's topic in Build Threads Requireing Maintenance
Well yesterday I ordered my boots from Imperial boots and this morning I have ordered a resin kit from Doopydoo's.