-
Posts
136 -
Joined
-
Last visited
Content Type
Profiles
Forums
Gallery
Articles
Media Demo
Posts posted by Ales
-
-
Very nice work, well done
Thanks Glen.
And now question again. The ear rank bar - where and how much stripes? Of course my goal is centurion level, and the CRL says: "Ear bars shall have only one or two bumps painted in black (rank stripes)". So here is the field for search...
-
The main thing is to stick tightly the stripes outline. Then you can use simple brush easily. This is all about trooperbay stencils.
-
Not a secret. Firstly I cut out the "pencil" line on the stencil background. Then I cut out about one fourth of background and put it in the right place, so I have a possibility to correct the stencil position. Then I just pressed the stencil part that was without background and fix it. Then carefully detach the second quarter of background and press stencil again. The same third and forth time. So I've got almost the right position without big folding lines. There was two places the stencil was not fit tightly. See the images how I eliminate this.


-
He he
 The left one is ready:

Do you want to know how I didi it?
-
Wow! Steve, the first your picture cleared my mind. Thank you!
-
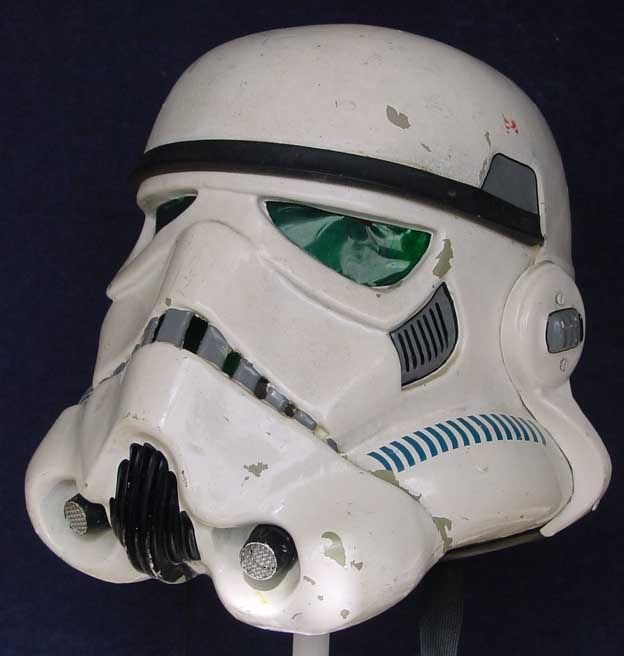
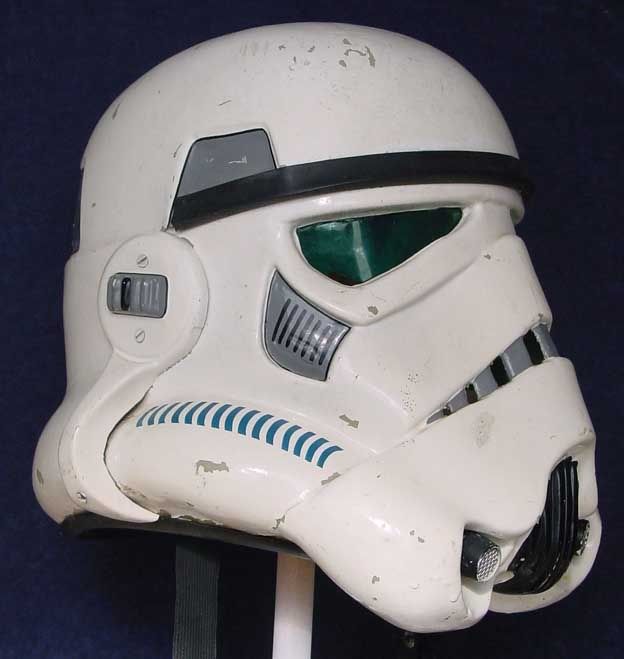
I need help with the tube stripes. I saw the picture of original helmet:


There are 16 stripes on the left side and 15 stripes on the right cheek.
I have such stencils:

There are also 15 and 16 stripes accordingly, but I'm not sure about end stripes camber. Is it the right orientation of stencils on my photo according to helmet?
-
Yes, good trick. But I didn't find in local hobby store the white enamel, there is only the acrylic paint. And I don't know if it possible to lay enamel over the acrylic and if it will be durable enough..That's why I want to go using airbrush. The airbrush allow to paint carefully covering the surface, as if falling from the top to down. And not to crawl through the stencil. The other one thing I want to say is that stencils a very good adhesive first time using. So If I'll be lucky to put it right way initially it will be no overspray totally, I'm sure. When you detach the stencil it going stretch and very difficult to use again without gaps. These are my observations when painting black stripes. So if I'll apply the stencil perfectly, I'll use just the brush easily.
The good thing is that trooperbay supply the double stencils in one set ($20), so if you spoil one sticker, you have the second one trial.
-
I have used the trooperbay stencil for the stripes. It's really help to make it without nervous tension:

The same I want to do with the tube stripes. May be using airbrush.
-
Painting in progress:


-
He he, now I see all the imperfections of the original stormtrooper helmet - twisted contour, curled nose, egg-shaped dom and others. I really love this, it is so humane and much more attractive than EFx I had.
See the ear positions from the top. The left one is far behind matching to the right ear


-
The symbols on the side are a representation of the original Hovi mark which is HOVI-MIX Pa2
as for placement someone with more knowledge will need to chime in but I don't believe the alignment matters so much but I would probably put them above or below to hide the mark although its mostly unnoticeable once placed anyway. Great build by the way! thinking about getting on that long waiting list for the ATA myself.
Oh, thanks for the info!
Yes, ATA is beautiful, I wait for my kit 9 month.... But now I savour the building after so long waiting

-
Fufff... I have adapt the left ear. But it take me nervous for some time.
First thing is that is more curved planes that should be fitted. But I did it:


-
I never regret of buying my airbrush system. It is necessary in many cases - furniture, home equipment, toys, models... anything that need to put paint carefully.
Excellent gift, grats!
-
While I'm not on the working table let me ask question about the mic tips. Here is some sign or symbol on the side:

What is it mean, and how to position the mic tip on the helmet concerning this mark?
-
Looks like you still have some excess plastic at the bottom of the ear. But the rest of the trimming looks great.
Oh, this is the easiest work, I'll trim it during S-trim installation.
-
So it is finally done....the right ear only!!
Using dremel sanding drum as rough cutting, then sandpaper by hand. Very addictive action

As I understand it is impossible to fit the ear "in-line". When you try it slightly covering there is one look. When you try it by hands making some pressure, knowing that there will be the bolts - another look. And when you screw it up by all of the three bolts - looks at all the different.


Don't look at the bottom of ear, I'll trim it when S-trim will be installed.
-
Two days of trimming of one right ear

-
Is there any reference by the ears placement on helmet. Any rules of ear position angle, tilt?
-
A liiiiitle bit curved

-
Now it's time to join the two halves of helmet. I like low brow and I'm seeing my helmet such way:


Is the sides alignment correct?
-
Glued, drilled, painted and screwed

By the way, the lens that Terrell send me with the helmet was very high (in dimension), so when I cut the lenses there is enough for installing the rest stripe from ear to ear. Just like I cut the nose area
 And if my installation will fail, I always can apply the accurate version
-
Here is the progress. Using of furniture cotter pins and fast curing epoxy.


-
Oh yes, you are right. I'm just use a wrong word, sorry.
I mean that using of two split triangular lenses will give neat interior of the helmet.
-
I like EFx style of lens attaching - bolt on. I will try to do the same. It will be more accurate looking than full stripe of lens from ear to ear. Also there will be no problem with fogging - I will install the blow fan inside the helmet.


Ales ANH Stunt ATA helmet assembly
in ANH (Stunt and Hero)
Posted
The same preparation and painting the right side blue stripes: