

LeMaxim
-
Posts
299 -
Joined
-
Last visited
Content Type
Profiles
Forums
Gallery
Articles
Everything posted by LeMaxim
-
LeMaxim's RS PVC ANH Stunt Build [*RS] (WIP)
LeMaxim replied to LeMaxim's topic in Build Threads Requireing Maintenance
Before I start documenting the mods to my armour I thought I'd just fill in a blank from my build. As I used the bracket system for my torso I needed to make the elastic hoops. Every time I thought about sewing I got sweaty hands and a slight anxiety episode. (textile workshop at primary school really seems to have damaged me.) So I needed a way of putting the hoops together without relying too much on my very limited skills as a seamstress. I thought for a while and got an idea, “Hey! I've got all these magnets lying around here.†Long story short. I decided to enlist the help och glue and simply add some manual stitches after. My idea was to simply wrap the hoops around a thin metal object and have them held in place with magnets while the glue dried. I had lots of magnets, elastics, and textile glue. The problem was finding a metal object thin enough to allow the short elastics to be wrapped around, and wide enough to allow for the magnet to keep it in place. After searching for a suitable object I again found something from the Swedish Embassy (IKEA). Grundtal stainless steel rail. Since I live by those rails and have a lot of them for hanging things on I actually had a few I still had not put up. As it turned out the diameter of the rail was perfect for wrapping the elastics. I used one of the wall-mount-brackets of the rail to keep the rail from rolling around. So. Here's what I did. 1. Cut elastics to length. 2. Apply textile glue to joining edges. I went for the circle shape instead of the, as far as I know, more accurate drop shape. 3. Let glue rest for a moment before joining the edges together as per the interactions of the glue. While waiting I had time to apply glue on all and let them rest. I let them rest on the magnetised to the rail. 4. Wrap the elastic around the rail so the edges overlap. Push down. Apply magnet to hold steady while glue dries. Repeat with each elastic as they had rested enough. 5. After glue had dried I simply removed the magnets and slipped the hoops out. 6. Stich glued area for extra strength for the hoops. (as a side note the hoops were very strong even without stitches) 7. Attach in brackets. Dress. Troop. Live the dream. It's not like the hoops are the most difficult thing to manage, but I had a fun time exploring this solution. Next post will be about protecting your eyes from nasty rebel projectiles while trooping. -
Affirmative! Now everything seems to work as expected again. Thanks!
-
LeMaxim's RS PVC ANH Stunt Build [*RS] (WIP)
LeMaxim replied to LeMaxim's topic in Build Threads Requireing Maintenance
Oh wow! That's 5 out of 5. Who says TKs can't hit a mark? Thank's Eric and Germain, then I'll continue building towards comfort, Centurion and general TK-ness in this thread. -
LeMaxim's RS PVC ANH Stunt Build [*RS] (WIP)
LeMaxim replied to LeMaxim's topic in Build Threads Requireing Maintenance
Thank you Troopers! Sorry for not posting any updates on mods or anything here for a while. As a high ranking (highest in fact) member of FISD just recently pointed out... How come I'm not going for EIB already? I will. Soon. Fist of all I wanted to properly troop in my armour first to get a better feel for it. Due to ill timed flue-knock-out and work the 10 planned troops became 5. Can you spot me? (Well. I did manage to squeeze in two birthdays for kids of friends too but they fall outside the official count) Secondly. We are doing some redecoration at home and since I work off our floor I have decided to put trimming off for a bit. But soon. Very soon. In the meantime I will share some mods I've done and other troops along the way. Hmm... Is it customary or not to put post-approval mods and EIB-mods in the WIP? It feels logical, some how, since an armour always seems to be a work in progress. Anyway. I hope 2014 have started of wonderfully for you all. Cheers, Maxim v.2014 -
I don't know if a screenshot would help. I can actually see and read posts I subscribe to or participated in. (Not this however) I can also get Unread posts listed. TT however doesn't list any posts when going through the "forum" exploration. It lists the forum and all the sub-areas but no posts in them. I have checked on the other detachment forums I'm following through TT and no other seem to have the same issue. Weird. I tried to reset cache and restart app again. No luck this time either. Maybe it's just some temporary gremling on my end. I'll be patient and check in later.
-
Is it just with me or does Tapatalk currently have issues displaying FISD posts? I cannot read anything of Tapatalk right now. Noticed it a few hours ago and have cleared cache and restarted the app without success. Interestingly enough I can read posts from FISD through Tapatalks Feed-function. Anyway. Thought I'd mention it to see if it's just me or anyone else too. Tech-wise I'm on an iPhone (5s) with Tapatalk pro v.2.5.0.
-
LeMaxim's RS PVC ANH Stunt Build [*RS] (WIP)
LeMaxim replied to LeMaxim's topic in Build Threads Requireing Maintenance
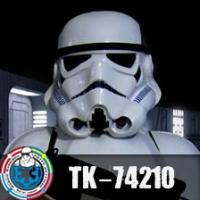
It's interesting how, once you get your approval, the build thread seems to take a long step back. I'm sure I'm not the first new trooper to experience this. Legion, Garrison and Detachment access to various forums and a new world opens. Troop sign-ups, Historical discussions, merchandise... So many new things to read. But while I have been away from this thread for a few days I have not forgotten about it. Thank you all again for your words of encouragement, advice, and congratulations. Now the real adventure begins. I have about 6-10 trooping events planned for the coming month and will, no doubt, find many things to attend to on the armour. A pinch here, and a sharp prodding pain there. Some "lightly scuffed" applied, and in-field mods done, then I'll be ready to revisit this and prepare for EIB and Centurion. I got the opportunity to get my first troop done on saturday last week, not 3 days later than my approval, and had a great day. Three TKs (TK-54321, TK-12020, and myself) and one certain rebel spent the day outside the local SciFi-book shop and collected money for the relief efforts in the Philippines while posing for pictures, high-fiving kids and fending of overly “cool†teens. It felt like a very worthy first troop and it felt great to be part of it and having finally joined the ranks of the Legion. The local weather was good and the locals were generous. I'm not sure if the numbers are official yet but in about 4-5 hours we collected the rough equivalent of a fully built and kitted RS armour (using this as a measurement as it's numbers I can compare with). Felt like a good start of the trooping-career. Nordic Garrison did similar troops in a number of cities for the same cause at the same time and from the total collected (which was split between a number of relief organisations) $800 was given directly to the Philippine Outpost for their Operation New Hope. (Nordic Garrison FB Coverage of the troop) All in all a good start. Finally. First picture of TK-74210 on troop. (L-R: TK-12020, TK-74210, That Rebel Scum. Picture credit TK-54321) Big hat tip to Nicky (TK-54321) for coordinating this event and the Garrison efforts for this cause. Oh. And finally. Why 74210? As I was building I kept a list of possible ID’s and significant numbers that popped up… After a while I found a great one and I started to stress about it getting taken before me. Fortunately I got it. So. 74210 is a combination of several numbers. Let’s start from the left. 7 = Always a good number. 74 = In Star Trek, as some of you probably know, 47 is a reoccurring and special number. So special and used, in fact, that they started hiding it away a bit more with the reversed 74. 4 = The number of my favourite classical Doctor (Tom Baker, the one with the long scarf). Also the current Doctor at the year of my birth (1978) 42 = Well. Apparently it’s the answer… 421 = I really shouldn’t have to tell any of you why this is a special number. 2 = “There’s always two…†210 = The TK-ID of Legion Founder Albin Johnson. Because he really started something good here and I’d like to honour that. 1 = Refers to “The One Ring†in Lord of the Rings. 10 = The number of my favourite modern Doctor (David Tennant) and the Doctor that really got me whooked. 0 = Apparently everything is nothing with a twist. So that covers the rest. There’s probably a lot more there too… but I didn’t want to over think it. Yes. I like numbers and quite a few other things. (edit: typo. "Rebel Scum". Not "Rebel Sum". ) -
LeMaxim's RS PVC ANH Stunt Build [*RS] (WIP)
LeMaxim replied to LeMaxim's topic in Build Threads Requireing Maintenance
Thanks again everyone for your help, comments, cheering on, and congratulations. I'm still very stoked about this As it turns out I'll do my first troops this weekend in support of the relief efforts in the Philippines. Time to hit the ground running. This is what we signed up for. I have a busy day today but have more pictures coming along this evening. In the meantime I'll offer this as a start. I have, sort of, kept this build-project a secret for my non-legion friends. Time to come out of the closet now. More to come. -
LeMaxim's RS PVC ANH Stunt Build [*RS] (WIP)
LeMaxim replied to LeMaxim's topic in Build Threads Requireing Maintenance
Thank you Reza! I'll try to wear it with dignity and make you proud. And as I was sipping my evening-tea, trying to unwind before bed, I got an email... TK-74210 reporting in! Yay! (Now I'll try to calm down, compose myself, and get some well earned and needed sleep.) -
LeMaxim's RS PVC ANH Stunt Build [*RS] (WIP)
LeMaxim replied to LeMaxim's topic in Build Threads Requireing Maintenance
Excellent! Looking forward to it. -
LeMaxim's RS PVC ANH Stunt Build [*RS] (WIP)
LeMaxim replied to LeMaxim's topic in Build Threads Requireing Maintenance
Long night, short sleep, long day and the jolt of anticipation with every new email. Thank you all for your kind words and suggestions. I still have some way to go before I feel comfortable about going for EIB and Centurion, but I'm eager to get started on that after I've been approved and have trooped at least once. There's a few events coming up in the coming month that I'm hoping to attend as a TK-proper. Thank you! I'll be very happy if I can offer any help to a fellow builder. I'm far from an expert but I'm getting more and more comfortable as a builder. Where in Sweden is your friend located? If it's somewhere near me (Gothenburg) I'd be happy to share my experiences and thoughts in person. Yeah. It was late and I had all but suited down when I realised that the gloves had come out a bit. *facepalm* I was too tired and too eager to send my approval pics to get suited up again that same night. I'm hoping the approval committee will see past that. Right bicep. Right you are. Back of thighs. Right again. I just wanted to keep as much as possible of the "original build" to try out before trimming. I will most likely find that and many other areas pinching and in need of a good dremmel-down in a near future. Blaster. Yes. Hopefully I'll continue with that this weekend. That's the plan. If there are nothing I need to fix on the armour for my basic approval I'll return the apartment to a more liveable state and head back to the workshop where I have my plaster parts impatiently waiting. Soon. Soon. (In the meantime I got myself a child proof extra. More on that later. ) Thanks! Yes. I guess I'm not as muscular as I would want. I still have some room to grow in most directions in the armour. Biceps are one area. I tried to gently heat bend it a bit but I didn't dare to do too much to start with. I'm hoping this isn't a deal breaker for basic approval and I'll be happy to mod it for EIB and Centurion as soon as I have some "miles" in suit. I'm actually hoping to be able to pick your brain in general and in person on a not too distant event about how to take everything to the next level. Cheers! I agree. I guess was still hoping that those extra papers I shuffle every day eventually will show. Thanks Man! The Han-snap is there but I do have some extra room in the torso that folds it out of sight in normal use. I didn't dare to take more of the torso before trying it out for real. As soon as I've been cleared for basic approval I'll gear up again for EIB and Centurion. I still have a few things to take care of before that. Slimming down the biceps and the torso will most likely be on the top of that list. For the moment the armour, and myself, is kept in a state of hallowed anticipation as we await the "Game on!" call. Thanks again everyone. I'll keep you posted on my progress. Ps. It seems this forum really doesn't allow the numbers of smiles I would want to share now. Imagine how it would react to a post-approval posting. Maybe I should change my nick to SirSmilesALot. -
LeMaxim's RS PVC ANH Stunt Build [*RS] (WIP)
LeMaxim replied to LeMaxim's topic in Build Threads Requireing Maintenance
Thanks Brian! I'm glad to see your build moving along. Looking forward to see you suited up too. -
LeMaxim's RS PVC ANH Stunt Build [*RS] (WIP)
LeMaxim replied to LeMaxim's topic in Build Threads Requireing Maintenance
So. Here it is. LeMaxim suit MK 1.0 In hopes that I could get started on MK 1.1 I sent these below pictures in for approval. The glue and paint (for rivets and screws) had just dried and I got eager to join. (hence the late night-unshaven-look) I still feel too wide in the torso-section but following the much repeated advice to not modify too much before you have had time to troop and get to know the ups and downs (and scrapes) of your suit I feel good about the current state. Anyway. MK 1.0. I hope it meets the standards to join. It's been a long day. Time for bed. -
LeMaxim's RS PVC ANH Stunt Build [*RS] (WIP)
LeMaxim replied to LeMaxim's topic in Build Threads Requireing Maintenance
Curing. Waiting. Mess. I went with the all glue strapping and it seems to turn out well. Tonight I'll be able to suit up and hopefully get my application pictures ready. Thank you Troopermaster and Locitus for the nudge in the glue-direction. I tugged hard at one of the finished straps to try and there's no way in Hoth they will come off unless deliberately wanting to get it off. Stay tuned. -
LeMaxim's RS PVC ANH Stunt Build [*RS] (WIP)
LeMaxim replied to LeMaxim's topic in Build Threads Requireing Maintenance
Excellent! Cheers Paul! I'll make sure to vent my confusion here as it arises. It will surely arise. -
LeMaxim's RS PVC ANH Stunt Build [*RS] (WIP)
LeMaxim replied to LeMaxim's topic in Build Threads Requireing Maintenance
Cheers Mathias! "A good enough" from you is more than good enough for me. On the topic of bicep-arm connection. Assuming the ridge on the bicep is 12:00 (o'clock) and the front cover strip is 15:00, where should the connecting elastic be centred? I would assume 16-17-ish. Is that correct? I cannot make out properly on the reference pictures I've looked at the last few days. I probably have seen a definitive picture of this before (vague recollection if it) but cannot find it now. -
LeMaxim's RS PVC ANH Stunt Build [*RS] (WIP)
LeMaxim replied to LeMaxim's topic in Build Threads Requireing Maintenance
Thanks Paul. I did a tape-up to get a first feel of the next step. So. Here's the first pictures of me suited up in my soon to be finished armour. (The tape didn't hold too well so pieces started to fall of and out... but you get the general idea.) Still some things to do, but I'm feeling very good about seeing everything together like this. -
LeMaxim's RS PVC ANH Stunt Build [*RS] (WIP)
LeMaxim replied to LeMaxim's topic in Build Threads Requireing Maintenance
Thanks. I might have expressed myself clumsily. What I meant was that the brackets are installed and will be used as they are. What I'm thinking about now is what to do with all the other straps. Shoulder bell, arms, torso (6 rivet side + opposite side), thighs, and shoulder bridges. As I understand all but the torso-six are glued to the armour in the original strapping system. There's a system with the Torso-six using split rivets and snaps. I believe this is referred to as the UKG way. Many seem to be using snap-plates instead of gluing. I'm curious about which straps could/should be glued and which could/should be snapped. As I see it it boils down to a question about accurate vs. easy to disassemble (I.e. For transport) with the cautionary addition of snaps might unsnapping and glue being difficult to correct if misaligned/mis-measured. I.e. That old question. -
LeMaxim's RS PVC ANH Stunt Build [*RS] (WIP)
LeMaxim replied to LeMaxim's topic in Build Threads Requireing Maintenance
So. Question time. I'm about ready to start strapping myself up in this contraption I've constructed and I'd be thankful for any dos and don'ts of strapping. Initially I thought I'd go all in for original strapping but now I'm starting to lean towards snapping it all up. I've already put the original brackets in so they will stay. Any wisdom or experiences to share on the topic? -
LeMaxim's RS PVC ANH Stunt Build [*RS] (WIP)
LeMaxim replied to LeMaxim's topic in Build Threads Requireing Maintenance
Meanwhile in Sweden... I have about two square meters of floor space to work with but work is continuing and nearing the end phase. Some friendly troopers over at Nordic Garrisons Forum pointed out that I might have been to eager to align the top of the right thigh on my armour. They were more than correct. In my eagerness to put the thigh together I remembered reading “The thigh ammo pack was probably put there to cover the missmatch of the lower part.†and on double-checking the reference pictures I just checked the alignment of the upper part... (From TKCaleb archive) At my first alignment the thigh pack didn't cover the lower part as I had assumed. In fact it left a nasty looking hole. That's a no go. It seems we have another RS quirk on our hands. So by the power of E6000 I tore the cover strip away and realigned it. *phew* And today I also attached the thigh pack. (Yes. My thighs are thin and I didn't want to walk like a cowboy. I tried. It's not me.) Moving on. -
LeMaxim's RS PVC ANH Stunt Build [*RS] (WIP)
LeMaxim replied to LeMaxim's topic in Build Threads Requireing Maintenance
So. Slowly, slowly this build is progressing. Haven't got time to do a proper posting but just wanted to let you know I'm still here and working on it even though there haven't been much from me lately. Some pieces are getting ready and I decided to do a test dressing up. I'll need to do some mods when I have all the pieces together. It's a challenge to move around even with only this on. Anyway. Enjoy the sneak peak. Have been trying to make everything fit me good. So far it feels it does but I foresee the torso giving me some grief. My trial runs so far make me look very bulky. I have a lot of space in it. But that's a head scratcher for another day. Hoping to have legs completely finished this weekend... But we'll see what i find time for. -
LeMaxim's RS PVC ANH Stunt Build [*RS] (WIP)
LeMaxim replied to LeMaxim's topic in Build Threads Requireing Maintenance
Ha! I can imagine. And that was "just one" droid. No. There's a wide variety of "screen accurate", and in the end you just have to decide which one of them you agree with the most. Thanks for your kind words. I hope I can be of use for you. The documentation really takes time but I feel it'll be good for me too. Someone once said that the problem with life is that we understand it backwards. So when the build is finished I hope I'll be able to turn it around and make some kind of sense out of it. In the meantime I'll just try to have fun and not freak out too much. I had hoped for some more big progress to report but as you all know life is what happens while you are busy making plans... so. Anyway. Some progress and since it's in the early AM here I will just put this picture here to show that things are moving on my end. Me getting my Hulk on. Well. Sort of. I have never looked so broad shouldered. Still things to trim. The pieces really doesn't "just fit" and I have plenty of room to go Popeye-Hulk if I need to. Tomorrow I'll trim more and hopefully lull myself to sleep with the faint aroma of E-6000 lingering about. -
LeMaxim's RS PVC ANH Stunt Build [*RS] (WIP)
LeMaxim replied to LeMaxim's topic in Build Threads Requireing Maintenance
He, he... Well. They are within on-screen tolerance, as it were, but I still want to trim them down a bit. Next round. Thanks again. -
LeMaxim's RS PVC ANH Stunt Build [*RS] (WIP)
LeMaxim replied to LeMaxim's topic in Build Threads Requireing Maintenance
You are quite right, and I will attend to the ears in my first mod session when the armour is complete. Right now I'll stay my hands lest I go mad with bucket details. It's on the to do list. Rest assured. And thanks for the nice comments. All of you. -
LeMaxim's RS PVC ANH Stunt Build [*RS] (WIP)
LeMaxim replied to LeMaxim's topic in Build Threads Requireing Maintenance
Where did all the time go? I'm came back from my vacation earlier this week and have been gearing up to get on with my build. I had a very nice time in both Hungary and Ireland. In Hungary I met up with the Hungarian Garrison. Had a very nice evening in Budapest and scored some rare loot. Thank you 1526, 2359, 2360, 3418, and 4302 for taking the time for a 501st-cadet! A few days later in the city of Székesfeérvár (Hungary) I had a night out and found some art and after a few beers I went to an all night Tesco and found some new toys. (Yes. I was very tired then that picture was taken but the Lego was a nice find. ) On to Ireland. Sadly I missed the troops of the Irish Outpost by about one week in both directions and didn't have the opportunity to meet up with any of the local troopers. All in all I had a nice time there too but TK Maxx was a big disappointment. After three weeks away from home I had come down with a serious case of builders-itch and on unpacking my suitcase it became ever more obvious. It feels good to be back. On with the build. When I left for vacation I had realised I was not at all happy with my tube stripes. As time ran short I decided to let it rest and do some research while being away. Pandatrooper's tutorial/stencil called for about a 20 mm length in the tubestripes which I aimed to follow. After seeing them on the bucket and getting some nice feedback (se above) it became more and more apparent that 20 mm was too long. Having heard good things about Trooperbays stencils I decided to order a few for reference and use. They had arrived well before I came back. This is my tubestripes before vacation: Not at all a fair sight, but I did at least try to freehand it. With a quick comparison to Trooperbays Dave M decals: The decals are about 16 mm in length and about 3 mm in width. This is about 20-25% smaller than my freehanded ones. So. Another bout with cleaning them away, applying the Trooperbays hand painted-style stencils, painting, and slight bleed-touch-up... ... I ended up with this There are still some details that I most likely will revisit in a later mod-session but right now I feel satisfied with the result. Please feel free to comment on the helmet. I will be aiming for Centurion but before I start to nit-pick my brains out I want to clear basic approval and do some troops in the armour. (Both comments about basic approval and things to be think about for centurion are most welcome) And finally. A poor quality selfie because, well... because it feels good to get my stripes on Yay!
