

meanders
-
Posts
73 -
Joined
-
Last visited
-
Days Won
1
Content Type
Profiles
Forums
Gallery
Articles
Everything posted by meanders
-
Meanders TK Build [*ATA]
meanders replied to meanders's topic in Build Threads Requireing Maintenance
Are you talking about the ends of the arms where the two halves line up like this? I think it I was doing it again I'd pay more attention to this part of the trimming and try to get the gaps closer. But there's also some cases where even if there is zero gap the edges don't line up (one might be further out than the other - more noticeable on the tops of the thighs). In that case I've used the ABS paste to smooth across. I don't own a sealing iron but I would guess that would also be an option bend the returns in to get them to join. So how's your build going @LePaul? I looked at your WIP thread but it hasn't been updated for a while -
Meanders TK Build [*ATA]
meanders replied to meanders's topic in Build Threads Requireing Maintenance
Starting to fit the thigh ammo pack. The placement looks good to me, but would appreciate any feedback. As I understand it, the rivets should go where the clamp pads are currently sitting. Excuse the masking tape on the front. In the process of filling a noticeable gap. -
You'll be fine Have you finished the belt yet? It would be good to see how that looks once its in place. I suspect that it will pull the sides into shape a bit better. I like what you've done with the cut out on the kidney plate. I'm about to look at doing the same on mine. How did you get the return edge done on that? I've been using ABS paste (Acetone and armor offcuts) for filling a few gaps. I leave a batch in a small jar to use. If it dries out, just add a slug more acetone.
-
Looking good Trevor! I'm up to a similar place with my ATA build as well. Its been a long road
-
Meanders TK Build [*ATA]
meanders replied to meanders's topic in Build Threads Requireing Maintenance
Time to add a few more obligatory build photos. This is taking a loooong time but in the few hours I get here and there its great fun Once the biceps and forearms were assembled (using the inner strips first) there were gaps on the arm openings where the two halves meet. They looked something typically like this. Even if you try to be as accurate as you can with the trimming you'll still get gaps. I made up some acetone ABS paste to fill the gaps as seen in the finished biceps... and forearms.... Nice and seamless returns. And I think there's sufficient lack of return on the front of the forearms. We'll see what it looks like when finished. The PVC cement (Protek brand from Bunnings) is doing the job with strong bonds. You only get one chance to get it right so slow and steady is the best approach. Here's a tip I discovered when putting the cover strips on. Some masking tape on the back of the strip, besides not getting confused over which side to apply the glue, can be made in to a handle to make sure you don't accidentally get glue on the fingers and everywhere else. The masking tape on the sides is there for guidance in placing the strip. -
Meanders TK Build [*ATA]
meanders replied to meanders's topic in Build Threads Requireing Maintenance
OMG! The ears! I started off going great guns getting right ear into shape ... until I realised it was the left ear But I think I hadn't gone so far as to be unrecoverable. From then on it was sanding here and there to get them into shape. Some 360 grit sandpaper wrapped around some 48mm PVC pipe I had in the shed was a good match for the cheek tube curvature, so I could get them pretty smooth. Here's where they are now, just held in with the top screw. The gaps at the front in particular will close up when the other screws are in place. The gaps at the back of the ears are not as tight. But I suspect there might need to be a few more adjustments once all the screws are tightened up and things flex a bit more. The only query I have is whether or not its worth trimming off even more to make the ears a bit more slim. But they look OK to me. -
Meanders TK Build [*ATA]
meanders replied to meanders's topic in Build Threads Requireing Maintenance
Yes, some other people have made that comment to me as well. I still left a fair amount of material behind the teeth so I can take more out, to get them looking more like these reference pics. Thanks -
Meanders TK Build [*ATA]
meanders replied to meanders's topic in Build Threads Requireing Maintenance
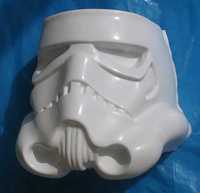
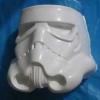
Did a lot of work on the face plate yesterday. To get the teeth nice and square, small strips of sandpaper. Or as I like to call it - Trooper-Floss. The final eyes trimmed. Pretty happy with that. And the nice shiney square teeth. All correct and accounted for. Started work on the ears. The ATA kits comes with two pair, just in case, but I'm still on the first pair trying to get the gap closed. -
Meanders TK Build [*ATA]
meanders replied to meanders's topic in Build Threads Requireing Maintenance
Started working on the helmet with a few detours . Obviously following the PandaTrooper build thread which is fantastic. One thing I wanted to check was if I could actually fit my noggin in the bucket, and if I could fit it with the glasses as well. Eventually got the brow sitting where I wanted it above the eye line. However there was not much overlap at the bottom of the face and cap plates. That would make fitting the bottom ear bolt difficult. And on closer inspection it looked like the brow and trim was not on the same level as the ridge on the back of the cap. Looks like I might have trimmed a bit too much off the cap brow Probably a bit too much off the sides of the face plate as well but I was just following the mold lines there. Anyway I could raise the brow to close the gap but I was never a fan of the high brow trooper So, with a bit of extra ABS from the trimmings, I was able to extend the cap brow line. And the brow trim covers the seam. Only my doctor and I ever need to know the truth So I can keep the brow positioned pretty much in the same place.... ... but with much better closure at the sides. Crisis averted It wasn't a full disaster (and I didn't get the to the crying stage) but it could have been worse. And on the question of the bucket fitting. Yes it does. With glasses? Not so much. Plan A to deal with this didn't work as you can see.... I'll need to explore this issue further -
Meanders TK Build [*ATA]
meanders replied to meanders's topic in Build Threads Requireing Maintenance
Yeah but your suit would be molded on by now after all that walking Thanks. Definitely under 6'. I figured getting the front strip attached would be the best place to start. And I've been studying the tutorials intently. They've been a great help. -
Meanders TK Build [*ATA]
meanders replied to meanders's topic in Build Threads Requireing Maintenance
I've also started trimming and test fitting the shins. They look to be the right length. And with room for a 22mm cover strip on the front and 25mm strip on the back as suggested it fits fine....until I try it with the boots and its a bit too snug about the boot ankle. So my question is, how high should the shin ankle (the bottom of the shin piece) sit on the boot? This image from the tutorials show them relatively high up. But in other reference shots I've seen them a bit lower. I could probably make the back cover strip a bit wider (40mm?) and it should sit comfortably at that level. My concern is that when trooping the shin will ride up above the top of the boot, and get stuck there. Are there any tricks to keeping the shins down? Any thoughts? -
Making a start on my 3rd costume to join the ranks of the shiney whites! Thought I'd share this here. I've been slowing slowing for a few weeks now, and not expecting this to be a fast build. Something to keep me occupied during the winter months, huddled over a fire, whittling away bits of ABS I've been to trimming away slowly. The score and snap method is working well with the trusty old craft knife. But for chewing away big chunks at a time the Lexan curved scissors are the ducks nuts. Got mine from a local RC racing shop. And the collection of ABS offcuts is growing. Going to experiment a bit (on the offcuts ) with the ABS/Acetone mix to see how effective an adhesive it is. Trimmed the left forearm and bicep back to where it fits and where a 16mm wide cover strip can fit over the joins. Seems to fit ok and I can still scratch my head With little imagination I can see the rest of the suit in place
