


theisaac
-
Posts
455 -
Joined
-
Last visited
Content Type
Profiles
Forums
Gallery
Articles
Everything posted by theisaac
-

Isaac's AM build - newbie- picture heavy[*AM]
theisaac replied to theisaac's topic in Build Threads Requireing Maintenance
Ya man, my forearm are tapered a lot! I took the two halves and overlapped them the drew a line. There is a half that's smooth with the crescent and the other with the dents/dimple things. Since I was butt jointing the edges I cut about 1/4 inch off the overlap on the bumpy side and did most of the trimming off the smooth crescent half. Then when I covered with the cover strip it looks like a screen suit more. I would trim the overlap down first then tape it up again and double check your measurements before cutting. I also undercut everything by a few milimeters just in case. Then sand down to fit and fix any waves in the trim that might be there so it's flush. I used a for sale sign for my inside shims and the extra abs that comes with the kit for the cover strips. You can go back to page 1 and see how much I trimmed on the forearms. Look at the finished piece and compare to your uncut halves. Make sure to remove the return edge at the wrist opening before you size them too or you'll end up with a bigger wrist opening than you want. Hope this helps bud! Isaac -
Isaac's AM build - newbie- picture heavy[*AM]
theisaac replied to theisaac's topic in Build Threads Requireing Maintenance
Thanks Mark. Break out your box buddy! There are some amazing AM build threads here to inspire. Not mine but Pandatrooper's build also Tkrestonva's build. My advice to anyone when it comes to first builds is study and bookmark what others are doing and have done. If you look at my bookmarks right now I think I have about 23 of them just on TK builds and how-to's. Learn from others and follow or better yet improve on their systems. We all benefit from it in the longrun. When you start your build, make a thread and let me know! I want to follow yours too! Isaac -
Isaac's AM build - newbie- picture heavy[*AM]
theisaac replied to theisaac's topic in Build Threads Requireing Maintenance
I didnt have the back snapped into the back of the kidney for the pics. I honestly just put it on to test it and my kids were outside so I walked outside the garage to show them and my wife snapped a few pics to post on her facebook about tattoo'd stormtroopers. I am hoping that having the straps connected will force the back up and the chest down where it is supposed to be. Im also going to put some snap plates inside the ab section to connect to the chest to keep it from riding up. Its not cannon but Im not a cannon size so I'll have to adapt a few things to make it work. In the end I want to be EIB though so its a give and take thing for this suit. When I bought it I didnt really understand what EIB was and now I want to be part of the 300 goal. At this pace I might just make 300 lol. Isaac -
Isaac's AM build - newbie- picture heavy[*AM]
theisaac replied to theisaac's topic in Build Threads Requireing Maintenance
Adjusted the biceps and shoulder bells higher. Took some pics to see how its fitting so far. Also testing the shins for fitting. -
Isaac's AM build - newbie- picture heavy[*AM]
theisaac replied to theisaac's topic in Build Threads Requireing Maintenance
Im doing a test fit of my straps and snaps and seeing how its fitting so far. I'll post some with the ab plate after the glue is cured more on that tonight. Im working on getting the chest fitted correctly right now. The moulded straps on the AM kit were trimmed down a lot to get the chest to sit lower. My neck and traps were pushing it up just under my chin. Im thinking about cutting some more off and making the webbing longer so it sits lower down my chest but im not 100% on it yet. Here are some test fitting pics. Below you can see the damn biceps rotate on me. They make an oval to fit my arms but it twists and forces the bicep to twist and get misaligned with the shoulder bell. I think Im going ot have to spend some more time with a heat gun on them. Seriously the most annoying part of this whole build has been that stupid 3 inch piece of plastic. I just see so much black right now. Not sure if thats just something I'll have to live with being a TK at my size or if its a position / strapping issue. Any thoughts? -
Isaac's AM build - newbie- picture heavy[*AM]
theisaac replied to theisaac's topic in Build Threads Requireing Maintenance
Quick clarifying question.. The ammo belt around the thigh... Rivets are ok or just glue it? Im going for EIB so I dont want to blow it on something simple like a rivet. thanks, Isaac -
Another AM armor build[*AM]
theisaac replied to silverBoyd's topic in Build Threads Requireing Maintenance
Yup, you'll want to remove the hyman there. Walk around with it for about 3 minutes and you'll see why. Everyone puts a rivet there to connect the elastic to the back of the butt piece too. So consider that before you cut. Take a look at Pandatroopers build and when he shows his strapping system you can see where he cut his. -
Another AM armor build[*AM]
theisaac replied to silverBoyd's topic in Build Threads Requireing Maintenance
Slow is the way to roll with it Jason. My thoughts on mine is that I only get to build it once and this is my first. There isnt a race to the finish line. I want to be proud of each and every little part when I look at it in pictures with me wearing it. I dont think that will happen with my obsession but still. No need to rush on it. Enjoy the build buddy! Isaac -
Another AM armor build[*AM]
theisaac replied to silverBoyd's topic in Build Threads Requireing Maintenance
I am building the same kit and I used the "for sale" sign on the inside shims of all of the butt joints. Biceps, forearms, shins. I used e6000 to glue the shims butt jointed. I let them cure for a few days and used the extra ABS that comes for the belt since im using a cloth belt for the cover strips. I can open them and get them around my legs without breaking the seam in the front. I have some thick shins too so it will work just fine if that was what your question was. I have put them on and off all weekend test fitting the back and havent had an issue. Good luck man, looking great so far! Isaac -
Isaac's AM build - newbie- picture heavy[*AM]
theisaac replied to theisaac's topic in Build Threads Requireing Maintenance
Ya this is just a really rough "hey tape this real quick" picture to show the sides and make sure they were right for the AM kit. Without that post I would have had it all wrong. Funny thing was even after looking at the images.. and marking them, I had them on the wrong legs and it felt aweful. Switched the legs and the fit was night and day. Brian I really appreciate your imput on this build man, When its done Im gonna send you a case of beverage of choice! Isaac -
Isaac's AM build - newbie- picture heavy[*AM]
theisaac replied to theisaac's topic in Build Threads Requireing Maintenance
So I went to my first ever armor party this weekend and got my shins done up. I think..... Can someone confirm this is the right sides for the AM kit shins? I also got the chest and back cut a bit but I dont have a way to take that myself so I'll have to wait to post those. -Isaac -
Isaac's AM build - newbie- picture heavy[*AM]
theisaac replied to theisaac's topic in Build Threads Requireing Maintenance
Got the frown pained and the lenses put in this weekend. Ordered new Brow trim and decals from Trooperbay. What do you think? any feedback? -
Isaac's AM build - newbie- picture heavy[*AM]
theisaac replied to theisaac's topic in Build Threads Requireing Maintenance
Starting to get discouraged on this build. Did you vets of building feel that way when you started? I feel like I've hit a wall and I dont really know where to go next. I want to go EIB so there is the pressure to not make a wrong trim or anything. I know either my bicepts are too long as they are right up in my armpit and I might need to trim that down not sure where though. My forearms are either too long or I need to trim that crescent shape down so I can reach my helmet but Im nervous about trimming that too. Makes me respect that guy from Hawaii who did it 100% on his own without another TK on the island to talk to in person to help size it that much more. Ive modded the helmet so Im proud of that at least. Although I want to buy a new one thats already built to troop in cause now I took out the rivets it doesnt feel very solid. I went from loving this thing to looking at my box of pieces and staring at it like its a nagging ex girlfriend if that makes sense lol. Anyway, back to my next round of questions. Can someone double check my shin sections that I have them marked right? I know the AM shins are different and I dont want to size them and find out they are the wrong sides. also the pencil mark on the back of the shins look like they are where they are "supposed" to be trimmed. Can someone confirm that before I trim that off? I was going to take off most of the return edge on the shins but then saw some AM shins in the EIB posts and they had a lot of theirs still intact so that made me pause. thanks FISD! Isaac -
Isaac's AM build - newbie- picture heavy[*AM]
theisaac replied to theisaac's topic in Build Threads Requireing Maintenance
Well after some advice from a Garrison buddy Mike, I drilled out the rivets I had in the helmet and took it apart. I painted the inside black and added foam from inside of a baseball helmet I got for 14 bucks. I also used the plumbers putty idea to build up the eyes and used velcro to seat the lenses better. Now I just have to decide on painting the details on the helmet or using Trooperbay's decals that look hand painted. -
I would suggest the AM kit as well. Im in the process of building mine and it sounds like we have the same build. Im 6'0 and 240lbs. I have lifted weights all of my life so I honestly never thought I could be a TK. I looked and researched for a few years and always thought it was out of the question unless I was 160 lbs. I settled on the RT-Mod and the AM kits and did more research from there. It came down to the measurements on both and I ended up going with AM lite kit. I love it. Its easy to put together and comes trimmed up really nice. You dont have to cut off the extra abs from the molds you just have to trim it down to fit you. Even with my odd proportions Im still trimming down to fit me which is something I didnt expect. Here is a pic to give you an idea of how you can make this fit without shims.
-
Isaac's AM build - newbie- picture heavy[*AM]
theisaac replied to theisaac's topic in Build Threads Requireing Maintenance
Im just trying to trim the return edge off of the shins before i get them sized up. How much of this trim should I take off? -
Isaac's AM build - newbie- picture heavy[*AM]
theisaac replied to theisaac's topic in Build Threads Requireing Maintenance
Ok, Here are the latest "throw them on and see how they fit" pics from tonight. Wore the underarmor to show how it will look. Understand these are just slid up my arms and not strapped or anything. I think the forearms need to be either cut shorter or opened up more via the curve on the bend of my forearm as I cant bend enough to touch my head. This could be because the bicep is falling down a bit. I just dont know. Feel free to add your opinions as its all I really got at this point.. -
Isaac's AM build - newbie- picture heavy[*AM]
theisaac replied to theisaac's topic in Build Threads Requireing Maintenance
Here are some pictures of how the biceps look after Mike got them sized up on me. Waiting for the glue to set on the forearms and i'll post a picture of them together. -
Isaac's AM build - newbie- picture heavy[*AM]
theisaac replied to theisaac's topic in Build Threads Requireing Maintenance
Got some really good advice and hands on help from my buddy Mike TK1636 from the Dune Sea Garrison and started over on the forearms and started on the biceps. He showed me how to butt joint them together. Im using the previously suggested "for sale" sign for the inside strips that nobody will see and will use the extra belt ABS material to make the visable strips on the outside. Got the biceps done today. Didnt have to shim them after all and even cut down some of the material and they fit pretty well. -
Isaac's AM build - newbie- picture heavy[*AM]
theisaac replied to theisaac's topic in Build Threads Requireing Maintenance
Used the other set of ears and took what I learned from the first go of it and the ears matched up a lot better. Also got the first pass of paint on the frown. -
Isaac's AM build - newbie- picture heavy[*AM]
theisaac replied to theisaac's topic in Build Threads Requireing Maintenance
Im at a standstill on my armor until I can meet up with my buddy from the Dune Sea Garrison to make sure I dont cut anything wonky so I assembled my ATA helmet today. The ears suck but I guess thats why the good folks at ATA send two pairs. Its fun and I had a great time doing it but I would much rather have one someone built so it looks the best it can. Im drooling over those new RT-Mod prototypes I saw posted here with the fans built in. -
Isaac's AM build - newbie- picture heavy[*AM]
theisaac replied to theisaac's topic in Build Threads Requireing Maintenance
Brian, Thanks for checking on my build and giving me feedback like you have! I really appreciate it. Makes sense on the shim, I have seen that site before and just never thought to put a cover strip on the outside to hide it. Even if I have to have larger than normal cover strips and it might look a little wonky I'll take it. So before I cut... Remove the part I marked red below and then shim inside with "forsale sign" then use the good ABS and coverstrip over the gap? My next question is with the forearms. Can I trim the cutout down a little more to make it so I can bend my arms up higher to reach my head? I have it dotted to show what I mean visually. I can bend a little bit right now but as you can see in the pics, as soon as I move my arms up the forarms are pushed down and dig into my wrists. Not sure if that was "normal". thanks for the feedback! Isaac -
Isaac's AM build - newbie- picture heavy[*AM]
theisaac replied to theisaac's topic in Build Threads Requireing Maintenance
Couldnt find shim threads here unless im calling it something different that what people usually use for it. I found some for the seams in calves and i'll cross that bridge when I get there. I did think about doing a shim where I can still hide it by using an overlap and clamping everything down. Take a look at this pic of what Im trying to explain and if anyone or anyone you know has tried it, did it hold up? I know its a small piece of ABS but Im just using it for reference to try to illustrate what I mean. I would probably do this on both sides so its centered and not lop sided when I wear it. think that will work? Or better ideas that are proven to work to make this bigger? Thanks for looking and your comments. You all really help a lot and give me confidence that I can pull this off. I appreciate it! -Isaac -
Isaac's AM build - newbie- picture heavy[*AM]
theisaac replied to theisaac's topic in Build Threads Requireing Maintenance
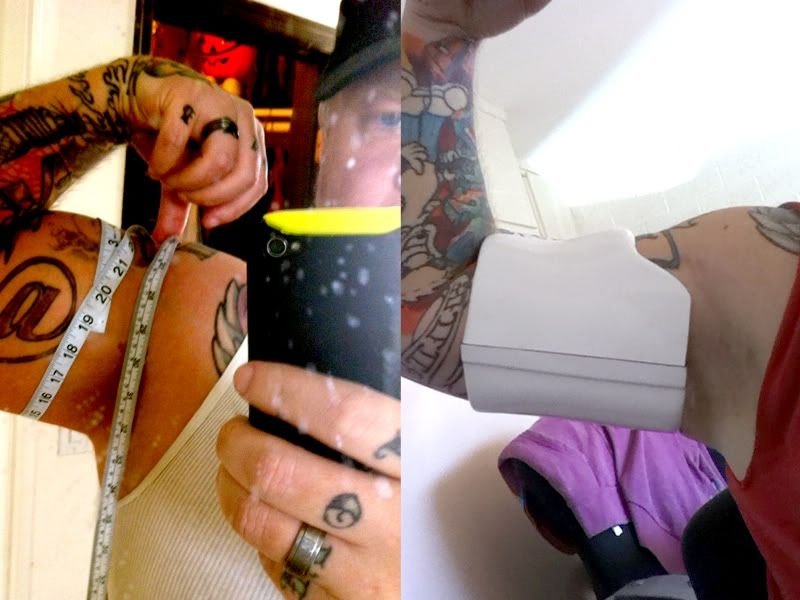
Here are the pics sir. The flexed arm one is cold didnt workout today at all. In fact, havent been to the gym in 3 weeks once I decided I wanted to do this. Im a little hesitant to post them as I dont want to hear Im too big to be a trooper. I can drop down to 225 or so but that will take about 6 months and I know there is a lot of charity things here in PHX over the summer and I'd like to be able to be a part of them. The above picture is with the bicep taped at the overlay on the outside and this is where it meets if I pull it down without any room for moving my arm up to touch my ear or anything. This piture above is when I give myself the room to move my arm up and touch my ear. I just need enough room to be able to take my helmet off without breaking a seam. Remember the opposite side is taped down using all of the overlap so If I need to shim or even some type of butt joint to give more room I can do that. I know I wont get to EIB until my body adjusts to not working out and I diet back down to my normal 220-225. Right now Im at about 245 or so. Even at 225 my arms are still about 18 flexed. -
Isaac's AM build - newbie- picture heavy[*AM]
theisaac replied to theisaac's topic in Build Threads Requireing Maintenance
Going to have to shim the biceps. Does anyone have a picture of how they shimmed theirs? Thanks guys!