

Nicky
-
Posts
444 -
Joined
-
Last visited
-
Days Won
1
Content Type
Profiles
Forums
Gallery
Articles
Media Demo
Posts posted by Nicky
-
-
Ok!
I played with the strapping to alter bicep height, backplate gap (that wasn't easy to get any significant change). And the belt was just sliding on top of my butt all the time so I lifted it with a velcro square in the middle. Also made a holster with black animal-free leather imitation that I reinforced by double-siding it with fabric glue, one snap, seven 4 mm rivets, velcro behind the belt to avoid the leather imitation to get too much weight tension and fail on the rivets.
Have a look:


-
I have shy biceps
 hehe but will do! I did leave extra length to the strap, I'll look at the reference pictures some more, add two snaps and it's gonna look better I think! Thank you
-
Thank youuuuouu!
Belt: Do you think that the ab plate is too low? (I thought so because the cod piece is always hitting the legs, doesn't bother me as I can't feel it or hear it from inside the helmet
)or do you think it's because I somehow pulled my canvas belt up in the rear too high and the front falls due to the rotation around side-snaps? I could try both! I don't have any tall mirror, darn! hehe
Biceps: Should I lower them, and the shoulder bells together? Reference pics show the biceps almost touch the forearms.
Backplate: Shorter elastic bands to the kidney plate, think that would do it? I thought of snapping the back plate to my suspenders in the rear too! I also noticed the gap. Also I strongly suspect the shoulder straps are too short and the back plate doesn't fall on the back but is in some sort pull from the shoulders and chest plate...
Hmm, thinking thinking!
-
Ok!
Semi-final pics before touching up and taking serious photos later this week:
http://nickymezzina.com/upload/files/images/120802_1555_NICKY_ANH_BUILD_2012.html
Can everyone who feels like it point me out everything that is wrong with my armor?
Like this:
1. Ammo pouches not right location on belt.
2. Holster, where is it??
... hit me!

-
Thank you! Couldn't have done it without help

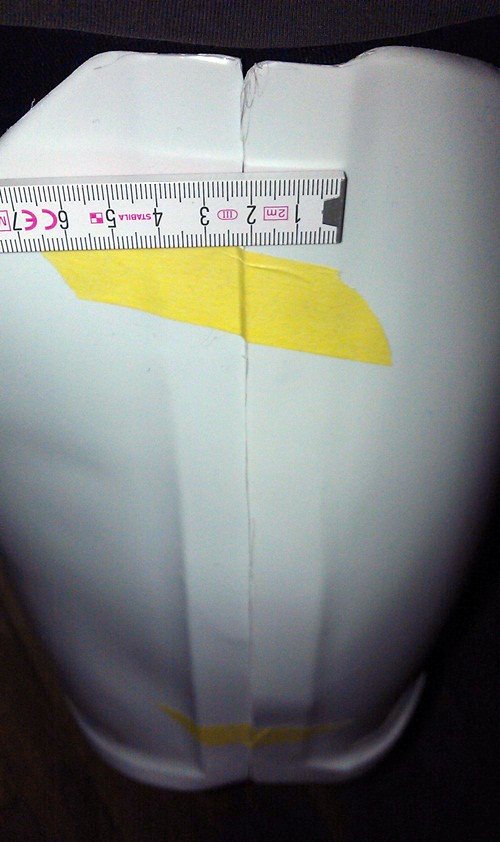
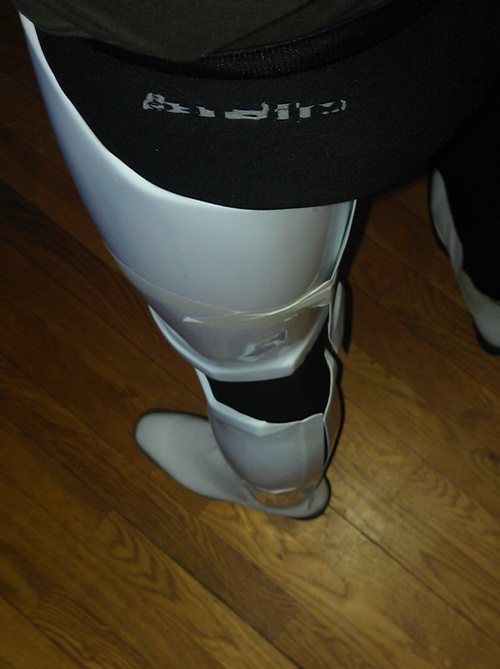
I went a bit further and fixed the thighs and shins, I trimmed the return edge off the left shin near the rigiht side of the knee where it bit so badly. It's much better now! I still can't climb stairs so there's something to fix very soon.
Fixed the belt, thanks to predefined holes that I only noticed after going mad at all the images of ab plate snaps for the belt that were so far inside that you would need extra tools to press them. Placed the snap covers too. That leaves a day without trying out the ammo belt on me.


Then I made the thighs' garter system with a belt and suspenders:

I can't really say if it's the inner curb of the thigh or my junk that you see there. So I'll just move on to the next picture:


Tonight has been full of joy!!! I still have a few things to do, accessories. But right now I can walk around as a stormtrooper as it is pretty much complete per se. The past weeks have been pretty intense with ups and downs because there's not much to make of the armor's appearance until we wear it completely. That I guess is the first-timer's main obstacle and I'm relieved I'm past it.
What I'm not past is finding my proper camera's battery charger. Until then I can only take mirror pics!
-
Name: Nicky Mezzina
TK ID: TK 54321
Forum Name: Nicky
Garrison: Nordic Garrison
Armor: T/MC
Helmet: T/MC
Blaster: Hasbro Doopydoo mod
Fitting data
Body height/weight: 177cm/82kg - 5'911/16/180 lbs
Cover strips (up/low): 16 mm / 22 mm
Trimmed on kit's marked lines: chest, back, kidney, ab, shins, butt, cod, bell, bicep, forearm (width).
Special trim: diagonal south thigh joint, upper thigh rings -2cm, south forearm rings -2cm.
Side gap: >3cm, needs shimming.
Ab plate: split
Bell height: covers bicep by >4cm
Boots: TK Boots
Belt: Trooperbay
Handguards: part of kit
Electronics: Aker 1508, Olympus ME52, iComm
Neck Seal: Trooperbay
Holster: Self made light leather imitation holster, + Trooperbay's if I pack my gat.
Thermal Detonator: part of kit
Lenses: part of kit green flat + solar film
Helmet Fans: TK 4261 (Curtis)
Dropbox Backs: part of kit
Decals: part of kit
Undersuit: Mil-Tec through asmc.de
Hi everybody!
First build thread, with pics and questions!
Awhile back I joined this forum to read up as much as I can about building a Stormtrooper armor (ANH). I would say ANH STUNT.... yeah I'm gonna say STUNT. I don't know exactly the difference in practice
I received december 2011 the plastic parts I needed, plus tons of accessories. It was a delight but I was so broke I could'nt have access to more tools than a xacto knife and stuff that my sister (TK5027) sent me from France (myself I live in Gothenburg, Sweden).
So the first step was trimming everything with the score and snap technique with the xacto.
I only started seriosuly about 2 months ago when I bought all the tools I needed, and even more seriously 4 weeks ago. I must warn you I am an IT tech, I'm good with computers. Not so good with manual work but I took my time, and tried my best! It was stressful as I couldn't always find information and how-to's about everything, some things that were trivial to me weren't for others and the other way around too which made me come to realize that we gotta get creative sometimes
So I received the T/MC kit, feels solid, it's glossy alright, and sometimes a dremel was the only way to sand things without burning myself with sandpaper.
By july 2012, here's my list of tools:
-Xacto knife, mail tool. I have many spares because like the true idiot I am I use the xacto for other things like lifting glue and the blades just don't work that way
-Dremel (3000 series)
-Heatgun
-Battery powered powerdrill, and lot of drillbits
-Sandpaper, sand sponges
-Lots of clamps, different sizes and strength. About 20 I guess.
-Big clamps for holding forearms, biceps, thighs, in place while glueing overnight.
-Medium strength neodym magnets, about 40 of them
-120W Halogen worklight
-Airway masks
-Protective glasses
-Measuring tape, various rulers.
Now on with the pics!
Spread out the ABS parts from the box I received.
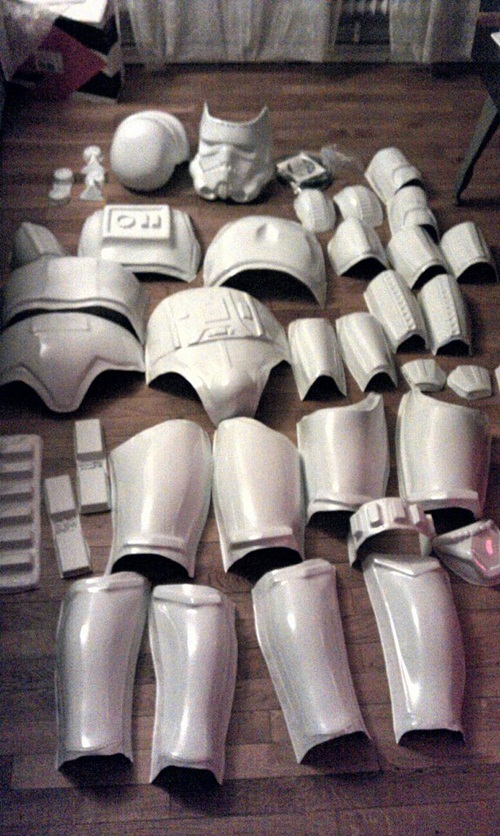
So yes, december 2011 I started trimming with the xacto and pliers.
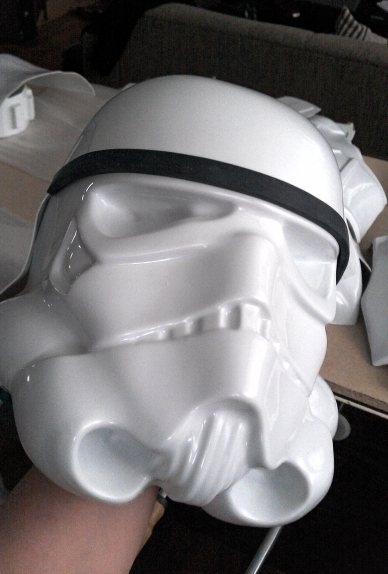
I quickly temporarily assembled the helmet to see where I'd put the frown. Of course, it didn't matter what I decided that early on.
Big break because I felt insecure working further, I couldn't go further without finding something else I'd need to buy. And money was a problem.
Here's my workshop:


May 2012!
Decided to start with what's wearable and most obvious, the chest and back. I would learn afterwards that it's best to fit from the extremities and inward to the center parts. So I did that:
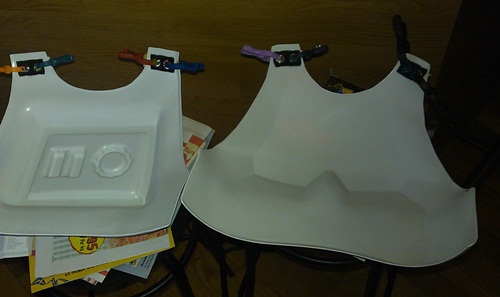
And started with the helmet:
That would be the first hole I used a drill on, the rest of the tile I just poked like an idiot until the holes fit a triangular filer. Then I used round filers a lot too. It's all about trying little by little until you can create the shape of a square. Right. I think.


It wasn't that hard, but I could have messed up which I didn't so *clap clap*
July 2012!
Ok I admit I took another stupid break. Time to get really serious and make something I can wear! Luckily I'm 177cm tall and 77kg heavy (or 5 feet 9^11/16 and 12.12 stones lolol) and I didn't find fitting so difficult. I could use the standard ridges on the legs and arms and not need extra plastic or to remove a lot except for the thighs.
This is what I did, first I refused the 40mm ridge. I went for 22mm / 16mm ridges.
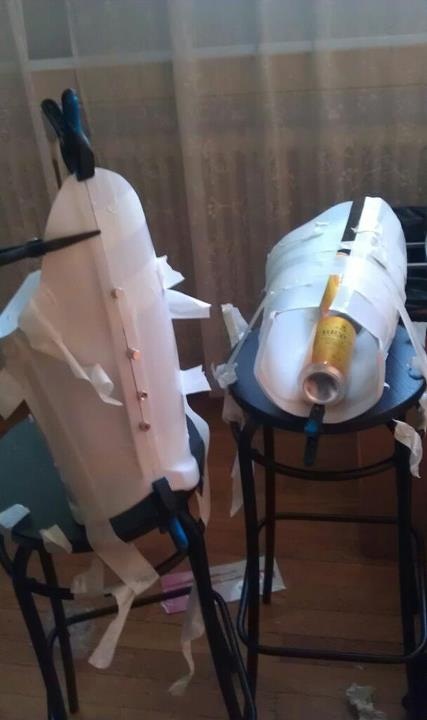
Ok that was tricky, how to hold this big thigh. I should have used tape, and strap it tight on the bar stool. But I used beer instead. Fair enough.
So happily I got most of the issues sorted out. Except for the shins. The left shin, top right return edge, digs into my left knee in a painful way. It's going to be the sniper plate so I guess I could remove that return edge and stop being a little girl about it. But anyone has advice on how to fix that? I think it's because the mirror image of the right shin isn't quite right so the curve of the inner left shin goes into the knee pretty rough.
I walked away and got some other easy stuff done:


Ok the ears was a bit of a failure I think because of the gap. I dont have much to say or ask about it, I have a good idea why there's a gap... I trimmed too much and didn't screw the right place You'll see with more recent pics later.


Now check it out, I painted with enamel paint, humbrol. And although I did use masking tape, I didn't use T/MC's enclosed masking lines for the teeth, that was probably a mistake, or it was just a mistake to use that kind of paint and expect it not to leak around.
See my nice surprise after letting it dry for 3 days:

A proper *yikes* is in order
Ok so I used a ketone-based oil-paint cleaner and scrubbed with a tower for ages. Didn't aim for the edges, I scrubbed the entire teeth area, the part that was under the tape could come off while the part that dried in direct contact with the air stayed there. That's after the wiping:

I applauded. I saved my faceplate
So the paint job had to be done, and I figured: I'm not a pussy, I can do it without masking tape, without pencil lines, freehanded. Huzzah!

Now eye patches, used heatgun to make the curve. Added solar film to darken the lense:


I decided to make that in two parts, so I have spares. Hmkay.

Notice the impalement hazard? I didn't notice it until...
Well I took shorter screws, seems that M3 @10mm was fine all the way, with "lock-bolts":

There, healthier now.
So the thighs were biting in my butt, used this cool ruler to remove 2cm off the entire edge. Keeping the curve parallel to the original. It cost 3 bucks and can do 45/90 degres angles.


Now I checked if the lenses are drk enough, I hope my eyes won't glow like that because it will be a fail.

*clap clap clap* "now make the mike tips and get your armor done already!!" Does it look like I just dip the mike tips in a tiny bowl of paint and they come out like that?


Oh yeah, so I did go for a Matt Dillon type frown.
Here's the inside:

Here's the ear gap that is a bit of a bummer:


It's just as bad on the other side:

I think I'll just live with it.
Still July 2012!
Now with the ab plate, the forearms and other stuff:
I did cut the cod piece off, and see what I did:


Yup, magnets! It just snaps right back into place! I used Darth Voorhees' other way of cutting the cod piece and used magnets instead of tape.
Now painting the butt'ns:

That's 2nd coat for grays, 3rd coat for blues. Enamel paint again.

I'm going to velcro that too the chest, so I just add a bump for proper adhesion.
Forearms, first I used the heatgun to make the inner and outer parts join in a sensible way so I wouldn't need ot apply pressure during glueing, "before" then "after" the heatgun:


After they're done with buttjoints and all I used an inner elastic band around the arm that is adjustable via velcro:


It's just velcro with adhesive tape on it that I stick on rubber elastic bands that have one female snap on it:

Front/rear sides.
So that I don't have to add weight or tension to the shoulders, the bells and biceps are attached, but independent from the forearms:


Strapping map:

Some fitting test:

I don't know why I had the belt on, the ab plate and kidney plate were holding themselves against gravity pretty well.
I'm gonna stop right there because the thighs (rear) are glueing for another 24h, and I'm trying to put a snap on the belt using a bar stool, tape, and my shoe.


-
Diana, this looks great. I will try to do better than you, and I will fail at it but aiming high is the key to any kind of success.
-
Thanks people!
@Mathias: well I shall do that, sir!
-
Hi folks out there!
I joined this forum since I've been browsing them handy tutorial topics around here for over a week now.
My name is Nicky, I'm 27, born in France, grew up there but moved to Gothenburg, Sweden 5 years ago. I work in IT and I drink beer.
I'm planning on getting my first stormtrooper armor just to have it standing in the living room, and mainly to goof around with my sister on fares, conventions and shucks (she's already in a french garrison), maybe do some trooping every now and then in Gothenburg, although I'm more of a softcore SW fan with an obsession for gear acquisition, military cosplay and creativity.
Also I want to make new friends. So there.
See ya guys around!
Kind regards,
Nicky
Nicky's ANH build [*T/MC]
in ANH Build Threads
Posted · Edited by Nicky.the.hutt
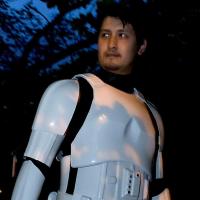
I think I fixed the belt issue, what do you guys think?
I raised it by a brutal 3,5cm, kept the two snaps on the ab plate the way they are, and the angle is to my surprise a lot more straight now. What makes me sad is that I have this new room for extra cookies so the ab plate leaves a larger gap.
And also I need to brag a little because:
IGOTAMICROPHONEINTHERE!!!