

michmalo
-
Posts
34 -
Joined
-
Last visited
Content Type
Profiles
Forums
Gallery
Articles
Everything posted by michmalo
-
Thanks all, I'm planning on using the makeup trick or something along those lines to "dirty" it up when it's time to take it out and troop! This way I can still switch back and forth between TK and HWT.
-
Submitted my photos this morning and just got the word that the judges all agree that I meet approval! I couldn’t be happier and prouder of this build. It was quick but I loved it, especially building the pack. Sent from my iPhone using Tapatalk
-
Thanks man, couldn’t have done it as quickly without your awesome tutorial! Sent from my iPhone using Tapatalk
-
I’m running out of things to build... I just realized that I never filled the hole in the top where I cut the cap off. Luckily I still have a fair bit of textured black styrene. I cut a little square and although it won’t be seamless after a little filing and sanding I think it’ll do the job. Sent from my iPhone using Tapatalk
-
Something else that I did that was a little different was for the container in the top middle. I made the original black strip out of styrene but I didn’t like the way it warped and fit the cylinder. I had some thin sheet metal ducting that already had a nice curve to it. I trimmed it out and painted it black and I think it looks perfect. Sent from my iPhone using Tapatalk
-
Thanks! I’m not sure if I’d call it “complete” but this is what it looks like currently. I’m debating how much, if any, weathering to do. I think basic approval doesn’t require any so I’ll keep it the way it is for now. Sent from my iPhone using Tapatalk
-
Thank you!
-
Now that the pack is done I'm going to work up some strapping for the ammo pouches and then I need to remove my drop boxes from my TK belt, is this a definite? can someone confirm that we can't have drop boxes on our belt when we're in HWT configuration? Either way I'll have to come up with some snaps and white elastic so I can take them on and off.
-
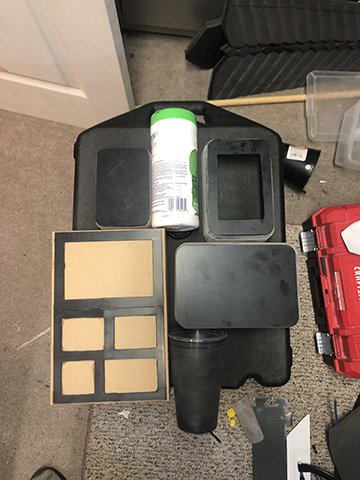
I wish I had taken more pics but I figured there were enough build threads on here that I didn't need to detail everything, the tube went together easily. Luckily I had an extra pair of shoulder bridges so that was quick. Remember to wear a respirator and not just a dust mask when cutting PVC, ABS, polystyrene or anything questionable for that matter. I cut outside with a respirator on and 10 minutes later I could still smell the gas in the air. I comped everything together and was happy with the way it was coming together. Next up was starting to attach the pieces to the box, I used a 3" bolt through the bottom of the pack and drilled out a hole in the cup, this allows me to take the cup off easily. I also used screws from the other side to attach everything except for the radio box, I used combination of contact cement but when the unevenness of the oil pan was preventing a solid contact area I used black silicone along the edges to give it some extra strength. This box is still mostly cardboard so it's pretty light, for good measure I through a couple of screws in the back anyway so it's not going anywhere.
-
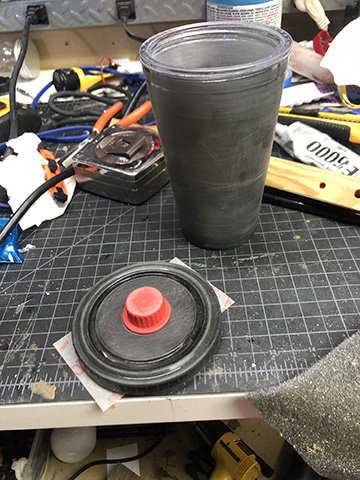
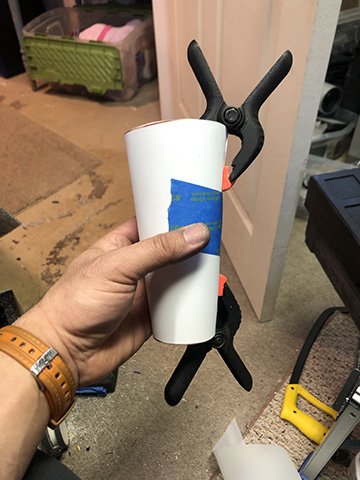
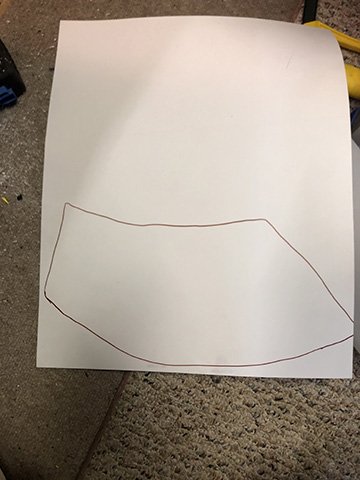
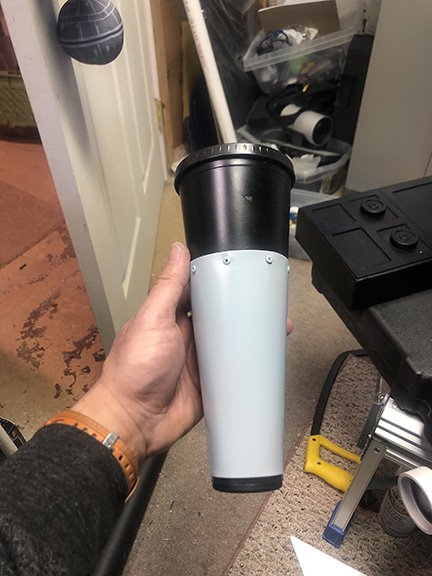
The rest of the build was pretty straight forward but one thing that gave me pause was the "siphon". Luckily I was able to find an old work cup that was looking for a second life so I sanded it down and got it ready. I also found the perfect cap for the top from one of my bins, I think it was from a torch or propane tank. I only had one piece of styrene to use for the bottom half so instead of rolling it up and cutting I decided to use a piece of paper to get the shape and measurements exactly right and then cut that out to create a template that I traced onto my styrene, I left some extra room around the shape to allow for error and then I was able to trim and sand the final funnel to the exact measurements. Some rivets and paint and it was starting to look the part, one thing worth mentioning, the cup was insulated so it was double layers of plastic and the inner layer was a bit more fragile than the outside. My guess is that the outside takes more of a beating so they made it thicker, the reason I mention this is that the plastic started to crack while I was riveting it. I ended up cutting strips of styrene to make flexible washers to take the stress off of the plastic and it worked a treat. For the bottom I noticed in some of the pics that there's an additional layer of black at the bottom so I used a 2" plastic plug.
-
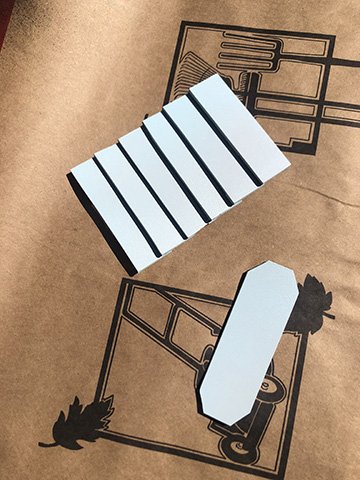
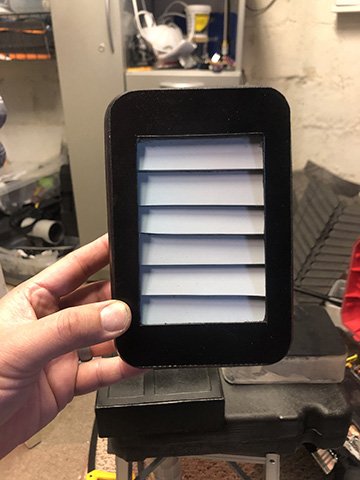
Instead of paper or cardboard I used styrene which I happened to have in black from an Imperial Droid build last year. It's a good option because not only is it sturdy and forgiving but if the paint chips it'll already be black underneath and makes for some cool weathering effects. For the vent box on the upper right I wanted it to appear a little more realistic and more accurate so I took a slightly different approach to building this piece. First I built up the louvers for the vents to give them some more dimension and then instead of gluing then on top of the box I cut the frame out and glued them in from the inside. After a couple of coats of paint I was pretty happy with the way they turned out, in this pic the vents aren't glued in place yet I was just holding them up for a photo.
-
Well since I'm all locked up with no where to go and I had already purchased and/or had everything I needed in house, I figured it was the perfect time to build my pack. I followed the CRL and @ukswrath build as closely as possible, (thanks for that Tony) about a year ago I lucked out and was able to pick up a pauldron for a steal. While I was still gainfully employed I added everything on the build list to my Amazon cart and I've kept it all in my shop all this time so as soon as I got the time I started building. I trimmed out some of the pieces and set everything up to get an idea of scale and layout and I was pretty happy with it.
-
MichMalo ANH Stunt Build
michmalo replied to michmalo's topic in Build Threads Requireing Maintenance
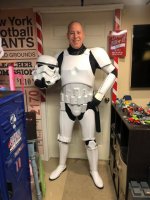
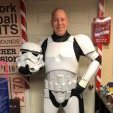
It's been a long road and I've done a terrible job at keeping this build log updated. I finally finished my armor up a few months back but was not approved because my chest piece was too small for my frame. I have a WTF kit and I stand at 6'2" tall and weigh in at around 225lbs. I was able to get a larger chest piece from Walt and after trimming and restrapping etc. I was finally able to submit new pics and get approved this morning. It's been a long road but I'm happy as can be! Next up will be building the HWT backpack, I already have some of the parts including the base so since we're in quarantine now's as good a time as any to start building something. -
https://www.501st.com/members/displaymemberdetails.php?userID=31996
-
MichMalo ANH Stunt Build
michmalo replied to michmalo's topic in Build Threads Requireing Maintenance
I’ve finally gotten back to building my armor. I still have a long way to go and I’ve done a terrible job updating photos. So far I’ve got the Chest and back connected, the ab and kidney plates all strapped together and I’m on to working on strapping up the arms. Strapping the arms up by yourself is tough! You can see here I need to tuck the bicep up under the shoulder more and I definitely need to lengthen the elastic between the bicep and forearm. Lots more to do but the fact that I’m wearing some of the armor gives me hope! Sent from my iPhone using Tapatalk -
MichMalo ANH Stunt Build
michmalo replied to michmalo's topic in Build Threads Requireing Maintenance
Thanks, it’s neglibly wider, maybe 1/2” I’ve been debating just putting it on the table saw and/or taking the belt sander to it but I have a lightweight Hyperfirm E-11 that will likely be my primary and trooping weapon. Sent from my iPhone using Tapatalk -
MichMalo ANH Stunt Build
michmalo replied to michmalo's topic in Build Threads Requireing Maintenance
Thanks I know that’s why I said it’s thicker than most in my post but I did lots of research and actually bought hand grips from a real MG34 and modeled the stock slightly larger than the Bakelite stocks on the MG34 to fit me. The flash hider is slightly wider as well but I like the look of it and it fits in better with the size and with some of the Battlefront screen grabs. Sent from my iPhone using Tapatalk -
MichMalo ANH Stunt Build
michmalo replied to michmalo's topic in Build Threads Requireing Maintenance
Almost done with this monster, scratch built DLT-19, started with Happytroopers plans but made lots of modifications along the way to get it as accurate as I could. It’s a little thicker than some builds but I’m a big guy so I don’t think anyone will notice, I was worried it might be too heavy but I think my ten year old daughter proves it’s manageable I’m working on adding a front sight as well as some ideas for a scope and maybe a flashlight and laser dot to it as well. Sent from my iPhone using Tapatalk -
MichMalo ANH Stunt Build
michmalo replied to michmalo's topic in Build Threads Requireing Maintenance
Thanks guys, ukswrath I'll be using your build threads for help and inspiration! So thanks for that too. -
MichMalo ANH Stunt Build
michmalo replied to michmalo's topic in Build Threads Requireing Maintenance
Thank you! I did realize AFTER I had glued them on that they were supposed to sit inside... I'm debating if I try and get them off (CA glue is often unforgiving) or if I just start over with a new set. Frustrating when you make mistakes like this and have to redo things instead of moving forward! -
MichMalo ANH Stunt Build
michmalo replied to michmalo's topic in Build Threads Requireing Maintenance
Thanks! I finally got my Mic tip screens in and attached them (after painting them). I also painted a rank bar finally! Not pictured is a lot more trimming and sanding I got done on the rest of my kit. I did manage to Plast-Dip the inside of my helmet black and started planning out some padding. My head is too big to use a lot of the recommendations for 3/4” replacement pads I’ve seen others use. When I put one at the top it immediately makes it impossible to see through the helmet so I went ahead and ordered some thinner pads. I did use some EVA foam and some felt to make a nose bridge, it’s not attached yet but I can already tell it’s going to add a little extra comfort and keep me from scratching my big nose on the lenses. Sent from my iPhone using Tapatalk -
MichMalo ANH Stunt Build
michmalo replied to michmalo's topic in Build Threads Requireing Maintenance
--------I grabbed a HFX Productions E-11 and also a holster from Darmans props, really loving the blaster already and the holster is a solid fit. I’ve been spending a lot of time getting my droid up and running for some Tripp’s this week so Armor building has stalled but I want to push on next week and make as much progress as quickly as I can. Sent from my iPhone using Tapatalk -
MichMalo ANH Stunt Build
michmalo replied to michmalo's topic in Build Threads Requireing Maintenance
I’ve got the legs started, both shins are done except for trimming the cover strip on the front and the backs are still open for now until they’re properly sized. The thighs are trimmed and taped up for sizing, I know I need to size them with my Under Armor on but this gives me a good indication. I’m pretty sure 7/8” cover strip will work but it may be tight. We’ll see how it goes tomorrow. Sent from my iPhone using Tapatalk -
MichMalo ANH Stunt Build
michmalo replied to michmalo's topic in Build Threads Requireing Maintenance
I got some more parts trimmed and I built the biceps (thanks Sebastian!). I found this posted which I found REALLY helpful; All return edges average 1/4 inch(6 mm) but can be up to but not much more than 3/8 inch (9 ish mm) Chest: bottom edge against ab. Sides but taper down as you get closer to shoulders. Minimal to none around neck. Back: bottom against kidney. Sides but taper down as you get closer to shoulders. Minimal around neck. Kidney: top, bottom and slight in kidney notch. None on sides. Butt: all sides Ab: top under chest, lesser return edge around cod area. None on sides Shoulders: none on edge against chest. Return edge against arm. Biceps: minimal to none. Some leave return edge some remove it all together. Forearms: none at wrist opening even up into the square indent ridge. Minimal to none at elbow side. Your choice. Thighs: return edge on tops and bottom. Shins: return edge on top. None against boots. Leg cover strip sizing info: Thigh cover strips are 7/8” front and back Calves 7/8” front but back can be 1” or as large as 1 1/4” Sent from my iPhone using Tapatalk -
MichMalo ANH Stunt Build
michmalo replied to michmalo's topic in Build Threads Requireing Maintenance
I spent some time tonight doing some more trimming, I got the chest and abdominal plate trimmed and trimmed out the shoulder bells as seen above. I think I’ll have to clean up the return edge and get it as tight as I can because at 6’2” and close to 230 lbs the chest piece looks small on me, I’ve read getting the shoulders trimmed tight helps with the screen accuracy. Current problem is that now that both of my forearms are built with 5/8” coverstrips im realizing that I need 7/8” strips on my biceps. I posted about it on the board and hopefully I’ll get an answer soon. Right bicep, it’s snug but it fits. I shaved down the return edges to nothing to help make it more comfortable. Sent from my iPhone using Tapatalk
