

FunkyTrigger
-
Posts
961 -
Joined
-
Last visited
Content Type
Profiles
Forums
Gallery
Articles
Media Demo
Posts posted by FunkyTrigger
-
-
I need to find you a TK-1650 BillHag diagram and tutorial for this.
I too used to be plagued with dreaded shoulder gaps

-
 1
1
-
-
May I ask what you are planning to connect to the 4 snap plates located on the inside of your chest plate?
-
Congrats Mindy.
Nanoo Nanoo.
-
Here is another tip for filling holes in plastic.
Use milliput.
It's a modeling clay epoxy resin.
About £3.00 per tube.
You can fill the hole from behind, and push into the hole.
About 20-30 mins later as it is hardening, wet your finger and run it smooth so that it is totally flush with your Armour.
Once it is dried.
Use a white enamel paint to match your Armour.
You will get a smoother and better finish than ABS paste.
-
Please find below a link to a company that has produced full carbon fibre TKs, with nice detailed pictures for your viewing pleasure.
http://www.carbonfibergear.com/star-wars-fans-carbon-fiber-enthusiasts-carbon-fiber-stormtroopers/
-
The shoulder bell positioning is actually perfect in your lids off picture.
I guess they went wonky when you reached up to put your helmet on.
Many people have this problem, to keep the shoulder bell as part of the bicep.
The shoulder bell bicep strap may have to be tightened.
You don't have to do this for this award but once you start trooping and pics are taken of you,
You will be upset to see faults taken of you with armour failures.
If you can address it before you start seeing pics of yourself you will be much happier.
With regards to the holster length.
Mindy is 5'7" this would not be affecting the scale in the picture.
This is an unusually long holster
-
I get it now
7/16 ths is around 11mm
-
I'm a metric person.
Around 12mm is what I was looking for and it's about that on the other scale of your ruler.
I don't understand the imperial scale

-
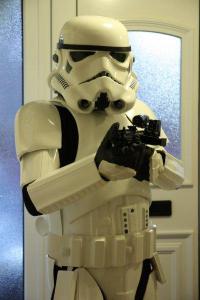
Hi Mindy, you do indeed look like a good Stormtrooper.
I'm sure that you will be asked to shorten the shoulder bell straps to bring them in a bit closer.
The holster also looks to be quite far down your thigh. This probably isn't a requirement to be addressed.
Good luck.
-
To be honest ...
Looking good for hand painted
What is your painted button diameter?
-
Hi Battery,
Your question is quite valid.
If you glued the two halts as they came,
Then they would line up (not perfectly but close)
But, the skill of armour building is to trim it to fit you.
You look as though you are shrinking the bicep to suit your sizes arms.
As a result the halves should meet up as you have shown.
You will indeed have to trim them to fit you and to try and carry off the contours.
Good luck
-
Hi Kev
I take it that you are just starting out, and making your first armour build?
My advice, and from plenty of others is for you to not use abs cement.
You are likely to make a build mistake.
If you use abs cement it will be near impossible to unstick your joints to adjust them.
Our advice is for you to use e6000 glue.
E6000 is very strong and can also be undone.
Good luck with your build.
-
May I say something to clear a fact up about the Doopydoos kits.
They make a kit to convert the Hasbro blaster to look a bit more like an authentic E11.
They make a full resin kit E11 blaster.
All of the components are not the same.
The full resin kits are near as darn accurate.
The Hasbro parts have been reworked to fit onto the Hasbro.
I just wanted to mention this, as you are referencing the Doopydoos parts for other readers of this topic, but not clarifying which kit parts you are referring to.
-
Good video Mathias, thanks for sharing.
-
Sorry, just read your post again about helmets only

Again avoid the FX and RT helmets, they are the biggest.
-
Hi Donovan
May I ask how tall your parents are?
And thus how tall you reckon you will be by the time you finish growing?
I know that as a teenager, you don't notice or think you are growing but I fear that your biggest growth spurts will be now.
It takes an builder from 3 months to 9 months to complete their TK builds.
It would be such a Shame for you to complete and outgrow your TK so quickly.
There are scaled 3/4 sized TK kits available.
Every other lineage TK kit will need cutting down
If you are going to cut one up to shrink every panel, for a kit that may only last you a year in sizing, then get a cheap 2nd hand kit that is NOT RT, AM or TM.
Good luck mini trooper.
-
You can safely remove 10-15mm from the bottom of your shins to lower them over your boot.
You can leave the sides long to give the illusion of longer shins
You can remove 10-15mm from the front and rear of your shins only and try that.
Remember to measure carefully.
You can't add plastic back.
Good luck trooper.
-
However, your sniper plate seems to be higher than the bottom of the thigh.
Pencil mark the overlap on your thigh.
Is is 10mm or 15mm?
I can see from your picture that your left thigh is lower than your right thigh.
Can you pull it up yo clear your sniper plate?
-
Hi Geronika,
If you would like help, lets start with you posting your dimensions.
Height would help in this case.
It is true that with foam experiments, you can do some test trials!
Grab some old packing foam and scissors and kit up!
Place some foam into the top front of your left shin to push your sniper plate forward.
Wedge some foam into the back of your left thigh, to pull the front of your thigh back closer to your knee.
This is how you play with your foam packers.
-
Unless you are incredibly small framed.
Don't cut your cod from the ab plate.
TK's look much better with a high belt, just at the AB button level.
When the cod is cut, new issues arise.
Where will your belt be forced to sit to cover the cut line?
Have you made your cod look small?
A Stormtrooper looks more menacing and better with that large cod showing!
If you have to cut the cod, to remove plastic and thus make the front ab panel smaller,
consider where you will remove platic from?
consider making the cut higher than the natural cut line of where the swage line is between cod and ab.
-
How tall are you Jimb?
Taking 3-4 inches from the top of AM thighs seems a bit extreme.
Also, if you do this, you will loose the arc shapes and return edges.
I would only cut, after you have posted up pics of the problem an discussed with previous builders, especially of AM and preferably of similar dimensions.
AM armour was designed for the larger trooper frame size, if you are not of this frame size, then I have to question your use of AM armour.
With regards to your question about shin rising up over your boot, I can give three suggestions.
1. Add a industrial Velcro patch to the outside front of your boot, and one to the inside of your shins.
2. add a popper to your boot with elastic to your Shin to keep them together.
3. Use a tighter method at the rear of your shins to close your shins around the boot.
Again, you need to show pics of your problem.
Good luck
-
It's not required to have inner joining strips but it doesn't harm and does contribute to making the armour closed parts stronger.
I Would endorse it.
-
Congrats Trooper
-
Shoulder Bell Rotation Issue
in Assembly, Mods, and Painting
Posted
First off
My gaps started where the bells met the shoulder straps.
Although I had the connection elastic, short, they would still pull away.
This was when I used to use elastic as the chest to backplate connection material.
The elastic used to pull out to the sides.
Webbing is a great material.
To make webbing an even stronger material, I know double it over, before adding the poppers.
I've also found that sewing the folded over material makes the package very strong as shown.
The shoulder bell is now connected to the webbing using a short elastic strap
I've also started to double over the elastic strap, before putting the poppers in to make them stronger to, and to stop the poppers pulling through the elastic.
Bells, biceps and forearms are connected as a single piece. Via elastic straps.
The elastic strap at the bottom of the shoulder bells that wraps round the biceps is not only canon but helps keeps the bells and biceps together.
If you look at BillHags diagram here
You can see how the positioning of the snap plates and elastic straps work together to stop the bell rotation issue.
Many years of trooping and building experience from Billy has helped develop the original strapping system to a modern system that is both practice to troop with and easy to use.