niugnep
-
Posts
88 -
Joined
-
Last visited
Content Type
Profiles
Forums
Gallery
Articles
Everything posted by niugnep
-

TK-8453 Requesting ANH Stunt EIB Status [AP][295]
niugnep replied to niugnep's topic in Request Expert Infantry Status
Trimmed the bottom of the left thigh. I'm afraid I'm in a rush though, so not a lot of time to model it -
TK-8453 Requesting ANH Stunt EIB Status [AP][295]
niugnep replied to niugnep's topic in Request Expert Infantry Status
Sorry for that problem. Should be fixed now. -
TK-8453 Requesting ANH Stunt EIB Status [AP][295]
niugnep replied to niugnep's topic in Request Expert Infantry Status
Thanks! The thighs are twisted slightly and I didn't fully tighten the garter strap, so there might be some sag. I just didn't notice it when taking the pictures I'm not sure what you mean by the sniper plate? Do you mean it needs to be more flush with the shin? Better? Okay... fixed... I can upload the trimmed left thigh tomorrow. Hrm... I can see the point you've both made. This holster made of real leather (best I can tell), but it's definitely a lighter leather. I haven't noticed it flapping or really looking weird with my blaster out though. Thanks for the input. -
TK-8453 Requesting ANH Stunt EIB Status [AP][295]
niugnep replied to niugnep's topic in Request Expert Infantry Status
Thanks Josh... just following up in your footsteps now -
Name = David "Penguin" White ID = TK-8453 Forum name = niugnep Garrison = Bast Alpha Armor = AP Helmet = AP Blaster = Hyperfirm Height = 6' Weight = 170 lbs Boots = TKBoots Canvas Belt = Rob Kittel Hand Plates = Trooperbay Electronics = Aker Neckseal = Nikkimat Undersuit = Under Armor Holster = AP TD clips = Jesse McClear Lenses = Trooperbay Mic Tips = Trooperbay Thank you!
-
Resin E-11 build thread - DDAY
niugnep replied to Dday's topic in Build Threads Requireing Maintenance
Ah. Nice touch. Well done. You're inspiring me here. Are you sawing off the hex bolts and then gluing the head in a drilled hole or are you actually screwing them into the cast? (Hope that makes sense) -
Resin E-11 build thread - DDAY
niugnep replied to Dday's topic in Build Threads Requireing Maintenance
I got this same kit from D*C last year before I was approved and only just now am I building it, so I'm very interseted to see your progress on this build. I'm cleaning up mine as well and using contour putty to fill in some of the bubble holes from the pull. I notice a few differences: 1. My sight must have broken, because the bead is only partially there. 2. I don't have the lettering in the circle of the right side of the stock. 3. I don't have the lettering on the magazine. I guess he improved his mold. -
Just a head's up. It's official! I got my TK number assignment last night! TK 8453 is now reporting for duty. Big THANK YOU to everyone for all of your help. I will try to pay it forward to other up-and-coming troopers.
-
Fixing the belt today for my garrison pics. I'll also take care of the bicep issues as well while I'm at it. As far as the logo on the back goes... yeah... it's underarmor and I just took a sharpie over the logo. I think I need to shorten the shoulder straps so the back hangs a tad bit higher, which hopefully will help cover the logo some. I'll have to see after that... I really thought underarmor was the way to go with this, but now looking at the back... maybe not. Any suggestions?
-
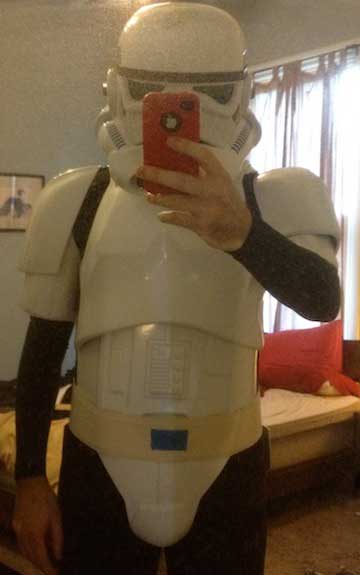
Thanks to everyone here and with my local garrison, I've completed my armor for submission to the 501st. It's going to be a LONG few days or weeks waiting for approval and my long sought after TK#, that's for sure! Still a few things to fix... The left greave is too tight, so I need to trim. I need to secure the belt to the abs. Also, my blaster sucks... so I need a good one. I need attach the forearms to the biceps. I need add the electronics to my helmet. Get some non-rubber gloves for regular trooping. I'm waiting on a few supplies from trooperbay to arrive and new clips for my canister. But otherwise, I'm pretty damn impressed with how nice (as it can) feels completely on. Here's some pics... and of course, I'm open for some more advice. If you look closely in the back of the left thigh, you might see my shim job with ABS paste... but, I actually think it came out very nice looking... you really have to look to see it. Again... thanks to everyone here for all the help!
-
Oh! I was writing out a response and suddenly it became very clear to me. I've been viewing Mark's picture in head upside down. D'oh! I get it now! Thank you!
-
Okay. Thank you! That's what I thought! Whew... really had me questioning myself there though when I saw this 501st member pic, which looks like the front side of the snap (but I guess that's just my eyes playing tricks on me): Is there a measurement it should be from the top and the sides of the right side of the ab plate or is it just what looks right? --------
-
Thanks, Brian. I'll add more space to the top of the thigh. Another question... I'm confused about the visible snap on the right side of the ab plate. Is it the back side of the male snap or the front side of the male snap? Seems like I can find photo evidence of both. In the screen shot often used for reference, it really looks like the backside of the snap to me. If it's the front side of the male snap, I really don't understand its purpose? Also, is there a specific measurement that it is in the top corner that I should place it? ---------- Thanks, David
-
Okay... this is what I have since my last update (of course, this will look much better with the drop boxes): And back: I'm still not really liking the space between the butt plate and the top of the thigh. Seems pretty huge to me. So, does that look right? I also have the gap at the top of the left thigh, although not as big as the previous position. This seems surmountable, whereas the other thigh assembly seemed too large for fixing... I still need to cut the space out of the back of the knees (bottom thigh) so I can properly walk and also it will allow the thigh to glue flush. As far as the abs... I've put in a shim and I'm using 1" brass fasteners (for hole punch paper), painted white. The top is 8mm. On the inside, I'm using white gaff tape to keep the metal ends for cutting or digging into me. I'd love to hear some feedback about this. Thanks, David
-
First off, it's the mirror. Makes my left thigh look like my right as well... Also, I don't have the strip of 4 buttons glued on yet, so that helps it look weird. Anyway... back to the thigh thing... so after reading your response last night, I started to rethink it... (nothing like lying in bed, watching 30 rock on netflix with your armor). I started to think that I could, in the words of Futurama, re-jigger it so I didn't have at the top of the left thigh. After a few trials, I think came up with a solution based a large part on your diagram above. I'm going to let it sit in my brain a little while before making the cut... still plenty of other stuff to do. BTW, gaff tape is great for armor trials... screen accurate too. Also, reading your sig, I just discovered your document on your AP build. What a wonderful morning read... I'll have to look at this in great detail before I start my day's build activities. Okay... attached are pictures of my (incomplete) snap system. I'll circled in red the place for the two additional snaps that I need to include... also, I need to secure my chest piece to the ab piece (another yet, unresolved snap). I'll try shortening the crotch snap and see if that helps. Thanks for the help thus far! Cheers, David
-
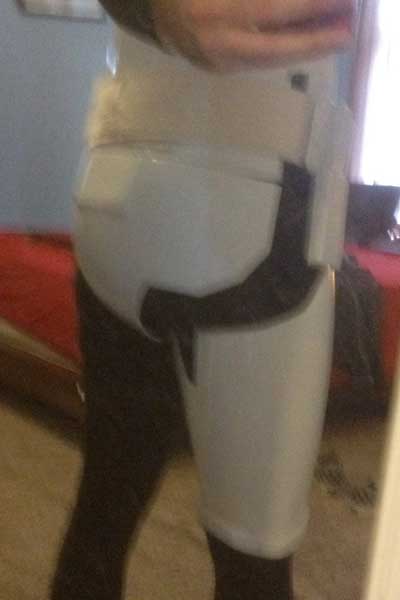
Hello. So, I started this AP kit build about a year ago... but then work got busy and my dad's health declined... however, now I'm back and trying to finish this build which I believe to be about 85% - 90% done (it's that last 10% that's the tough part, I'm finding). Anyway, my original post is here: http://www.whitearmo...l=&fromsearch=1 I've done a lot since my last update there though, so a little progress report then some questions. Helmet = done. Just need to install fans but totally ready for approval. Arms = nearly done. Just need to attach the forearms to the biceps and then wear it for a little bit then trim, trim, trim. I think the biceps and the bells came out pretty well though. Torso = nearly done. Belt is now completely done. Still need to clamshell the sides, but that's a question I'm having. All the snaps are in place (just a few more to fine tune) and I'm using a suspender system to hold it all up. (please see pics) Legs = Hrm... shins are pretty much done... however the thighs are being a giant pain in the an impolite person. Turns out the left thigh is not the same diameter as the right thigh and I'll need to shim the thigh piece (as seen in the pic)... very annoying and a little beyond my current skills probably... hopefully someone from the local garrison (Bast Alpha) will be able to help me. Anyway, here's the questions... If notice in this pic: There are several problems/questions here. 1. The butt plate rides pretty high and overlaps the kidney plate, which makes it so the butt plate does not sit so nicely on my tush. What am I doing wrong here? It's connected to the kidney plate by two elastic snaps in the center and 2 velcro strips on the side. 2. You'll notice that there is a nice gap between my ab plate and back. Not nice. I think I have to shim, but I think if I just lose 10 lbs, I wouldn't have to... is there a way I can temporarily shim this? 3. A local garrison member and friend (who has been a HUGE help to me) says this doesn't look weird... but to me, it looks like I have a HUGE gap between my butt plate and the top of my back thigh! A lot of black there! Is that normal? 4. You'll also notice the nasty way the left thigh (this is a mirror shot) doesn't connect at the top. Makes me feel like I have giant legs or something... anyway... a garrison member said it's a shim using an ABS paste you make, but... well, he's supposed to help me with that... any advice? So, sorry for the long-winded post... just trying to figure this out. Cheers, David PS. Sorry for the crappy pic quality. Seeing as I'm a camera op for film and TV, please don't consider this an example of my professional work!
-
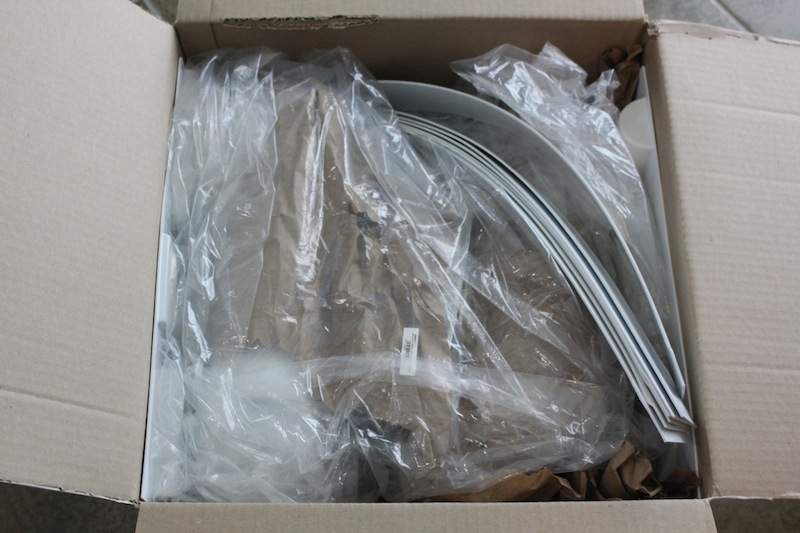
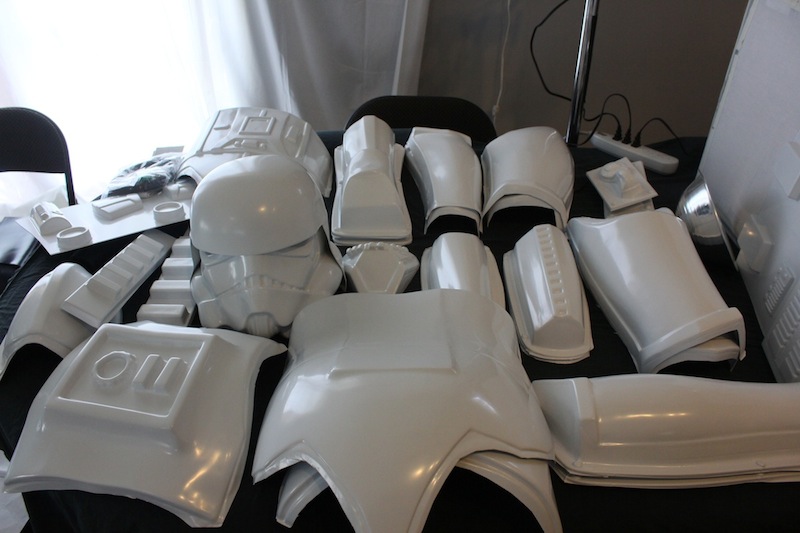
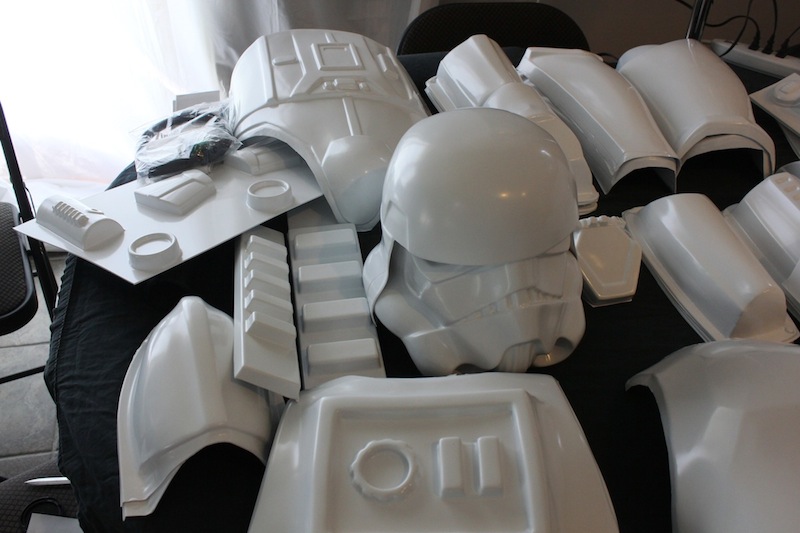
AP armor arrived today... so shiny!
niugnep replied to niugnep's topic in Build Threads Requireing Maintenance
Good to know about the "creative trimming"... I'm almost done with major trimming. Sanding and return edges will be the next step very soon. I've done a little work since the last post, but I got hired for a production, so probably won't have anything new to report til Sunday. -
AP armor arrived today... so shiny!
niugnep replied to niugnep's topic in Build Threads Requireing Maintenance
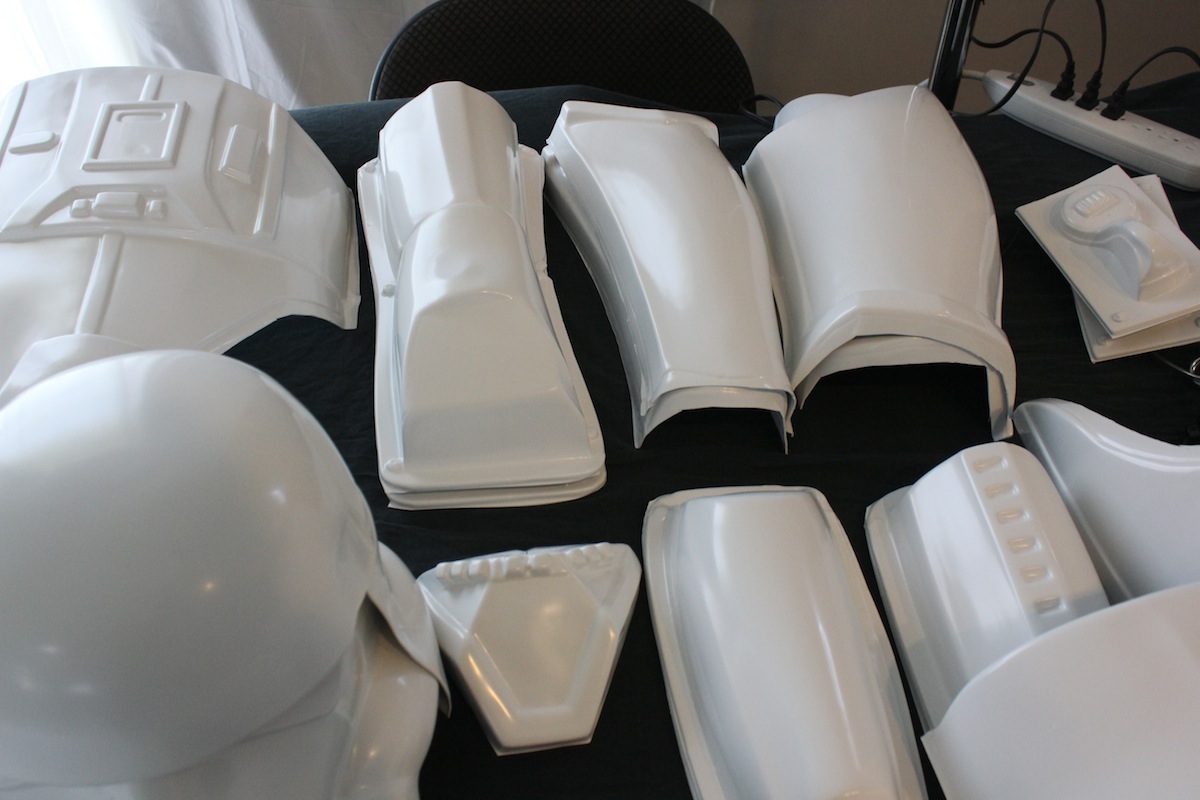
So this is where I kinda start to skip around. I was having some confusion reading the score lines of the back forearm pieces, so I skipped to the thighs. Standard practice, I started by marking my lines with a pencil (even those these lines are pretty damn visible). Masking the curve parts is horribly time consuming. Ugh. The left thigh trimmed. It matched up pretty well. Not a perfect match, but I think I'll be able to work it into a better match. And the front. Same problem. The right leg is horribly off, however. I'm not sure why this would be the case. But, it is... more on that later though as I just started on that today and I don't have pictures yet. Thanks for reading and if you have any advice or suggestion, please don't hesitate to add your .02 cents. On to my other problems today... but this morning at least I got lexan scissors! Cheers, David -
AP armor arrived today... so shiny!
niugnep replied to niugnep's topic in Build Threads Requireing Maintenance
As you can see, I'm aiming to leave a larger (better to cut to little than to much) return edge here. First I was trying this without masking, as this curve part is hard to mask. But all it took was one slip with the blade to realize that I better mask it all (which slowed me down significantly). Snapping off a curved section is not the easiest, so I'd split it down the middle, which made it much easier to snap. In this image you can see my slight slip on the right side of the right most forearm piece. Very annoying. I didn't complete the back of the forearms as (yet again) I'm having a little difficulty understanding the score markings and exactly where I'm supposed to cut. I think I'll tackle that today though (as this post is about yesterday). -
AP armor arrived today... so shiny!
niugnep replied to niugnep's topic in Build Threads Requireing Maintenance
Lucas, hi and THANK YOU. That's an immensely helpful resource. Question though, what did you do with the bicep pieces? They're the ones giving me the greatest IDK moments. And thanks everyone for the encouraging comments. I'm really glad there is such a great community for this obsession. Today's beer: Abita Purple Haze Okay, on with the show. Yesterday I jumped around a lot, so bare with me. I started with the shoulder bells. The lines were pretty visible and more importantly, the shape is very simple. I marked them in pencil first and then used electrical tape to mask them off. The opening I just did free hand. This was definitely the right piece to start with, it gave me a boost of confidence for the rest of the pieces (again, I'm saving all the sanding for last). So, next I moved on to the forearm. I slightly more difficult part and HIGHLY visible, so I was a little nervous about this one still. I did the same technique though. Draw a pencil line, mask the straighter parts with electrical tape and score and snap. -
AP armor arrived today... so shiny!
niugnep replied to niugnep's topic in Build Threads Requireing Maintenance
Okay... on to the biceps. Which frankly has me a little baffled... probably because it's one of the parts that you never see good photos of in already completed armor... more on that a little further down. The lines are pretty faint and actually kinda confusing (which maybe you can see in this photo... several pencil marks). Anyway, I cut them into two piece to make it easier to work on and gave a return edge to the piece (although I'm not sure why... as I'm pretty sure that bit will be covered by the shoulder bell). Okay, here it is cut.. and this is where my confusing sets in. I noticed one side of the inner bicep part was higher than the other, so I wanted to see how this matched up with the outer bicep before just cutting away like a madman. Man, am I really glad I did that! In this photo you can see basically what I'm talking about... the near edge is shorter than the corresponding far edge (bottom right). So, I trimmed some extra ABS away so I could match them up. Once I trim that excess on the right piece up, they match up find on the top. But on the bottom, it's a different story... If I would have cut where my pencil marks were, I would have been very unhappy. On the right side, my pencil mark *was* where the indention is... That's not even close! Is that indention just wrong? Should I instead go with the curve at the bottom of the right piece? I'm really confused and without being able to really see a good picture of how this piece is cut... I'm a little stuck. My confidence shaken for the day, I decided to take a break until I could post up for help. The rest of the stuff I have to cut will be a lot more visible. Another question for the group... I notice some of the indentions allow for a return edge and some do not. I already think I screwed that up slightly with the calve part and didn't allow for a return edge on my right up part where it meets the knee. I'm wondering how big a deal this will be. Thanks for listening and hopefully this will not only help me, but someone else in the future. Cheers, David -
AP armor arrived today... so shiny!
niugnep replied to niugnep's topic in Build Threads Requireing Maintenance
I've gotten over my free of cutting! It just took me setting up a station and getting a nice cold beer to steady nerves. My workspace. Beer selection for today is Miller High Life. Dmian's post up for quick referencing. (sorry the pictures are orange... I forgot to white balance... which is kinda embarrassing, given my profession). Per Dmain's suggestion, I started with the basic bits. Thermal detonator, drop boxes, and hand guards. That's the pile you see the to upper right of the card board. Thermal detonator trimmed. Just need to be sanded and the tube painted grey and it'll be good to go. You can't see it in the picture too well, but the curvature of the cut line is a little weird... I'm going to have to tighten that up later when I get around to finishing this piece. Still... kinda like a quick reward to see this complete. I'm using painters tape to mark my cut lines. Also, I've noticed that this gives me a little protection if I accidentally miss. As Dmian did, I started with the calves as the lines are pretty clear. I've since switched to electrical tape though per a suggestion I saw on the web, as it is easier to curve slightly. Some lines though, I felt more comfortable marking with a pencil... especially on the bits that were curved and not easily taped. Right inner and outer trimmed (but not sanded) Like Dmian's, they match up pretty well once you adjust for the warping. Next up is the sniper plate. Very delicate. I worked from the inside as well, marking my lines with a pencil, and was really careful about scoring enough before trying to snap. and completely trimmed (again not sanded). -
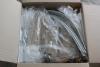
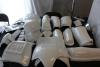
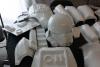
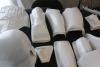
So, my AP armor was delivered today and it was like Christmas in August! (Thanks, Mark!) As I'm getting a ton of advice from these forums about what armor to buy (and now) how to build this shiny plastic, I figured I'd start my own thread. Also, I'm absolutely petrified to cut into it... so I'm delaying the process by starting this thread. It's so shiny and I really don't want to make a mistake. Luckily, I have this website and the local garrison has been really helpful. Another TK even took me out to lunch just to show me his armor (AM build) was set up and how he put it on. So, anyway... here's some pictures (that's the best I could fit it all on my poker table... can't wait for that picture) of me opening the box and inspecting everything to make sure it's all there. I guess I really need to get over this fear now and start the trimming process. I'll have to update once I actually start making some progress. I'll be using TK-Dmian's guide a lot for the first stages! Thank you whitearmor.net! Cheers, David