Search the Community
Showing results for 'Imperial Gaskets' in topics.
Found 3 results
-
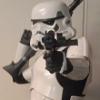
 In this HOW TO I'll be illustrating how to modify and attach Wyatt's Imperial cloth gaskets to a FOTK under suit from stormtrooperundersuit.com. After receiving my gaskets from Wyatt my first impression was they appeared flat in thickness in comparison to the rubber gaskets. No disrespect to Wyatt's wife for making these excellent gaskets however, being I can never leave well enough alone I decided to add to the perfection and increase their thickness. Something that also frustrated me about most the gaskets out there was having to buckle the left and right arms together or velcro the gasket to the armor. I wanted something that would basically be part of the under suit itself so that I could step into my armor with less effort, like with a OT TK. To do this I found it easier to just sew the Imperial gaskets directly to the under suit. Items needed: Cloth Imperial Gaskets Under suit form stormtrooperundersuit.com 2" x 6" black Velcro (sew in type) 2 yards of 1/2" polyester filler 2 yards of fabric backing to seal in the filler Tools: Scissors Exacto or similar (split seams) Fabric pencil or similar Sewing machine Imperial gaskets Stormtrooperundersuit.com under suit Starting with the legs, measure, cut and sew filler and backing to underside of knee gaskets. Next, remove stitching from shoulder gaskets seems Sew in filler and backing. With the shoulder gaskets turned inside out, sew the seams together that you separated earlier. Before After. Notice any difference? Returning to the legs. Locate the center of the leg gaskets. Cut a 2" x 2-1/2" section of velcro. Note This only applies if you currently have velcro retaining your knee cap armor. If not you may want to switch or find a way to incorporate your mount into the gaskets. Place the velcro on the fabric and outline Sew in place At this point there's two ways you can go here, either sew the seams together creating a round gasket where the outer diameter is the same at the top and bottom, or you can taper it, like the shape of your leg. If you want to taper it, using a fabric tape ruler measure the upper and lower legs where the gaskets will reside when finished. Cut the fabric accordingly giving yourself 1/2" extra for the sewing seam. Another way to do this is to turn the gasket inside out, wrap it around your leg overlapping one side, using a fabric pencil mark the over lapped section. Don't forget to add 1/2" for seam. Sew the seam. After With the armor knee cap. With under suit With armor, test fit Ready to sew in place Install leg and shoulder gaskets. Mark under suit and gasket locations. Sew in place. Cut of shoulder gasket connecting straps as they are no longer needed After, front side After, back side Finished I'll try to get a few more pictures with better angles.
 -
I have been in the process of updating molds to a more screen accurate shoulder gasket. I am also creating a full polyurethane mother mold so I do not have to build mold boxes and bases any more. This will speed up my mold production time when they wear out or get broke. Molds are like working with fine china in a bull pen. FOTK belt kits are in stock and ready to ship with no wait time. Pauldrons are on hold until new gasket molds are complete and up and running. White pauldrons are on hold until I solve the problem that I'm having with the color. Cloth gaskets are still in production by Mrs. tk4205. She answers all of your emails, handles invoicing, printing, labeling shipping and book keeping. She also does all of the material scouting, sourcing and ordering too. I don't know how she finds the time to sew for us. She cares about us troopers, so It makes her sad when members rant and rave and drop F-bombs on her because they are tired of waiting. Our order list is "first come, first served" and I don't care who you are. Unless of course, you're the president;) If you are on our list and get an invoice, please don't ignore it; we have lots of people waiting and I wont take it personal if you no longer wish to buy. Just don't hold up the line. Imperial Gaskets (rubber) are the premium gaskets for accuracy, durability and comfort. You can reach Centurion level in only two brands of gaskets, but only one you can actually move in . Email ImperialGaskets@gmail.com to reserve your spot today. Cheers to all and thank you for your business.
-
Ok first of all imperial gaskets are absolutely amazing. Super mobility. Not complaint nag about them at all. <br><br> I just have a question as to the arms.<br><br> Anovos gaskets have about a 14 inch circumference. The biceps at the bottom have a hair over 14 inches inside circumference. The top of the forearms have a little over 14 inch circumference.<br><br> The imperial gaskets are 14 inches at the cuff but then sort of cone (like a sleeve on a shirt) larger to the shoulders, which you need, but at the bicep bottom it is 18 inches around. This results in needing to bunch up the gaskets at the bottom of the bicep, which is less than ideal.<br><br> All this is unmodified measures.<br><br> Now this was probably done to fit a range of arms. What I'm wondering is should I trim Down the gasket at the bicep so the gasket is more of a 14 inch circumference cylinder until it's at the top of the bicep where it needs to flare out?<br><br> Has anyone else done this?<br><br> Thes gaskets are so much better than the anovos economy ones that I could not move in. But the bunching up at the bicep is something I want t to fix, but before I cut I'm interested in what others have done.