
TikiTechie
-
Posts
260 -
Joined
-
Last visited
-
Days Won
10
Content Type
Profiles
Forums
Gallery
Articles
Everything posted by TikiTechie
-

TikiTechie Requesting Pre-Approval - FAC Stunt TK
TikiTechie replied to TikiTechie's topic in Request TK Pre-Approval
Another pass with changes above. * Thigh ammo pack raised to bottom of cover strip * Rivets removed from sniper plate and re-attached. * Added tabs to sides to keep them even * Minor: added bicep strap hooks, added elastic from bicep to forearm. Helmet off Face on Side Back Casual On guard Die rebel scum -
TikiTechie Requesting Pre-Approval - FAC Stunt TK
TikiTechie replied to TikiTechie's topic in Request TK Pre-Approval
I discovered after the shoot that my shirt was flipped over on the bottom and that's the tag peeking out. It's since been removed. I'll make the side tab adjustment you mention. Great, thank you! -
TikiTechie's ANH TK Stunt trooper build
TikiTechie replied to TikiTechie's topic in ANH Build Threads
Shortened the shoulder straps to make it a little less sloppy. -
TikiTechie's ANH TK Stunt trooper build
TikiTechie replied to TikiTechie's topic in ANH Build Threads
Did my first time ABS patching on the holes. Sanded & polished as much as I could. Doesn't look too bad. -
TikiTechie Requesting Pre-Approval - FAC Stunt TK
TikiTechie replied to TikiTechie's topic in Request TK Pre-Approval
Thank you! Working on updating my photos with the fixes I emailed to you. Tightened up the shoulder straps. -
TikiTechie's ANH TK Stunt trooper build
TikiTechie replied to TikiTechie's topic in ANH Build Threads
After submitting for pre-review it was pointed out that I had riveted the sniper plate which is ROTJ and not ANH. :/ I didn't do my research and just followed the mfg instructions blindly. Lesson learned. It's one of the few areas I didn't do my due diligence on. The shins of my kit have been a real difficult chore. It seems that the right / left item labels were reversed so I had that added confusion, which is already confusing based on what I've seen in other threads. After that, the left side was much smaller than the right and was originally unwearable. I added a much larger cover strip on the inside to hold the width, giving me a bit more room. It's still tight but I think it's wearable. We'll see when I start trooping. I had to cut away most of the return edge on the top of the left shin which was digging in to my knee. Ow. So, after the comments on my split riveting, I went ahead and took them out with pliers and started gluing them on. The knee plate is really thicker looking than some of the other ones I've seen, or at least the shape does not fit what the knee looks like, so I did some hot water bath & struggling to get it to lie a little flatter to the tops. It's still not a very good match so I just went ahead and glued them a bunch and clamped them down overnight. For now it's holding. I'll be curious to see if the E6000 will retain the hold. I have not used CA glue at all during assembly given it's my first kit and I wasn't confident. (Was a wise decision based on some changes I've had to make). This may be a time I will use it if the e6000 doesn't do the trick. Here are some photos. I did a lot of work to bend/force the side to fit. Looks like a crack formed while it was clamped. I will try to fill this in with some ABS Paste later today. The rivet hold will get the same filler. I trimmed this one back to remove the rivet hold and match some pictures I've seen on where it attached, which seemed a little shorter than the low point of the leg border. I will fill this in with some ABS Paste later today. This view from the top shows a bit of the work needed to get this to kind of fit together. I'm hoping the clamping bent it enough to remove the tendency to return to it's original shape. I'll post more when I fill the gaps. And I'll add it to my pre-request post. -
TikiTechie Requesting Pre-Approval - FAC Stunt TK
TikiTechie replied to TikiTechie's topic in Request TK Pre-Approval
Yeah, those hands are definitely not flexible. I def will cut & bend them when I get a chance. I'm going to fix up the knees. Thanks for the feedback! -
TikiTechie Requesting Pre-Approval - FAC Stunt TK
TikiTechie replied to TikiTechie's topic in Request TK Pre-Approval
Interesting, for some reason I never knew that. :/ I can easily fix that I think. The split rivets were a bear to get installed anyway. I'll fix that up. Thank you! -
My shins are killing me. Back cover strip alignment
TikiTechie replied to TikiTechie's topic in Tutorials, Tips and HOWTOs
I've gotten past a few hurdles. Having clamped it overnight in position and now with velcro holding it, it seems maybe fitting better. Still pretty tight. The main problem spot is this on the knee. Yowch! My initial thought is to apply some heat or pressure or both to this spot and bend it outward. I'm not sure how much give it's going to have though. My second more drastic thought is, can I remove this whole piece since it's hidden behind the sniper plate? Or would that look bad. My photo edit might look more drastic than I planned. Maybe just trimming back the top border part? -
Name: Jim Munro Height: 5'10" Weight: 170 lbs. Garrison: Mountain Garrison Armor Maker: Far Away Creations (assembled by me) Helmet: Far Away Creations (assembled by me) Blaster: 3d printed E-11 mod Neck Seal: ImperialSeamstress (Etsy) Holster: Darmans Props (Etsy) Boots: DIY painted Chelsea boot Posing w Blaster Helmet At ease
-
My shins are killing me. Back cover strip alignment
TikiTechie replied to TikiTechie's topic in Tutorials, Tips and HOWTOs
This is the back left leg. The other photo maybe looks it maybe more spread than it is, however it is still pretty uneven and I have to crank it vertically if I want it to be even at the top in the back as well. -
My shins are killing me. Back cover strip alignment
TikiTechie replied to TikiTechie's topic in Tutorials, Tips and HOWTOs
@gmrhodes13 Assuming I got the back to close somewhat nicely, is that cover strip placement a problem or would it pass muster? -
My shins are killing me. Back cover strip alignment
TikiTechie replied to TikiTechie's topic in Tutorials, Tips and HOWTOs
THank you. I have had a real challenge getting these to lay correctly. I'll check out those links. -
I am on the last piece of my armor and am really having trouble getting these things moving. I've looked at it so long I'm starting to not see what I am doing wrong. The pic below should show what I mean. You can see the cover strip alignment in relation to top middle and bottom of the raised area. I'm not sure how to be trim these pieces if I am supposed to be covering more or if it's correct and I just want to be straight up and down. If I keep the cut shin edges straight, I get this strip that's wider in the middle than the edges, if I wanted to straighten that out, I would think it wouldn't close properly. Does this look right, or do I need to adjust some piece of it?
-
TikiTechie's ANH TK Stunt trooper build
TikiTechie replied to TikiTechie's topic in ANH Build Threads
Yep, there is some along the top edge. I might end up putting a little dab on the top edge all along. It seems like the middle gets a little slack when curved on my waist. -
TikiTechie's ANH TK Stunt trooper build
TikiTechie replied to TikiTechie's topic in ANH Build Threads
Trying to post up some progress stuff, but I'm mostly done. however, I do know that I've had confusion and questions cleared up just by seeing some pictures, so I'll post these two of my current belt. Maybe there's something to fix, hoping it's gtg. -
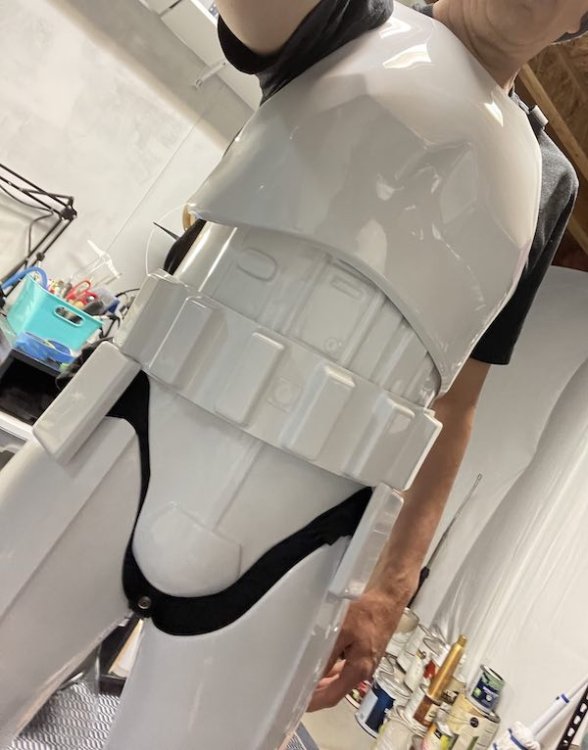
TikiTechie's ANH TK Stunt trooper build
TikiTechie replied to TikiTechie's topic in ANH Build Threads
Definitely. Once I get the shins correct I am going to revisit my straps. Those are first on the list. At least it's an easy fix to shorten. Thanks for the feedback! -
TikiTechie's ANH TK Stunt trooper build
TikiTechie replied to TikiTechie's topic in ANH Build Threads
Almost there. The shins are still a problem and need to finish and add sniper plate. -
TikiTechie's ANH TK Stunt trooper build
TikiTechie replied to TikiTechie's topic in ANH Build Threads
Excuse the roll of shop towels in the back. Not a good look. I did discover they aren't the best for a trooper build as they leave blue fuzz all over.
-
TikiTechie's ANH TK Stunt trooper build
TikiTechie replied to TikiTechie's topic in ANH Build Threads
Helmet complete. The most stressful thing I've ever built.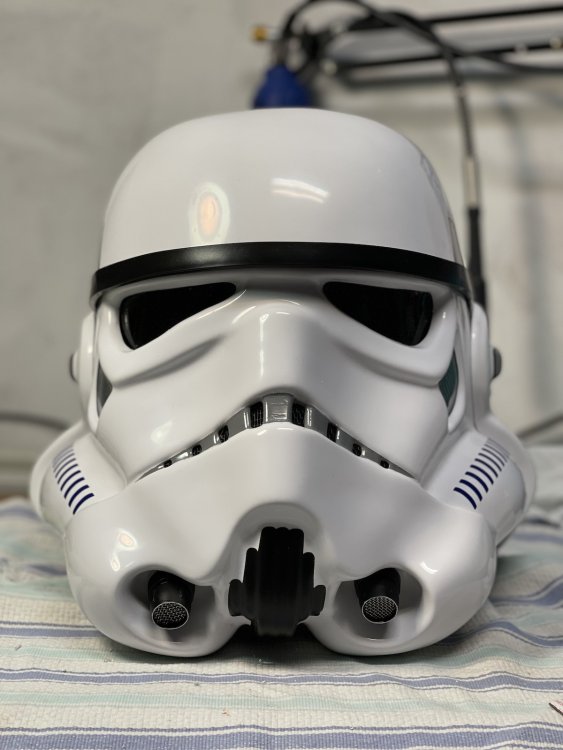
-
TikiTechie's ANH TK Stunt trooper build
TikiTechie replied to TikiTechie's topic in ANH Build Threads
Yeah, that first cut on the kit was nerve wracking. I feel much more confident now, until I got to the helmet and I was terrified again of making an irreversable blunder. It appears to have survived and the paint is drying now. -
I didn't start this thread until late in the build process, so I might be light on WIP pics. Oops. Next build. Got a kit from Faraway Creations in Colorado. Got pretty much all the torso, arms & thighs done. Had a bit of a snag with the calves, more on that later. In progress with the helmet at the moment.