

Krisko720
-
Posts
208 -
Joined
-
Last visited
-
Days Won
4
Content Type
Profiles
Forums
Gallery
Articles
Media Demo
Posts posted by Krisko720
-
-

Almost forgot.. I’ve also been sanding off my fingertips on this little fella. Getting the PLA print lines smoothed away has been quite the chore. But it’s looking good and almost ready for the final coat.
So. Much. Sanding.

Sent from my iPhone using Tapatalk
-
 1
1
-
-
Been a while since I’ve posted, but trust me when I say I’ve been diligently working on my armor. It’s been hard finding time to work on everything, but I found a solution..
I’ve placed some pieces outside on the patio where we hang out after work and sometimes on the weekends. I have told myself to simply pick up a piece of armor and do ‘something’ to it. It’s surprising how much progress you can get from just doing a little bit at a time.
Here’s where I am now:
After seeing a post from KB Props on this stuff and trying my hand (very poorly) at making ABS paste) I got this stuff. It’s my favorite so far out of e6000, Loc-tite epoxy, and the ABS glue I have.
It’s very slow to set (I give it at least 48 hours). It takes a while for the center of a glued area to cure. This stuff will soften the armor if the piece is large enough. It has only happened in one spot on my calf strip though and is barely noticeable.

After putting my yoke and back together, I’ve done several test fittings for various things.
And then.. this happened.

Even with the new design, there is still a weak area once the yoke has been flexed enough times. Instead of getting upset, I set off for a solution. Here’s what I came up with and has worked extremely well with the substrate applied.


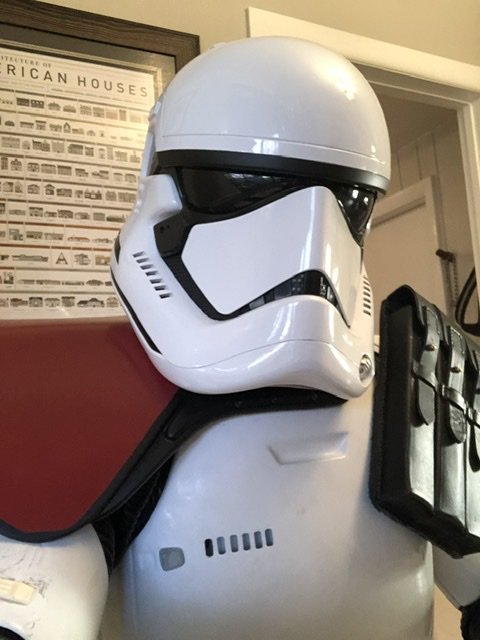
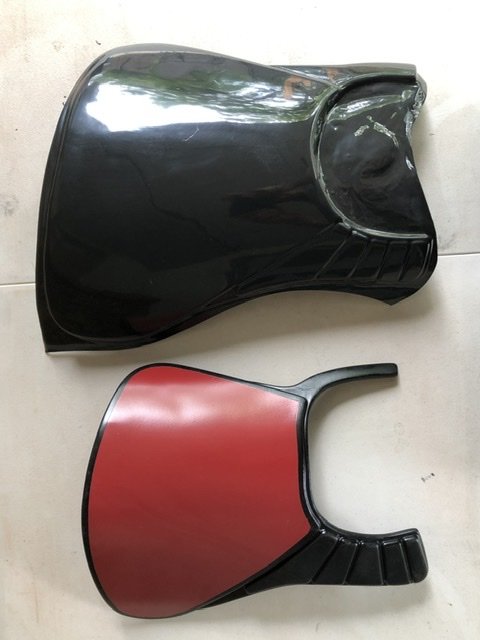
Because KB kinda forgot about my order of individual pieces, he gave me a new chest piece. The new one is from his current set of armor which is being pulled on his upgraded vacuum table. He’s getting better pulls on the armor leaving a tad more detail as much as probably possible. So the vent is a bit more crisp. So much so that he is not offering the resin chest pieces any longer.
The most important update and the one I cared about the most was the chest greeblie alignment. I couldn’t stand them being so uneven on my first chest. I wasn’t ok with having crooked nipples..
New piece:

Old piece:

He has since redone his mold and corrected this. This give me the opportunity to use the chest with all the magnets as my officer chest. I will modify this one more to be used as the permanent pauldron and ammo pouch set. This will allow me to trim out the return edges where the mounts cross and tighten up the gap it was leaving (This pauldron will of course be changed out for my new larger one.)

For those that are curious, this magnet setup was a pain. But I find that it works extremely well. Now that I have a second chest I can make some improvements to this one and keep it as a one piece alternative setup. It’s a toss up which I’ll wear more. You loose a lot of head movement to the left due to the ammo pouch. And the black leather marks up the chin of my helmet pretty good black marks. (But the Officer was my initial attraction to wanting to become a trooper and just looks so damn cool!) I will use the regular chest when I want to rock the shield and riot baton.


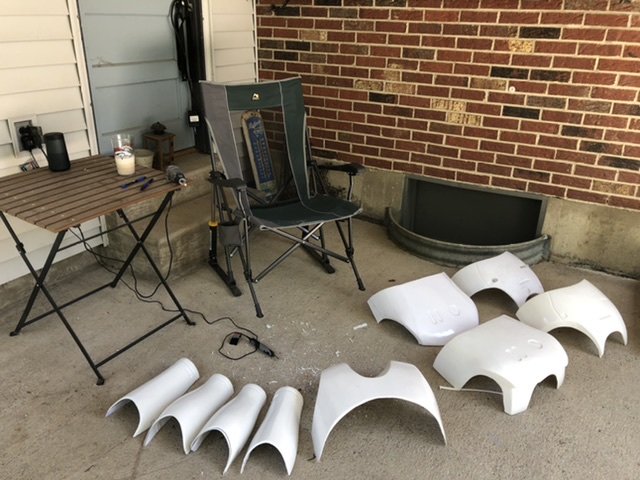
Next I have been working on my lower leg armor. I got new claves and shins as I wasn’t happy with my last pair.
The recessed ring around the ankle for the spat is now extended around the back of the calf which is nice.
The only thing I’m unhappy about is the recessed areas for the clip greeblies. I’ll have to get creative somehow and fix this. It seems he modified his molds but never test fit any of the armor after the new pulls. The faint rectangular lines on the inside of the calf have also disappeared. As well as the excess ABS that you can use as a glue strip.


Almost done trimming the outside mating surfaces. After that I can finally glue these bad boys together.

The biggest thing I’m battling is the shape of the inside points at the top of the armor. KB seems to make his armor adaptable to almost any size trooper. Unfortunately for those of us the exact weight, height, and body type as a real stormtrooper it leaves me having to scale this way back down.
I have found the following issue, the calf looses a lot of height. Needing a backing strip to use as the Velcro area anyway, I cut off the outter part of my old right calf and glued it inside the inner part of my new left calf. I’ll use this as my Velcro overlapped area for my closure and use it as a backing for the modification to build this point back up.


Sent from my iPhone using Tapatalk
-
You made it! Glad you were able to hop on the forum. Wasn’t aware you had been on one before. Look forward to seeing your progress!
And btw, if you can’t tell from my profile pic.. I’m a huge R2 fan! That’s a pretty impressive project to undertake. I can’t imagine the amount of work and patience something like that would take. And money of course!! Lol
Hope I was of some help getting you over here! We have lots of KB builds going on at the moment and several that you already know of. Again, welcome to the FISD! Glad to have you aboard.
-
1
-
-
Hey guys! I haven’t disappeared.. being in the heating and cooling service industry we’ve been quite busy. Summer has been pretty warm here in Colorado! Plus I’ve been waiting on my spare parts from KB Props that I ordered, which finally arrived!
I made a royal mess of my yoke and back piece. So I reordered those.
I also snagged a new updated chest piece (the nipples? weren’t straight on the previous chest).And I got new shins and calves along with the larger more appropriate sized pauldron.
I've been busy trimming, gluing and test fitting. I should have some progress pics up soon! Can’t wait to suit up again, it’s been far too long.
(pic is of my last suit up during a work Zoom meeting/costume contest, I won btw lol)
-
2
-
-
Great work. It’s too bad Anovos is being the way they are, it really is a great looking set of armor! You’re killing it. Glad to see someone else had a set of rubber, I’ll be doing mine soon.
Sent from my iPhone using Tapatalk-
1
-
-
There are several modelers working on these at present so there wont be a shortage of supply that is for sure.
Files are already available to print your own.
I do like it. But not enough to build another character. I’d go Mandalorian or get better quality pieces to upgrade my Obi Wan.
I gotta get me one of those printers. Seems dangerous though. The ability to make things.. I don’t have the room to display all the stuff I’d wanna print!
Sent from my iPhone using Tapatalk-
2
-
-
Very nice, I add a 3.5mm jack to my blasters that are wired along with the speaker, normally fit them underneath the barrel at the back behind the handle then your hand covers the wiring, so they aren't seen, allows you to run a cable from the Aker amp down your arm to the blaster, nice and load for conventions.
Hmm.. I like this. I didn’t see a 3.5 jack on the BlastFX board but I know there is an option for an external source in the menu. Of course I can always add one if need be.
Thanks for the tip! I wouldn’t mind rocking some blaster sounds on the super loud speaker I have.
Sent from my iPhone using Tapatalk-
1
-
-
Just allows the sandpaper to glide a little easier and doesn't clog as much as dry sanding, I know what you mean about sanding your fingerprints down, here's my fingers after wet sanding my Sithtrooper armor, you don't realise the skin is going until it's too late

Lol, that’s about where I’m at!
I was hoping to get more done by now, but guess what.. still sanding.

I have managed to make it through the layer of filler primer and was able to clean up most all of the pieces for paint. A few of the parts needed some touch ups with filler primer to even put the surface a bit more. I added some epoxy putty to a couple of spots with larger gaps or where the 3D print strands weren’t completely filling in the voids.
I have the SE-44C almost ready for the regular primer stage. Of course this means more sanding between the coats of everything, but at least it’s fine grit and I won’t really be shaping anything else.
I have also started sanding and shaping a few of the F-11D parts.
And I was even able to find a speaker to replace the one I have. The speaker that comes with the BlastFX is made to mount inside the inner tube of the E-11. I don’t have the room for it on this rifle so I found a speaker that will fit inside the power pack (the box that’s behind the magazine).

It has the same specs as the round one I have, although smaller, and even has an enclosure. Found it at a hobby train supply shop online. I’ll post more about this mod once I get it to work.
Also looking to install the larger BlastFX screen. Granted the F-11D doesn’t have a display, but the BlastFX screen graphics are just too cool not to have. I’ll probably hide it with a blank off plate for accuracy but will be able to take the plate off to show off the screen if I want to.
The E-11’s have this counter screen. If you haven’t seen the BlastFX in action it’s definitely worth the watch on YouTube. Here’s the counter screen.

Of course each screen (the scope display and the counter display) can be changed to a number of moving graphics.
So anyway, I’ll update more once I get some color on the SE-44C!
Sent from my iPhone using Tapatalk
-
Saw on instagram that this is happening.. in case anyone needs another bucket to add to their collection.


Sent from my iPhone using Tapatalk-
2
-
-
Just so you know.. because I made the mistake.. the line I circled in your pic is not a trim line. It’s where the spat sits on the shin. It’s misleading because it looks like every other trim line. I’m waiting on another set of shins because of this. Just wanted to save you from a potential bad cut! Lol

Sent from my iPhone using Tapatalk-
1
-
-
I hate the prep work with 3D prints but it's worth it in the end. I found using wet and dry sandpaper and water with a little soap detergents really helps.
Pretty sure my fingerprints are gone by now.. lol. I’ll try the soap and water. Thanks for the tip!
The detail parts are so time consuming with the file set. The 3D print definitely isn’t perfect but I’m sure it’s miles beyond what was available before 3D printers.
Sent from my iPhone using Tapatalk -
Tiny update. Got the SE-44C ready for some filler primer. Took down the striations with some 120grit paper and my small file for the tiny spaces and then went over that with 120 and 150 grit sponge sanding blocks.
Still need to add some putty to a few small areas for filler. But overall the PLA is nice to work with and the wall thickness of the print allows for some work to be done to it. The strands hold together nicely and have only pulled out a couple of spots. But nothing some putty won’t fix.
Once I lay down some filler primer I’ll start working my way up in grits until she’s ready to prime and paint.
I think these are going to turn out really nice.
More to come soon.

Sent from my iPhone using Tapatalk
-
BTW this build thread has a lot of great information and detail. Worthy of being pinned in my opinion.
I’m not sure how I missed this thread.. it is definitely chock full of greatly detailed work! I will agree and say that it ranks up there with those used for researching ways to accomplish a build.
I’m digging those spat closures! Might have to use that idea for mine.
Sent from my iPhone using Tapatalk-
1
-
-
Can the speaker fit in the magazine (face down)?
I’ve been working on the pistol and haven’t played around with placement too much yet.
I’ll take some more pics when I get home later. The speaker isn’t too large in diameter, but the magnet is pretty thick and chunky.
I’m going to pick up a battery for the BlastFX so I can play around with the speaker placement. Not sure if enclosing it will muffle it too much or not. Again, if it won’t work I may have to switch to another speaker. Pretty sure the BlastFX is primarily designed to work for the E-11. So I’m wading into uncharted waters.
Sent from my iPhone using Tapatalk
-
If you can build armour to the level you have been , you will smash this out easily.
Looking forward to seeing the progress on these blasters Chris, you got this.
I appreciate the kind words. It has all been a learning process. Not at all easy and has been waaay more expensive than I originally anticipated. But it is an enjoyable process and has been rewarding. The payoff comes every time I suit up for a test fit!
The electronics will prove to be a challenge but seeing videos of different working blasters with lights and sounds was too tempting to not give it a try!
Sent from my iPhone using Tapatalk-
1
-
-
Hey great information. Can we get the names and contacts of the steel and blaster vendors so we can add them to our FOTK supply list thread.
Thanks for your help
I made a post on the First Order Stormtroopers FB group page and Darren ended up putting me in touch with Justin Lee Morrison.
I believe he also makes holsters, but cannot conform this.
Sent from my iPhone using Tapatalk-
1
-
-
Started sanding and filing down a few pieces on the SE-44C last night to begin cleaning up some areas before I lay down the filler primer.

So far I’m digging the prints. The red piece that is used for the light is too small and too skinny, so I’m going to use an idea I found on another build and use a small red LEGO. It should allow me to get the look I want and let the light shine through.
Looks to be a pretty straight forward process with the pistol. Just going to continue to bodywork the parts until they’re smooth. I’m not at all a fan of print striations.
-
The F-11D has quite a few more parts. The entire assembly is built around an aluminum pipe. It’s very sturdy and has some decent weight to it. It will prove a tad challenging to fit the Tramp BlastFX kit into this blaster. There aren’t any build threads with this exact kit that I can find so I’ll fly solo and see what I can do.
The lighting is a no brainer. It’s setup just like an E-11 with LED strip up front and LEDs in the magazine and the other boxes.
Just need to find a spot for the rotary switch and the push button switch.
The battery will most likely go in the lower magazine compartment. I’ll have to use some more magnets to allow the outer magazine to be removable.
The main piece that’ll be a bigger challenge is the speaker. It’s a beefy speaker and will need a mount of some sort. I’ll have to place it somewhere where it can be heard but most importantly where it can easily fit.
Any ideas or threads with this information? I’m definitely stepping into another big project with the electronics being added. I knew this going in but the BlastFX kit is just so awesome and I had to have a working prop.

Oh.. and almost forgot. I also picked up the replica Scout light for this. I have a few real tactical guns and I’m a fan of lasers and lights. So the Scout light was a must.
This is a SOTAC M300B. It’s about $30 and is identical to the real $300 SureFire model.

Anyway, just wanted to post a few pics before I start getting too carried away. I’ll be working on the SE-44C first. More pics to come over the weekend.
Sent from my iPhone using Tapatalk
-
After waiting since the end of October.. my little brown box finally arrived!
I got these from 3D-Props:
*DIY Standard F-11D (TLJ Version) + LED + BlastFX
*M300 Scout Light
*DIY SE-44C Blaster Pistol
The print quality is pretty decent from what I can tell. Definitely not paint ready like one company I have seen, but the parts themselves are pretty thick and sturdy. A huge step above my shield parts I had to work with.
The SE-44C seems pretty straightforward. Just a few little parts to complete the assembly.
The F-11D has quite a few small parts. But again, good prints with tight fitting pieces and nice tolerances. Just a bit of sanding and some cleanup to do.
I didn’t receive any instructions and there aren’t any build groups or threads that I’ve found yet. A little unsure where everything goes, especially having all of the electronics to install, but as the armor has taught me.. finding out is part of the fun!
Should make some progress on these by the weekend.
Sent from my iPhone using Tapatalk-
2
-
-
For my FOTK build, I’m thinking of using the Nerf Rival F-11D as my blaster. Of course I’m going to need to do some painting, and slight modifications. However, I wanted to know if it was allowed, or viable.
Thanks,
Ian
I will let the other (more knowledgeable) guys here answer in more detail, but for an approved weapon.. the short answer is no. I asked the same thing when I first joined here.
I bought two for my nephews and was seriously impressed with the Nerf as a toy weapon. But it doesn’t match up in terms of being the correct dimensions for a screen used weapon.
Sent from my iPhone using Tapatalk
-
2
-
-
Welcome to the forum! Fairly new here myself. I have a TLJ KB kit. There’s a pretty active group that have been tons of help for me. Wouldn’t be near where I am in my build without them.
Just a couple of suggestions where you didn’t have a lead.. these are only my suggestions based on my recent purchases from them.
Belt- Belts of the First Order
(Darren is super active on here and has a really well put together kit for the belt. I also have the TrooperBay belt and did not use it due to it not being as good of quality.)
Gaskets, Harness, Shiny Shorts and Neck Seal- Geeky Pink
(Teresa is simply awesome. She’s very responsive via messenger and does great work. I have everything she offers for the FOTK.)
Electronics for helmet: Speakers, mic and amp, shoulder bell brackets, hearing support mics-
(Ukswrath on this forum who sells on eBay. Also super active on here with a detailed build thread you have to read. I have everything he offers for the FOTK. Super fast shipping and also very responsive.)
Helmet- Search eBay for an Anovos helmet. Best deals you can find plus you don’t have to assemble or paint it!
Sent from my iPhone using Tapatalk
-
1
-
-
Looks like they even have one (top mask) that says ANOVOS across the front of it in case you’d like to advertise...

Sent from my iPhone using Tapatalk -
Darren was able to help me out (once again) finding a part I wanted.
I was looking for some metal plates to replace the printed ones on my pistol and rifle that I have coming. Granted it’s probably not necessary, but it’ll go nice with the metal holster and will look much better than a printed and painted version.
I think a use of real materials, where feasible, helps make props look more realistic. I’m definitely a fan of the use of the rubber and metal pieces on Hasbro’s riot baton.. and of course how Disney used metal for the lightsaber parts at Savi’s.
With the kind referral and a quick transaction, I have a set of these being shipped out tomorrow from a fellow FB group member in Northern Ireland.. I’ll post more later this week!

Sent from my iPhone using Tapatalk
-
Added some metallic paint to the tips and the shield is now complete. Happy with how it turned out considering what I had to work with and it being my first time working on something like this.
And just in time, my blasters will be here Wednesday!


Sent from my iPhone using Tapatalk
-
1
-
-
And there we are.


Just need to add the foam, trim the bolts, replace the nuts with white ones, and paint the light tips on the front.
Sent from my iPhone using Tapatalk
-
1
-
Krisko720’s TLJ FOTK Officer Build
in TLJ Build Threads
Posted
Appreciate the kind words! It has been quite a learning experience with this build, especially since it’s my first go at anything like this.
I have definitely learned some useful skills.. too bad that’ll mean having to do another costume in the future (my lady may kill me if I do..) but it is satisfying getting closer to a final suit up. She’s starting to see what the huge pile of parts and all the plastic shavings have been turning into.
Sent from my iPhone using Tapatalk