

Imperial Valour
-
Posts
38 -
Joined
-
Last visited
Content Type
Profiles
Forums
Gallery
Articles
Media Demo
Posts posted by Imperial Valour
-
-
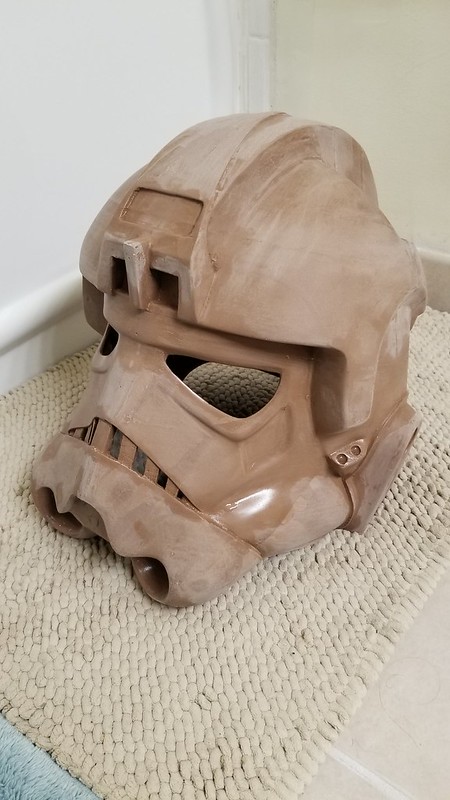
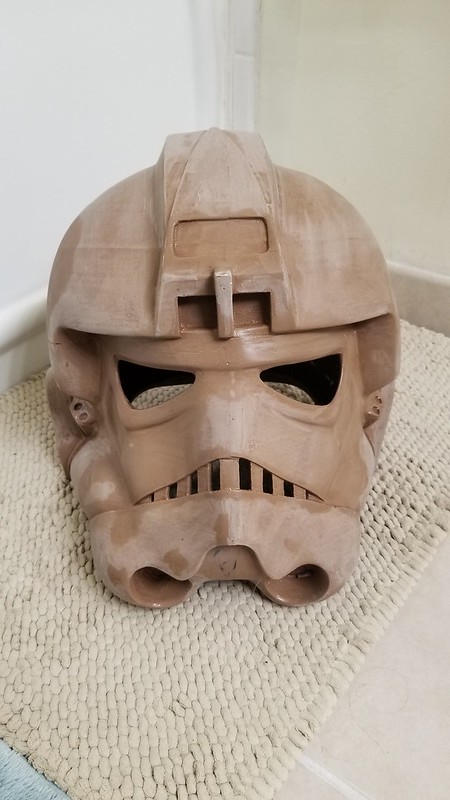
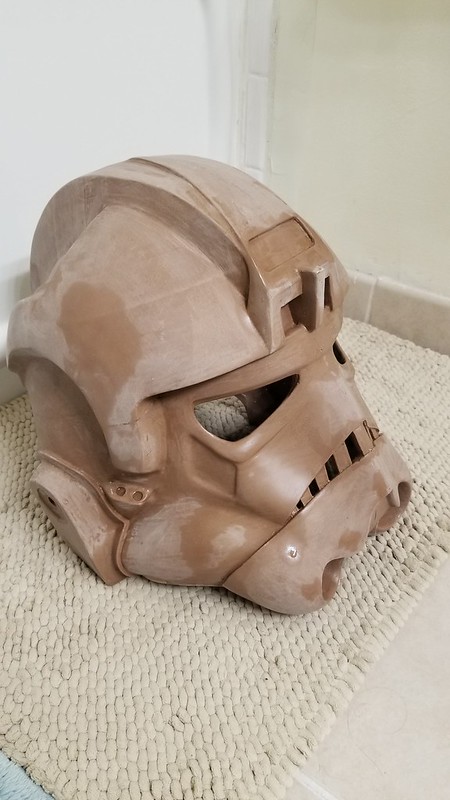
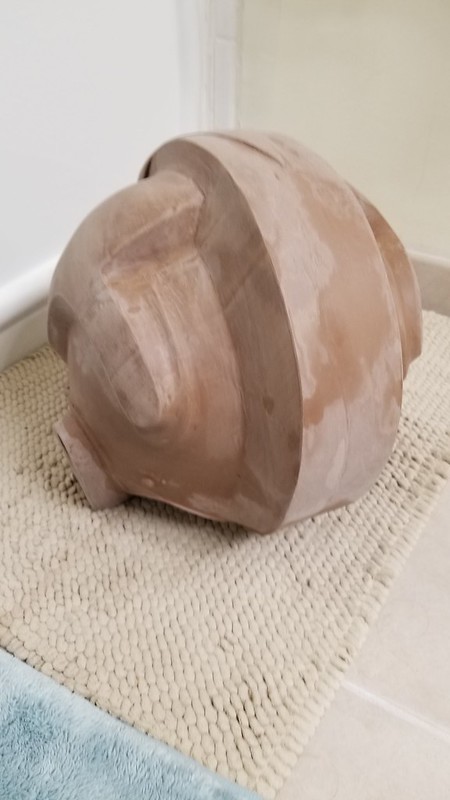
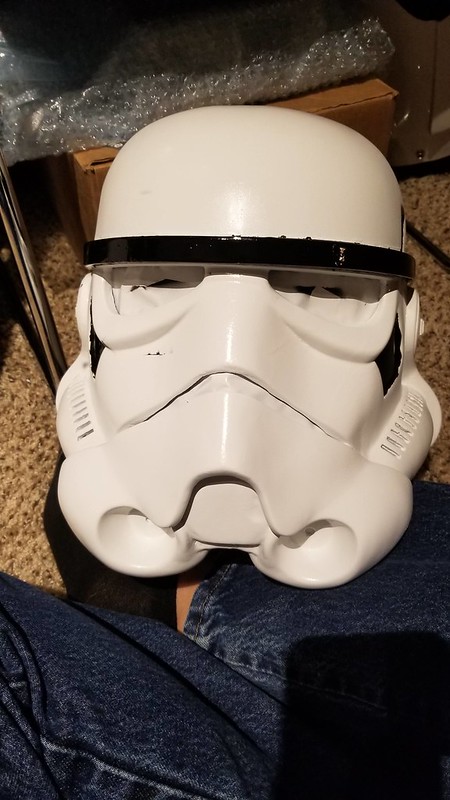
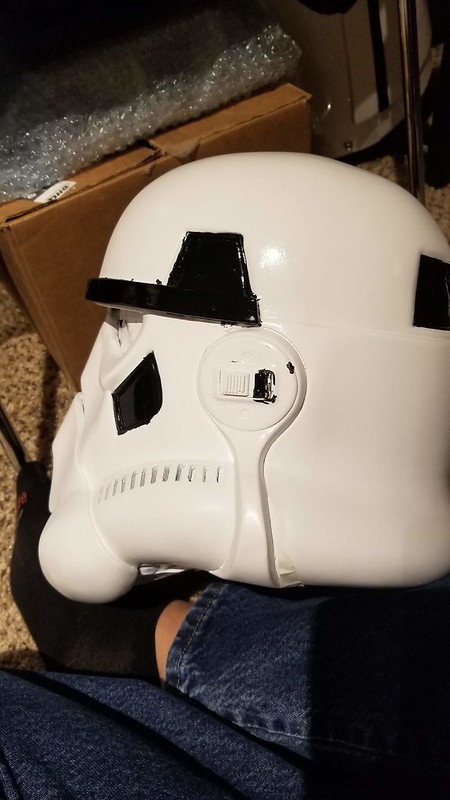
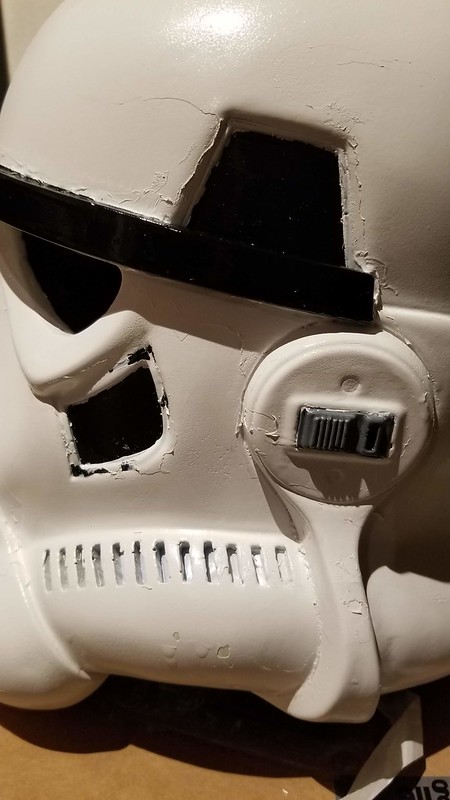
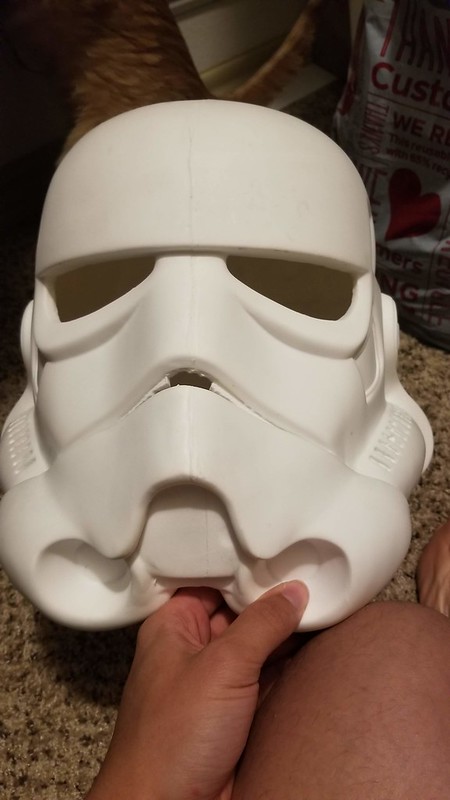
Some more pics of the helmet as it stands now after sanding and washing.
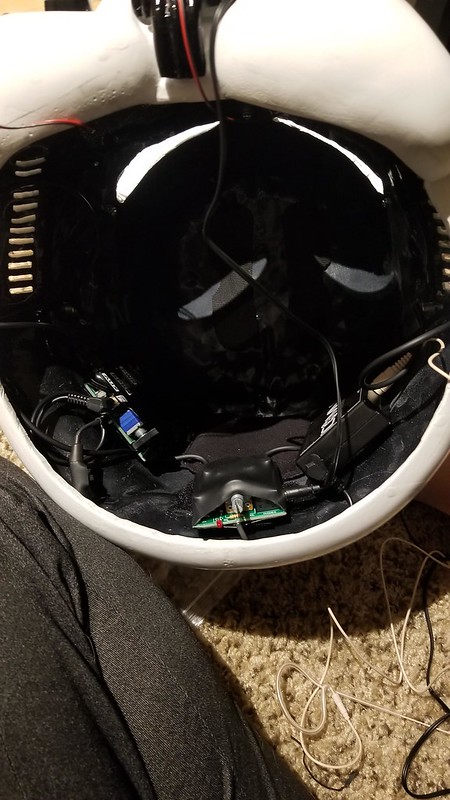
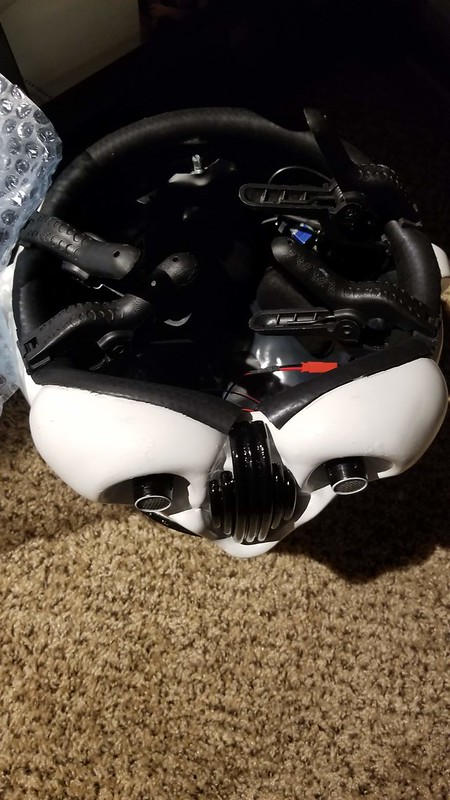
The last pic gives a better idea of the patching that I had to do. Some of these spots were razor thin. I also drilled out holes where the ear caps and the oxygen mask connector pieces go. I used Ukswrath's complete audio solution in my R1TK, and ideally, I would do the same for this costume but with modified mic tips.


-
 1
1
-
-
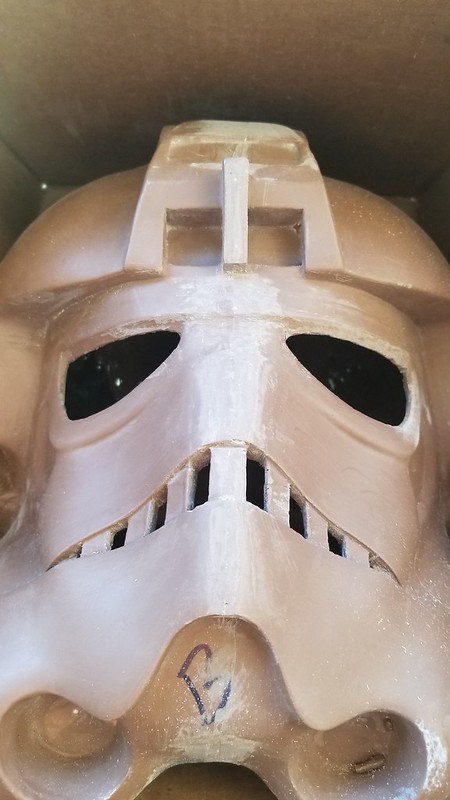
Started working on an Iden Versio build for my wife awhile back, figured I should post about it. The JRS forum is super quiet though, so I'll post it here.
So far I just have the helmet from HSP that I got a few months back. It was a B grade pull and I got it for cheap, but I have suffered for that. I had to patchup several spots that were super thin and grind down the top of the mohawk. These arent the latest pics, but I have sanded down the whole thing now.


-
Pretty excited to see this completed, that incinerator trooper was awesome on the show!
-
1
-
-
I am curious to see how HSP armour comes out, I have their helmet but 850 AW armour.
-
1
-
-
I used 850 Armor Works for my TK and got approved with no issue. As several people have mentioned, Jim Tripon also makes a fibreglass kit out of the Philippines.
-
1
-
-
Looking forward to seeing this build!

-
8 hours ago, TKSpartan said:
Hi Dan, As I have seen in some R1 building threads they use some king of fabric or as Justin pointed, foam or similar.

Good luck with your project.

The last two pics are from my helmet and I literally went to Michaels, grabbed some blue fabric from the clearance area, and glued it in there. Just try to get something breathable so air can get through it, if you grab wool or something, you are going to have a bad time.
-
1
-
-
On 4/25/2020 at 9:35 PM, TerribleBen said:
Hello. I have looked at your build to help me with my 850AW R1TK build. Thanks for posting this as it has helped me lots. Your armor looks great. My question is about thigh strapping. Yours is about in the middle of your hip. Is this a choice of yours or is this a mandatory placement ? I was interested in hiding mine behind the drop boxes. What is your thought. Thanks again Ben
I am not sure if that placement is mandatory for approval, but that is how it was done from the screen captures that I saw. Having them there is also super convenient when you have to take the armour off, and they aren't very noticeable. My only concern with putting them under the drop boxes is that the thighs might not hang correctly and give you trouble while wearing them.
-
So my ship date was 3 months because he was just starting to make them, I ended up getting it after 4 or so. I'm fairly certain I got the first one he completed if he is telling you 10 days to ship now.
-
I'm sure everyone has warned you about Head Shot Props and their lack of timeliness. That being said, even though my helmet was late, it was in good shape and it came out great. Working with resin is easy, and I am pleased with their details.
-
My armour is completed and approved as of 1 December 2019.
-
1
-
-
It is finally complete! First troop will probably be 21 December with the Imperial Rough Rider Squad in Star Garrison. See you out there, fellow troopers!


-
3
-
-
-
I got my approval email this morning!!! Thank you so much to everyone who helped me along the way!! My childhood dream has finally come true!!
-
3
-
-
5 hours ago, Adam said:
I was hoping to vet this maker and I can safely say:
DO NOT ORDER FROM HEAD SHOT PROPS
It's been over a year and after multiple conversations with them: No kit, no progress pictures, no refund in sight.
They now have a reputation for taking pre-orders without ever delivering,
I've already filed a complaint with Paypal, my Bank, and the Better Business Bureau but I'm not expecting to see my money or the kit...
Guess I'll chalk this one up as a loss and become a cautionary tale for you all!
Im sorry to hear that they did not work out for you. My helmet is from them and I went back and forth with them because it was delayed by a few weeks. I am pretty happy with my helmet, it just took way longer than I expected to get it.
-
On 11/18/2019 at 5:54 PM, delcid23456 said:
your armor looks great but there is something off about you left leg it looks like you have two right shins from looking at it, and if that's the case look in to getting a replacement for the shin, but i could be wrong, also you may need to paint the resin cover strips to match the armor
Unfortunately, the resin strips and the ABS plastic are not the exact same shade of white. I tried to match them at least 3 times and settled with the closest white I could find locally in a spray can. The helmet is the same way, and is the same colour as the cover strips, I don't think its that noticeable so I hope it won't be an issue.
-
This will be a long post, as I was locked out of the forum this past week.
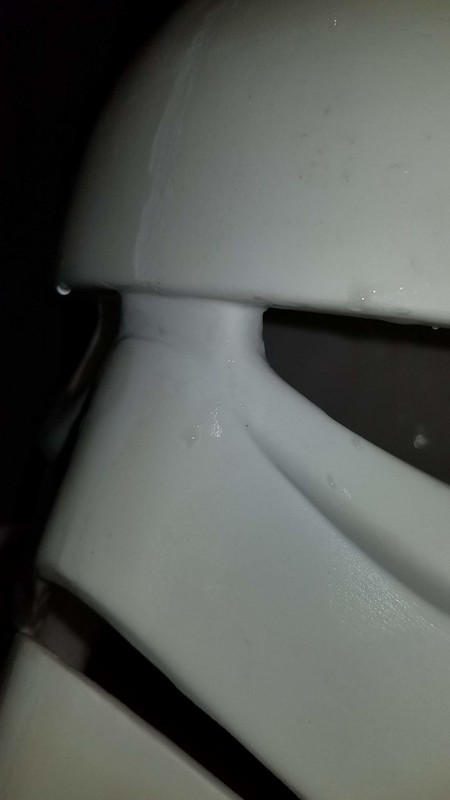
This helmet gave me so much trouble, mostly because I forgot how much I hate painting. In any event, I attached the brow and realised afterwards that the CRL states that it should be a 1/4 inch above the eyes. I decided to keep pushing forward since taking it back off would have been a major pain. It's a shame as I was aiming to hit all of the level 3 certifications. After that I fought with painting for around a month with numerous coats before I painted on the details and got ready for the clear coat.

However, when I put the clear coat, it reacted with the paint and caused it to bubble and distort and made a big mess. I thought about launching the helmet off the balcony but decided against it, and sanded it back down as best I could. I repainted it and took extra time for it to dry before putting clear coat on, and that helped but still left the helmet less than perfect up close.

I also painted the interior black and put all of the electronics in and the lenses.


I finished up the belt by using snaps and glue, and I'm pretty happy with how that came out.


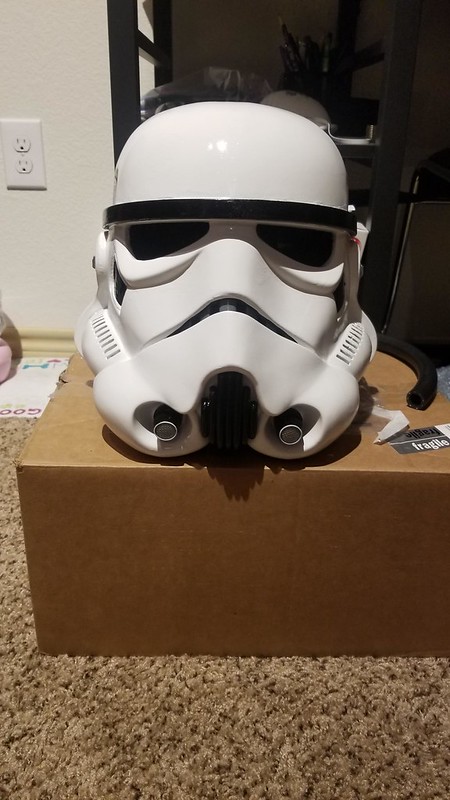
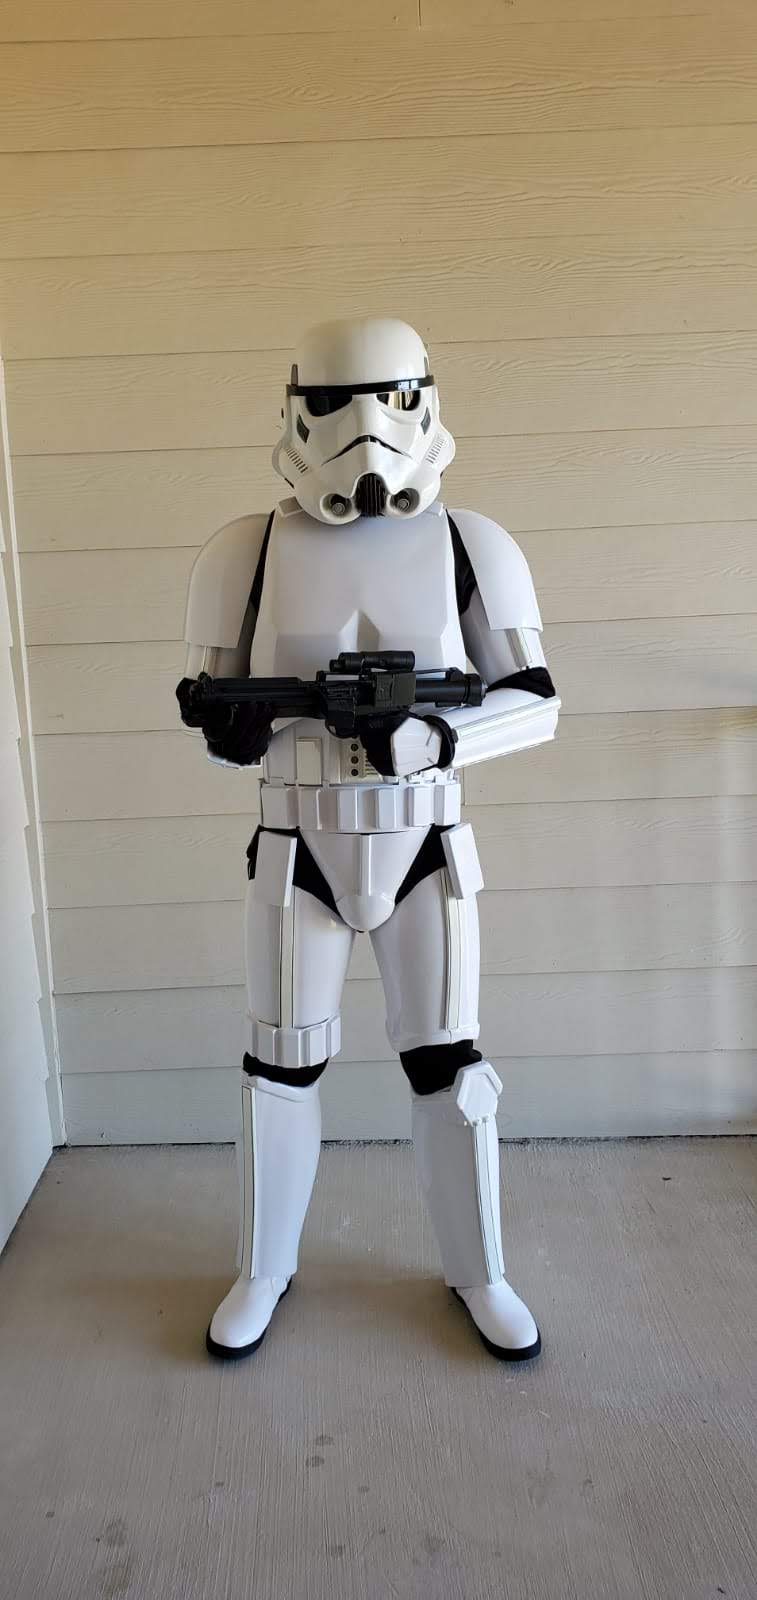
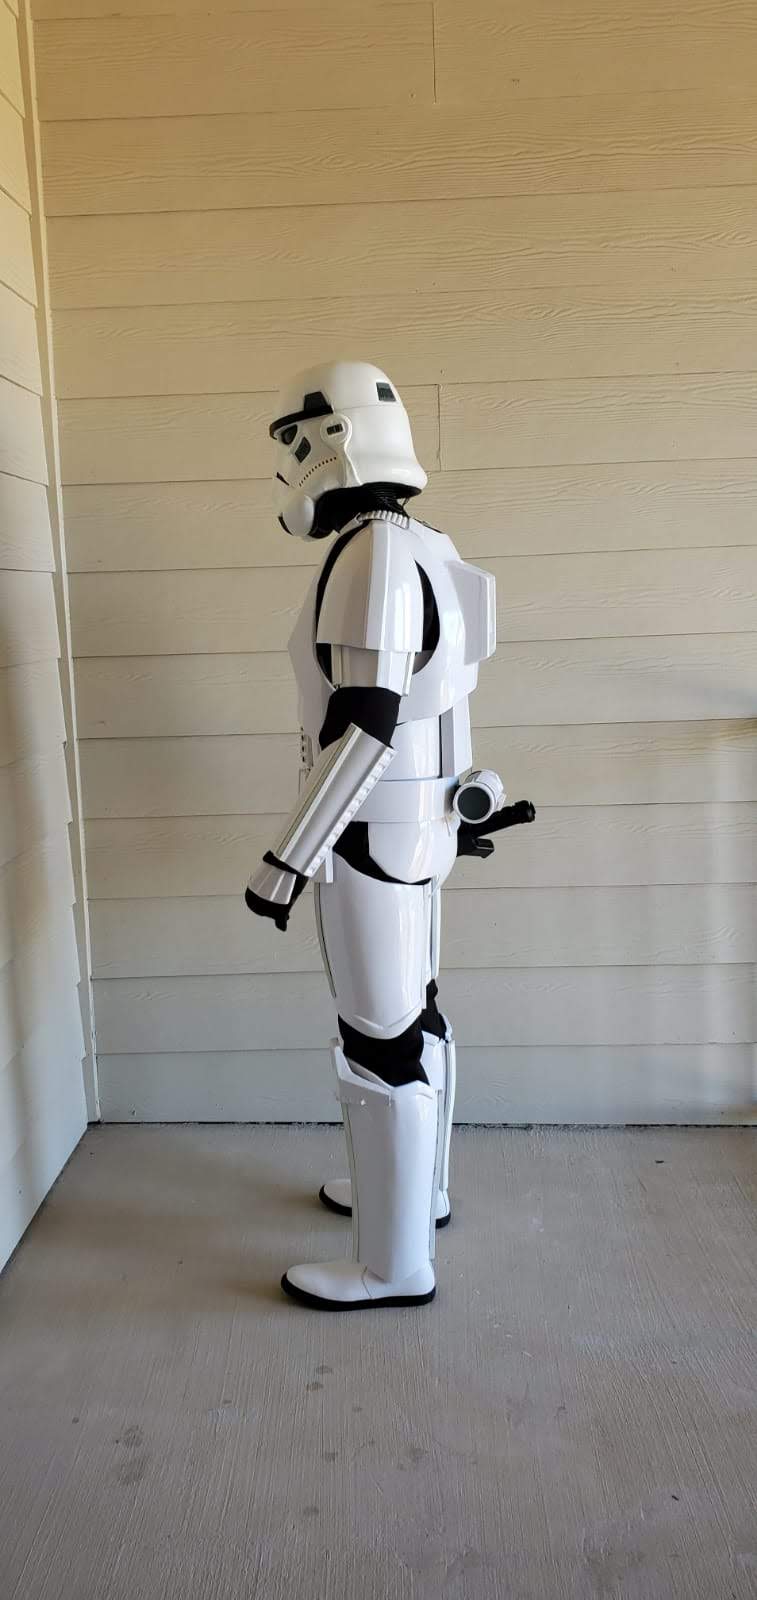
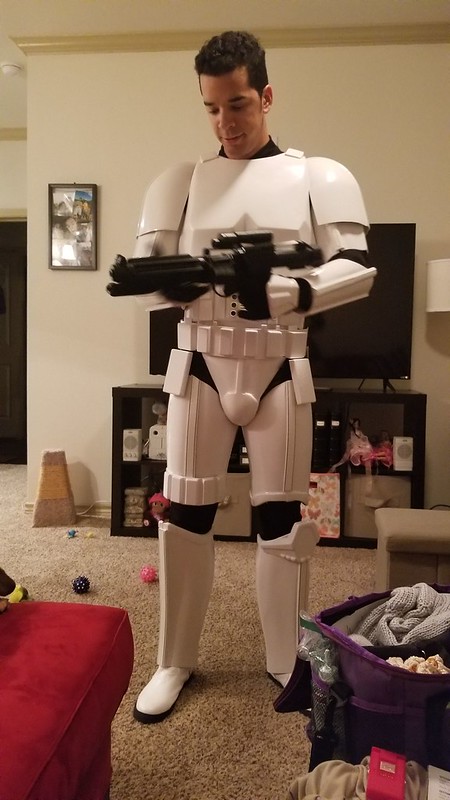
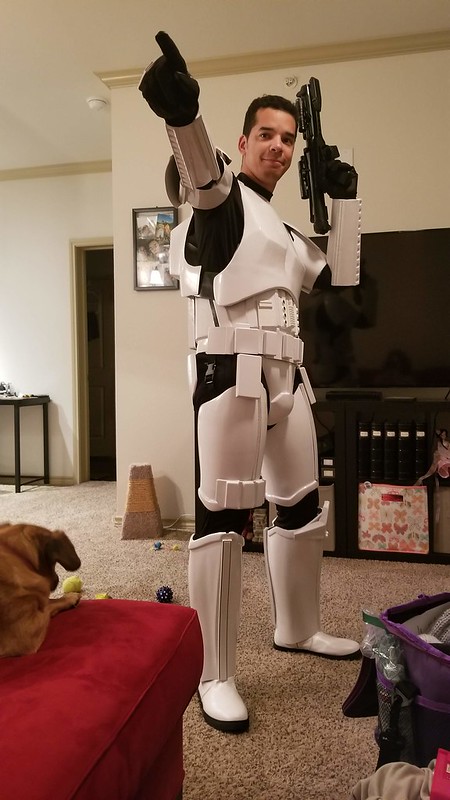
And finally today, I glued on the last of the grey squares on the helmet, so I donned the whole suit and took some pictures!! I think that it's ready to submit and I'm super excited to get approved and start trooping with all of you!


-
1
-
-
Quick question for you on your build. How did you attach the thermal detonator to the back half of the belt? I am thinking about using rivets or velcro but I am curious how you did it.
-
I figured it out guys!!! I was geting ready to take a shower and I thought about scoring the styrene and then drilling a bunch of holes in a line. The scoring helps to prevent the bit from jumping around, and then I just clean the channels with an Exacto knife.
I also worked on sanding down the nose area on the helmet to give it the proper shape.
-
1
-
-
On 10/2/2019 at 10:14 AM, 11b30b4 said:
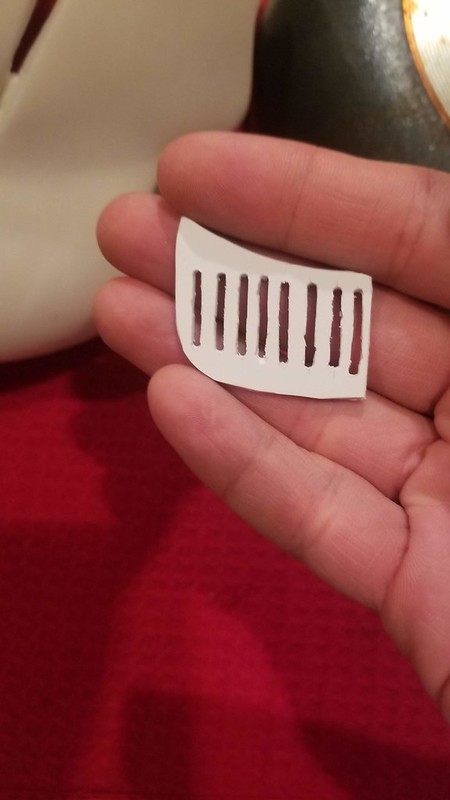
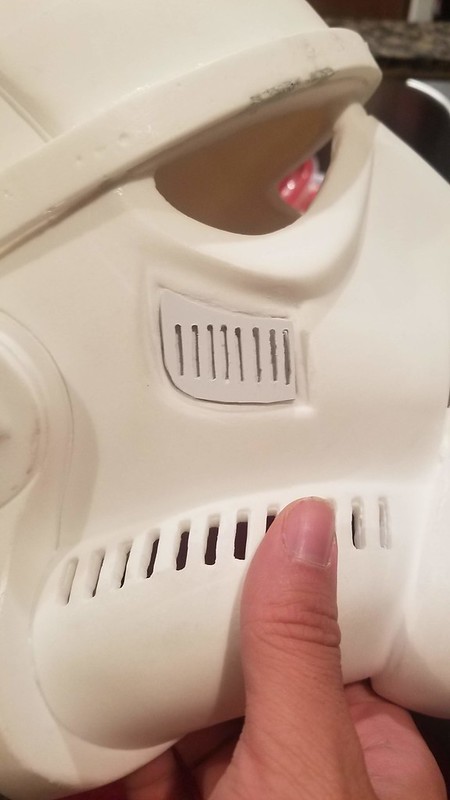
Imperial Valour, based on the HSP helmet, it looks to me like there is a recessed area in the center of tear traps, temples, and rear vent boxes? If this is the case, I would suggest you make the (grey area) out of styrene. Make a stencil for the lines and cut them out if the styrene then shape (hot water bath or heat gun) the styrene to fit the curvature if needed. Paint the area on the helmet black then paint the styrene admiral grey and glue it in place. I think this is how the actual screen used helmets were made and why we have in the CRLs that there must be a recess black outline of each of the boxed area. Most of us have this already molded in our helmets so we can not make the tear traps like this but it looks like you have the ability to do so.
You are correct, those areas are indeed recessed. Too lazy to take any pictures right now, but last weekend I tried to cut out the vents in the helemt itself. Things didn't go well and I have now patched the holes with Water Weld resin. I have to finish sanding down those areas so the styrene I bought will cover it nicely. These vents are turning into a major headache, I made a template and tried to use the dremel which caused the styrene to melt. So then I switched to a cordless drill and inevitably rushed and now it looks pretty bad. No big deal as I have a bunch of styrene to remake the trapezoid. At this point though, I am tempted to just paint on the black lines rather than try again. I just can't figure out a good way to cut out these vents without taking forever.
-
7 hours ago, Twelveravens said:
I took some close up shots. Maybe you can scale them and print them out to use as templates?


Sent from my SM-N950U using Tapatalk
Thank you so much, this should work perfectly.
-
Looks great!!
-
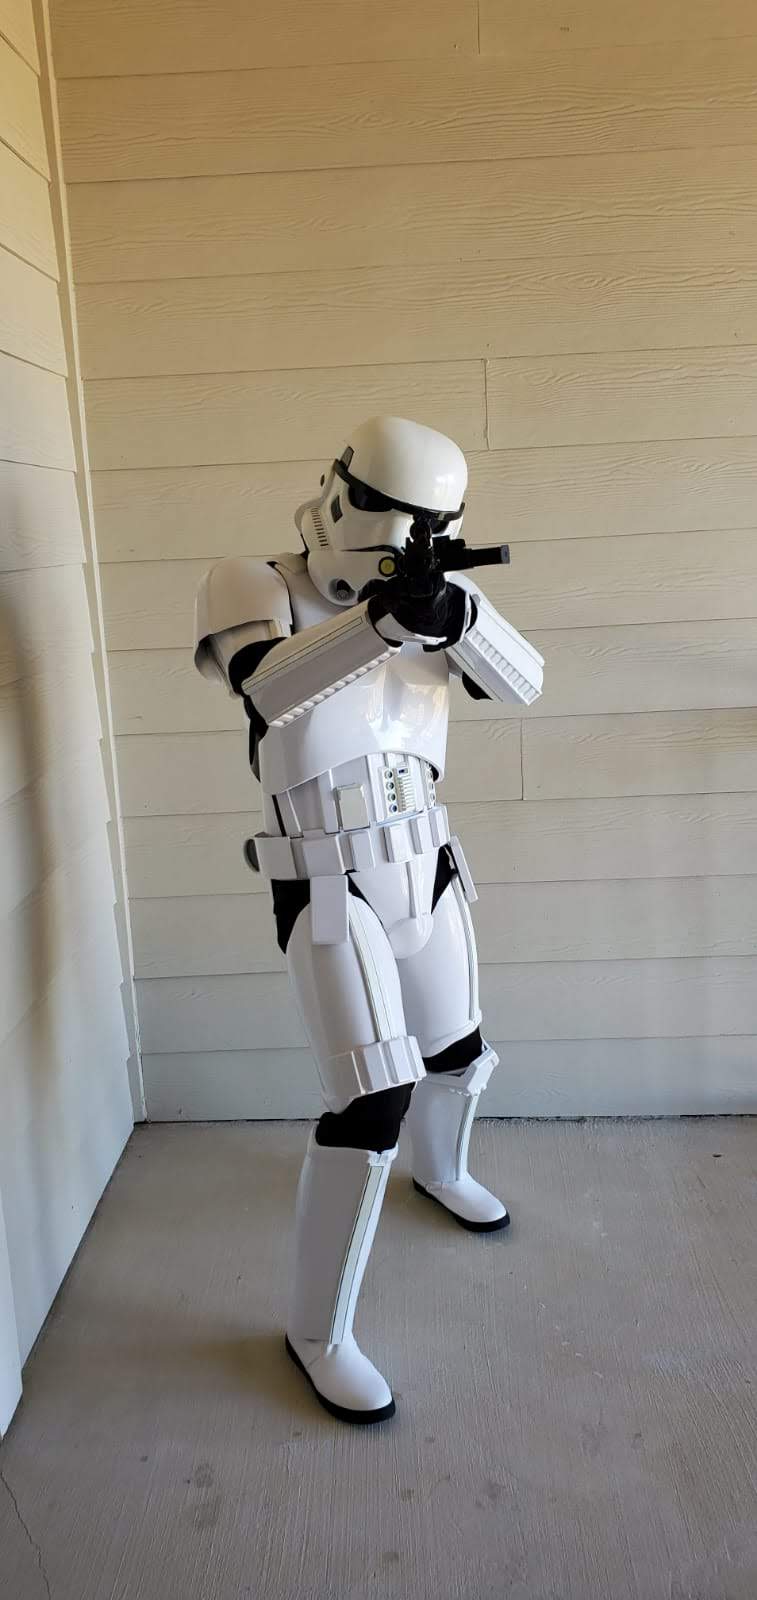
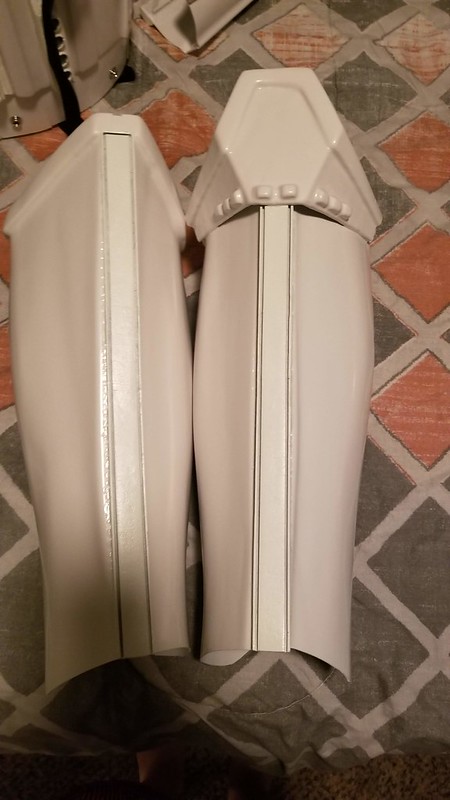
So at this point, I have finished the majority of the work. First the thighs.

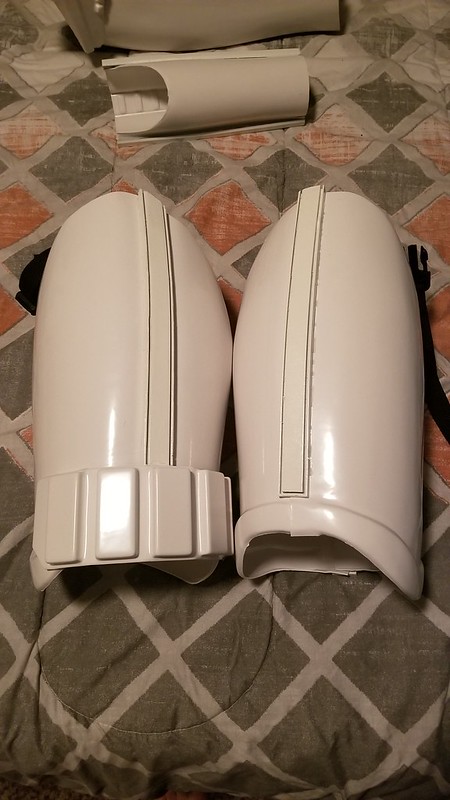
The shin armour. I added some foam to help keep them in one spot on my leg, real happy with how these came out.

I added some foam on the inside of the bicep pieces to help them sit right. They were digging into my sides originally.


Finished up the forearms for the most part, they are tight on one end, but I don't like how they fit right now.

I also trimmed down the ab section so that it doesn't show per the CRL.
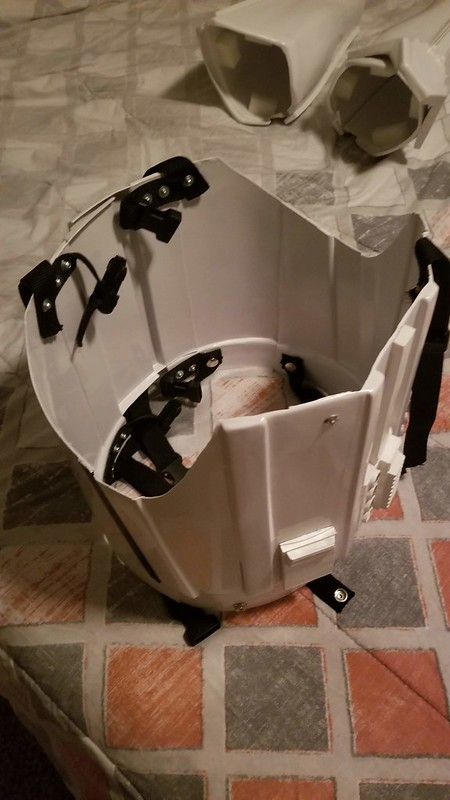
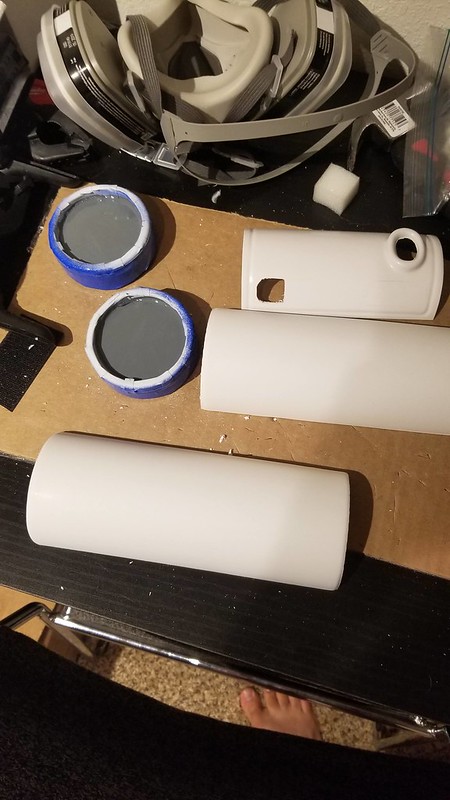
Started working on the thermal detonator, the paint I used took like 4 days to finally dry.
And then there is the helmet....
So, this is the HSP helmet and I have mixed feelings right now. For the most part it looks pretty good, but in the second picture you can see that the slits were messed up so I will have to fix that. The brow has some pits in it as well that will have to be patched. What really bothers me is that the frown is a separate piece and I will have to try and grind down a bunch of material to get it to fit right. I'm really not sure why HSP didn't just mold that into the helmet as well, but oh well. With some patience it should turn out okay.


And finally some shots suited up.

Edit: I forgot to ask if anyone has a template or a guide for the slits on the helmet that have to be cut out. I am a little nervous about trying to guess about the spacing.
-
1
-
-
Wow, this looks pretty good. I am having issues with the belt as well, it just doesn't line up properly.
New ANTHOLOGY TK Crl
in Rogue One
Posted
So I noticed that there are imperial binders on the CRL now, does anyone know what the reference is for these? Every version I can find is the more generic one that disney released a few years back. Trying to find a few more reference pictures, before I attempt to make them.