

TK-Timbuktu
-
Posts
39 -
Joined
-
Last visited
Content Type
Profiles
Forums
Gallery
Articles
Media Demo
Posts posted by TK-Timbuktu
-
-
14 hours ago, TheSwede said:
Flexible ones are for Centurion and yours are fine as is, personally I wouldn`t go over 10 or under 5.
Second loop can go around your wrist and pehaps that´s what you meant - keep up the good work

Awesome, thanks. And yeah the wrist makes more sense. Time to learn how to sew I suppose. I'd like to get as accurate as possible on this build, but at the moment I think I'm going to stick with the plastic handguards and maybe upgrade later on.
-
After a couple weeks of not working on my build, I finally got the time to get back to it. Did more fine trimming on the chest and back pieces, then sanded everything down in preparation for fitting.
After that, I went ahead and drilled the holes for the brackets after checking my measurements several times.


I also installed the brackets to the armor and it came out better than I thought given my measuring skills. And following ukswrath's build I went ahead and used shims to reinforce the brackets.
Here are the results after some trial and error. I think it looks good and hopefully better after some paint on the bolts. I know I am going to have to drill the holes for the side rivets and cod (have them marked to drill now) and that I probably should I have done that first, but I only thought about that after the fact. Like I said, trial and error. But so far I am looking forward to keep the momentum going on this build.


And finally, I was able to trim the hand guards to better fit, but I'm still thinking it's a bit thick. What's the rule of thumb on width around the handguards? I have it at about 10mm all around right now (front is wider at the moment). A lot of the photos I see are the flexible handguards but was planning on using these for now at least.


And for now I am using the provided hand strap, swapped out with industrial Velcro. I also want to add another loop to go around my thumb to keep it from falling off but will look into that more later.
In the meantime I am going to finish the fitting process in time to start gluing sometime this month at a locale that isn't my apartment (don't feel like breathing in all that E6000 in an enclosed space). I'm hoping that if I have it all fitted and ready to glue, I can get it all glued on the same weekend. I have 50 rare earth magnets and a 22 pack of clamps for the job, so we'll see. -
Got my set of brackets in the mail from Trooperbay, so I started to measure out where I'm going to drill following ukswrath's build. Measured sides (3/4 inch) and after making the bracket holes on the sides found the middle of the back plate.

After that I marked the bracket holes for the center. To ensure consistency and because I'm not the best at measuring, I'm making center lines for the brackets and measuring 20mm from hole to center line. (They're about 40mm from end to end)
Next I lined up back to kidney and got them lined up as best as possible.
Then I did each side of the top kidney, lining up with the back plate.


Now measuring the middle of the lower kidney and the sides.


And here's the finished bracket holes marks for the lower kidney plate.
And to finish off the bracket hole marks for the back armor, lined up the posterior with the kidney plate. As much as I admire the asymmetry, lining these pieces up proved to be pretty stressful, but after trial and error I think I have them lined up as closely as I can. The center and left (looking from the inside) are spot on, but the right (from the inside) is off a bit, so I'll have to adjust that one later. Although at some angles of holding them center with the kidney the inner right looks close. Any tips for properly lining these pieces up without having an extra pair of hands?
Inner left:


Inner right:
Inner right after making new bracket marks. Still not perfect but a little closer:

Center:
I'm going to start on the abdomen and chest plate later today or sometime tomorrow. I'm also planning on making support pads for the brackets, so that will be on the to-do list as well. And I'm not going to start drilling yet so if there are any suggestions or corrections I would gladly appreciate the feedback. Also for clarification is the correct drill bit 7/64? -
Have been busy building IKEA furniture the past couple days, but I did get the chest and ab plates trimmed over the weekend. Left some extra return edge until I get the brackets to see how much I can trim off. I'm also going to start fitting this week when I get the free time, starting with the biceps.


-
 2
2
-
-
7 hours ago, Rat said:
Yeah I'm hoping to get mine done in time for Solo premier. Hoping. I hear ya on the fitting part, I'm just starting on that and it seems daunting, "Like do I trim evenly from all edges or just one side?"
Sent from my VK815 using Tapatalk
If you haven't already, check out Panda Props videos, the way he shows it is that you want to overlap the pieces so they're even when fitting. Keep in mind he's doing a bigger size kit that is not Anovos, but check this one out and see if it helps, you can start the video at 8 mins:
-
Not too much to report, got all the back pieces rough trimmed, as well as the thigh ammo pack. Will get started on the chest and abdomen tomorrow, and then from there I'll start fitting. My goal is to have this completed by spring, so far I think I'm on track for that.


-
1
-
-
9 hours ago, 68Brick said:
Great Start Ian! Good job on the trimming. Have you looked at tapering your thighs to fit your leg?
Thanks! I haven't started fitting yet, still doing trimming for the torso parts, but I will definitely take that into consideration when I get there. I think measuring and fitting might be the most difficult part of the whole build, so it'll be a slow and precise process for me. What parts would you recommend to start fitting first to get the hang of it? Or would you say the thighs are a good starting point?
-
18 hours ago, Rat said:
Coming along and looking good. Yeah Mike TK 1636 is a great resource for lots of stuff. Making bra hooks, brackets and how to navigate through kits. He's been my greatest resource so far as the building goes.
Sent from my VK815 using Tapatalk
Thank you, slowly but surely. I've watched his videos as well, I also like Panda Props videos, he explains the process more in depth.
-
1
-
-
5 hours ago, Rat said:
Thanks. That first was a pure fluke that I was up late doing it. I'm pretty happy with it so far. Now to move on to fitting and final trimming and sanding.
Sent from my VK815 using Tapatalk
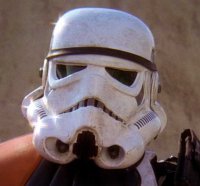
Nice job, looking great. I'm excited to see your progress on the fitting, too. How do you like the helmet interior? I had to use a bit more padding but it seems to fit quite nicely. Still debating if I want to switch out with the chin straps. Keep up the good work!
-
And as per Swede's advice I went ahead and got rid of the return edges on the forearms.


-
Alright haven't been online in a couple days but I did get the thighs done yesterday. Here's the left one after trimming.


And here they both are. Ended up better than I thought after fighting against the awkward angles.
Also got the kidney plate done, will need some sanding, but this piece was softer to cut since the plastic was much flimsier than the other pieces I've cut so far. There wasn't really a trim line on this one so I just used lexan scissors all around.


-
On 1/7/2018 at 9:27 AM, magni said:
Great start! Keep up the good work!

Thanks a lot!
-
On 1/7/2018 at 11:28 AM, QuartZ said:
Looks like you're moving at a pretty good pace! Keep it up and don't rush. Check your reference often and you'll do great!
I didn't realize the new kits had copyright information printed inside each piece. Interesting! I wish they would have printed something more useful inside like the part numbers so that they don't get lost when you take the protective plastic film off the outside
")
Good luck,
-Dana
Thank you very much. And yeah, it would've helped because several pieces were missing number stickers so had to go through process of elimination to determine some of the thighs and shins parts.
-
Got the right thigh pieces trimmed yesterday. Didn't take too long, just getting around the awkward angles on them was a bit of a challenge. Here are some before and after shots.


The "finished" result after the initial trim. Turned out better than expected, with only one minor injury to report (always wear your gloves).


I also took some time to go over the "strapping system" that comes with the anovos kit, and I wouldn't trust it to hold anything. From looking over at what other people have done, I think I am going to with the brackets for sure, the belt for the thighs, and I still haven't decided on what to do with the arms yet, but I do like the method of all arm pieces being attached. Might look into it more next week and start gathering the supplies for it. -
Awesome-thanks again, will have to go back to the forearms for that and I'll keep that in mind when doing the torso. Tomorrow I'm going to start on the thighs so I'll see how those turn out. Until then.
-
1
-
-
Thanks for the advice, really appreciate the info.
") I was actually planning on using the brackets, so as for keeping the return edge would I just cut to the trim lines to leave the space for drilling? As for the forearms, I'll have to go back and trim the wrists-Do I just cut it right at the edge where it starts to curve, leaving a straight edge? And I did read through his build thread before getting the armor, but I'll have to look over it again to brush up on the specifics. Thanks again.
I was actually planning on using the brackets, so as for keeping the return edge would I just cut to the trim lines to leave the space for drilling? As for the forearms, I'll have to go back and trim the wrists-Do I just cut it right at the edge where it starts to curve, leaving a straight edge? And I did read through his build thread before getting the armor, but I'll have to look over it again to brush up on the specifics. Thanks again.
-
So far I have been averaging about 2 parts trimmed per night, but yesterday I spent a bit more and ended up trimming all four shin pieces. Here they are side by side, trimmed and untrimmed.


And although this kit seems to be an updated version, the shins are still labeled wrong-that and they haven't updated it on their manual either.
Got really nice cuts down at the ankles by following the inner trim line since it is much easier to see and follow on this particular piece.
The issue I had was with the top of the shins, the cuts were very difficult for me, as the angles were hard to work with. Everything turned out alright, except that I cut slightly over the trim line. I'm wondering if the best thing to do is subtly taper down into where the cut is?
Here are back & front shots of the shins, top are right and bottom are the left shin (if I'm not mistaken). I have 25 with 28 & 24 with 27. I think I have them in the right position-inner & outer-but will have to look more closely tomorrow.

-
Shoulder bells before and after trimming:


Overall these were one of the more easier parts to score and snap, the curves along the cut line are where it got tricky. As you can see, my cuts were a bit rough, but I'm hoping some sanding will clear that up. -
Been working on trimming the past few days and have gotten all the arm pieces cut, and am now onto the legs. Here's the biceps:


And the other bicep. These were pretty straightforward to cut, other than the awkward angles.


-
Also, I just started my first build thread here:
-
1
-
-
On 12/28/2017 at 7:14 AM, Pretzel said:
Welcome to the FISD PA Brother!
Here are some helpful links.
1. I want to be a Stormtrooper. Where do I begin? https://www.whitearmor.net/forum/forum/38-getting-started-read-this-first/
2. Where do I buy armor? https://www.whitearmor.net/forum/topic/11538-the-various-types-of-armor-and-where-to-find-them/
3. What is recasting/where do I NOT buy armor? https://www.whitearmor.net/forum/topic/19329-where-what-and-whom-to-avoid-when-buying/
4. What are the steps to becoming a Stormtrooper? https://www.whitearmor.net/forum/topic/30456-how-to-join-the-501st-legion-as-an-imperial-stormtrooper-tk/
5. What are Expert Infantry and Centurion? https://www.whitearmor.net/forum/topic/35371-eib-and-centurion-what-do-these-terms-mean/
6. What supplies will I need? https://www.whitearmor.net/forum/topic/31404-supply-list-for-your-tk-build/
7. What the heck is an "Armor party"? https://www.whitearmor.net/forum/topic/42877-armor-party-101/
8. How much does a suit of TK armor cost? https://www.whitearmor.net/forum/topic/28304-how-much-can-i-realistically-expect-to-pay-to-finish-my-stormtrooper-costume/
9. I'm 501st approved, what do I do on my first troop? https://www.whitearmor.net/forum/topic/39382-your-first-troop-a-few-tips/
What part of the Lehigh Valley do you reside? I live north in Carbon County. Beltsville area.
Thanks for the links, Pretzel - always appreciate the advice. And I'm in the Bethlehem area by the way.
-
1
-
-
Moving onto the handguards next, I tried two different methods for each. For the first one, I would do a straight cut with an xacto, then snip the edges to break it off. Between lining up for the cut and cutting the edges with lexan scissors, it felt like it took longer than it needed to.


The other hand guard I tried something different, this time doing all the straight cuts making 2-3 passes on each side. After that, I snipped the ends of each side and snapped the pieces off. That way went much faster and the cuts were a bit cleaner too because I could match up the previous cut I had made.

-
Next, did the same for the right forearm pieces. This one has a second trim line unlike the other one, tried it first but it was way too big, so I went with the inner trim line.


The finished result after a rough trim. Have been getting pretty good straight cuts with score and snap, but still getting used to the curves using Lexan scissors. Hopefully will be able to clean it up during sanding.

-
For tools, I am using an xacto, lexan scissors, and blue painter's tape to make a border along the trim lines. I will be sanding and gluing later on in the build.
To start, I am doing a rough trim of each part. Using the score and snap method for straight lines, and lexan scissors for curves, I began with the left forearm. Here are the results:


TK-Timbuktu's Anovos ANH Build
in ANH Build Threads
Posted
Cool, I didn't cut as much to make sure it wasn't too thin, but will have to see how it looks with the armor when fitting. the original trim line made them crazy thick though.