


Ravant
-
Posts
19 -
Joined
-
Last visited
Content Type
Profiles
Forums
Gallery
Articles
Everything posted by Ravant
-
Ravant's ANH Stunt Build (A first-build! - From the Anovos Kit)
Ravant replied to Ravant's topic in ANH Build Threads
Final Photos! Alright, now there are some minor adjustments that still need made, but can be done over time now that I'm not pressed for time. But, here's the final photos as taken Thursday night. All photos provided by my awesome roommate who's behind Imperial Photography. -
Ravant's ANH Stunt Build (A first-build! - From the Anovos Kit)
Ravant replied to Ravant's topic in ANH Build Threads
Thank you guys for the tips. I'll definitely be looking into these before I take my approval photos. I'm going for base approval first, but my ultimate goal is EIB. Not sure if I can bring this to Centurion, as the rivets holding the thigh ammo belt on aren't the proper type, and I really don't want to disassemble now, as it's comfortable. Some things I did notice while I was out at DragonCon: 1) I lost weight since I did the thighs, so they're very large on me, the bottoms of the thighs actually "swing" as I walk. I'll need to trim and fix. 2) The velcro holding the calves together is stronger than E6000. I need to get a stronger glue to hold that together. 3) The strap holding my voice amp in the chest plate needs to be attached with something other than E6000, as it won't bond to the strap material. 4) I need to cover my Camelback in white before I stick it in the backplate, so it's less noticeable and I can actually use it. 5) I need to mess with the strapping so the back plate sits higher on my back and the chestplate sits lower on my front. The whole set of armor kept "rotating" somewhat around my body with the front getting pulled up and the back getting pulled down as I walked. This means the shoulders start digging a little weirdly. I also need to pull off some more return edging on the shoulders of the front and back plates. 6) I need to adjust the bucket's padding a little so it sits better on my head, need to change how the battery pack for the fans mounts in the bucket, and I need to adjust where the fans blow as to not blow on the mic. Also need to trim the return edge around the eyes a little on that bucket. The undersuit (patched together with Reebok and Nike compression clothing) helps keep me surprisingly cool compared to the undersuit that came with the Anovos kit. I'm glad I switched. And when worn correctly, any seams/logos/etc. are not visible in any way. I will probably stick with the new undersuit type and buy a couple more sets so I can do cons without smelling bad. -
Tom Clancy's The Division - Division Agent
Ravant replied to Ravant's topic in Non Star Wars Costuming
Thanks! I finally actually got this one done. Was at DragonCon with it this year, and didn't expect to see as many Division cosplayers as I did this year. There were at least 20-ish. Here's the two pictures I have that I was in... Dat watch doe... This one was my favorite. We hosted a Division-themed room party, made the room out to look like a safe house. It's hard to see, but there's a reload crate right behind me. -
Ravant's ANH Stunt Build (A first-build! - From the Anovos Kit)
Ravant replied to Ravant's topic in ANH Build Threads
And some new pictures. (Will post more when I get back home from DragonCon.) Missed every shot, he died anyway.... -
Ravant's ANH Stunt Build (A first-build! - From the Anovos Kit)
Ravant replied to Ravant's topic in ANH Build Threads
I'm thinking about just shrinking those return edges by half, then getting some elastic to run across the chest under the front plate to pull them together in the front. -
Ravant's ANH Stunt Build (A first-build! - From the Anovos Kit)
Ravant replied to Ravant's topic in ANH Build Threads
Yeah, I'm determined to have it done/ready for DragonCon. XD I'm trying to bring them in. Because of the return edges, they're pinching down on the biceps and pushing outward. The Anovos Builders Group on Farcebook gave me a bit of advice on how to fix, going to try it tonight and see how it goes. And if the trimming of the return edges doesn't work, I may run some elastic across the chest in the front to connect 'em. We'll see. Right now, I'm focused on getting my left thigh calf to stop un-velcro-ing, and I'm trying to find a good position for the thigh snaps, as one unsnapped and the other somehow unglued from the ab plate. -
Ravant's ANH Stunt Build (A first-build! - From the Anovos Kit)
Ravant replied to Ravant's topic in ANH Build Threads
Well, good news, bad news. The Good: Found out my new undersuit keeps me cool/borderline /cold/... I am still gonna sweat like crazy, but I'm not going to die. And I now know what needs adjusting and can work accordingly. The Bad: First functional test of the TK was a glaring failure. Thigh straps failed, left shin velcro got screwed up, need to readjust fan to keep face from fogging, and need to readjust thigh position to keep armor-bite away. The Ugly: Should just leave the bucket on... -
Alongside my TK, I've been building another costume to wear to easily take a break from the TK and cool off. And with this costume, I get a bag to hold stuff, including lots of water! I plan on being a handler for a few friends while I'm in this costume, simply because it'd be an easy way to be both a pack mule and emergency assistance if necessary. Oh, and I can sit in this costume! Maybe. It Begins... Contents references bag attire 'electronics misc missing 'trial The different parts of this costume are pretty simple. In The Division, you play as an agent sent in to the heart of a plague in NYC to help restore rule of law in an otherwise post-apocalyptic scenario of a virus wiping out... most people. The costume itself is fairly simple. You need some durable clothing, a jacket, a sling bag of some kind, pouches, a drop-leg holster, a mask (for contaminated areas), and a rifle. I'm sadly missing the ping device my in-game character uses, because I'm not going to be able to complete it in the next week or so, with the work on the TK being ongoing. (Unless I get some time this weekend...) So here goes. The References/What I'm basing this all on... first The below are all screenshots from the game Tom Clancy's The Division by Ubisoft/Red Storm Entertainment/Massive Entertainment. I don't own any of the IP shown here, nor is it meant to be a reproduction of the game in any way. Also, no spoilers are shown. I'm sorry for the low-quality images, I had to zoom in kinda far on the images to get what I meant to show. Here's the overall reference for the watch, and a lot of the stuff on the character's head/face. Backpack reference. Gonna need super-powerful magnets to make that gun-stick to the bag happen! (Just kidding. Probably zip-ties at this point.) More backpack reference. I don't have a medpack or ping pack like shown here, nor do I really have the time to bang either out. (I might carve the ping pack out of EVA foam and add some greeblies like copper wire and wifi antennae. Reference for the mask I made. Level IV contamination filter... The front strap. I plan on making that quick rope ascension/descent device seen above the pouches out of EVA foam and paint. first The Bag first The bag! Oh my ghawd, a bag. I get to carry things! All the things, even. This'll be a far cry from the TK. That includes a hydration bladder, even! I'm happy 'bout this. There are pouches all over the bag, too. This one holds a fake grenade and snacks behind that. (Snacks aren't in there yet.) Because you can never have too much hydration, a water bottle contained in an insulator. I tried to get one that matched the game's colors as best I could. Around front of the bag. There's a few magazine pouches, a pouch for my multitool (which will be in there), and a random misc pouch that's also seen in the game, which... I'm not sure what it contains in the game. I'll be using this for batteries for things like my watch or shoulder device. Still missing/need to make: The quick ascension/descent device and the shoulder communications device. The Level IV contamination filter. Or... rather a 3M paint mask with the straps removed, painted black, some acid/vapor cannisters added/painted, and tape thrown on to give it some flare and to look like the game. I'm going to hang this off of the bag as well, since there's no way to realistically wear this without reattaching the straps and ruining the look of the mask itself. It's more a prop, anyway since I end up looking like a chipmunk with fat cheeks whenever I wear this. first The Attire first The jacket. It needs a Division patch sewn into the arm. I'll be doing that this weekend once the TK approval pics are sent out. The undershirt. I may need to switch to black because issues with the green and my vest. Which, you'll see. The vest. ALL the pockets! No, seriously, this thing has six functional pockets. Not that I plan to use them all, just the one for my cell phone. I got this one to simulate the look of a kevlar vest, but it has a V that's too deep. It leaves my heart vulnerable. (Insert sappy analogy here.) It's why I may need to wear a black undershirt instead. The jeans seen in this picture will probably be the ones worn for the cosplay, too. Gloves, because the character wears gloves exactly like this in-game. first The Electronics! first Here's a quick video of the shoulder communicator in action. Pictures of the electronics themselves and the components drying from paint to follow. (Sorry, dunno how to do YouTube embeds here.) Put the watch electronics together... don't mind the bad-looking burns to the left two LED's, dog bumped me while I was soldering there, and it's a tight fit. They still work fine, and you can't see them when installed in the watch body. Watch internals again - this time the back. Made using parts from Adafruit. The 12-NeoPixel Ring and a 3.3v Trinket. If there's enough demand, I'll upload the Arduino sketch used for this to light it up and do the patterns. The watch assembled! It's a Chinese knock-off of the Casio G-SHOCK, "G-SHORS." This was the closest I could get to the in-game watch without gutting a watch from the collectible edition of the game. It's all lit up, uh-huh! Here's the electronics in the Shoulder Comm Device from the video above. Used a 16-pixel NeoPixel ring (didn't bother with a white-included ring to save money...) and a Gemma V2. Like the watch above, if there's enough demand, I can post the code that makes this thing run. Beginning to throw things together. Mostly assembled here. And complete! This is before weathering and some added greeblies for wiring/etc. The Random Misc. Items first The belt and drop-leg system. I couldn't decide if I wanted this under attire or misc. items, since there's more in display here than meets the eye. On what would be the right side of the belt when worn is a sidearm (also shown below) in a drop-leg holster with a spare magazine (that's mismatched, because... reasons.) Just behind that is a little flashlight pouch, which contains a decent Nitecore flashlight that may see some use if I'm wearing this at night somewhere that's not bright as hell. And on what would be the left side of the belt is an actual medkit, in this case a fully stocked first-aid pouch including ace bandage, cold compress, anti-inflammatory, etc. I'm hoping it doesn't have to come in handy, but it's available in case it's needed. The fake sidearm, a thoroughly broken cheap-o airsoft gun whose safety is permanently locked on. Can't even rack the slide. It's modeled after an M&P 45, which my character uses in-game. And the fake rifle. Also broken airsoft. I may be swapping this one out though for a different, lighter one. Either way, both have had their wires cut and the inner barrels removed. On this particular example, the plastic gears that run the gearbox are stripped, too. So even with a battery installed and if I didn't clip the wires, it still couldn't fire. Peace bonded for sure! And if that little mount plate on the side of my bag doesn't play nice, I'll probably just be zip-tying my rifle to my bag instead of using that anyway. first What's missing? There are a few things missing from this list which will likely get added as DragonCon gets closer. We'll be carving a quick ascension/descent device device out of EVA foam. And if I can find it, I'll be wearing my throat mic under a shemagh, going to a hidden radio among my equipment. I also need to sew an "SHD" patch onto the left arm of the jacket. There's definitely more to come! I'm also going to be editing this post itself with pictures of the other items as they're found/added/completed. first Trial Fitting first Here we have the first trial fitting of the costume. And from the side. first
-
Ravant's ANH Stunt Build (A first-build! - From the Anovos Kit)
Ravant replied to Ravant's topic in ANH Build Threads
Adjusting fitment! Almost there..... need to stay on target though. But seriously. All that needs done for fitment are the shoulder bells/biceps (need to move velcro points around.) and the thighs. Very first test-fit. Issues I've noticed, and please chime in if you see anything else wrong: Kidney shim on my right (left in the pic) keeps popping out of the ab plate. I'm adding tabs to fix that. Bottoms of the shoulder bells stick out a bit far. Biceps keep slumping too low, which then causes the forearms to slump a little low. Oh... my... GHAWD, you guise. I just got my transfer to DS-1! How do I look? This time, the left plate popped out, but the right behaved. Biceps are still being a pain. More to come once the thighs fully dry and are ready for wearing. -
Ravant's ANH Stunt Build (A first-build! - From the Anovos Kit)
Ravant replied to Ravant's topic in ANH Build Threads
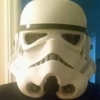
Internal Helmet Mods The stock suspension shipped with the Anovos helmet is... iffy at best. The back velcro comes undone very quickly in the heated environment of the helmet. SO! I purchased a motorcycle helmet liner, blacked out the interior of the helmet as best I could (for at least what you'd be able to see through the eyes, then added the liner. I'm also putting together a fan/battery pack, and fabric-gluing in some velcro for my ice packs. Looks like the eyes need trimmed. I'll get to that when I muck with the lens. Blacked out with helmet liner installed. One of the many ice packs that will be dispersed through the armor/helmet to help absorb and deal with heat. And the fan unit. This one was a fun little mini-project. It's a pair of 18650 battery holders. These holders put two 18650's in series to one another. Then I wired the battery packs themselves parallel to one another. So what this gives me is a pair of 7.4v, 4000 mAh battery packs. Wiring them in parallel allows me to go roughly 8000 mAh (not adjusting for inefficiency. It'll be more like 7500-ish if the batteries last as long as advertised.) Since the fan itself only pulls ~150 mAh, I can expect about 50-ish hours of continuous run. BUT! Since I'm expecting these batteries to only have about half their advertised capacity, I can still expect ~23-ish hours of continuous runtime on that fan. I also wired a little μ-resistance switch in-line with the fan so it can be turned on and off without pulling a battery. The resistance is so low on the switch, my cheapo-multimeter failed to register any at all. Which, this makes me happy. I wanted to put in a rheostat to control RPM, but that would kill battery life. More to come as I complete these modifications. (That includes trimming the eyes. Because, they need it.) -
Ravant's ANH Stunt Build (A first-build! - From the Anovos Kit)
Ravant replied to Ravant's topic in ANH Build Threads
Well, I've run into a snag. My shims on the ab plate don't match the armor at all. I thought I'd found a paint that would also match, but testing on a test strip? No dice. Any idea on the best way to get a good paint match on the shims? Or at the very least, smooth blend the colors from one to the other and back across the shim so it's not quite so noticeable? Unfortunately, I need about a 4" shim on either side. (I'm a big guy.) Edit: Nevermind, I think I've figured it out. (See the kidney plate post above!) Instead, I'm gonna put the legwork images below here later. Leg Day(s)! (There was more work than I anticipated!) Alright, I started with the shins and got this little guy done. (I'm still messing with it to try and minimize the bottom gap, but it's now lined up with the top shin ridge.) The other one's also done, just minus the knee. Same joint construction method, non-overlap. Then I started on the thighs. Whoo, boy. This was... a problem. Starting to prep to add shims. Cover strip install. And here starts my mistake. I thought I shimmed it enough. That was not the case. It was too short by... a lot. Finalizing said mistake... When I realized my foley, I took it home, took it all apart, and began increasing the size of the shims. Here's one after I added the shim and ABS-pasted away the seams. Still needs sanding/polishing, but... it works. Same on the other side, actually putting it together. It needs sanding/polishing, but at least it'll fit right this time. Need to extend this ridge. I've got something... Once the glue dries and the ABS paste finishes drying, I'll apply it to the left thigh's rearward gap. All will be sanded, then polished when the Novus gets here. Added the cover for the gap and added some ABS paste. Going to need to hit it with one more layer tomorrow. And the bottom of the same. The seams under the clamps are what I'm going to have to cover, but I'm afraid to take the clamps off until the E6000 holding this thing in place fully cures. Ammo belt added. Rivet one painted. Rivet two painted. (Blurry picture, sorry.) I'll update this with the finished product once both thighs' glue dry completely. Probably not 'til tomorrow at this rate. Guess approval won't be happening before DragonCon. Is my own fault though, I procrastinated, trying to lose as much weight as I could before starting this project. -
Ravant's ANH Stunt Build (A first-build! - From the Anovos Kit)
Ravant replied to Ravant's topic in ANH Build Threads
Thank you! Thanks for the heads-up, looking more closely, the eyes do need some trimming/detail work to be good. The lens behind it presses against them and makes certain edges more visible than they should be. When I take it apart to black out the inside, I'll trim it as well, killing two birds with one stone. -
Ravant's ANH Stunt Build (A first-build! - From the Anovos Kit)
Ravant replied to Ravant's topic in ANH Build Threads
Ab plate shimming The unfortunate fact of life is, I'm not built like a 1976/1977 Brit. I've got extra weight I'm lugging around on my bones. I'm working to remedy the situation as quickly as possible, but since that's a year or more out, I've decided to take some temporary measures in shimming my kidney plate so there's no gap between it and the ab. This'll do double-duty in also making the strapping that Anovos supplied with the kit actually reach its objective on the opposite plate without killing me in the process! (Well, maybe. Can never be too sure.) I've already taken the first step toward this goal prior to starting this build thread. I took off the inner return edges on the sides so I could add these inner strips that will act as the Kidney-plate-side support for the shims. The shims themselves were unfortunately not cut out of the same ABS the rest of the Anovos kit was cut from, so, color is a bit off. However! I'm going to try to see if a layer of ABS paste (made from the Anovos scraps) will rectify that on a test piece. All of that, however, will be edited to toss into here as soon as I get the acetone involved. So, more to come! Stay tuned. And - here's the edits. Back of the shim, glued to the tab. The colors are not matching! Which, normally I'd panic, but I've two options. I'm exploring one of the options over the course of today. I made some ABS paste for the seam. It needs to dry, then I'll sand this smooth and polish it with some Novus to make it look smooth. That doesn't deal with the color issue... so... This is the other side. I may do this to both, spread the ABS paste across the whole of the shim, sand and polish. It'll be a pain to get to that point, but at least the colors will match! I was hoping to have this TK done/ready for final fitment by Sunday, but I don't think it's going to happen at this point... at least it'll come out good, I hope! This is all prior to sanding/polishing. I need to wait for it all to fully dry to make it work. What I did was I mixed scrap ABS into acetone 'til it was thick, but still flow-able. (I didn't want a thick paste.) Then I used other bits of scrap ABS as an applicator, smoothing out the liquid ABS over the surface as best I could. The bumps and the like are from abnormalities during drying as the surface contracts around the still-liquid ABS underneath. Once it dries all the way through, I'm going to sand it 100% smooth, use some plastic polish to bring it to the same shine as the kidney plate, and call it a day. I'll update this with the new pictures once that's done. (Likely not 'til tomorrow, but hey, worth a try!) Also a note: DO NOT BLOW ON THE ABS PASTE TO DRY IT. I can't stress that enough. I had to re-do an entire shim plate because I tried this. It creates a cool pattern all over the surface of the ABS, but you really don't want this as your base if you're going for something smooth later on down the line... if there's any demand, I'll do it on a test strip and take a picture to show you what I mean. Alright, the ab plates are complete! (Note, this is before I modified the holster to be only two screws. More on that in the fitment post when I write it up.) -
Ravant's ANH Stunt Build (A first-build! - From the Anovos Kit)
Ravant replied to Ravant's topic in ANH Build Threads
Workspace/Storage/Already Completed Items! Well, here goes nothing! I'm hoping these pictures aren't huge. I had to shrink them from my phone to make them forum-acceptable. Workspace: I know it's cluttered, but it's an organized chaos. Got some stuff drying along the far edge of the table, with tools/mats on the leftmost side and a workspace closer to the right. I've usually got a chair in front of here, but I was vacuuming up bits/dust of Hasbro E11 I had to cut off. Storage: Costuming storage! It's temporary. Pay no mind to the leftmost column. That is not the column you're looking for. Move along. Now on to (some of) the already-completed items! Button Painting: Thermal Det: Forearm (Not sure which side...) Initial fitment and issue discovery: That last one's a bit of a pain. The shoulder bells and biceps need work. The issues are as follows: I mis-placed some of the strapping, so the biceps aren't held as high on my arm under the bell as they should. The left shoulder bell is "squeezed in" at the bottom, as if it's pinching down on the bicep. I need to put some weight on it and hang it somewhere to stretch that out. The strapping mount point in the upper part of the shoulder is too close to the stop. I have spare Velcro. I'll be fixing this down the line when I get to my fitment step. -
Alright, as promised, I'd told some people I'd post a catch-up build thread as I took a break from getting this done. A little backstory: I got the Anovos kit without the intention of getting it done by DragonCon this year. However, I've more or less gotten sucked in. So much, in fact, that I neglected to take unboxing photos, or even pictures of the progress along the way to my current point. Though, from here forward, I'll make sure to take plenty of photos. I'm going to separate the thread into a few posts here, to make future reference and navigation easier for anyone that might want to use what's left of what I've done for their own purposes. Contents (A work in progress!) Workspace/Storage/Already Completed Items! Kidney plate shimming (Because I'm not done losing weight yet, but still need to.) Leg Day! (Working on the legs...) Internal helmet mods! (For the sake of comfort.) Adjusting fitment... final Editor's note: I'll be editing to update this initial post with links in the contents as the posts get made. It's gonna take me a bit to make it all happen!
