.jpg.ab53c1acba31cc4c0d0e70b788c7b5d6.jpg)
EmlanThane
-
Posts
181 -
Joined
-
Last visited
-
Days Won
2
Content Type
Profiles
Forums
Gallery
Articles
Media Demo
Everything posted by EmlanThane
-
.thumb.jpg.77bd551337f7adc46a4b151e703df6be.jpg) Sorry for the delay in progress, I've been waiting for my scissors to come in. They've just arrived so it's time to start trimming! Also... I may have gotten an already-assembled helmet from Walt. I am ABSOLUTELY going to build my own, but WTF was doing a run the other day and I caught it at the right time and figured if I was likely to mess up on my own helmet and get the replacement pieces, the full helmet is relatively not that much more so I might as well grab that. So I have two helmets now MoSc0ut- thanks for the paint offer, but you don't have to go out of the way or me, although it's very thoughtful of you. I found the paints and they will also be coming in a few days. I DID trim too much off of my helmet. On the left side of your faceplate you have that little fold/dent- I cut past that thinking it was excess. Hence the "backup helmet." With it here now, however, I am more confident to tackle my own. Plus who doesn't want two helmets?
Sorry for the delay in progress, I've been waiting for my scissors to come in. They've just arrived so it's time to start trimming! Also... I may have gotten an already-assembled helmet from Walt. I am ABSOLUTELY going to build my own, but WTF was doing a run the other day and I caught it at the right time and figured if I was likely to mess up on my own helmet and get the replacement pieces, the full helmet is relatively not that much more so I might as well grab that. So I have two helmets now MoSc0ut- thanks for the paint offer, but you don't have to go out of the way or me, although it's very thoughtful of you. I found the paints and they will also be coming in a few days. I DID trim too much off of my helmet. On the left side of your faceplate you have that little fold/dent- I cut past that thinking it was excess. Hence the "backup helmet." With it here now, however, I am more confident to tackle my own. Plus who doesn't want two helmets? -
I'm actually planning on getting the centurion kit from Trooperbay when his sites goes back up because it makes that part of it SOO much easier for me. Thanks for the heads up on the TD! I'm going to practice scoring and snapping with simpler things (still). Likely all the buttons and the belt are coming next. But today is TD day!
-
Wow, congratulations! I hope to be where you are someday
-
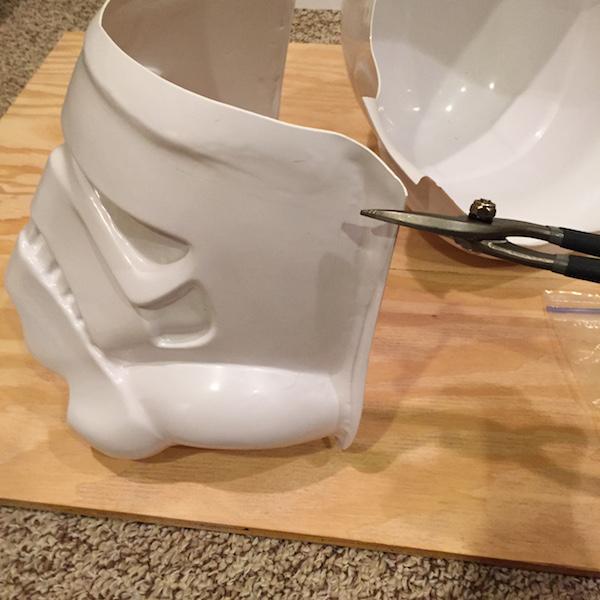
OKAY! So.. thanks for the paint info! I'll get on that! MoSc0ut- I am stopping by my hobby store this weekend because I STILL don't have the right scissors, and if they don't have the paints I'm looking for, I'll check back with you- that's very kind of you. After being very discouraged with my helmet mishap, I decided to take it many steps back, so I did the drop boxes-arguably the simplest pieces, but since I'm still such a beginner it still took me awhile. Hopefully my skills will improve. Here's what I did: I used my exacto knife to rough trim each drop box half away from the excess molding (it is the top-most rectangle formation) I cut the corners with my heavy-duty scissors (because I don't have the right ones ahh ) to make snapping much easier! As you can see, I didn't score high enough up (I have a hard time keeping my scoring straight, and I usually end up making twenty different lines, so better safe then sorry, even if it takes longer.) I went back in with my clumsy scissors and some sandpaper to reduce the outer drop box thickness to about a centimeter. The lines aren't perfectly straight, but hopefully that's ok. Here I am in the process of trying to make the cut straight: And here are the finished products! The inner drop boxes should be less than a centimeter thick so that they sit more flush right? Because this inner drop box can be trimmed more, right? RIGHT? I'm so paranoid about over trimming now...: This one sits more flush. This inner drop box wiggles a little bit more in this one (the other is a tighter fit) but that's just the molds- there's a little more wiggle room up top. It will actually stay once I glue, but I'm going to hold off on that for now. So? Did they come out okay? The top one I need to shave the inner drop box a little more, I think, but I just want confirmation. Now here I've rough trimmed the TD pieces. The WTF kit came with a PVC pipe with the proper dimensions, but I still have to cut that down. Time to tackle the TD! (and fine-tune the drop boxes!)
-
Where does everyone get their paint for the TD? I've rough trimmed and am going to get started. Also does E6000 not bond well on painted surfaces, because I'm seeing a lot of people cover the areas where the end caps and plate go with tape so the paint doesn't get on it? I finished the drop boxes- uploading pics now
-
Oh I see haha... Well I do feel a little discouraged right now considering I'm working on the drop boxes and each one is taking me like an hour to get even remotely "perfect"even though they are still crooked-ish. Pictures will be coming soon, but boy is this going to be challenging!
-
off what?
-
I might put the helmet on hold until I can figure out how to properly trim it. I realized that I have the wrong scissors, which is why I found it so clumsy to maneuver them through the plastic! Until I get the right ones and until Pandatrooper and others confirm that I can trim the brow more (and how, because I want to be extra sure) on my other thread dedicated to this issue, I am going to work on some smaller pieces. Updates coming tonight! Perhaps drop box and TD trimming
-
You have made me feel so much better! While I still think I've trimmed too much, having someone else saying I did not does put me slightly more at ease. I will have to see it to believe it but at least it's not doomed now. I had a little mess up on the bottom of the left back where I probably trimmed too much off, but maybe the ear can cover it. If all else fails, do you think I could make a little ABS bridge between the back and faceplate to get more overlap and stability? I'll see if I'll even need one. Again thank you for all of the information. Knowing that you're a fellow WTF-er I will no doubt be coming back to you in the future for help! That's a great idea for cutting the teeth out too!!
-
Thanks you! I do have a question about the WTF helmet- when you trim the brow of the cap, it looks like people trim closer to the line made by the bottom of the trap on the left side, and there's more extra room below it on the right. Is this intentional? Also, how much excess faceplate siding (potentially I have trimmed too much!) did you have because I don't have very much which is making securing the left side very difficult! OOH and one more thing! Why aren't Walt's ear screws centurion standard? Thank you- I've looked through your thread and it is VERY helpful!!!
-
Helmet Assembly Mishap- help!
EmlanThane replied to EmlanThane's topic in Build Threads Requireing Maintenance
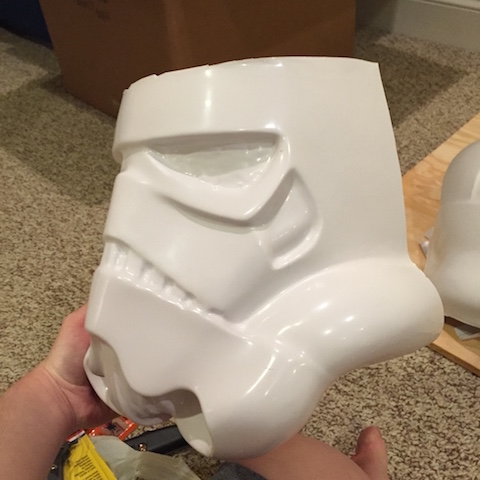
Hi Pandatrooper! Here are some pictures with and without the brow. Is this what you were looking for? I don't think I cut it very even, but if I cut the sides up until the traps then it will be straight and then maybe I can raise the faceplate up. What do you think? (The sides of the cap/back and faceplate don't have a lot of intersect room AT ALL btw, not relevant to this but certainly part of the problem- this is why I cannot really bring the chin forward anymore) What do you recommend to use to trim a tight spot like this? My scissors are kinda clunky to maneuver this... -
Thank you. My biggest worry is that my faceplate is trimmed too much, and the bottom of the cap/back, too. I am afraid I won't be able to fit my head in (even sideways) and there won't be enough room in the front for stripes. I am so grateful for everyone who has jumped right in with helping me. Thank you for the words of encouragement!
-
Helmet Assembly Mishap- help!
EmlanThane replied to EmlanThane's topic in Build Threads Requireing Maintenance
Heavy? I'm sorry I don't quite understand. Is there still more room for me to trim out under there? -
Helmet Assembly Mishap- help!
EmlanThane replied to EmlanThane's topic in Build Threads Requireing Maintenance
I will try trimming the brow a little bit more to raise the faceplate up. Thank you for the advice. I am panicking slightly less now. I have magnets to use so I will go grab those, too. The other problem is that I really can't pull the chin out more- when I trimmed it the other day I took away very little, but maybe it was still too much. Is the bottom of the cap ok? I also think that back-to-front isn't long enough, and like I said I think I trimmed to much already! I have been checking other people's builds a lot lately, I am noticing that their faceplates do come forward more than mine. Hmmm... -
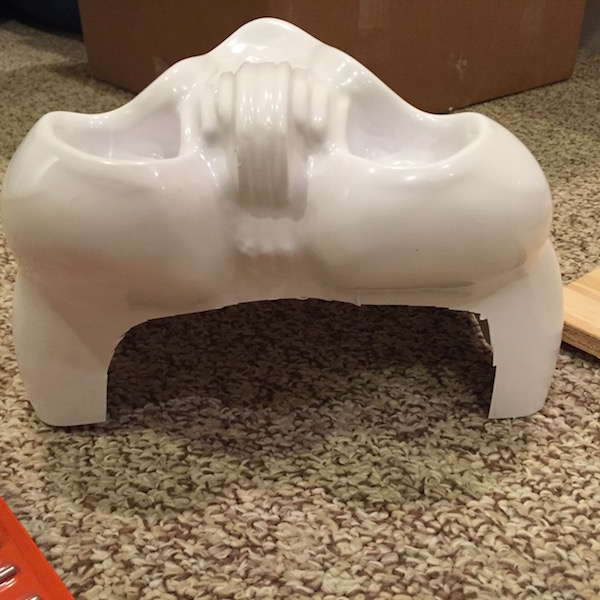
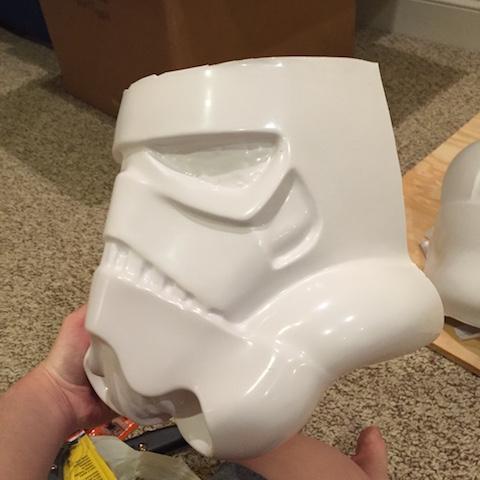
I am in a combination of both sadness and panic. There's an issue that appeared when I began to assembly my helmet... the back/cap and faceplate didn't fit together very well AT ALL. I did post about this on my build thread (which you can follow here: http://www.whitearmor.net/forum/topic/38064-emmas-first-anh-stunt-wtf-any-help-is-appreciated/#entry509345 ) but I am re-posting my problem here in the hopes that more people who are willing to help can lend me a hand. I really want to try to save this before I have to put more money into new pieces. Here's what I posted on my thread: _______________________________ Ok, so day two is over and I think I hit a very large bump in the road. In my excitement I fear I may have trimmed TOO much- which is the worst thing one can do, especially on the helmet. ***IMPORTANT QUESTION*** Please take a look at my pictures below. Is the helmet salvageable? The pieces just aren't aligning properly, and the faceplate seems very short on the sides. The back doesn't reach down far enough. I'm pretty upset. The worst thing that can happen is I reluctantly spend more money on replacement pieces. The best thing that can happen is you all help me figure out how to fix it, but it still looks more "unique." My day started out pretty ordinary- I cut out the eyes with an exacto knife and filed them down- Still could use a little fine-tuning, that's ok Then I began trimming the back and cap- again started out pretty rough but I sanded it down.. As you can see I am still getting the hang of the dremel.. Then the scary part happened. I fit the pieces together, and well.... you'll see Looks okayish here.. AHHHHH whAT IS tHAT AND it seems so smooshed- how can I fit my head in there? This is the best I could get it to align. Otherwise the back and cap and face place intersect at an angle so that the bottom is less flat and more a giant "U" Please, any help is appreciated. I want to try to save this before investing in new pieces.
-
Ok, so day two is over and I think I hit a very large bump in the road. In my excitement I fear I may have trimmed TOO much- which is the worst thing one can do, especially on the helmet. ***IMPORTANT QUESTION*** Please take a look at my pictures below. Is the helmet salvageable? The pieces just aren't aligning properly, and the faceplate seems very short on the sides. The back doesn't reach down far enough. I'm pretty upset. The worst thing that can happen is I reluctantly spend more money on replacement pieces. The best thing that can happen is you all help me figure out how to fix it, but it still looks more "unique." My day started out pretty ordinary- I cut out the eyes with an exacto knife and filed them down- Then I began trimming the back and cap- again started out pretty rough but I sanded it down.. Then the scary part happened. I fit the pieces together, and well.... you'll see Looks okayish here.. AHHHHH whAT IS tHAT AND it seems so smooshed- how can I fit my head in there? This is the best I could get it to align. Otherwise the back and cap and face place intersect at an angle so that the bottom is less flat and more a giant "U" Please, any help is appreciated. I want to try to save this before investing in new pieces.
-
Wow thank you for the advice! I regret buying my ordinary sandpaper now haha! I plan on getting to the teeth today but I'm returning to the hardware store anyway to fix my dremel so I'll check for needle file sets (I have one right now but it only has 3 sizes, I'm not sure if it's good enough).
-
Forgive me... I feel it again...the call to the light. And by light I mean HELMET! Today was both exciting and slightly disappointing actually... I picked up all of the tools and supplies I need at the hardware store that are not already included in the Trooperbay Centurion Strapping Kit (with the exception of the ear screws and paint which I will order online). I started out by trimming the faceplate. I'm still not used to the scissors so the cut is EXTREMELY rough. I planned on sanding it today but my dremel malfunctioned so I have to have that fixed before I do anything with it. I also realized I was using the wrong scissors half-way through (*facepalm*) so have to pick up ones that are curved in the proper direction tomorrow. Hopefully my trimming skills will improve- and the right scissors will help. Here's the ceremonial first cut: And here's my super-duper rough "beginner's" trim that I will dremel smooth tomorrow: **^ I think this trim is not even enough but I don't want to risk cutting away too much more at the bottom. Do you think I should trim away the left bottom a little bit more? Is the right too far already?

-
Well I figured out the screw question They are 6/32 1" long #4-40 wooden brass flathead slot screws (woooh thats a mouthful, but maybe I'll help somebody out in the future) AND I just got back from the hardware store. Time to start!
-
Making a trip to the hardware store! What size screws are used on the helmet for centurion? I heard that the ones that came in my kit may not be acceptable but I want to be sure! I plan on getting the Trooperbay Centurion strapping kit but his website is down for at least a month now so I won't be buying any strapping materials, but I'm off to get a rivet gun, a sanding drum, files, and all that good stuff!
-
I've already read Diana's thread which was EXTREMELY helpful, but no doubt I will be coming back to it in the future! Thanks!
-
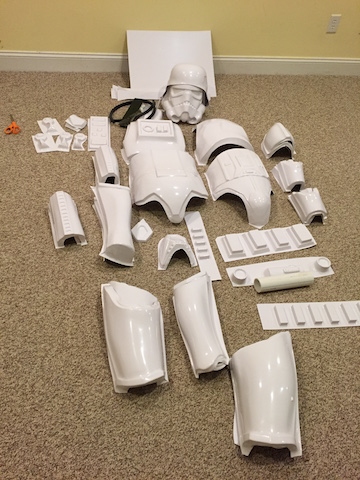
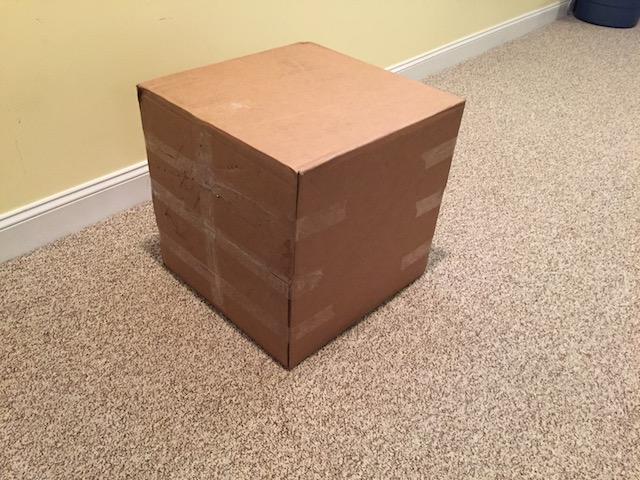
Here are the pictures! First, the BBB in all of its glory! And unboxed! (I am in the process of swapping out the ROTJ-style kidney/butt piece for two separated ones- this was just a communication error.) Let the fun begin! I think I'll start with the bucket.... *evil laughter*

-
Helooooo everyone! Today is a very special day- it's Big Brown Box Day! Pictures will be coming out tomorrow In the meantime, I want to thank everyone in advance who will help me out and answer my many future questions. I am new to this and this is overwhelming but I am also very, very excited. I will be building an ANH Stunt from Walt's Trooper Factory, and my goal is to make it to Centurion standards the first time around. I am 5'5" so this will be a challenge, but it has been done before so this makes me feel better!<br><br><br> My first question is:<br> Where did everyone get the mesh material for behind the frown and on the mic tips (and is it the same material?)? <br><br> I plan on posting regular updates and a very detailed log of my progress. This has has been a longtime dream of mine and I am beyond excited to begin my journey to trooper-dom. All help is welcome, more updates coming soon!!!
-
My Walt's Trooper Factory TK Build (WIP)
EmlanThane replied to EmlanThane's topic in ANH (Stunt and Hero)
is the trooperbay centurion kit (literally all strapping, proper hand guards and gloves and canvas belt) any good? As someone who might struggle finding all the right sizes of elastics and rivets and fabrics at a craft store I feel like this may be a good idea for me since it covers everything besides glue and a few tools, and I'm new at this and thing a kit would be very handy! -
Hello everyone! My name's Emma, and today I have begun my journey to stormtrooper-dom. I've ordered my kit from Walt's Trooper Factory. Although I have 6 weeks of waiting to do, I thought I would say hi and let you know that I am trying to do as much research as possible before Big Brown Box Day. I know my biggest challenge will be my height- I am 5'5" so I'm definitely a little short to be a stormtrooper. But I won't let that stop me! Stay tuned for my progress The rest of it will be on the actual build thread, this is just a greeting.