rtfitzpa
-
Posts
57 -
Joined
-
Last visited
Content Type
Profiles
Forums
Gallery
Articles
Everything posted by rtfitzpa
-
Thanks, Dan! Your builds are very helpful. Does that mean I should paint up the “walls” of the tears a bit? Sent from my iPhone using Tapatalk
-
Ok, painting update. Lines are done, but perhaps a tad thick? I little bit of touch up work before the blue stripes. Sent from my iPhone using Tapatalk
-
This time, the gray is much better! I taped up the inner section now, in an attempt to get as clean a black outline as possible. Lots of scissor work involved to get the right lines. Sent from my iPhone using Tapatalk
-
Thanks! You’re the best. Cheers! Sent from my iPhone using Tapatalk
-
Got it. Here’s what my white looks like, but somehow it’s more yellow than the abs. That’s not quite right either...? Sent from my iPhone using Tapatalk
-
Ok, thanks for the tip! Does that mean putting a white edge down before the gray? I thought I’d put the gray down first. Sent from my iPhone using Tapatalk
-
Paint is stripped and used painters tape to get better lines. The gray was too dark, likely from mixing with the black that I put down first. I used Castrol Super Clean to take off the paint. Each section soaked for about an hour, then used a toothbrush and running water to remove the paint. Sent from my iPhone using Tapatalk
-
In doing some research, I found a great build that might be an excellent resource to fellow Imperials.
-
Some updates: Most parts are roughly trimmed. Per TM’s suggestion, the edge of the canister is beveled and the end caps are trimmed to 20mm. I went ahead and started painting the helmet, using CableDan’s videos as a reference (thanks!!). The grey seems dark to me, but it is Humbrol #5, especially when compared to the canister. There is a handy color code floating around the forums I also ordered some screen mesh for the frown and stencils for the other painted areas from Trooperbay and have arrived.
-
Updated the ears. Are the screws still not flush enough? Sent from my iPhone using Tapatalk
-
Hi folks, Ears are attached and completed thanks to the tutorials posted earlier. I’m pretty happy with the contour of the ears. It took a few hours, I’d say, just going back and forth with the Dremel and a pencil. The screws are in, although they protrude slightly. Should the holes be drilled slightly larger than they currently are to allow it to be flush? In starting to trim up the underside, I noticed a small stress crack. Any suggestions on how to reinforce this? I’ve ordered mesh for the frown and painting stencils from trooperbay. Thanks all! Sent from my iPhone using Tapatalk
-
Thanks! Adjustments have been made... do you recall if you trimmed much off of where the brow trim will be? If I line up the yellow lines, it pushes the eyes pretty close to the brow.
-
So potentially a small snag in the build... There seems to be quite a large gap between the faceplate and the dome, where the ears would cover. In attempting to rivet the bottom (with some slight tug to try to close the gap), the plastic has torn on me twice. I feel I am losing space to connect the rivet The side by side is the Anovos helmet which was approved at Centurion a few years back. Thoughts? Sent from my iPhone using Tapatalk
-
Excellent!! thanks - that's very well done. I deeply appreciate your help and work documenting that process!
-
Wow, perfect. Not sure how I couldn’t find these. Thanks a million! Sent from my iPhone using Tapatalk
-
Wondering if anyone has any ear-trimming advice? I’ve made some basic cuts, but I’m afraid to work too quickly! It’s my understanding that they should be angled slightly downward to the front of the helmet? This ATA video shows a neat way to achieve that. Sent from my iPhone using Tapatalk
-
Helmet marked for trimming - I used a dry erase marker. Spent a good deal of time on the eyes tonight, using a combination of sandpaper and exacto-knife. I’ll probably try the ears next... a tad intimidated about not cutting too much off of them. Sent from my iPhone using Tapatalk
-
Also - I snagged some NEAT foam helmet liners from WS Custom Helmet Liners. I bought a second one for the Scout that I’ll be working on at some point. I found them through their Facebook shop... Very high quality and so practical. I've tried hardhat liners and chin straps in the past, but my head can't turn much anyways because I don't have a long neck (the helmets haven't been able to clear the should bells very well). And since I'm not tumbling around during photo ops, I'm content to just let it rest in place with enough padding on the top of the helmet. Sent from my iPhone using Tapatalk
-
Here are some closer photos of the helmet, which I’ll be starting with. Also a big thanks to TM for the detailed strapping labeling! Sent from my iPhone using Tapatalk
-
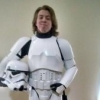
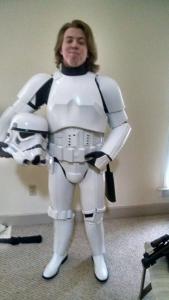
Hi all! I’ve built a WTF Snowtrooper and a 2016-ish Anovos ANH TK (I found the plastic to be very thin), so for build #3, I’m putting together this Troopermaster kit I bought more than a year ago, capped in 2mm gloss finish (much sturdier!). I am aiming for Centurion accuracy on this build. For some additional context, I plan to 'retire' my Anovos kit, while utilizing some of the parts, such as gloves (which I got as a combo from Trooperbay) and boots (Imperial boots). TM's kit looks to come with just about all of the strapping and rivets needed. As side notes, I also have a build thread started for Jim’s fiberglass (V.5?) First Order TK (which I hope to resume work on after this build, since I’ve had it for almost a year and half with virtually no work on it) and a WTF Scout Trooper on the way. For reference, I’m about 5’6” and 150 lbs., so I know I’ll need to do some heavy trimming on this TK.l, given my experience with my Anovos build. I’ll try to share as much of the build as possible to assist fellow Imperial troops. For the Empire! Sent from my iPhone using Tapatalk
-
Perfect - I may take to be professionally painted. The video in your second link was made by a former member of this garrison - thanks for linking it!
-
Whew! It's been a couple of months, but I moved across town and all of my projects (personal and professional) got put on the backburner. But spring has arrived in Alaska! Over the next few days, I'll be washing down the parts for the first time and hitting those cracks with the fiberglass matting and resin. I'll post some photos as it happens. I've been looking into heavy-duty snaps, as they are some of my last parts to acquire, but am also very interested in this magnet idea, especially for the chest and back. On another note, I know I'll have to trim down quite a bit of material and reshape as much of it as possible, as I do not have an especially large frame at 5'7". I have some ABS from Trooperbay that I'm hoping to use to bridge some of those cuts. Does anyone have suggestions on paint/primer? Huzzah!
-
Spats made it! Next step is going to be a first wash of all the parts, then filling the small cracks in the armor. Sent from my iPhone using Tapatalk
-
Yes, I was planning on the wash. I have gloves and a mask as well. That’s a great idea to have specific clothing for fiberglass work.. Thanks for the advice! Sent from my iPhone using Tapatalk
-
Initial thoughts - armor is well made and already quite smooth. I live in Alaska and have limited use of a garage, so sanding may have to wait until warmer weather when I can use the deck. There are four small cracks in total. I have not worked with fiberglass, but it seems like it should be easy to fix. Most of the pieces are going to have to be cut down for my frame (5 foot 7 inches, 140 pounds). I’ll have to order some ABS to help bond these split pieces, unless there is another suggestion? I’ve ordered decals from Trooperbay and will pick up some bondo and new Dremel saws. Obligatory photo dump.... Small crack Two small cracks R2Dan’s holster (top) next to Jim’s. I’ll be using R2Dans. JAFO’s belt and Imperial boots and gloves. All fit perfect and are of excellent quality. Ukswrath yoke brackets Anovos bucket with Vaderpainter aerator. Good quality, but not sure how to get the plastic one in the helmet out... Sent from my iPhone using Tapatalk