Scopes Mapeo
-
Posts
5 -
Joined
-
Last visited
Content Type
Profiles
Forums
Gallery
Articles
Everything posted by Scopes Mapeo
-
Hey all! Unfortunately I don't have any pictures of the masking for the black. But I used automotive masking tape. I've never had too much luck with the blue painters tape with past (non-helmet) projects. I had a brush that was almost the exact width of the black stripes and brow line...so it made it easy to stay in the lines. Beyond that, I just took it real slow and steady, making paint control my highest priority (as opposed to getting mad coverage with a stroke of the brush). For the mesh under the beak I took a beater of a small paint brush and painstakingly went hole to hole filling the black. In hindsight, a spong brush may do better at this, but I only realized that after I was cleaning up my bench. As you can see from some of the pics I didn't color in all of that area. No need to really, since the beak covered a appreciable portion of the mesh. <br><br> I used the same automotive masking tape to get a decent edge where I could for the remaining black. The ear area was pretty challenging. It took some time, but it paid off. When it came to the painting, I carefully added the black. I wanted to sneak up on the edge...as opposed to totally trusting the tape to make an edge. Again, I've put too much faith in masking tape in the past only to be disappointed. <br><br> I spent a fair amount of time doing touch up work too. Especially, where the mesh meets the....I guess "jaw line" of the bucket. Alternating between black and white acrylic to dial in a hard line edge as needed. I used a really fine point brush for this work. Once it was good, I slowly built up the gloss coat to give the paint job a nice depth and give it that "plastoid" feel. <br><br> Doing the painting made me want to attempt a weathered version of this helmet. The nooks and crannies are just begging for a wash or two!! My brother kept egging me on to do this up as Finn's helmet post massacre on Jakku. Which, I think would be a lot of fun to recreate!!<br><br> Sorry I don't have pictures of this process!! It was over the course of a few days. Where I'd do a part then walk away...let everything dry...do some more...walk away...etc.
-
Thanks! It was a lot of fun seeing this project come together.
-
I used Rustoleum Lacquer spray paint. White and clear gloss. The black is just some basic acrylic paint.
-
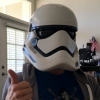
I picked up this mitcheg1 FOTK bucket a few weeks back. Forum member Zuko had partially completed it (done a lot of sanding, filling, etc). Once I got it, I finished up some filling and sanding, cut out the eyes, and went through the whole prime, paint, and finishing process. Anyway here are some photos of my process! Untitled by Scott Peterson, on Flickr Eyes cut out and some sanding. First Order Stormie Helmet WIP by Scott Peterson, on Flickr Ready for primer! Untitled by Scott Peterson, on Flickr Priming... Untitled by Scott Peterson, on Flickr Primed! Untitled by Scott Peterson, on Flickr I decided to hand-paint the black. I wasn't 100% confident that I could spray the black without overspray, or getting into all the nooks and crannies. Untitled by Scott Peterson, on Flickr Main build and painting complete. From here I did some touch up work on the boarders between the black and white to make a crisp line. Final gloss coat, and touch ups complete! by Scott Peterson, on Flickr After doing some detail work with the brush and laying down all the gloss. Done! by Scott Peterson, on Flickr Lenses installed. Done! by Scott Peterson, on Flickr I used MICH velcro helmet pads to fit the helmet to my head. Sorry for all the pics! But I was eager to share with the community.