lerxstrulz
-
Posts
166 -
Joined
-
Last visited
Content Type
Profiles
Forums
Gallery
Articles
Everything posted by lerxstrulz
-
This was the bad BLE, correct? Sent from my SM-G965U using Tapatalk
-

TKTalkie v3 Released!
lerxstrulz replied to lerxstrulz's topic in Electronics for Helmets / Blasters
The wireless mic works in the mic port (I use a 2.4Ghz with mine) you may just have to adjust the mic input gain. If you have the line-in wired up and working then great, but you are right the line-in cannot be adjusted via the app (it was dropped in favor of the mic port.) Your ble issues sound like either a short somewhere or a comm issue between the ble and the teensy. If the light goes solid then you have a connection, but if nothing else happens it means that they can't talk to each other. Make sure the TX of the ble goes to the RX of the teensy and vice versa. Also take a voltmeter and make sure you have continuity from end to end on the TX and RX wires. Lastly, if you are on Android make sure location services are on. They tied the ble radio into that a few updates back. Oh, and make sure the baud rate in your config.txt matches what the ble is set to, which is typically 9600 by default. Hope that helps! Sent from my SM-G965U using Tapatalk -
Hey guys, we've recently released V4 of the TK-Talkie system. This latest update includes more voice effects INCLUDING a voice pitch changer (up or down!) so if you're a dude that wants to sound like Phasma or a lady who wants to sound like Vader this update is for you! We've also updated the control app with a new interface and more features, and have added a Control Glove to the mix. More than just a sound glove, you can program each individual button via the app to perform up to 2 functions including volume adjustments, sleep/wake, PTT, mic gain, loop start/stop, mute/un-mute and more. More info is available at tktalkie.com/v4 or at our store at store.tktalkie.com. The video(s) below offer an overview and brief demonstration of some of the capabilities. The first video is a standard setup and basic config, and the second video runs you through using the app and demonstrates different profiles you can setup and how to use the control glove. facebook.com/groups/tktalkie
-
- 1
-

-
TKTalkie v3 Released!
lerxstrulz replied to lerxstrulz's topic in Electronics for Helmets / Blasters
Someone has done that. It is in one of the threads...maybe the V2 thread? Sent from my SAMSUNG-SM-G930A using Tapatalk -
TKTalkie v3 Released!
lerxstrulz replied to lerxstrulz's topic in Electronics for Helmets / Blasters
The board has a built-in over-amp circuit that will shut it down and should protect it from getting fried. Can you connect it to your computer and see if it comes on? As strange as it sounds, I had one a while back (like a year ago) that I was experimenting with and did the same thing. It would not come on so I thought it was dead. Then a few weeks later I plugged it in just for the heck of it and it worked. Not saying you should wait a few weeks -
TKTalkie v3 Released!
lerxstrulz replied to lerxstrulz's topic in Electronics for Helmets / Blasters
Delete the app and reinstall. Sounds like the device list became corrupted. You will not lose any settings on the TKTalkie as they are stored on the micro SD card and not in the app itself. Sent from my SAMSUNG-SM-G930A using Tapatalk -
TKTalkie V2.0 Released!
lerxstrulz replied to lerxstrulz's topic in Electronics for Helmets / Blasters
Yes it is designed for the Teensy 3.2. Check out the website tktalkie.com Sent from my SAMSUNG-SM-G930A using Tapatalk -
TKTalkie v3 Released!
lerxstrulz replied to lerxstrulz's topic in Electronics for Helmets / Blasters
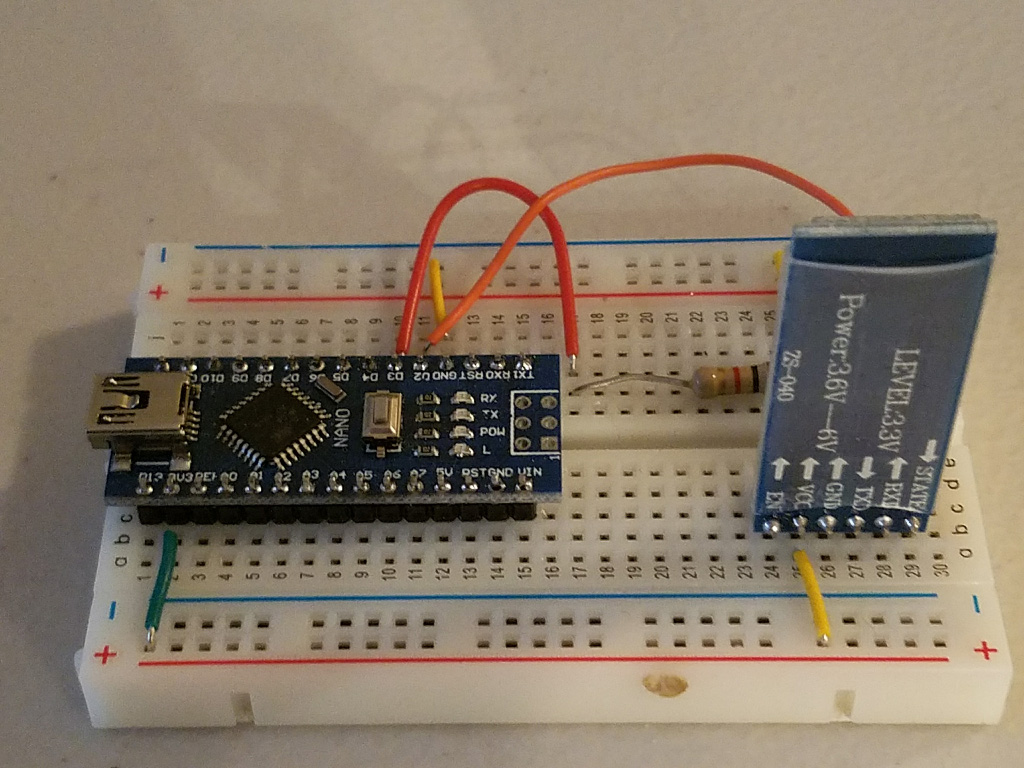
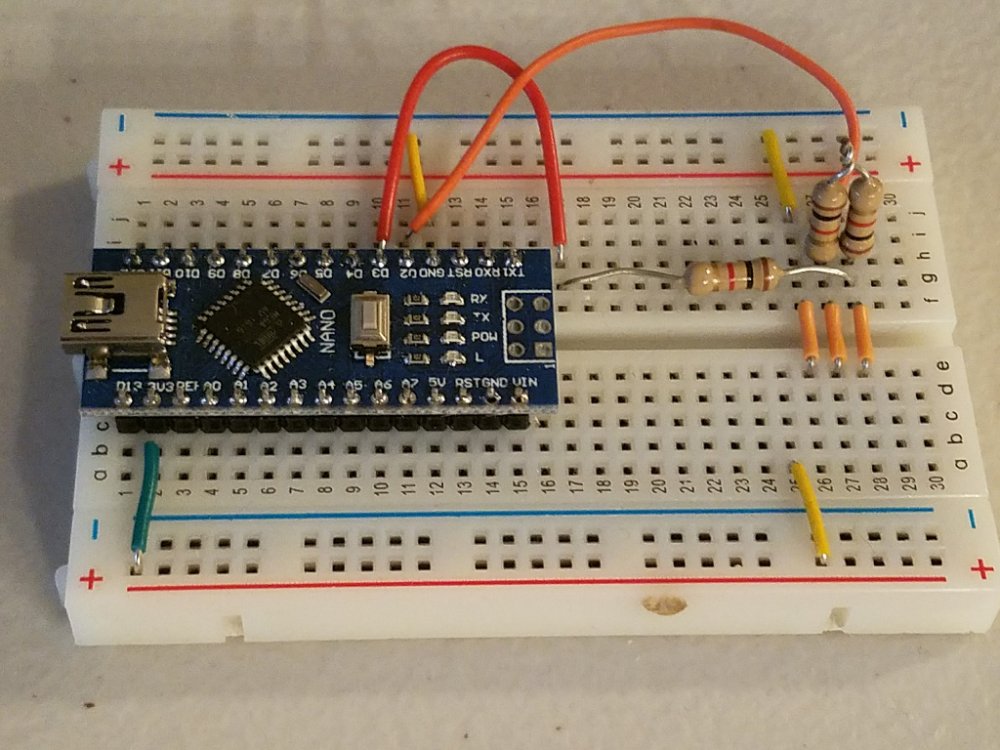
This is the setup I use to program the BLE. I don't have a diagram but these pics should show you exactly how to set it up. I'll also post the Arduino sketch I use. Just connect at 9600 using the serial monitor and enter the commands. To set the name: AT+NAMEYourNameHere [Enter] Some BLE modules "may" use AT+NAME=YourNameHere. It will depend on the manufacturer and how well they stick to the spec. Most real HM-10's will use the full AT command set but a lot of the CC2541's use a reduced or modified set. You can check that it set correctly by just typing AT+NAME and it should display the programmed name. // Basic Bluetooth sketch HC-05BLE_02_9600+ECHO // Connect the BLE module and communicate using the serial monitor // // The BLE defaults to commincation mode when first powered on. // The default baud rate for communication mode is 9600. Your module may have a different speed. // #include <SoftwareSerial.h> SoftwareSerial BTserial(2, 3); // RX | TX // Connect the HC-05 TX to Arduino pin 2 RX. // Connect the HC-05 RX to Arduino pin 3 TX through a voltage divider. char c = ' '; void setup() { Serial.begin(9600); Serial.println("Arduino is ready"); // HC-05 default serial speed for communication mode is 9600 BTserial.begin(9600); Serial.println("BTserial started at 9600"); } void loop() { // Keep reading from HC-05 and send to Arduino Serial Monitor if (BTserial.available()) { c = BTserial.read(); Serial.write(c); } // Keep reading from Arduino Serial Monitor and send to HC-05 if (Serial.available()) { c = Serial.read(); // Copy the serial data back to to the serial monitor. // This makes it easy to follow the commands and replies Serial.write(c); BTserial.write(c); } }

-
TKTalkie v3 Released!
lerxstrulz replied to lerxstrulz's topic in Electronics for Helmets / Blasters
Updated tutorial for the v3 with BLE: http://www.tktalkie.com/tutorial/v3 -
TKTalkie v3 Released!
lerxstrulz replied to lerxstrulz's topic in Electronics for Helmets / Blasters
The BLE defaults to 9600 Sent from my SAMSUNG-SM-G930A using Tapatalk -
TKTalkie v3 Released!
lerxstrulz replied to lerxstrulz's topic in Electronics for Helmets / Blasters
I wish I could find a supplier of BLE's where the header pins were not already soldered on. I have JST connectors that would work great. I tried removing the headers but it was a LOT of work. I ended up using 4-wire dupont connectors that slip on to the BLE pins and direct solder the wires to the Teensy. -
TKTalkie v3 Released!
lerxstrulz replied to lerxstrulz's topic in Electronics for Helmets / Blasters
I've updated the case design (dubbed MkII) for the v3 so that the BLE is now inside the case instead of an external dongle (the original design was adding the BLE to the v2 and that was the most efficient way to do it...) The pic is a low-res prototype. There are two access holes in the top: the larger one in the back is for viewing the Teensy LED and accessing the programming button for doing firmware upgrades. There is a smaller one above where the BLE sits so you can see the LED as well. I will be posting the STL on the website and hopefully getting a short tutorial put together on how to mod your v3 for this (mostly just need to extend some wires.) All orders from the website moving forward will use this case.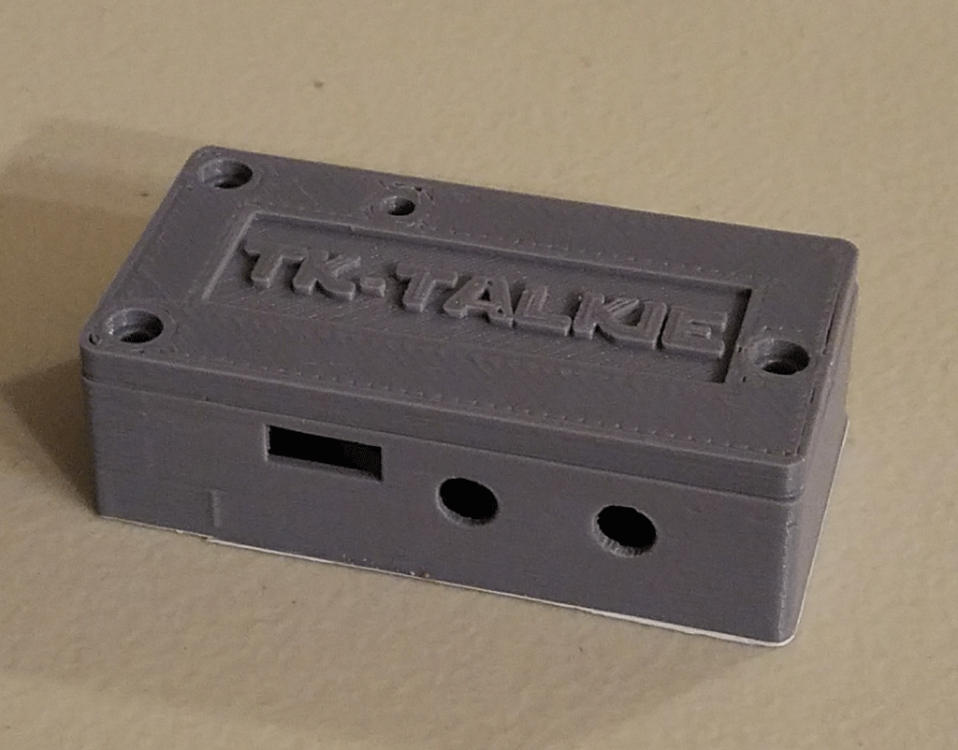
-
TKTalkie v3 Released!
lerxstrulz replied to lerxstrulz's topic in Electronics for Helmets / Blasters
I will go back and make sure those are working. the Github repos were reorganized recently and I had found a few more. I thought I had caught them all...thank you for finding that. Those errors are due to the way Windows saves the source code when you copy and paste or jus try to download the source code. If you look at what you have, you will probably see some HTML code in there You will need to use the "Download" button and download the ZIP file. I'll update the README file on GitHub to reflect this. This is mostly likely a mic calibration issue. The static only plays while you are talking and not hearing static does not mean the mic has shut off. Check out this video on mic calibration: Wiring up a PTT jack just requires connecting the ground lug of the jack to a ground pin on the Teensy (or Audio Shield) and the left channel lug (or mono lug if it's not a stereo jack) to a pin on the Teensy (defaults to pin 2.) I do need to add that to the tutorial! The button is also simple...I use a microswitch and wire it to a 3.5mm jack (see example.) Again, I need to add that whole process to the tutorial. To keep the case compact, the rear connection is either Line-Out or PTT, but I am working on some other case designs Join the group at facebook.com/groups/tktalkie and PM me there and I will help you get a PTT button built if you are wanting to add that. -
TK Talkie DIY Comm Effects
lerxstrulz replied to lerxstrulz's topic in Build Threads Requireing Maintenance
It's up to version 3 now. Check out tktalkie.com for the latest. Sent from my SAMSUNG-SM-G930A using Tapatalk -
TKTalkie v3 Released!
lerxstrulz replied to lerxstrulz's topic in Electronics for Helmets / Blasters
Ok I tried this on my TKTalkie (after putting the "Blink" sketch on it) and it installed ok. Just to be safe I recompiled and recreated the zip file and uploaded it -
TKTalkie v3 Released!
lerxstrulz replied to lerxstrulz's topic in Electronics for Helmets / Blasters
The hex file is the already compiled code and you use the Teensy loader to put it on to the TK Talkie. To select the directory whenever you are on the sounds page just tap on the drop-down box and you will have a list of directories at the bottom of the list that you can change into and it will list any files in that directory. Sent from my SAMSUNG-SM-G930A using Tapatalk -
That's good stuff. I've actually been working on incorporating this type of setup into the TKTalkie. You can link the video on you tube Sent from my SAMSUNG-SM-G930A using Tapatalk
-
TKTalkie v3 Released!
lerxstrulz replied to lerxstrulz's topic in Electronics for Helmets / Blasters
Glad to hear it! I'm working on a little cleaner wiring scheme as well. Sent from my SAMSUNG-SM-G930A using Tapatalk -
TKTalkie v3 Released!
lerxstrulz replied to lerxstrulz's topic in Electronics for Helmets / Blasters
Are you sure the Bluetooth adapter is an HM-10 or clone (cc2451)? I ask because typically the phone can't see the module without a BLE app like LightBlue. You can also connect the Serial Monitor in the Arduino IDE up to the TKTalkie while you are trying to connect and see what's going on. Just enter the commands debug=1 and then echo=1 and you will be able to see what is going on when you try to connect. Sent from my SAMSUNG-SM-G930A using Tapatalk -
TKTalkie v3 Released!
lerxstrulz replied to lerxstrulz's topic in Electronics for Helmets / Blasters
by default it's 99, but you can raise it in the code. Sent from my SAMSUNG-SM-G930A using Tapatalk -
TKTalkie v3 Released!
lerxstrulz replied to lerxstrulz's topic in Electronics for Helmets / Blasters
New ways to use the TKTalkie Video on the Facebook page. https://www.facebook.com/groups/tktalkie/ -
TKTalkie v3 Released!
lerxstrulz replied to lerxstrulz's topic in Electronics for Helmets / Blasters
This is what happens when you let engineers design user interfaces -
TKTalkie v3 Released!
lerxstrulz replied to lerxstrulz's topic in Electronics for Helmets / Blasters
Actually, that particular setting works in reverse. 13 is loudest. And I just realized that is not indicated anywhere. The audio board works that way for some reason. Try turning it "up" on the app and it should get quieter. The valid settings are 13 to 31...again...idk why they built the board that way. As a matter of fact I'm adding that to the next release so that it is more user friendly. I have mine set on 27. -
TKTalkie v3 Released!
lerxstrulz replied to lerxstrulz's topic in Electronics for Helmets / Blasters
I may add that later, I thought it wasn't really needed simply because you can easily adjust these values on the fly with the app and test quicker than you could with the serial interface -
TKTalkie v3 Released!
lerxstrulz replied to lerxstrulz's topic in Electronics for Helmets / Blasters
You can delete the default (startup) profile...it will just update your settings to use the one that is currently loaded, so no worries. Yeah unfortunately that's a limitation of the SD card library...boo. I looked at another library, but there was a big speed difference. I've had a couple cards go bad...and not cheap cards either lol. I have noticed these little micros like to be left alone for the most part To be fair while I'm going through my testing protocols the card gets inserted and removed one BILLION times (it's Science...) I have been using the SanDisk HD cards but recently switched to a PNY HD card and it is working just as well and does not cost as much Don't worry brother...I'm not one of those devs that believes I write perfect code...I've been doing this long enough to leave ego out of it. I use this project as well so I want it to work and work WELL and welcome all feedback. There are a things in there that are improvements offered by others. We used to have a guy at work we called "Works for me" because that was always his answer when you had any issues with his code (he no longer works here lol.) I appreciate the feedback! No sweat man...thank you for your help!