
staermose
-
Posts
33 -
Joined
-
Last visited
Content Type
Profiles
Forums
Gallery
Articles
Everything posted by staermose
-

What the heehaw am I doing wrong?! (A DD pipe dream)
staermose replied to staermose's topic in ANH BlasTech E11
DKK 1060,- including shipping for both. Equal to aprox. €143 or $173 I'm installing a resin piece there, so I didn't ask. -
What the heehaw am I doing wrong?! (A DD pipe dream)
staermose replied to staermose's topic in ANH BlasTech E11
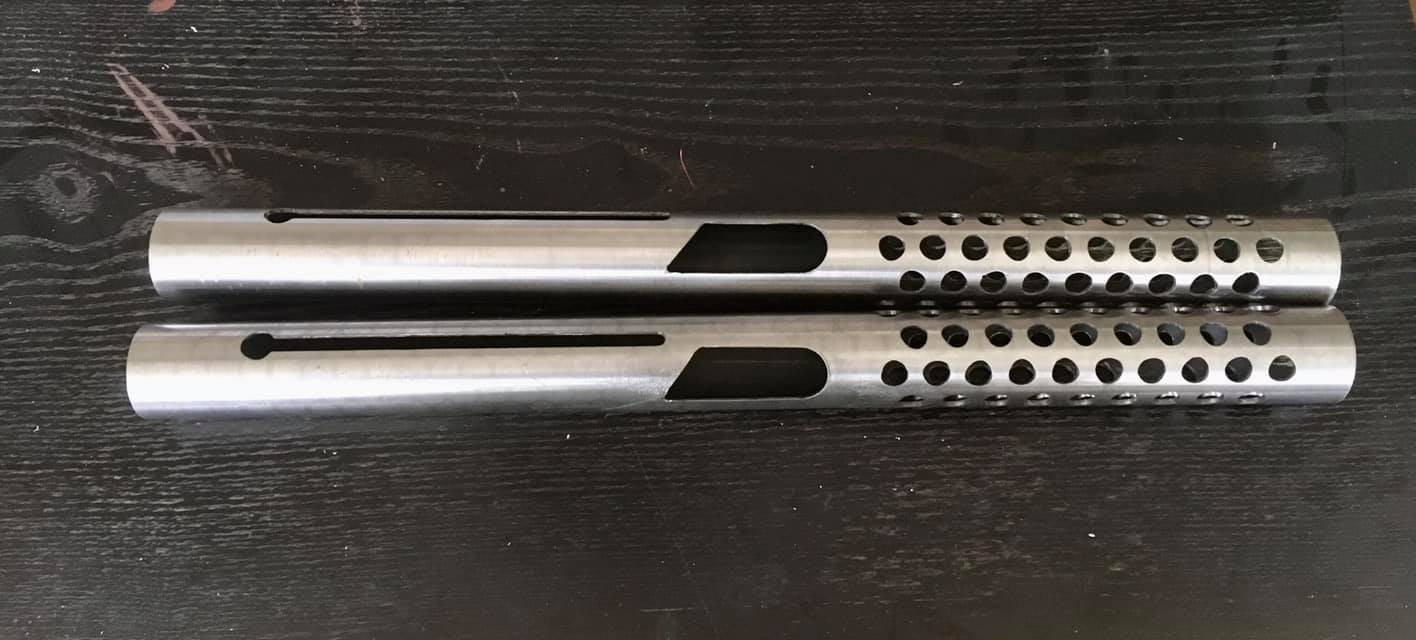
These are 2mm steel. For the weight and the coldness they will have when holding them, as opposed to a resin or PVC tube. -
What the heehaw am I doing wrong?! (A DD pipe dream)
staermose replied to staermose's topic in ANH BlasTech E11
I finally found someone local who could make these.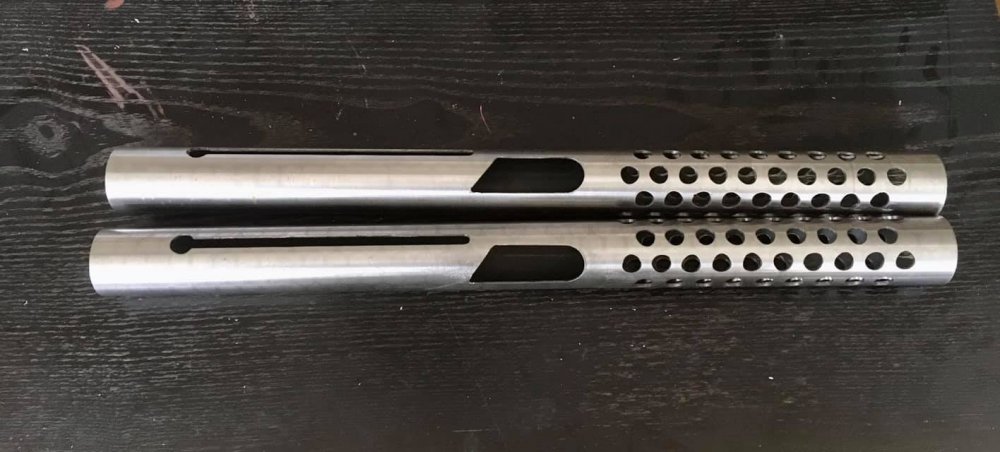
-
What the heehaw am I doing wrong?! (A DD pipe dream)
staermose replied to staermose's topic in ANH BlasTech E11
Thank you T-Jay -
What the heehaw am I doing wrong?! (A DD pipe dream)
staermose replied to staermose's topic in ANH BlasTech E11
"Holy necro resurrection Batman!" I'm back to be building this. I have been long absent. Too many moves to count. But have finally landed at a stable place. Much have have changed. For one thing, I have sorted through a lot of boxes and found that I have parts for at least two full E-11s. And a lot to spare. Almost... I need some the metal hardware. The pibe I made myself is too inaccurate. And need some new ones. Plus scopes rails. Can anyone point me to a good reliable source, preferably within the EU? Thanks! -
What the heehaw am I doing wrong?! (A DD pipe dream)
staermose replied to staermose's topic in ANH BlasTech E11
You're right, but I'll have to move the hole. It's an easy fix. The top cover isn't squared, but slightly askew. So it will only fit one way. And thanks! -
What the heehaw am I doing wrong?! (A DD pipe dream)
staermose replied to staermose's topic in ANH BlasTech E11
Personally I find the difference to the better. -
What the heehaw am I doing wrong?! (A DD pipe dream)
staermose replied to staermose's topic in ANH BlasTech E11
Thanks. It still need a lot of work though. The magazine is sanded and painted. The housing is not. The print lines are more evident IRL though. And it is a plus that I can print it in black ABS. The inside of the magazine is large enough for me to place the batteries that'll run all of the light and sound extravaganza! I'm thinking of 3D modeling a battery holder that will fit perfectly inside the magazine, and make magnetic locking system. -
What the heehaw am I doing wrong?! (A DD pipe dream)
staermose replied to staermose's topic in ANH BlasTech E11
More progress. The parts for the magazine and housing has been printed. It still needs a lot of scratch built details. The Power Cylinders are fixed in place with screws. I know these are not originally there. But I'd Rather secure my parts as best as I can. The screws will be painted later, along with the weathering process. -
What the heehaw am I doing wrong?! (A DD pipe dream)
staermose replied to staermose's topic in ANH BlasTech E11
I needed more room for indoor plumbing. And had two options. 1. Use the DD resin I already have, and these have all the correct Sterling text and markings. But will have to be Dremmeled out. 2. 3D print, and loose the markings. I chose the second option. Firstly, a lot of the text and markings will get covered underneath the Power Cylinders. And a lot of them are sitting on the underside. They are cool, But I don't consider them a huge loss. Especially as I'm already removing texts from a bunch other places. The Magazine is being printed without a huge part of the side wall. I will replace this with a piece of plastic sheet. Much easier than sanding print lines within the wave pattern. -
What the heehaw am I doing wrong?! (A DD pipe dream)
staermose replied to staermose's topic in ANH BlasTech E11
I thought about it. But the area for gluing these in place is very small, and they would easily break off. So I purposefully left them off. Barely visible are also two supports I made underneath the cylinders. To make sure, if pressure was placed on them, they wouldn't break or bend. -
What the heehaw am I doing wrong?! (A DD pipe dream)
staermose replied to staermose's topic in ANH BlasTech E11
The first thing I did when I started this project, was to order a resin kit from DD. Along with the M38, and the Hengstler as resin castings as well. So far I have remade the M38, the Hengstler, and now the Power Cylinders. And I will probably redo a few other things before I'm done. I Wonder If I will have a complete DD resin kit as spares. And could just these into the E11 I set out to build? -
What the heehaw am I doing wrong?! (A DD pipe dream)
staermose replied to staermose's topic in ANH BlasTech E11
The main body of the M38 is painted. -
What the heehaw am I doing wrong?! (A DD pipe dream)
staermose replied to staermose's topic in ANH BlasTech E11
Work has commenced on the M38 as well. The 3D print was sanded roughly. Just to know down the worst of the print lines. Then I added the texture effect, to simulate it being cast metal. On top of the texture I sprayed it with a filler primer, just to knock down the effect a bit. After this dried, the tops of the texture was sanded lightly. To give it a softer appearance. And finally it was spray painted with a flat black. After this I will add chipping in the paint to show some of the brass that supposedly is underneath. As well as other weathering effects. -
What the heehaw am I doing wrong?! (A DD pipe dream)
staermose replied to staermose's topic in ANH BlasTech E11
The metal mesh has been installed in the front of the Hengstler. It'll be painted black, this is just to show it more clearly. -
What the heehaw am I doing wrong?! (A DD pipe dream)
staermose replied to staermose's topic in ANH BlasTech E11
3D print are in progress. They have been printed, and today I started prepping them. I ran into a few problems, as I'm new to 3D printing, but got it solved. I had the three tubes on the Hengstler in the print, but they got damaged when I tried to drill them out. So now they're brass tubing instead. Perhaps a little too large. The M38's body will be covered with a cast texture, therefore I'm not putting too much work into cleaning it up. And I'm getting more and more surplus, as the project evolves. Now the DD M38 and Hegstler I bought are just extra bits. Either for a later more static build. Or will be sold. -
What the heehaw am I doing wrong?! (A DD pipe dream)
staermose replied to staermose's topic in ANH BlasTech E11
The parts for the M38 and the Hengstler are ready for print in ABS. The the large rear scope ring will be printed in this batch. And replaced later with a resin printer. But two things still prevent this. I need to finish the lettering. Haven't decided on which style yet. And I have to have a smalle course in the resin printers, before I can use them. -
What the heehaw am I doing wrong?! (A DD pipe dream)
staermose replied to staermose's topic in ANH BlasTech E11
Just as I redrew the M38, I have also redrawn the Hengstler counter. I'm undecided on wether I shall have an Eagle logo on the side, or something more 'In Universe Styled'. And the window on the rear that normally shows the numbers still need to be cut out. But I plan to place a small display screen here, and I still need to measure the size. The front will have a mesh installed inside at the bottom, at the 'roundish' shapes, and the side that faces the Sterling as well as the bottom now has a grill pattern. Both to better let out the sound of the speakers I want to install inside. -
What the heehaw am I doing wrong?! (A DD pipe dream)
staermose replied to staermose's topic in ANH BlasTech E11
Most of the parts are here! -
What the heehaw am I doing wrong?! (A DD pipe dream)
staermose replied to staermose's topic in ANH BlasTech E11
Thanks. The tear should be the right size, but id not I can make it bigger when then prints are done. I'll compare it to my DD casting of the M38. I might add a number there, numbers are after all canon. Just haven't fully decided yet wether or not one will go there or not. Or even which number. -
What the heehaw am I doing wrong?! (A DD pipe dream)
staermose replied to staermose's topic in ANH BlasTech E11
The project isn't dead. But had to be put on pause due to exam. I have gotten a lot of the parts I need, and ordered some I won't need after all. I have an extra of DD's M38 scope and Hengstler counter. Both will be 3D printed instead. As I want to make them hollow. The Hengstler to be able to put electronics and speakers inside. And the Scope, just to let light pass through. I had previously made the geometry in 3D, but wasn't fully satisfied. So tonight I redrew the files again. Some parts aren't included, as they will come from other sources. Such as the screws (from T-Jay's parts set), and the lenses I got from another place. And as I was already doing the files, I thought I'd some fun and made a render of them. I haven't yet put text on the rear of the scope. I'm not fully decided if I want this part 'on screen accurate', or 'in universe style'. For the latter I imagine doing them in aurebesh letters, instead of latin letters. -
What the heehaw am I doing wrong?! (A DD pipe dream)
staermose replied to staermose's topic in ANH BlasTech E11
Here are a couple of pics of a kit I build last year. As it shows, I'm quite fond of wear and tear. The E-11 will however be much more subtle. -
What the heehaw am I doing wrong?! (A DD pipe dream)
staermose replied to staermose's topic in ANH BlasTech E11
Thank you. I think it also reflects that i have been a model builder for more than 30 years. One aspect my modelling background will reflect will be the paint job. I will use several different types of black and metallics. To show that the original props was assembled from bits and pieces. The T-tracks will remains unpainted, to show the black rubbery quality. The handle will be gloss black, as the original was a plastic type. Perhaps bakelite. I will paint the majority of the Sterling L2A3's body parts with crinkle paint. The M38 scope, although 3D printed will have added cast texture to the main body. And will be painted to show some of the "brass" underneath the black paint. Only parts that was metal on the original prop, will have paint chips that shows silver og gunmetal underneath. And there will be added dust, oils, and gloss wear and tear, where appropriate. I feel that this approach will give my prop replica more of a feeling that it is grounded in real world items. ' I have seen some builds that use the same flat black for all parts. And paint chipping that shows the same metal underneath all parts. I think this approach is also valid. It just tells a different story, that I want with mine. -
What the heehaw am I doing wrong?! (A DD pipe dream)
staermose replied to staermose's topic in ANH BlasTech E11
Thank you, but as I have access to free 3D printing, I will use that option for now. My models might not be perfect, and a few small details have been omitted, and some smaller holes will have to be drilled after it has been printed. But I think I can make them work. -
What the heehaw am I doing wrong?! (A DD pipe dream)
staermose replied to staermose's topic in ANH BlasTech E11
Small update. This will be a slooow build. As I'm also finishing a Masters in Industrial Design. Besides the steel pipe, which still need at lot of work, and a lot more holes. I have ordered the following: A DD resin kit. https://www.doopydoos.com/stormtrooper-e-11-pipe-blaster-base-detailing-kit-2068-p.asp Wannawanga T-tracks https://wannawanga.com/products/t-track/ More small finishing parts from T-Jay https://www.whitearmor.net/forum/topic/28444-fs-completion-sets-for-e-11-resin-kits-with-worldwide-tracked-shipping-and-paypal/ A whole heap of electronics from eBay. Waaay toooo many links to list. I have made 3d files of the Hengstler Counter and teh M38 scope, and will soon be printing these. I have chosen this option to make them hollow. The Hengstler to be able to install speakers and electronics inside. The scope to make light pass through, and give a better effect of it being an actual scope. But all of these are still in transit. The build will pick up some speed i the beginning of next year