

kawnr
-
Posts
48 -
Joined
-
Last visited
Content Type
Profiles
Forums
Gallery
Articles
Everything posted by kawnr
-
Kawnr's ANH Stunt AM2.0 Build
kawnr replied to kawnr's topic in Build Threads Requireing Maintenance
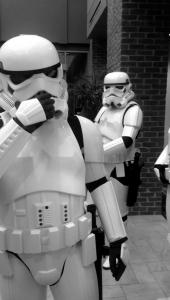
So I've been working hard these past few days. I trimmed my thighs so they're shorter. Cleaned up all arms and legs. Sized and trimmed my torso. Started on my helmet. And began the long a tedious task of making all the snap plates! I don't have pictures of everything I've done. I'll update more when I get home from work. -
Kawnr's ANH Stunt AM2.0 Build
kawnr replied to kawnr's topic in Build Threads Requireing Maintenance
Almost forgot! I also started on the helmet today! Just fitted it together with a couple screws and good ole blue tape in the back. But I think I'm going to save putting it all together for last. -
Kawnr's ANH Stunt AM2.0 Build
kawnr replied to kawnr's topic in Build Threads Requireing Maintenance
Almost finished with the calves! Just waiting for them to cure overnight. I had to trade off doing the fronts and backs since I didn't have enough magnets. Then all I need to do tomorrow and add some velcro. I also fitted and trimmed my thigh pieces tonight. I'll sand them and add the finishing strips tomorrow when my magnets are ready! I may even go buy some more to speed things along... -
Kawnr's ANH Stunt AM2.0 Build
kawnr replied to kawnr's topic in Build Threads Requireing Maintenance
I did trim off the plastic I knew I wouldn't need. That made it a little easier to fit. I actually just completely re-did my forearms. (I noticed they were a little too big after I glued them the first time) You can always take off more, just never take off too much! -
Kawnr's ANH Stunt AM2.0 Build
kawnr replied to kawnr's topic in Build Threads Requireing Maintenance
Fitting my calves last night and my armor finally drew first blood! Putting these with the right parts was such a chore though. I almost went crazy thinking I was shipped two left legs. But once I found THIS everything became so clear. If you're having trouble with these definitely check that link out. -
Kawnr's ANH Stunt AM2.0 Build
kawnr replied to kawnr's topic in Build Threads Requireing Maintenance
Got the biceps all clamped up! Then tomorrow I'll just add the cover strips and I'll be done...with the biceps... Has anyone else with the AM2.0 had any trouble with how large the forearms are? Am I going to have to trim them lengthwise? They pretty much take up the entire length of my forearm and leave little room to bend at the elbow. I'm worried that if I need to trim them lengthwise, I'll lose one of the notches on the top? Has anyone else run into this issue? Last question for now. The arm with 11 notches is for the left, correct? -
LoveMonkey's AM 2.0 Build Thread
kawnr replied to LoveMonkey's topic in Build Threads Requireing Maintenance
Awesome! I'll be following your build as well. It's exciting to see so many people get the same armor at the same time. We're all in this together! -
Kawnr's ANH Stunt AM2.0 Build
kawnr replied to kawnr's topic in Build Threads Requireing Maintenance
Tackled the biceps tonight! Well, started them at least. These needed so much trimming. I found that with the AM2.0 it was easier to fit if I trimmed off the ABS I KNEW I didn't need. Then I was able trim them down to fit my arms. I decided to do inner strips since I really want my armor to be as solid as it can be. Now I'll just wait till tomorrow to put the pieces together! -
Kawnr's ANH Stunt AM2.0 Build
kawnr replied to kawnr's topic in Build Threads Requireing Maintenance
I've decided to go the safe route and start with the biceps. I've cut out 4 15mm cover strips. Now all I need to do is fit measure and trim. Fitting is proving quite difficult with the AM2.0 since there is so much extra plastic. Also, what is the deal with the return edges on these? I know I can trim either the top or bottom, but I'm not sure which. -
It happened! I got home from work to see a big brown box sitting on my doorstep! I opened her up and man was it wrapped well. Took be half an hour just to get everything out of the foam wrapping. But once I got everything unwrapped and laid out, I realized what I had gotten myself into. I have just been sitting and starring at all the pieces for like 20 minutes just trying to figure out where to start! Since the AM2.0 is made with a little extra space for bigger troopers (I'm 5'9'' 180) I'll have a good bit of trimming to do. Not as much as some but still a good bit due to my height. I really want to start with the helmet. (Bad idea?) I've done my research. A lot of it. And I think the thing that most worries me is trimming down the thighs, calves and forearms. Those seem to be the parts that will require the most trimming. Anyway, I'm so excited to start this journey. I can't tell you how many times I refreshed that damn tracking page. Well here goes nothing!
-
Nice! looks good. I really wish I could have taken mine apart without risking breaking it. (All the screws were stripped when I got mine.) Would have made customizing a lot easier. But yours looks amazing. It's been fun to watch the evolution of these builds since these guns went on the market.
-
Just used a dremel tool, some sand paper and one of those mini file kits so clean it up. Unfortunately the screws on my gun were stripped when I got it, so I couldn't open it up and open up the rail behind the counter. But even if it was opened the counter would block the view anyway.
-
So while I'm waiting for my big brown box day I decided to start working on all the other aspects of my TK build! First thing I ordered was one of these bad boysI know it's a rubies but I just couldn't swing a more expensive E-11 at the moment. I'll save that for the future! The first thing I did was drill the barrel holes. Sorry, I didn't take any photos of that process. After that I primed and painted. White then silver then black. After all the paint was dry I did some weathering and added a sticker to the counter. But I wasn't satisfied with that. So I stared some sanding. And more cutting. I sanded down the T-tracks and drilled the barrel out. I also opened up the scope rail as best I could. So it was time to paint again. After the paint was dry AGAIN I made some power cylinders out of a couple old AAA batteries and some random plastic I had lying around and added that along with some wires. Then some more weathering and a couple decals and boom! It was finished! I'm pretty happy with how it turned out considering I spent around $25 for everything. Plus it was a fun way to start my 501st adventure!
