


menschie
-
Posts
186 -
Joined
-
Last visited
-
Days Won
2
Content Type
Profiles
Forums
Gallery
Articles
Media Demo
Posts posted by menschie
-
-
Hi Jeff! For basic approval, my GML asked for:
- Body: front, back, left and right
- Helmet: front, back, left and right
- Boots
- Shot with no helmet (to show that it's you)
- Action shot
- "Other detail photos"
Hope that helps a bit.
-
Looking sharp buddy! Welcome! Great to have you!
-
Hey Jeff! Exciting times! Welcome!
-
Also, late to this party, but woah...what an amazing first post! Love it.
Just adding to what's been said already in this topic, absolutely no shame whatsoever in buying it pre-built. Tons of people do it, and I see the pre-builts even in the Centurion threads often! It's all personal preference, for sure.
By the way, those IB boots are amazing. Do yourself a favour ... put a bit of velcro where the front of your shin touches your boot. Yes, you'll put velcro on the inside of your shin as well, and that'll help hold it in place, but it'll also keep your shin armour beating the absolute snot out of the front of your boot on your very first troop.
") Plus, put some gel insoles in there for your first troop...it'll be like gliding on a cloud of air!
Plus, put some gel insoles in there for your first troop...it'll be like gliding on a cloud of air!
Always great to have fellow CDN in the 501st, even if you do live like 4000 miles away from me. LOL
-
On 6/17/2018 at 8:44 AM, GideonTX said:
Greetings from North Texas!
I'm in the process of taking over a TK from another member that hasn't finished his kit. I currently have an ANH TIE and am looking forward to adding a TK to my mix.
Sean Bradshaw | TI-69265 | TIE Pilot - ANH | Kilted Trooper Brigade
M: 210-381-6905 | txeagleeyes@gmail.comWelcome! I currently have a TK and am thinking of adding a TI to my mix! LOL.
Great to have you on here!!
-
 1
1
-
-
Awesome job! Sailing up to Centurion!
Just a couple of things that I'll mention ... especially for centurion: all the pics of the right drop box look like it needs to come out a bit, so that its outside edge is flush with the edge of your belt. It's close, but not quite there.
If it were me, I'd move that belt up a tiny bit higher as well, so that it covers the ab plates a bit more. New female snaps on the inside of your belt, directly below your existing snaps, may work to make it just about perfect.
Again, beautiful job on that armour. You should be proud!
-
1
-
-
Josh, beautiful job on your armour. Looking like you're a hair away from Centurion, let alone EIB. I look at the beautiful painstaking job you did on the teeth in the helmet, and can see you're a stickler for detail, have an artistic flair and are willing to take the time necessary. That's always impressive. Can't wait to see your Centurion application!
Your lenses are showing blue for me. Likely just a strange pic, but still.
-
2
-
-
Welcome fellow Canadian! Great to see you on here. You've certainly found a home here, and we're all excited to help you on your journey!
-
On 6/16/2018 at 6:28 AM, FarEast said:
My garrison GML has already approved the build and asked for a couple more photos for my legion profile photos!!
I will suit up again tomorrow and ballance our the bicep, forearm gap and post those here too.
Congratulations. Looking forward to officially welcoming you to the 501st soon!
-
Awesome! Congrats and welcome! Let the trooping commence!!
-
Hey Rowan! Welcome! Starting your armour with the goal to go to Centurion quickly will make it so that it's not even really that much extra work, and your armour will be far more stunning in the end for it. That's a great plan! As you're already finding out, you'll find everything you need on here! Check out the link in my signature...things I wished I had known when I was where you are. Maybe you'll find something in there that will be helpful! Let do this!!!!
-
1
-
-
12 hours ago, dawyer47 said:
Thanks for the add. We are currently working on a TD for myself and a TD Magma for my wife. I have also assembled a RS TK for display and also built a R2 unit.
Welcome! Sounds like you're off to a flying start!
-
Hey Jesse! You're so close! Really looking forward to typing a massive "congratulations" in here to you!
-
I hear ya, and I do understand where the GML's are coming from. I think it's less about EIB and more about making sure they're doing the Star Wars franchise and their garrison proud when their out in public on their first troops.
-
Thanks so much for the very kind words!
Jim, I think we've gotten there with TrooperTalk!
-
1
-
-
You may be right about some of the feedback given, but I suspect the GML from my garrison would have asked for most to be addressed, at least to some level...just a heads up for Patrick.
-
My back closure straps are very short, very tight, and the Tandy's never unsnap. Bullet proof! So, good call on those.
About the thighs...got ya. That's tough.
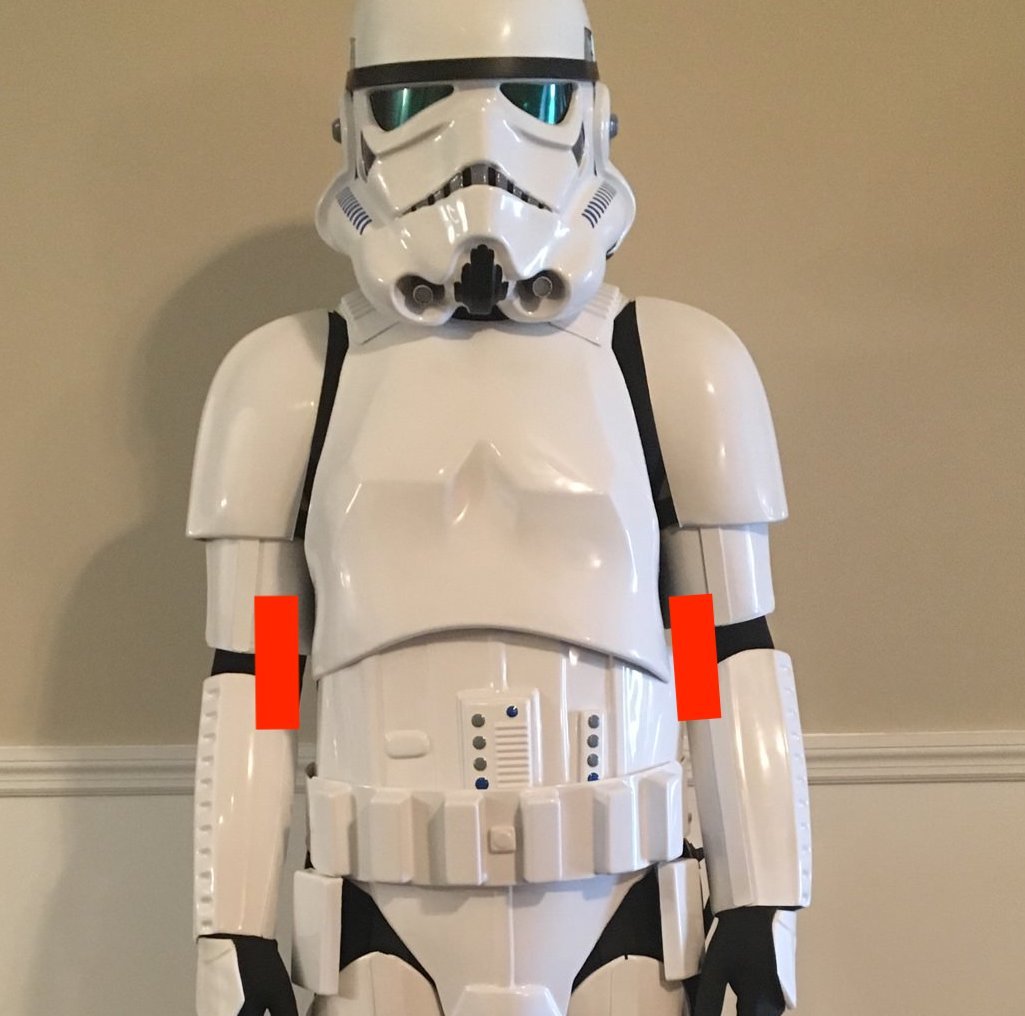
Arms are always going to be a bit tricky to bend, even when strapped correctly. Having your forearms too close to your hand guards definitely is going to hinder. It's all about where the strapping is connecting the bicep to the forearm. The strapping should be more on the inside towards your body, as opposed to right down the front of the two pieces. That will allow your forearms to actually come back on the bicep when you bend, creating more forgiveness and room. When strapped right, the gaps (large or small) won't hinder your movement, and you can opt for the aesthetic without having to worry (always opt for aesthetic anyway.
)

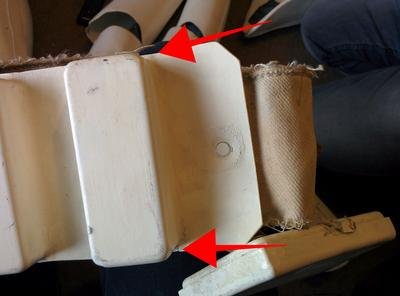
Edge of the belt for reference
Again, great job. You're so close!!! Exciting times!
-
Awesome job! Congratulations and welcome to the 501st.
Great eye for detail and nice job on that armour! A lot of great advice! I have a couple cents to put in, as you look to lvl 2 and 3 and, more importantly, just getting the most out of your armour:
- I'd worry a lot less about the back neck line being a hair low, and butt plate being higher, and more about the back to kidney gap. Getting the gap to an absolute minimum improves the look exponentially. I'm 6 feet, so I have similar concerns to you, but it's not been a problem. Something that might help is getting some more flex in that butt plate, by removing all return edge completely, except at the top/kidney edge. I think you'll find that once suited up, with weight pulling on the whole thing and your cod to butt connected, it'll all be fine.
- If it was me, with the thighs, I'd undo the back cover strip, extend to 25mm for the cover strip if not already, and create a gap between the two halves, to eek out as much more room as possible. Then, at the edged not covered by the cover strip, I'd fill it with some ABS gunk. If you're concerned about strength after that, you can glue internal strips too. You've done such a beautiful job on that armour, I know you won't feel 100% good about it unless you've addressed that.
- Arms at your sides photo...a super easy fix is making the 2 arm gaps (bicep to forearm and forearm to hand plate) equidistant. You'll find it a LOT more comfortable too when you bend your arms.
- Looks like you need to shorten the strap or elastic from your chest plate to your ab plate. When you raise your arms it's coming up too high. If you don't shorten, you'll have people coming and pulling your chest plate out from under your ab plate on troops.
-
Also, for sure Joseph or Tony will tell you to trim that edge off your ABS belt.
Hope this helps a bit. Clearly you've built with Centurion in mind, and it really shows!
Great job!
-
Hey Patrick! Fun getting to this point hey!?
Excellent feedback so far, obviously! This feedback is going to help you get that little bit further right to the end, and it's amazing how much these last little tweaks will make your armour look incredibly better, and how much prouder you'll be when you hit your first troop. When you look at the before and after pics, you'll be stoked!
A few things to add:
- I think you'll find your chest plate lays nicer across your ab plate if you taper the return edge of the chest plate a little more as it gets to the sides. Does that make sense?
- Also, the bicep elastic looks like it's much larger than 3/4 inch. Will look much better when it's the correct size.
- There's not a back shot, but those back --> kidney --> butt plate gaps should be as minimal as you can possibly make them. Looks amazing when done properly.
- You have large gaps at the kidney to ab connection. It almost looks like you've run out of ABS. Did you trim to the mold line, or beyond?
Best help I can offer is totally geek out on your favourite Centurion application threads, comparing those photos to your own.
Almost there! A tiny bit of work will get you very far from here on in.
-
3 hours ago, Twosolitudes said:
Hillman makes pan-headed slotted screws, and I bought mine at Canadian Tire.
Thanks, but they didn’t have them at mine.
-
This makes me very very happy ...
-
3
-
-
There are people on here with a LOT more expertise than I have! However, I did get there and I want to just give a tip synopsis of things that are valuable to me.
These are tips for those just starting. Much of it can be found on here, but here’s what I wish I knew at the start, with my own personal spin on it, from experience or from a lot of digging in the forums. Of course, some things you’ll still have to figure out for yourself…I wouldn’t take that from you!
A million thanks to the FISD community. I owe realizing the dream of proper TK armour to you all!
Helmet:
Don’t rush it. Everyone’s been looking at this helmet for 40 years, and when it’s not perfect it doesn’t look completely right to people, even though they can't peg quite why. The look and consistency of the original costumes was really quite amazing, overall. Things to hyper focus on … the eye holes and the teeth. Eye holes…I often see people not taking enough out, or crooked lines. Slightly crooked can be cannon I guess, in some examples, as some of those eye holes were a bit messier than others. Sand and look. Sand and look. Teeth…people often make them too long and too square. I initially used a dremel, and then refined with hobby files. Compare them constantly to the movie worn helmets. If you make your teeth right, your helmet will likely stand out as an amazing example!
Return Edges:
People seem to have a desire to keep return edges. This can create fit, shape, and wearability issues…plus it just doesn’t look “cannon.” Again, look for the screen references. The return edges are often much much smaller than we’d all first think, and often there aren’t any at all. For instance, people often want to have too much return edge on the top of the butt plate, or any at all on the other edges of it. This will give you “trooper dumpy butt” I call it. Again, screen reference and look at the best Centurion submissions.
Bending ABS:
I know some people use a heat gun. This is outside of my comfort zone. Too many horror stories. I did a lot of bending to get things where I wanted them to be. FYI, I was able to accomplish this by pouring boiling water from a kettle on the parts I needed to bend, and applying a plastic clamp for the weight to apply the bend force. When it was where it needed to be, or just past actually (it goes back slightly), I'd immediately put it under cold running tap water. Sometimes I had to repeat this process. This worked perfectly, on 1.5mm ABS.
My Favourite Build Resource:
Centurion submissions! The build threads were cool, of course. For me, the single biggest help were the Centurion Submissions. So much detail, and real life scrutiny of what you eventually want to have. Specifically, and this is really important, find submissions of your armour make (RS, ATA, etc.) with someone who is approximately your height and weight. That’s a huge help.
Glue:
I read a lot about E6000. I was unsure about it, as I heard about how bad it smelled and how long it took to cure. The smell does go away quickly. I couldn’t recommend it more. When you wear your armour, it will flex, and there will be times where it may be called up to really flex. CA glue does not allow for any flex at some points on your armour that have a LOT of tension. E6000 is a way safer route to go. Plus, if you make a mistake you’re not hooped. I can’t imagine using anything else. Also, people talk of 12 hour cure times. On anything that has a bit of tension in it you'll need to go 24 hours. Even then, I put it over a forced air heat register (in cold months). If you push short cure times you'll eventually get some separation. Not fun to go backwards!
Cover Strips:
I did not use interior strips. I’m not saying you shouldn’t do it. It’s all about preference and comfort level. In my experience, if you do your outside cover strips properly, your armour will absolutely be strong enough, and you’ve just saved yourself an incalculable amount of work and curing time, in what is already a long and arduous process.
When using E6000, it is VERY important that you glue right to the very edge of the cover strip where it touches your armour. You want some bleeding out. Most of the force is at the edges. When you clean the glue that has pressed out, if you happen to peel even a fraction of a mm from underneath the cover strip, you can expect your cover strip to come away at the edge at some point. For some people that’s not an issue...lots of people with cover strips that aren't consistently flush and in full contact. For me, I need to have my cover strip in complete flush contact. Better to leave a tiny bead of E6000 at the side edges of the strip, than to completely remove it and have separation.
Strapping:
Tandy snaps are the best. Reading other's horror stories, I'd go as far as to say essential. To keep gaps very minimal, keep the snaps very close to the edge of each piece of armour, and make the strapping tight. It will stretch and it’ll always seem like you’re making the strap to short at first. In fact, even then you’ll likely eventually make them shorter. I tried elastic strapping and I hated it. It flexed better, but the gaps were a mess. So, for back to kidney plate to butt, I changed to nylon/no stretch strapping. Nice and tight with almost no gap! I just used flexible straps from the chest to ab. Even those, make them shorter then you think you need them, or you’ll have issues with your chest plat ending up under your ab plate on troops.
They’re expensive, but buy lots of extra snaps. Don’t be afraid to scrap and start again on strapping for bits that aren’t cutting it. Likely will be shortening at some point.
Don’t use velcro for anything that has a lot of force, torsion, or will do any pulling away. The only place I have velcro is for my wide white elastic at the shoulder, from my bicep to forearm connection and for my shins. They work great in those applications only. Even then, use the industrial strength velcro and E6000 it to the ABS or to the strap. Don’t rely on the adhesive that’s already on there, especially on the strapping.
Armour ABS Thickness:
I have 1.5mm ABS. It’s extremely durable. I don’t worry about it cracking or breaking. I’ve felt others' 1mm ABS armour, and I'd be very nervous with it.
Cutting your ABS:
Score and snap is your friend! Again, it’s comfort level with how close your willing to go to the final line. Take your time (can’t stress this enough). A dremel to clean up a line and shape a little I think is very necessary. Then, I use a 180 grit sand paper to smooth, and finish up with an 800 grit to make the edge shiny and smooth.
Boots:
You can research and research, and the conclusion that you’ll come to is that Imperial Boots is pretty much it if you want proper high quality boots at the time I’m writing this. The good news is that they are really really good guys and they do an amazing job, and they’re worth the money and wait. On the wait … plan on getting your boots early. You could end up waiting almost a month for an ordering wave, and then another month for processing and shipping. Don’t be sidelined like I was for 2 months because I wasn’t proactive with this. On fitment ... I did the prescribed, order a size bigger. Out of the box they were a tiny bit loose. However, I put in gel insoles, still leaving the original insoles in, and they're absolutely perfect! Wouldn't have them any other way at all.
Check out your local fabric store:
You’ll be surprised how much of what you’ll need you’ll find there, and for cheap!!
Neck Seal:
Do not buy one that has rigid metal wire running through it. They’re a nightmare and you won’t even be able to look down while putting your armour on without breaking your neck. Buy a completely soft ribbed one only. Learn from my pain. Literally. On another note, does anyone want to buy a wire ribbed neck seal? Special price!
Helmet Cooling:
For helmet, like others, I highly recommend dual 5 volt blowers and a usb battery. You can get all of this super cheap on eBay from China. Will last hours on one battery. When the battery is new, charge and discharge it a couple times to make sure it’s not defective. You don’t want a lithium-ion battery lighting on fire when it’s next to your head! Seriously.
Audio:
Whatever audio solution you choose, it’s imperative that you have sound dampening in your helmet. All plastic surfaces should be covered. I used sticky back 1/4 inch thick x 3/4 inch wide foam. This should almost completely eliminate most feedback for most setups. If you still have issues, put a bit of foam inside your chest plate at the top, to prevent sound from coming up into your helmet (thank you BDWC for this tip!).
Lastly, whatever audio solution your pick, it needs to have the static burst after you talk, at a bare minimum. FYI, I use an Aker amp and mic, and the TrooperTalk iPhone app.
Blaster:
You’ve spent all this time, effort and money on your armour. Amazing! Now don’t fall short on your blaster! The idea of doing your blaster right can be a bit scary, but you can do it. Actually, if you do it right it can be the most fun part of your custume to make! I did DoopyDoos. It’s an amazing resin casting, it’s cheap, the shipping is fast. They have horrible communication but they get it done. The FISD E-11 Blaster Reference thread is amazing and the build threads by Cable Guy and T-Jay were very important to me too. If you do your blaster right, then you really do feel like you’re back on the movie set in ’77…you’ve gone that last mile on your costume!
Thermal Detonator Screws:
What a freaking pain! Did you know that the planet earth pretty much stopped making slotted screws? And for good reason! If you do find a slotted pan-head screw, it’ll likely be a threaded screw—which means the only way to make it hold in the PVC is to glue it. So, after much much searching, I found a slotted wood/metal screw, but it had a domed head—not CRL Lvl 3 kosher. Again, dremel is your friend! I just dremel’d off the dome and made it into a pan-head. You can do this, or you can order 4 screws from somewhere in the UK and wait a month.
Start to build with Centurion as the end goal! If you have Lvl 3 on your mind right from the start, you’ll easily get there. I notice that people who don’t start their builds this way, have a harder journey and seem to be a lot less likely to get there. Furthermore, their armour at the basic approval level can tend to be a little bit of a mess, because they've been lone ranger-ing it, and haven't been using Centurion submission photos as their go to. I'm guessing that those who start this way, most often have far better looking armour right from the start...even if they never progress to EIB or Centurion.
Hope that something in here helps someone on their journey!
-
11
-
-
Q, Jim, Andrew, Jay and Shane ... thank you so much!
Jay, you are the man! Thanks! I'll PM you now!
-
Just now, CableGuy said:
Wow, Colin - that was quick!!
Many, many congrats. Welcome to Centurion. :-)It was! Thanks bro! So stoked!
-
1
-

TK 11250 Reporting for Duty
in Newly Approved Members - Sound Off!
Posted
Hey hey! That's my fellow garrison member right there making me proud!
Looks amazing and I can't wait to troop with you and see it live! Congratulations and welcome to the FISD!!