

TKedt
-
Posts
318 -
Joined
-
Last visited
-
Days Won
1
Content Type
Profiles
Forums
Gallery
Articles
Media Demo
Posts posted by TKedt
-
-
Are u chewbacca?
-
 1
1
-
-
Depends on the budget. U can get a used Hasbro and the conversion kit or go pro for a hyperfirm
Sent from my HTC0P4E1 using Tapatalk
-
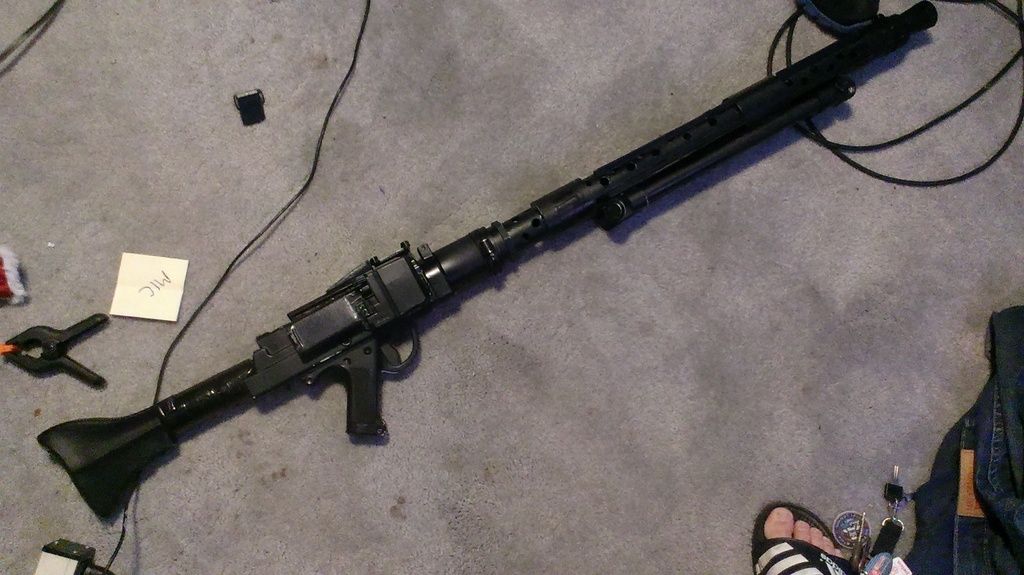
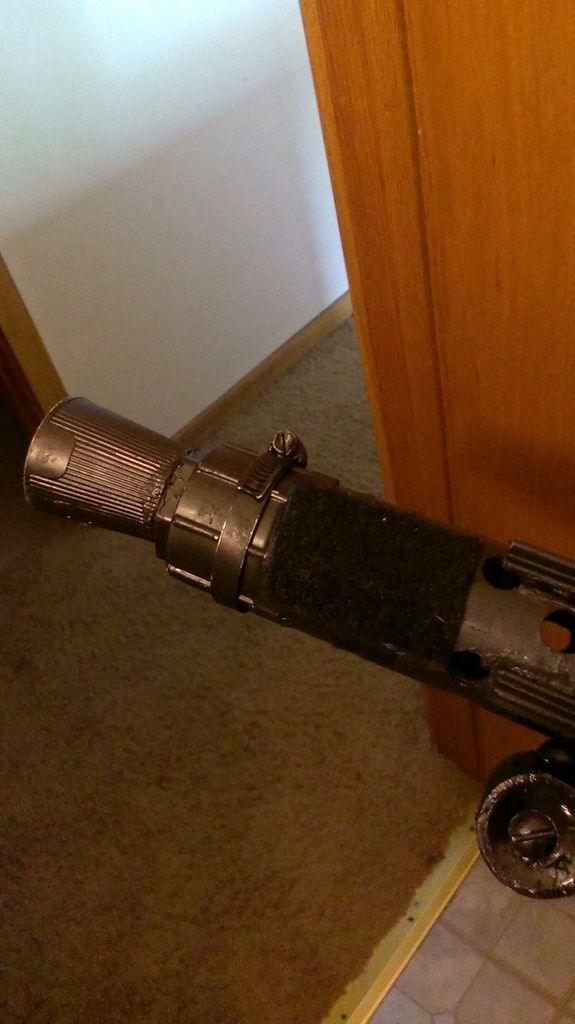
Its been about 5 months that I built the first prototype of this weapon in a low budget. Taking ideas from "CHUNK'S" original E-11 conversion tutorial and ideas from other troopers I have been improving it. This has been tested on the field and I had great response from people at troops and some fellow troopers. This is not a 100% accurate but it gets the job done. This is a small tutorial of how to build the weapon for about $50 and 1 weekend or less of your time. This also includes where to attach an action camera in case you want to document troops.
I am not very good making tutorials but I have some pictures that may maker the build easier.
You will need:
Hasbro's Build A blaster gun with Stock. (The original barrel from the gun will not be use in this build).
*Tripod (Couple of pieces of 1/2 inch pvc, couple of angle ends, couple of caps, couple of plugs and 1x ½ inch coupling)
*2 screws
*BARREL:
*2 feet 1 1/4" PVC pipe (to match the barrel of the built a blaster)
*Mouth wash cap
*(1) 1-1/2 in. x 1-1/4 in. PVC Sch. 40 SPG x S Reducer Bushing
*(1) 1 " coupling (1/2 slip on 1/2 threaded
*(1) reducing coupling 1¾ x 1½
2x 1 " “ coupler
*1-1/2 in. x 1-1/4 in. PVC DWV Hub x Slip Joint Trap Adapter (this is to attach the main gun with the barrel)
*Extras:
* Leaf Rake (to make T- tracks)
*1 tube of window crack sealer
*Gorilla Heavy duty Duck tape
*Dollar store cardboard sheet
*E-6000 glue
*Dremel
*Black Spray paint (it is recommended to use one that adheres to plastic and has primer as well.
*empty altoits box
*empty ink cartridge
*industrial strength Velcro
*Templates for barrel’s holes and gun dimentions
http://www.haui.eu/u...chnung_1zu1.zip

You can find this used on ebay . New may be kinda expensive.
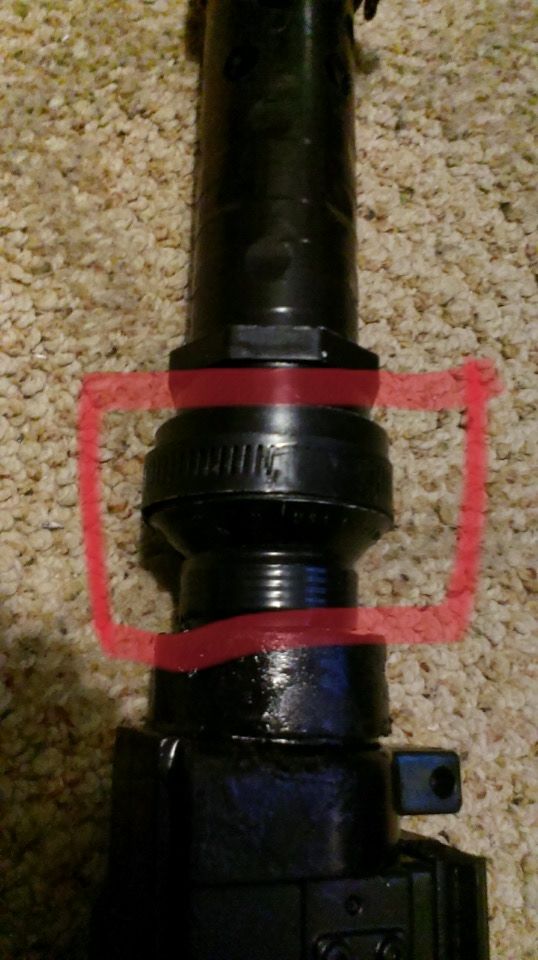
*concentrate in the barrel first so then you can attached easily to the main gun and avoid excessive pressure on areas that may break .
This is the tip of the gun:
glue the mouthwash cap with the *(1) 1-1/2 in. x 1-1/4 in. PVC Sch. 40 SPG x S Reducer Bushing
*(1) 1 ¼ coupling (1/2 slip on 1/2 threaded
*(1) reducing coupling ¾ x ½
you may use a washer machine cable holder to simulate a cross hair.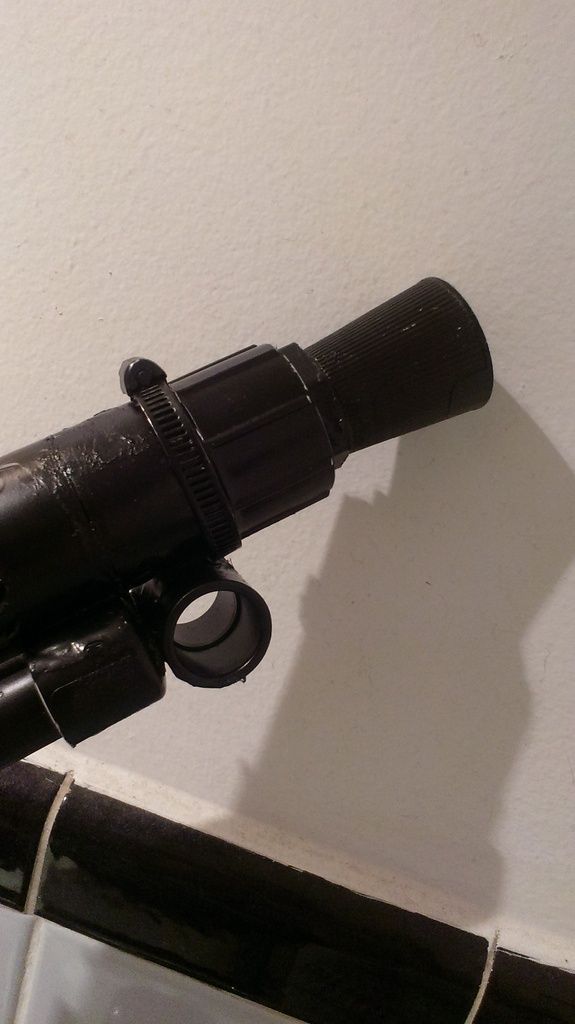
2.
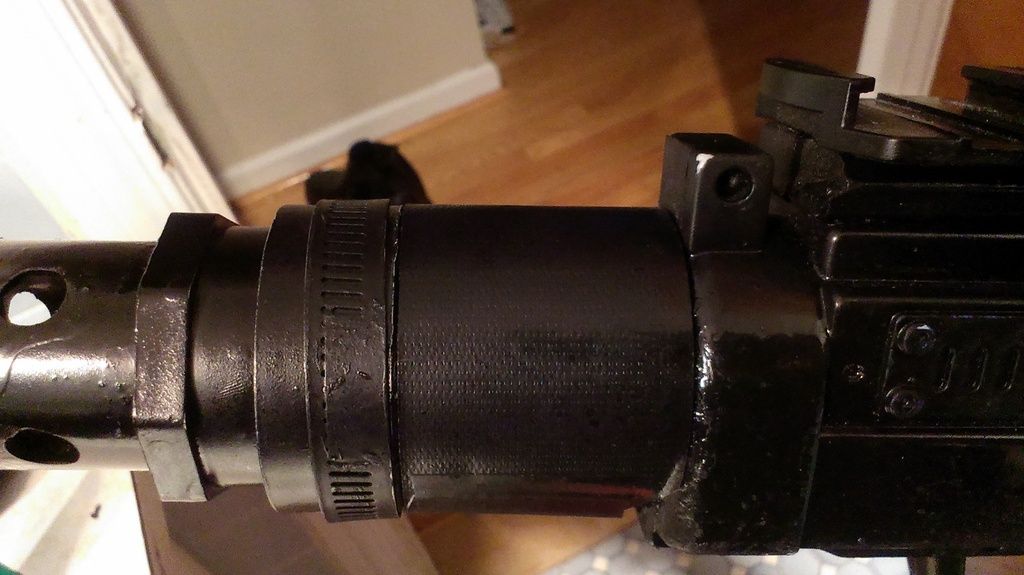
*Cut the PVC pipe in 8 inch and 6 inch sections and attach them using the couplings
*Make holes to the barrel with a dremel or drill (there is a link at the top to get templates)
*Cut T-tracks from the Leaf Rake and glue them
*Cut the 1/2 inch pipe in 12 inch sections and place caps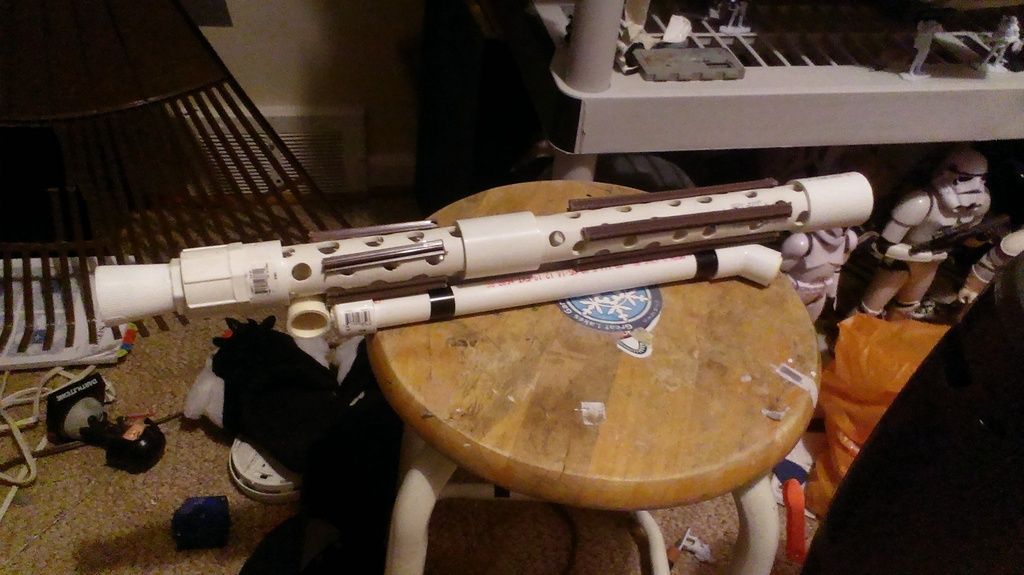
3.
*Place the 1/2 coupling and fill it with the window sealer and place screws
*Glue tripod to barrel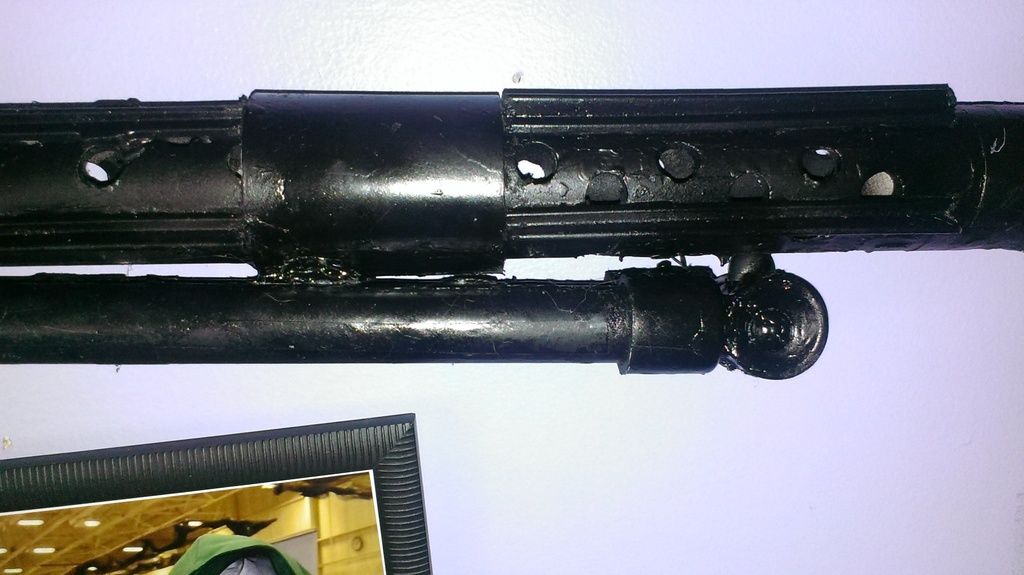
4
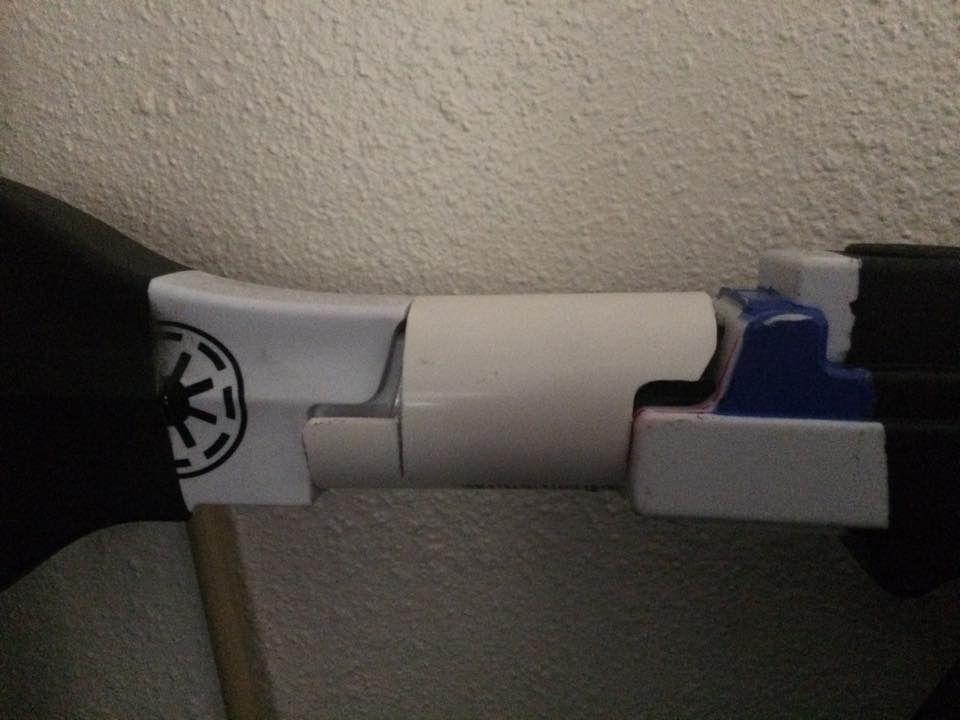
*Attach main gun to barrel using *1-1/2 in. x 1-1/4 in. PVC DWV Hub x Slip Joint Trap Adapter
*add 3 inches of 1 1/4 pipe to connect the copuler from the main gun to the coupler from the barrel
5.
*Cover the coupler with a piece of cardboard and then use duck tape to cover it. (when you paint it it will blend in)
6
*Extend stock using 4 inches of 1 1/4 inch pipe ( I got this tip from fumatroop)
I used duck tape over to cover the pipe
7.
(Optional) Add the box of altoids and empty ink cartridge (brother)
Paint gun (I used satin black)
Action Cam placement
*Place velcro on the left side of the barrel
*Tip: In order to get a good angle of focus place the camera where you can make eye contact with the lens
This was taken with my action camera placed there
Well, There you have it.-
2
-
-
Awesome. Feel free to share.It seems like that did the trick! I put roughly 2 pieces of duct tape on the back side of the microphone. I attended a parade in which was only a mile, but in armor for 2 or 3 hours. And no problem! No more cutting me off or on/off erratically.
Sent from my HTC0P4E1 using Tapatalk
-
I live in Michigan and will be attending a troop in Canada. I am skeptical about taking my DLT -19 across the border because I may get stopped and the prop may get taken away when checking at customs. Anybody has experience taking prop weapons across the border?
-
awesome pics. I prefer pictures troopers interacting with con crowd. These look great!
-
You only have to tape THE BACK SIDE. Leave the front openI'll have to do the same because I was having the same issue. I thought maybe the battery of the Aker voicebooster speaker had something to do with it. I'm just afraid that if I put too much tape around it, that it won't be able to pick up MY voice

Sent from my HTC0P4E1 using Tapatalk
-
Not sure if this topic has been shared before but I just want to share it with you.
I have been trooping with the Icomm for about 1 year and I love it. People always say: "wow the voice effect sounds so cool!" However, it is very touchy and it goes at the minimum sound when in voice recognition. The PTT wears off with use and there is no other choice that voice recognition. I experienced that when I breathe or When I walk the icomm triggers itself causing and endless static burst and clicks.
I was dwelling in my frustration when I realized that the mic was picking up sound FROM THE BACK. I insulated the back of the microphone by putting electrical tape over it (I used heavy duty Gorilla tape) I used about 3 layers so the mic does not pick up sound and turn a little bit downwards the front of the mic. in order to be as close to your mouth. Then, put back the mi foam. Now there is no triggering when breathing or walking.
This is how it looks from the back of the mic (without the foam on)
----------
-
4
-
-
Are u the guy at maker fair dressed as egon?
Sent from my HTC0P4E1 using Tapatalk
-
1
-
-
LOL. well you can go to walmart and get this -------------
-
1
-
-
Welcome and remember to join the great lakes garrison boards!
Sent from my HTC0P4E1 using Tapatalk
-
1
-
-
Great pics and awesome armor! It was great trooping with you.
Maker fair was my first troop last year and holds a special place in trooping. This is from the one this year:
-
4
-
-
Great start and welcome!
Sent from my HTC0P4E1 using Tapatalk
-
looks great. Just consider taking the barrel off when drilling the holes. The pressure may hurt the joint where the barrel and main gun attach.
-
Look on eBay in the US . Even here is rare but keep looking
Sent from my HTC0P4E1 using Tapatalk
-
that blaster used here is the hasbro "build a blaster". Look on ebay. New are very expensive
-
1
-
-
you can set it up facing towards the armor. I have been trooping with a voice amp and never had any issues with sweat damaging the speaker.
-
Welcome. Where on Michigan?
Sent from my HTC0P4E1 using Tapatalk
-
yes , will be handy at maker fair when you go outside!!
-
It lasted me about 5 hours
Sent from my HTC0P4E1 using Tapatalk
-
Regular paper worked for meWhy use gimp?
Use a bigger sheat of paper and print it on this i onrginal size A4 then cut it out
Sent from my HTC0P4E1 using Tapatalk
-
good choice. In my experience the build a blaster looks more accurate than the e-11. Seems like you got it all down.

-
Is this in the 501st site? Is this the new pack approved?
Sent from my HTC0P4E1 using Tapatalk
-
Good luck bro
Sent from my HTC0P4E1 using Tapatalk
Space trooper
in ANH (Stunt and Hero)
Posted
has anyone tried this before. I am not sure how to go about the jet pack. Any ideas???