

russellr2d2
-
Posts
369 -
Joined
-
Last visited
-
Days Won
2
Content Type
Profiles
Forums
Gallery
Articles
Media Demo
Posts posted by russellr2d2
-
-
Thanks Barcode!
I have seen it on many threads...thats why I was curious about the position.
I thought there was some physics reason or something.
-
Congratulations Sir! Beautiful armor. I am going to dig back into my armor and hope to have my Ab-to-kidney gap on the left as tight as you achieved here. Seriously good build.
I could give you one trick though to make it fit better where your knee plate tucks under your thigh. Place some foam (1/2" aught to do it) at the back of your thigh. This will pull the thigh back against your knee. I also have foam built up behind my knee plate to push it forward away from under the thigh. I never have the knee plate tuck under even marching a mile in a parade. Also some on the side to pull the thigh over center at the knee do you don't have that knock-knee look we all get.
Again congrats! You EARNED this. Go print your certificate !
Sent from my iPhone using Tapatalk
-
The edge with the big rolled look to it is down. I just got word today from the maker himself.
The plate is upside down in this photo. You can see the big rolled looking edge that gets trimmed off.
Sent from my iPhone using Tapatalk
-
Not finished yet ! I am digging back into it to improve some things.
After a couple troops I have some issue with my webbing hinge on the left side. Ordering new split rivets and getting ready to replace it with a flexible rubber sheet. I'll post another photo thread on this. It should work out well to hold the AB and kidney plates together . The webbing used now is pulling away from around the rivets and allows misalignment.
-
Thank you sirs!
Certificate printed and framed.
Got the badge and rocker for my shirt today. Beautiful embroidery.
Sent from my iPhone using Tapatalk
-
 2
2
-
-
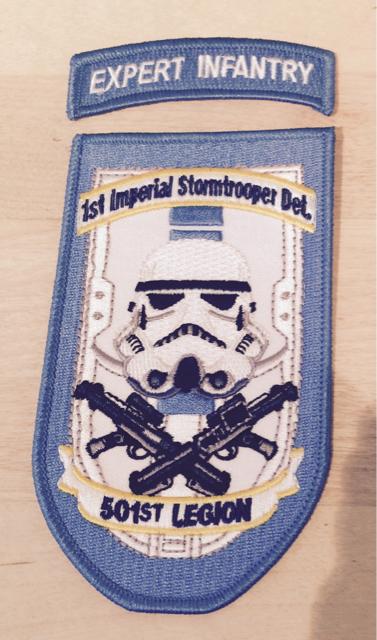
I gots one of deez !
SHINY !
UUUU ! and my name over there on the left of this page has an Expert Infantry thingy on it too....
You get all kinds of goodies in this club!

-
2
-
-
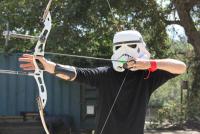
Russell Rucker 20017 EIB LETTER
Thank you!!
Sent from my iPhone using Tapatalk
-
"If someone forced me to comment on something...... It would be to first get some matching paint for your house so the repairs match....."
Yea, thats a wee bit embarrassing there! Thats 3yr old pink paint on 25yr old pink paint.
I didn't really want to do my EIB application against a PINK background....but what the heck, their not looking at the background really ....uhhhh wait.....yes they are!
-
Yea after I repaint the house! Thanks!
Sent from my iPhone using Tapatalk
-
I am humbled, thank you. I am proud to be part of such a group. Without the information and watchful eyes of others here this build would not have happened! Thank you all and a special thank you to Tony for all your comments!
Sent from my iPhone using Tapatalk
-
Photos! Put up photos!! I guarantee that you will receive nothing but good help and suggestions. No one is here to slap anyone down for a mistake or skill level.
Hey I glued my thermal detonator on upside down and didn't even know it until I posted here and someone helpfully guided me in the right way !
It's all good brother!
Sent from my iPhone using Tapatalk
-
Just how many builds do you have going on!!

Sent from my iPhone using Tapatalk
-
"It willlll beeeee..... Hmm, it willlllllllll beeeee ...
Sent from my iPhone using Tapatalk
-
1
-
-
Thank you all! I will put up those photos this evening (not needed for EIB?) I have them in my camera.
Sent from my iPhone using Tapatalk
-
Put up my EIB application this evening.
http://www.whitearmor.net/forum/topic/32206-tk-20017-requesting-anh-stunt-eib-status-ata/
Wish me luck!
-
Name = Russell Rucker
ID = TK 20017
FISD Name = russellr2d2
Garrison = Southern California Garrison
Armor = ATA
Helmet= ATA-hand painted details with Trooper bay stencils
Blaster= Doopy’s full resin, built by me
Height = 5' 11''
Weight = 175lbs
Boots = TK Boots
Canvas belt = Tkettell
Neck Seal =Darmin
Holster = Darman
Electronics = I have an Aker amp with a ipod nano for TK radio chatter, Eco fans in the helmet (whew!)
Full body front:

Full body back:

Full right side:

Full left side:

Right side detail:

Left side detail:

Close right side

Close left side:

Helmet front:

helmet left side:

helmet right side:

Helmet back:

Hovi tip detail:

Spooky lens color!

S-trim:

Accessory Photos:
Full belt:

Belt attachments/holster:

Boxes back:

Boxes side view:

No return edges on forearms:

Neck seal:

Rubber hand covers on black rubber gloves (Trooperbay)

Scruffy nerfherder boots:

Blaster:

Blaster:

Blaster front:

D-ring:

TD:

TD:

TD:

ACTION SHOT !

Interior strapping:

White shoulder straps:

White elastics on shoulder bridges (crooked because I am no IN my armor here)

Side notch cut outs-right:

Side notch cut out left:

3 white rivets on left side:

Right side "snap to nowhere"

Ab detail:

Knee plate attachment:

Knee plate attachment-2

Ammo pack rivet:

Cod details:

THANK YOU SHOT!

THANK YOU!!!
-
1
-
-
Yea I really doubt you "ruined them". They probably just need some work. Put up photos of them detailing what you think is wrong with them and I bet some people here can give you sound advice.
SLOW DOWN.... When you build use the score and snap technique and then sand down to your final line. Do not use a Dremel tool to cut out pieces it us not accurate enough. Do more research on your armor in the above threads.
Breath...... Slow .... Measure twice cut once.
You WILL be a Stormtrooper!
Sent from my iPhone using Tapatalk
-
1
-
-
Please enable me for 501st access ( I am applying to EIB status).
http://www.501st.com/members/displaymemberdetails.php?userID=18929
Thank you!
Russell
TK20017
-
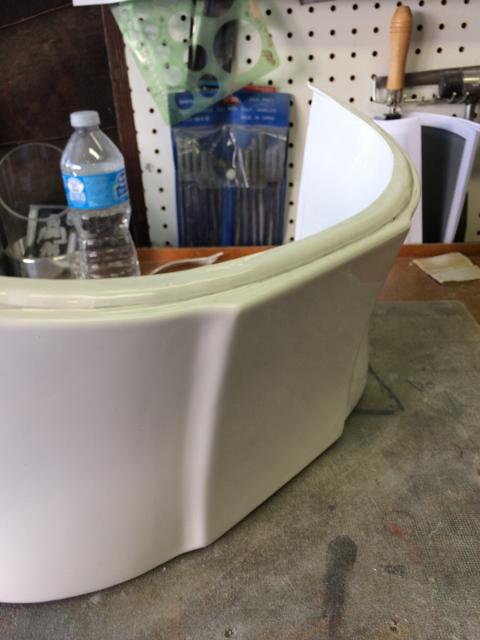
HEAT BENDING AGAIN...
I have never liked how the fronts of the butt plate splay out away from the hips. One of those things that bugs me looking at my armor.
Here is a big enlargement of the offending flap. It just looks ill-fitting to me.

So out comes my 8qrt pot. NOT BOILING WATER! Just very hot about to start steaming is enough. It makes the plastic too hot to handle but the water is not boiling hot.
Others have melted their armor with this hot water bending idea. Beeeee careful!

To prepare the butt plate I tapped the two ends together way tighter than I wanted. The plastic will only take part of the bend and bounce back.
I want the two flap ends to push against my hips while wearing it and not be splayed out as in the photo above.

Into the very hot water! I leave it in for about 5 seconds is all. Then run over to the sink and run cold water over it while bending in each side at the very ends of the flaps.
I want it to really curve in at the ends and hug my hips.

Here is the "after" shot. A slight kink in the return edge shows where I really bent it over.

Now the measurement is just about 13.5"" When new it was much more.

I tried to open up the bottom of my right thigh too but, I was not very successful. It is too thick down here.
I may have gotten just a little more of an opening. I wanted to do this because it is so hard to get the boot into the bottom of the shin.
The shin is way too tight.

I didn't make a before measurement but I think it's maybe 1/4" wider now.
I heated just the bottom flaps for about 10sec at a time and pulled the flaps apart to try to bend the very ends
to make a wider ankle opening. This should make it easier to stuff my boot up inside the bottom of the shin.
The left shin is very wide compared to this one and not trouble.

-
1
-
-
Another masterpiece on it way!

-
1
-
-
COOL! I LOVE Dremel tools. Everybody should have one. My Dremel has saved me during changing out a kitchen faucet by cutting off the under sink parts that were rusted up.
How does that cutting blade work on plastic. I would imagine it does not melt the plastic like a cut off wheel does.
HAVE FUN!
-
Make sure your armor is wiped down with a baby wipe or anti bacterial wipe, then completely dry before storing in plastic bag. Plastic bags make great incubator's for the bacteria that comes off in sweat. Bacteria + ABS/PVC + Incubator = Mold/Mildew

Will do! Waxed, and cleaned the entire armor. Let it stay dry overnight and this evening I packed everything into a new duffel bag I finally got off ebay.
Its huge!! 48" x 20" almost too big to carry around but OK. A big plastic bin will not go into my tiny Ford Fiesta.
My entire armor kit fits, even my helmet in a helmet bag and my boots in their original box. My blaster gets wrapped up in a thick towel.
I added the rubber badge. kinda of crappy shoulder and carry straps though, but only $30 ! Free shipping-ebay.
I think a sheet of foam core or thin wood to keep the middle from sagging while I carry it may be in order. To give it a firm floor inside.

-
Some of the "damage" from my first troop. Looks like the ink from the sharpie I use to color stitches in my body suit comes out onto the plastic.
I had this on the edges around here and there....weeeee don't need to go into EXACTLY where !
Below is the inside on one thigh.

I bought some of this at Walmart it was like $1.99 so what the heck. It has UV protection. Takes a few minutes to dry but once it does the cloudy shine turns to a hard shine.
Getting all paranoid about the plastic yellowing.
I think it actually might be oxygen not UV rays that turn it yellow. Just a theory.
I am going to start storing my armor in plastic trash bags, might help??? Less exposure to the air.

-
SWAG !!!
Go on a first troop and collect/buy cool stuff.
Ralf Garcia TI-8616 TIE Pilot set me up with ten stickers he is selling on the SCG boards. He also threw in a set of nice stickers for a "happy first troop" ! Thanks Ralf !

BACK TO BUILDING !!! ( "Say what!?? I thought you were finished!" )
EIB & Centurion were always my goal, so here are the correct rubber gloves and hand guards (Trooperbay!).
This is how I glued them on...
Cleaned them and the gloves up with acetone. Acetone takes off oils well. Make sure the material is safe with acetone....it likes to eat stuff.
The hand guards and gloves are fine with it ( I am using gloves from OSH hardware and hand guards from Trooperbay....others may melt with acetone).

CA glue and some weight....but wait !!! These is more to the gluing!

You gotta get the guard down on the glove with no wrinkles in the glove. I figured that if I glued down one side then the other as I stretched the glove I could get the guard down and sealed at the edges with no winkles in the glove under it.
So first I glued one half of it down and let it set as above. then I put on the glove and made sure there were no winkles in the glove under the guard. Then I glued down that side as I wore the glove. I held it down on the edges with my other hand until the glue had set.


If there were any open gaps I could squirt in a little CA glue and wipe off the excess before it dried. Clean up with acetone.
Note no winkles coming out from under the rubber guard.


ATA Armor Build_My First TK
in Build Threads Requireing Maintenance
Posted · Edited by russellr2d2
A BIG FIX!
I was noticing how my left side hinge was opening up at the bottom and generally becoming wider and wider. I wanted to make a better connection here to clean things up.
Opening up split rivets is hard! You need to get under the tang and lift it up.
Then you can start squeezing with pliers and working away at em'. One had to be cut off because it
would not bend the way I wanted.
Here is the webbing hinge. The holes have become elongated allowing the parts to open up and be crooked.
This is what I want to replace the fabric hinge with. This is a sheet of rubber I stole from the bottom drawer of my tool chest.
I think the ribbed design will be perfect for bending in only one direction.
Flexible in the right direction and the holes will stay round.
The other side .
I like to add plastic plates to cover the rubber. They are glued to the rubber. E6000 is perfect.
The finished hinge. Tight and straight in line. New rivets put in and painted white.
Order your rivets before starting this.
I will troop with this for a while and report back on how it is working.