

Silverback73
-
Posts
68 -
Joined
-
Last visited
Content Type
Profiles
Forums
Gallery
Articles
Media Demo
Posts posted by Silverback73
-
-
1 hour ago, Chemi said:
Great work Josh
 . I am sure that you will be one of the 500!!!
Thank you very much, my friend!!!
-
Just got a chance to take pics with the fixes in place. Hoping these will make it happen? (crosses fingers)
")


-
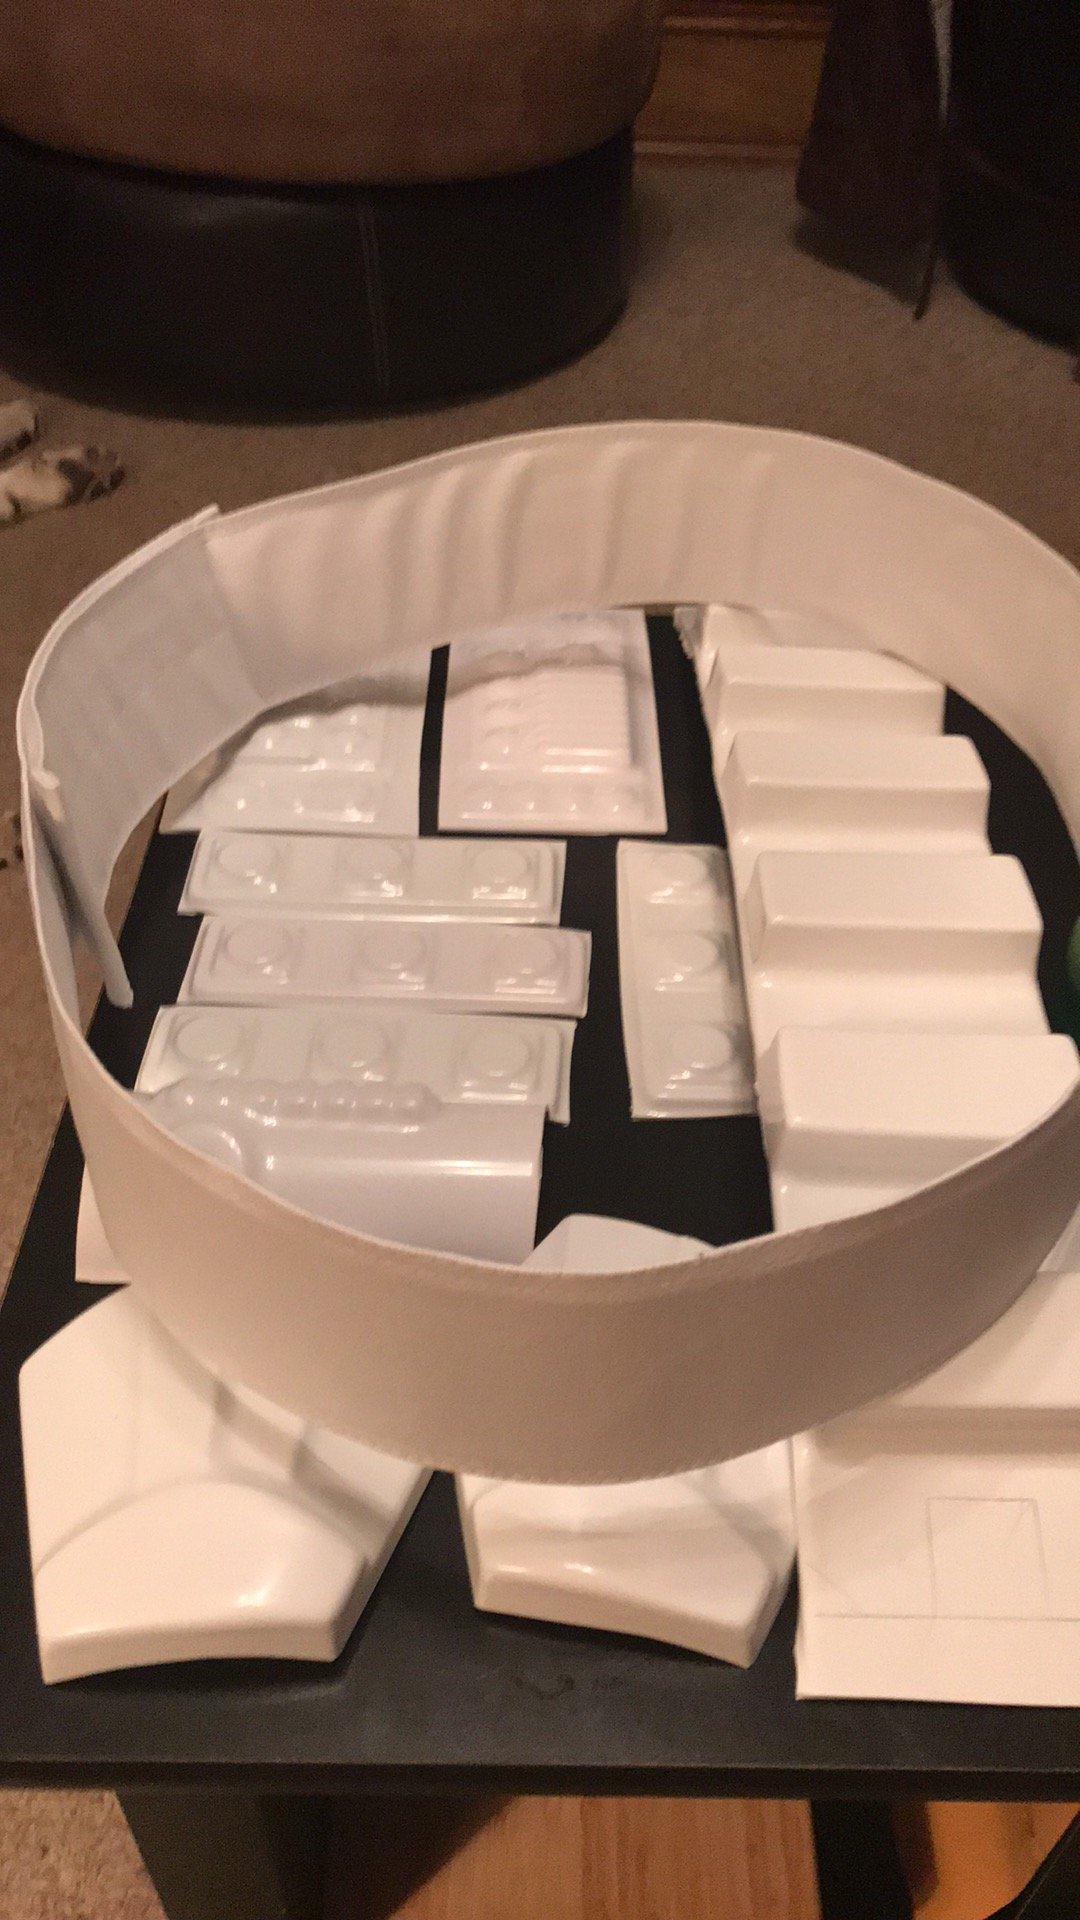
Happy New Year's to you all!!! I apologize for the delay with updating. Took a week off and stopped to smell the roses. I've done the 45's on the ammo belt, in hopes to comply with the suggested fixes. I believe this is the final step on my road to reparations? Here are some pictures of the completed belt rebuild.


As always, I appreciate the time and energy you contribute, towards my application! I look forward to seeing your feedback, and await any instructions I will need to follow in hopes of obtaining the Centurion rank. Thank You!!!
-
 2
2
-
-
Okay gents!!! I've made some progress and hit another stopping point. First the progression part:

Ab button plates have been secured in place and I believe they are now up to the standard.
Next I have been racking my brain all week long trying to recall the steps i took with the belt building process. I also had a little chat about it with my Sensai. Decided I needed a second set of hands as well and knocked out the belt for the most part. It is so much nicer than the old one now.

Now we get to the next hurdle and this is where I'll need your expert advice before I can move forward with confidence. I need to do the 45's on the ammo belt, but it looks like the 45's are going to be tiny with the small area I have to work with. I'm not quite sure how far into the belt I can go before I hit the "too much" area, and I'd like to forego ordering another one

The canvas belt is 3 inches and the ammo belt is 3-3/8 inches.

I dug a little bit and found the information that I had followed instructions on, for the first belt I'd made. I believe them to be outdated at this point, or perhaps for basic approval, since this was one of the areas that was needing a correction.

Thank you again for your time and energy in helping me look the best I can!
-
1
-
-
13 hours ago, TKSpartan said:
ah ok, I just would add be sure let then with square corners, not rounded.
some references


Alright brother, I spent a little time getting the button covers squared up, as you instructed. Will use a finer grit to knock down the roughness, next. I'm feeling good with where they are but will proceed with glue, once I get your blessing.

I have them taped in place for now. Thank You!!

-
1
-
-
That I can do and will fix it next. Appreciate that!!
-
1
-
-
38 minutes ago, TKSpartan said:
Hi Josh, great idea.! If i can make a suggestion, before gluing, could you please post a photo of the final result and the final position?
keep on doing a great work Trooper!

Thank you for the suggestion. I do believe it is in the correct place where it should be. I put tape on the back to get it to sit in that spot. If there is anything else you can suggest, I’m all ears and would greatly appreciate it!
-
So the button plate for the small side, unfortunately, isn't going to match up and look proper. I discovered this after I got it trimmed and sanded.

Not to worry as I've got an idea I hope you will appreciate?

I thought I could recycle the one from the other side and got it cut and sanded. I will await your suggestion on it before I glue it, as I think it needs to be a little bit slimmer.

I broke out the belt sander and got it to this point. Hopefully I'm close and this is an acceptable fix to my situation?
Next I need some input on the bigger ab plate before I glue it on. I will also await your input for this one so I can get it right the first attempt on reparatrions.


I must admit that I thought I was gonna pop when I got out the Dremel for the next photos, but I survived it. LOL


My apologies, as the pics are a bit out of order, but I was anxious to get some progress shown in hopes of getting any direction I need at this point to move forward.
The belt rebuild will be the next part I will be working on, but I need to do a little remembering, as well as some homework on it before I dive in. It's been about 5 years since i assembled the one that is not up to snuff. I may need to purchase some supplies if I am unable to reuse the things I have on hand in the garage. Rivets may be the only thing I'll need off the top of my head? The steel ones are preferable, over the aluminum type.
Looking forward to your response so I may continue with forward progress. Thank you very much for your time and energy!
-
1
-
-
13 hours ago, justjoseph63 said:
Take your time, look at the reference pics and post up photos if you have any questions (before cutting or attaching anything).
")
I dove into it this afternoon and got some good progress in. Ammo belt needs a light sanding with high grit to smoothen it out on the inside. Ab button plates are cut and I removed the center area on the old one. Might need to take a little more off the edges of the plate, but will see what you think about it first. Will get some pics up ASAP
Thank you again!!!
-
Just now, Silverback73 said:
Hello brother!
I got the canvas belt and plastic pieces Saturday and haven’t had any time to hop to it. I do plan on seeing what I can get done this afternoon. Trying to determine where I can cut and what the best way to attack the issues is.
-
1
-
-
1 hour ago, justjoseph63 said:
Any updates, Josh? I'm looking forward to seeing the new pics!
Hello brother!
I got the canvas belt and plastic pieces Saturday and haven’t had any time to hop to it. I do plan on seeing what I can get done this afternoon. Trying to determine where I can cut and what the best way to attack the issues is. -
On 11/29/2020 at 5:17 AM, justjoseph63 said:
AWESOME news, brother!
 I know having to get new armor pieces is a pain (believe me). My first kit was the old AM style from years ago and I had to replace the chest, kidney and butt plate for Level 3 (along with a lot of other fixes) so I feel your pain... it'll be worth it, though.
Looking forward to seeing the new photos and as always, if we can be of any help, just ask!
Hello Brother!! Finally got a minute to hop on the PC and get a few pics of the happenings. It's all gonna come together, just a little bit of time and a bit of effort. I'll address the first fix I was able to make which was the frown extending outside the proper area. Big smile here, and it admittedly looks much better than what I submitted initially.

Hopefully that takes care of this issue?
Next is the Hengstler counter. I believe the angle of the photos of it are to blame and it is a non-issue? If not I am happy to make the adjustment to correct it.


Next I took your suggestion on the Ammo belt, although I wasn't 100% positive there would be enough area to pull it up to snuff. I failed on the cut (as I am out of practice) and have to get a new one. lol

YEEEEOOWCH!!!! yeah, that was a tough reminder. I used E6000 on all of my build, so into the freezer it went. I've disassembled it, without anything breaking.

I did get in contact with Pandatrooper and the parts have shipped out this afternoon. I did also order a new canvas belt from Kittell (Imperial Issue) and it is on the way as well. Its now just a little bit of a wait, until the parts arrive, and I can begin a complete belt rebuild.

Will I need to retake all the photos again, once it is assembled, or how would you prefer it to be?
Thank you once more for your patience and guidance on my march towards Centurion!
-
1
-
-
On 11/24/2020 at 6:42 AM, justjoseph63 said:
Hi Josh. and thank you for your submission for Centurion! Our apologies for the delay, but there are several items that will need to be addressed before we can get that badge under you name, trooper. While some items below may not be specifically mentioned in the CRL, it does state that we "....must consider both text and pictures (CRL and reference) when reviewing" a set of armor.
First up, we need you to remove some of the paint on the lower "teeth". As per Basic requirement: "Paint shall not leave the teeth area". Easy fix!'
Reference images


Since this RT MOD kit was made before 2018 when they updated the bucks (molds), the ab button plates are integrated into the actual ab. This is one of the reasons they updated them, as the plates must be separate pieces. (Super nice pint job on the buttons, by the way)!
Reference images


Not to worry, this is not only possible to fix, but has been done before as seen in the first image below. You should be able to get a set of replacement plates from RT MOD, so it would just be a matter of carefully cutting out the centers, trimming the new ones and gluing them on.
RT MOD Centurion from 2016 showing fix


The next few concern your ABS/canvas belt. As per the CRL for level 3, "The corners of the plastic ammo belt shall be trimmed at a 45 degree angle that meets the outer edge of the cloth belt".
It looks like the corners were trimmed a bit too much, sad to say.
Reference images


At this point you have a 2 options.. you may be able to trim off the ends of the ABS belt a bit, as long as they don't come too close to the edge(s) of the button squares. Alternatively, you could purchase a new belt.

Last up in this area we have 2 concerns. The CRL for Centurion states that the "Canvas belt must be firm/sturdy in appearance. No creasing or sagging".
A large crease can be seen on the lower part that extends around the back (red arrow). The second issue is the staining (blue arrow). A few marks/scuffs are to be expected, but the color of the stains on each side are pretty prominent and a big contrast to the bright white above them.
Reference images


Finally, I gotta' say that is one of the sharpest looking blasters I have seen come through in a long time, but the Hengstler counter will need to be moved forward to where the rear lines up nearer the rear bolt of the folding stock. Removing the scope rail and re-positioning the mounting screws forward should do the trick.


We realize you have some work ahead of you, but none of these items are insurmountable and we feel confident that you can address these issues in fine style. Know that we are here to help or if you have any questions on your way to Centurion!
Thank you so much for making time for my review for centurion.
I have already corrected the frown issue so we can start smiling again soon. Blaster is a non issue and the fault lies in the photo angle. I believe the Counter is placed in the correct place. Will upload those photos when I’m near a PC and can access my Imgur account. (Silly cel phone)
Been in contact with RTMOD and I am waiting for cost of parts and shipping quote. A new ammo belt, button covers, and ab button covers will be obtained. In addition I gotta order a new belt from Kittell because the one that didn’t make the cut, has 5 years of troops on it and the inner parts that keep it firm have deteriorated. Yep, the whole thing is getting redone. I’m hopeful these fixes will not take very long, but I’ll get them corrected and knock this out of the park!!
-
4
-
-
2 hours ago, TKSpartan said:
Super Fast, Great!!! Added to the processing line . One of us will be with you shortly.
Thank you very much!
-
1
-
-
3 hours ago, RLH2515 said:
Wow! Way way way pickier since my approval. Good luck bro remember if you find pictures of on screen use them

Sent from my iPhone using TapatalkIt’s a right of passage.
-
Also, I just remembered the lenses have been replaced with the proper green.

-
1 hour ago, Silverback73 said:
Hello Mario
I have been at it for almost 8 hours on this submission, and I'm not the most savvy when it comes to Technology. It was almost 2 years ago that i submitted EIB and was done with a different format. I am at a loss as to how I can correct the issue. I am certainly ready and willing to right this so we can move forward with the application.
Thank you for bringing this to my attention.
I have corrected the photos as per your request. The issue was when I emailed the pictures and saved them it produced a copy adjacent to the original in my phone. I uploaded both pics of each, and went in to delete the smaller sizes, then was able to upload the photos to edit this post and hopefully it is righted for proper review. Thank you for your patience.
-
1
-
-
4 minutes ago, TKSpartan said:
Hi Josh .
Glad to see your Centurion APP, before we can start you review, there's Just one detail:
Could you please post the photos with a larger size? most of then are too short to see in detail. If you look at your EIB app, they have the correct size.
Thanks in advance Trooper .
Hello Mario
I have been at it for almost 8 hours on this submission, and I'm not the most savvy when it comes to Technology. It was almost 2 years ago that i submitted EIB and was done with a different format. I am at a loss as to how I can correct the issue. I am certainly ready and willing to right this so we can move forward with the application.
Thank you for bringing this to my attention.
-
Name: Josh "Silverback" Hopkins
TK ID: TK-20112
Forum Name: Silverback73
Garrison: Star Garrison
Armor Maker: RTMOD
Helmet Maker: RTMOD
Blaster Maker: DDay
Height/Weight: 5' 12" / 220lbs.
Boot Maker: TK Boots
Canvas belt supplier: Rob Kittell
Hand guard supplier: Sonnenschein
Neckseal maker: Veedox
Holster Maker: Darman


-
On 7/12/2018 at 3:13 AM, justjoseph63 said:
That actually works pretty well as it stiffens the glue. Just uses a sharp razor knife (very carefully, of course) and pry it off a bit at a time and you should be golden.
Surprisingly, I used no E6K on the end caps. Pried right off out of the deep freeze, no problems. Just haven't had a free minute to play. I need to rough up the heads on each screw and paint them black, prior to installation. SOON my friend, soon....
-
15 hours ago, justjoseph63 said:
Great to here, Josh! (Sounds like you have been busy)!
Took maybe an hour? Think I'm gonna need to freeze the detonator to pry it apart??? LOL
-
Hello everyone!!!
Fixed the ears, vocoder has been repainted, and belt has been raised. Will knock out Thermal Detonator this weekend. Someone was awesome and sent me the proper screws!
 Last piece I'm waiting for are a truer green set of lenses. I'll be applying for Centurion very soon!!!
 -
1
-
-
WOW!!!!
 I feel honored and appreciate the welcome to the next level!!! THANK YOU!!!
Time to get the rest of these fixes underway. Think it's only natural to reach for Centurion
-
3
-
-
On 6/25/2018 at 2:41 PM, justjoseph63 said:
I thought it was just me. Are those gray lenses by any chance?
Lenses are dark green. I have the other green on order.
-
1
-
We Did It Centurion #500
in Announcements
Posted
I’m so proud to have joined the ranks!! T-minus 8 and counting down!!!