


fueledbychar
-
Posts
43 -
Joined
-
Last visited
Content Type
Profiles
Forums
Gallery
Articles
Media Demo
Posts posted by fueledbychar
-
-
My suggestion would be hard luggage since its thinner. Other than that those 18 gallon storage tubs.
-
Aha. So your email ends in @msn.com. It seems your mail server has our mail server on a block list. Microsoft thinks mail from our server is spam. It isn't even reaching your spam folder but the server is just plain rejecting the connection from FISD from the get go. I'll look into seeing how to get off their block list... wish me luck with that

A quick alternative is to use gmail or something instead.
-Eric
I am having the same issue but mine is to a gmail.
-
Charlene, in case you are talking about the thin area behind the hovi mic tips, there is a common mod to fix this by adding a little cloth piece, soaked with CA glue.
This is exactly where I am talking about. One side seems to be a little stronger than the other and would love to strengthen it up. Can someone point to a thread where this was done or can I just wing this one?
-
Guys? Anyone? Still not getting emails...
Im not getting them either.
-
Post a pic of the seal when it's done!
will do when i get out of work
-
Magnets. I always forget about magnets.
I do too. That is why its the last thing I did but should have been first lol.
-
SO this may be a dumb question but here it is anyways.
If a helmet (not from anovos) has just a thin area but most of the helmet is solid, would it be ok to do this dip/cloth method only in that area, or all around to just keep it even?
-
Ok, made another - much happier with this one, but still not 100%<br><br>
Tried to conceal as much as possible. Might still need a little cover material, but gap does shrink when worn.<br><br>
I have the same problem with mine. I am going to add a bit of fabric to the ends. I tried everything I could think of hook and eye, velcro on the edge. The only thing I am going to try before sewing on fabric is magnets. That may help keep it flush. If not, fabric is an easy fix.
-
I ended up getting one from a gentleman on here for a good price that looks well. Thank you all
-
You saw Joe's list right? http://www.whitearmor.net/forum/topic/31404-supply-list-for-your-tk-build/
No i didnt. When you type in stuff to the search, the results are not very good. It doesn't bring up stuff like this.
**Edited for english.
-
 1
1
-
-
Well done this will be helpful for a lot of troopers. I had to dig the crap out of these forums even after I had what I thought was "all" of my tools lol. Keep it up!
Thank you! Yeah I haven't really noticed a big list like this so I am trying to help people get a grasp of what its going to cost just for the supplies, and what work that goes into this.
It's totally worth it, but but maybe it will help curb the shock and awe of what really goes into this.
Ill be posting some videos tonight of my trimming.
-
-
On 1/27/2016 at 9:42 AM, Fivezero said:
Hey Josh! This is the same Ty you've been poking about this build, can't wait to see your progress!!

And here's the first Force Unleashed - Shadow Stormtrooper (mid-build) for everyone else.
--------------
Fivezero
This is awesome. Do you have a build thread for yours?
-
Looks like the only tools/supplies you left out are (1) rare earth magnets for securely holding down the long seams while your E6000 is curing, (2) blue painter's tape for dry-fitting your armor pieces BEFORE you glue, and (3) a good pencil for marking cut lines.
Good Call! Will update my list now. Thank you!
-
I've always liked the Shadow Trooper... just be prepared to have everyone call you Darth Vader! I know the Tie Pilots get that a lot. Ive heard Imperial Gunners get called Vader too! LOL!
Looking forward to the build progress.
I've heard it done a few times too! lol Its funny. Great thing about a bucket they cant heard me laugh. That was my biggest problem as an officer, I smile too much.
-
1
-
-
Hey everyone. I know there is the "Other 501st" area but that area doesn't get a ton of love and I would like to get feedback from as many people as possible here. Also, I wanted to put what I had done here on the boards since it could help any new Stormtrooper since they are so similar. Let me know if I left anything out!
______________________________________________________________________________________________
Since my armor just got in, I will do my best to post as many pictures and videos as possible to show progress and help any other super new person as I can. I will even list out tips/tricks I have found.Step 1: Prepping for your armor.
I HIGHLY recommend buying all your tools and supplies prior to your armor arriving. Otherwise, you are super excited for your armor and cannot do anything with it. A tip, AMAZON PRIME IS YOUR FRIEND! I found a lot of craft stores in my area were expensive. Luckily, I wanted to be over prepared and bought the following supplies.... (I'll add pricing so people can know what my build ran to get an idea)
1.) 1 inch Black Elastic on Amazon - $3.49 each (I bought 3)
2.) Heavy Duty Black Snaps and Snap Fastener Pliers - $20
3.) E6000 Craft Adhesive 3.7oz - $7
4.) Clamp Assortments - $12
5.) 1 inch Black Industrial Velcro 10 ft. - $12 ( I bought 2)
6.) Google Mirror Replacement Lens - $5-$30 (depending where you find this.)
7.) Compression Shirt - $8
8.) Compression Pants - $11
9.) Fake e-11 prop for photos -$14 (this is not mandatory, I am just cheap and wanted a prop)
10.) Helmet bag - $15 -$20 (depending where you find this)
11.) 50 ft. Extension cord - $12 (This is helpful if you are attending armor parties, or live in an apt and need to work outside)
12.) Stainless Steel Ruler with cork back - $4
13.) 1 inch Black Nylon 10 yards -$4
14.) Variety Pack of sandpaper -$7
15.) Supplies for neck seal - $5 -$50 (Depends if you can make your own or not)
16.) CA Glue - $10
17.) Plastic Cutting Scissors- $10
18.) Exacto Knife - $5
19.) Rare Earth Magnets- $15
20.) Painters Tape- $8
Total for supplies: $187.49 - $250.49
Then I had to buy additional items that do not come with my kit or tools so I could properly cut/trim my armor
1.) Holster - $20-$75 (depends where you purchase or make)
2.) 50 Gallon Mobile Chest to store and transport armor - $65
3.) Dremel- $50-$70
4.) Dremel Accessories - $25
5.) Fabric/materials to assemble how the armor hangs on to your upper body/ thighs - $10-$60 (depends if you make it or buy it)
6.) Boots - $40 - $100 (Depends where you can find them)
7.) Nomex Gloves - $10-$30 (Depends where you can find them)
Total for additional armor support and tools: $220 - $425
So far a grand total of $407.49 - $675.49 can be reached just for supplies if you are starting from scratch.
______________________________________________________________________________________
Step 2: Armor!
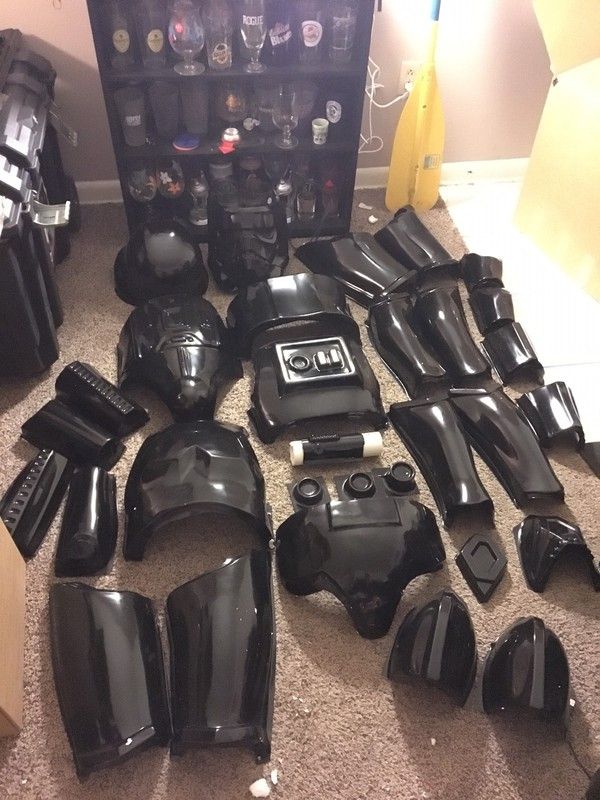
When your brown box arrives, do a little dance and rejoice. Take a ton of pictures and get your mind right for trimming. Don't be afraid to cut before you can get to an armor party. I was at first, but when you get your kit its pretty obvious where you can cut most extra material off so do that to prep. If you are really worried wait till an armor party or call someone who can walk you through it.
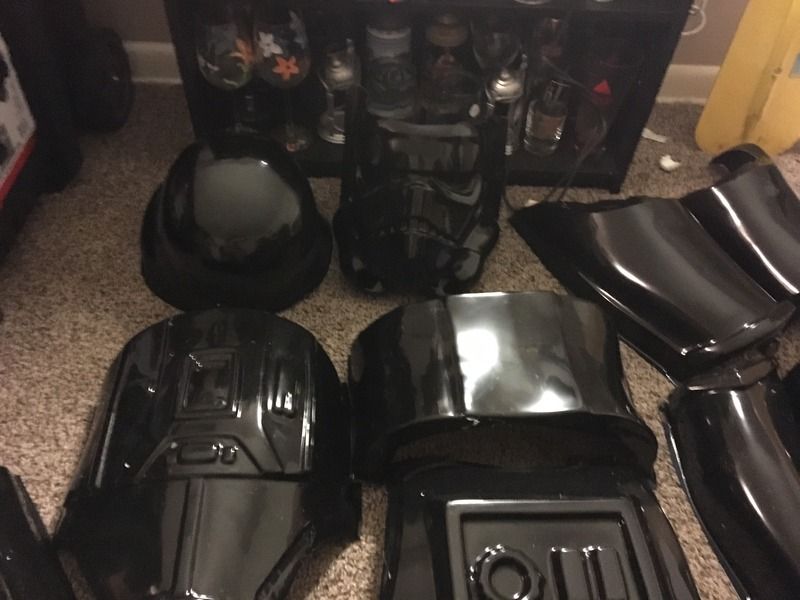
I recommend laying out all your armor and tackling it in sections.
-
2
-
-
Brilliant, thanks for that, may be the route I go as (like you say) it looks really cleans.<br><br>
I've seen shadow stormtroopers with a white imperial cog on the left hand side of the chest that looks awesome, but this is on the new battlefront game so I'm guessing not canon
You can get a cling on decal or vinyl decals and wear it to non LFL/Disney/High Level troops or just for fun some days.
-
Hey everyone. I tried to find a topic for TX lenses but the only one I saw was from 2009. <br><br>
I am looking for the mirrored lenses... Someone recommend motorcycle goggle replacement lens but wanted to see if anyone else had something. <br><br>
Any help is appreciated.
-
So I attempted this and its not bad. I have extra material and may try a second one. I actually did this for $5 at Walmart since home depot stopped selling it around me and it was not available online.
Little background on mine. I actually took card stock and kept it rounded for a day or so. Then I sewed fabric around it to it was nice and stiff yet soft. I then hot glued the strips down to the fabric. I then ran a light stitch (by hand) from the card/fabric through the tube just to make sure it was fastened. **If I attempt a second one, I will use an epoxy or cement glue just so I wouldn't have to run the stitch. ***
The adhesive the tubing/stripping comes with is strong, but with sweat and heat (I am in Florida) I am not sure would hold up that is why I added the hot glue and stitch to just make sure I wont get separation between the fabric and the tubing.
Then once that was done, I added Velcro to the fabric that extended past the tubing as well as the opposite side to the end of the tubing on the other end. This works really well but I will warn you the end (no matter what you do) sticks up slightly. I am thinking of adding a hook and round clasp to help keep it down and add fabric to the ends to help conceal this.
All I need to do is sew the part that tucks into the shirt and I will be good to go. I purposely left this off for me personally because I was debating using a turtle neck compression shirt but opted to go the regular route.
**One other note. If your tubing comes with a little indent it it or crease which you can see in my pictures. I just had a heat gun and ran it over a few times while I held the neck seal circular, took the indents right out. Should have taken a photo of after but I didn't plan on posting this until today.
All in all really awesome. I will post better "in progress pics" for the next one I do. Thank you so much for posting this, you saved me $45 bucks.
-----------
-
1
-
-
If you're going for total accuracy, I recommend rubber chemical (dish washing) gloves. You can find them for $5 at the hardware store. Wear cheap cotton winter gloves underneath, or you'll be bathing in sweat. An often recommended alternative to rubber gloves are "nomex flight gloves."
I saw the flight gloves, but the color almost looked grey for the black. Does any one have a picture of the black? I get hot very easily so I want to keep the layers or thickness to a minimum. (Says the girl who chose black armor and lives in florida) ahah
-
I've used these for my boots when I had a TX
I actually just bought the same pair but in black leather not the patent leather. I got them brand new for $30 bucks so I will just polish to give them a shine and I should be good to go.
-
By the way, I thought about this more, and it doesn't even have to be extra cloth of the shirt. You could attach additional cloth to extend the sleeve with the velcro. Or you could even just sew on a velcro strip onto the overlap area. I'm not sure which way would work better, but either way you wouldn't need a bigger shirt then.
This is awesome addition to what he created. Will definitely try this.
-
Hello everyone, I am new to the armor scene since I used to be an officer. I have just bought one of Walt's shadow stormtrooper kits. I have heard good things about his stuff.
Can anyone on here help me with some items?
This is a post I currently have up in special ops but may get more answers here since its much more active.
THANK YOU.
I am looking to get my boots and gloves purchased for my TX. I have linked below some items I have found. Would any of these work? How long does one recommend the gloves go? Thank you for any help!
Boots:
http://www.ebay.com/...Uw5Txd1oxtOx30w
http://www.ebay.com/...gWKCtGrdHITIAYQ
http://www.ebay.com/itm/Smoky-Mountain-Leather-Jodphur-Riding-Boot-Black-Womens-Size-8-Youth-Size-6/121835933126?_trksid=p5411.c100167.m2940&_trkparms=aid%3D222007%26algo%3DSIC.MBE%26ao%3D1%26asc%3D20140131123730%26meid%3D20a3679dfac94378beffc1d56bdff4af%26pid%3D100167%26rk%3D1%26rkt%3D1%26sd%3D121846547375 -
I am on the special ops board but its not very active due to a small group can I utilize this forum as well to help me since the TX and TK are very similar just black vs. white?
I am looking for some help but do not want to anger the mods.
Thank you

Hello all from Tampa, FL Starting a TD
in New Member Introductions Archive
Posted
So glad you are busy at work today