

tkrestonva
-
Posts
5,265 -
Joined
-
Last visited
-
Days Won
4
Content Type
Profiles
Forums
Gallery
Articles
Media Demo
Posts posted by tkrestonva
-
-
I have an RT-Mod bucket with Stomper's HoviMix aerator speakers, they work perfectly with the WalMart voice changer. I'd never sodered or rewired anything before, but Smitty's diagram and instructions made easy work of it. I have the AA battery pack positioned behind the vocoder with the circuit board glued to it. I'll get some pics up in a day or two. Being able to ditch the AA battery pack for a single 9V battery would be a great space saver.
I don't have fans installed, if you can find a way to stuff fans in there along with the voice changer I'd like to know about it. As is, my RT bucket is a very snug fit.
-
Yes, that is U.S. Space Shuttle Enterprise. It never flew in space, but is was instrumental in proving that the "flying brick" that is the Space Shuttle could actually be piloted to a safe, aircraft-like landing.
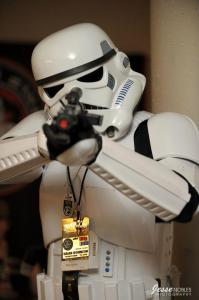
This event was a blast! Tiring, but a blast. Thousands of fans of every age, including lots of kids in Star Wars costumes (including a 3-year old wearing a pretty good-looking TK, gotta find that picture), and you couldn't ask for a better setting for a Halloween troop than the National Air & Space Museum. I got called a clone a number of times, but I guess that's to be expected.

My only regret is I didn't get to see nearly as much of the museum as I wanted, as I couldn't go a few feet without a line forming for pictures. Of course that was nothing compared to the line of fans wanting pictures with Vader, it actually looked a lot like the line one would expect for photos with the mall Santa during the holidays. Vader Claus, maybe?

As a bonus, I got to field-test my newly-modded Elite costume. I need to make some tweaks here and there, but overall it worked out pretty good. Submission pics soon!
-
Wow, I'd been racking my brain trying to figure out how to keep the thigh pieces together while the glue dried. Magnets - brilliant!
I love the shiny paint job! I know a lot of troopers frown on a TK that's too clean, but I like the look. Gotta go polish my armor now, I have a huge troop tomorrow and a bunch of fans to blind with my dazzling white armor.

Keep up the good work.
-
What's the marking on the TK's left shoulder? I recognize the Imperial cog, but what's the rest?
-
You're the first I've seen to go with the grappling hook and comlink instead of the thermal detonator, awesome!
Should the hook & box be closer to the center of the back?
There are several closeups you'll need, for example the helmet's lenses and mic tips.
-
As Kris said above, we are everywhere.
Man, that's pretty ominous sounding, if I weren't already a stormtrooper I'd be getting a cold chill right now.
-
Yeah I live in Madison, WI, and 5'10" 155 lbs. Not the biggest guy, but I hope there would be something out there for me. I can't say how much I appreciate all the help yall have given thus far, you guys rock.
-Phil
Perfect size for TE2!
-
Welcome.
It looks like you've stumbled on a pretty good find there, no doubt you'll eventually make it shine. Lots of good info here on how to bring the costume back up to speed. Don't bother building the FX helmet, just go get yourself an MRCE.
Good luck & keep us posted.
-
Nice job Kevin, it's a fun and fulfilling hobby we have here.
After each troop you learn something new about how your costume needs to be tweaked, adjusted, etc. It takes a while to totally shake it out, and trooping your living room just doesn't do it. For example, at my first troop my belt constantly popped open, among other things. Now, several troops and adjustments later, you practically need a crowbar to get it off.
-
In addition to your height, how much do you weigh, and how would you describe your build (skinny, muscular, chunky, etc.)? That'll determine to a rough degree what type of TK armor might suit you best.
-
The idea is to use a heat source to soften the plastic just enough to allow you to slightly reshape it. Frankly I'd be suprised if a blow dryer actually got hot enough to do the job, but then again I don't use blow dryers. You could use a heat gun like the type used for removing paint, or a no-cost alternative is to dip the shoulder bell in boiling water long enough for it to soften enough (but not too long) for reshaping.
-
Armor Details
Must meet all the requirements of the base armor.
Holster is worn on the left
Holster must be attached to the belt from behind instead with no loops covering the outside of the belt
Nothing in the ANH Elite standard that dictates that the holster will be attached with 2 rivets if doing Stunt, or for that matter 4 rivets for Hero. 2 for stunt vs 4 for hero is screen-accurate, but not explicity called out in the requirements so I can't see how you would be ruled ineligible.
-
Looking good there Thayne!
You just need to start getting the other TKs in your garrison to change out those FX buckets and get their Elite mods done . . .

-
As has been said, it looks like you're the first here at FISD to make the Rubies Supreme plunge.
Pictures of your costume are the first step. Also, I highly recommend making contact with your local 501st garrison, they'll be able to examine your costume up close and offer some assistance on how to improve it in terms of form and fit.
-
I don't know which kit you have, but for my FX I opted for the canvas-covered belt, vice straight canvas. I'm sure I'm in the minority with my choice.
Both are acceptable for Elite, but even though canvas-covered isn't screen-accurate, I like it because it provides more support and an unlimited number of attach points for TK gear.
-
That's exactly how I attached my holster, and for the same reason. Makes the belt more compact and easier to pack if the holster can be easily attached & removed. The fact that the snaps were similar in both size and appearance to Luke's belt was a unexpected bonus.
 You can get the snaps at Michaels or some other craft store.
Details are in the thread below:
--------
-
Cool, another reference resource.
-
Man, that was cheesy.
On the up side, the stormtroopers looked GREAT! Were those all tour suits?
-
Welcome.
Be sure to register at the Garrison Tyranus board, Virginia's 501st garrison. We have a handful of members that live in the Roanoke area, at least one is a TK and is active here at FISD.
Have you been to Shevacon?
-
Welcome.
The only advice I can give is take your time and do it right.
You have lots of great resources available to you here.
Welcome.
Read, read, and read some more. Most of the questions you will have have already been answered, some of them multiple times.
-
Interesting experiences many of you have had with kids, but I've had the opposite. I've never had any child attempt to walk away with a piece of my armor or attempt any aggressive behavior. Perhaps its because every time I've dealt with a child, the parent was never more than a few steps away. Further, many kids were so afraid of me that their parents had to literally drag them in my direction for a photo opportunity.
Teenagers, on the other hand, . . .


Since my primary weapon is my DLT-19 and I typically keep my E-11 holstered on troops, I've allowed them to pose with the E-11 for an "action photo" with a stormtrooper. Helps break the ice, and never had anyone try to walk away with it.
Definitely, a handler and an armor "field repair" kit are a must at every troop.
-
I'm going to shim the sidegap with some spare ABS from the kit.
I'm thinking of doing it like this:
Cut a strip of ABS and glue it to the inside of the side of the armour with half inside, and half on the outside.
Then glue the shimming plate on the half of the ABS strip sticking out of the armour.
This, in theory, makes the shimming plate align perfectly with the chest armour.
According to the Elite standards:
"PREFERRED: A shim can be used to bridge the gap. Ideally shims will be added in a seamless fashion to the ab/kidney plates to emulate these parts of the armor meet in the middle."
By doing this on both the chest and the back, I will have plate that meets in the middle.
Does this sound good at all?
That's essentially how I did it, except I didn't glue a shimming plate on the half of the strip sticking out. I might do that tonight, just to see if it gives me a cleaner look.
-
I used the iron at 200C (or 392F). You also ned to have the sock on (which will reduce the temperature a few degrees). It takes a little time to heat the plastic, but it worked great for me. I have done the mod on the shoulders, butt, chest and kidney so far.
Outstanding! Those are the exact same areas I want to touch up.
-
I trimmed the chestplate and I'm now trying to do the return edge with the hobby iron. Too high a temperature setting and I melt the plastic, leaving a wavy look when it cools. Too low and the plastic never softens enough to bend. Fortunately I've been practicing on the scrap from the chest trim, so I haven't touched the actual chestplate yet.
I have a Hobbico brand custom sealing iron. Can anyone whose done a return edge on FX armor recommend a temperature setting?
New with Questions
in New Member Introductions Archive
Posted · Edited by gmrhodes13
link not working removed
Ditto on what Thayne said.
RT-Mod, while not as accurate as AP or TE2 (but more accurate than FX), is sculpted specifically for guys on the plus-side of 6', 200lbs. Anything else and you're looking at a significant amount of shimming in order to wear it.
RT mod
All are acceptable for 501st membership.