


TrooperD
-
Posts
78 -
Joined
-
Last visited
Content Type
Profiles
Forums
Gallery
Articles
Media Demo
Posts posted by TrooperD
-
-
Moving to the kitchen, too cold in the shed!!!!
Gonna get a telling off from the wife


-
Right shin almost finished.
Finishing strips front and back to fit and internal elastics with hooks for closing the back.

-
Lots and lots going on right now, determined to get this TK finished and doing the rounds.
Legs are next, trimmed and 'abs cemented' the seams with strengtheners glued to the insides.
Some adjustment required on the right leg though. The top digging into my groin and my backside, and I cant bend my leg so have to cut the back of the knee.
Insides...

...top front...

...top back...

...back of knee.

-
Thermal detonator parts arrived yesterday morning to fit 65mm pipe.
Thanks to Andy for these....

...one thermal detonator.

-
Had a bit of difficulty glueing the shoulder straps on, they just kept sliding about no matter how many clamps i held them down with.
Resorted to adding in a piece to the back of the strap before applying to the chest.
Used a small G-clamp to apply a wee bit of pressure in the middle of the plate which pulled it into the curve of the strap.
This seems to be working, not to mention a bigger area to get a foot hold and not just using the edges of the strap.

-
Got the gloves from Adsa, only £2.35.

Heavy duty type, definitely better than normal marigolds!
These should do the job, just hand guards to arrive and glue together.
By the way, what is the best glue for the rubber hand guards and gloves? E6000 or other??

-
Finally got the arms finished, here they are....
....set on the right being the left arm...


Not too happy with the bells though, they seem a little narrow to me but that was the edge of the mould.
Right shoulder...

...left shoulder.

Happy with the bicep strap hooks designed by SIMpixels...


-
Arms are proving a pain.
Right bicep turns out fine...

...left bicep, well, had a little problem.

Cut this to the same dimension as the right bicep and because of the odd shape it is, it's too small!!

As you can see the bottom opening is an oval and not round like the right bicep.
So i've had to shim the gap required and plate the inside..
....forearms appear to be working out ok though?

Left forearm just been put together...

...return edge to line up before finish strip is applied.

No return edge on the cuff, still to dress up. (left forearm)

Return edge not quite as bad on the right forearm...

...no return edge on right cuff either...

...huge gap on this side but can't make it any smaller so I think I'm going to have to pack the inside?
-
Just for info, the tube stripes were Humbrol 48 Mediterranean Blue which is the revised colour.
Thanks all again.
-
Thanks for all the support guys and girls. Unfotunately life has caught up again and wont be able to do any more for 3/4 weeks.
Made a start to the arms so will post pics up.
-
Body armour complete and ready to try on...

...had to heat the whole kidney-plate to bring it into line and not flare out around 3/4" either side...

...male popper on outside corner of ab-plate.
For some reason the top of the butt plate keeps on pulling away from me?

Some gaps here so I'll have to tighten up here and there...

It's been pointed out to me over on the UKG that I should bring the ab-plate bottom corners into line with the top of the cut-outs on the kidney-plate.
So I've still got that to do....
-
Next problem was that I just couldn't make up my mind wether to go for full popper or split rivets to give a more authentic look to the build?

Went with the split rivet...

-
Back and chest complete....


Kidney plate to finish but no corners cut out so had to wait for the amazing Billy Haggis to come up with the dimensions for this...

.....and of course he did, thanks Billy.


-
Now on to the body armour.
Been a big break in the build since doing the helmet last year, life, work and all the other usual things we have to deal with.
One of the guys came round to help trim everything and that really helped push things on, so big thumbs up Colin, cheers.
 :duim:
 Having to run over some of the return edges just to define them better and add some in...

...first pass with the modelling iron

after sanding the rough edges out then smooth over with steel wool...

and polish up to finish the new return edge.

Job done.

repeated this process wherever needed.
-
Helmet exterior finished.


All hand painted, no stencils here!!!
-
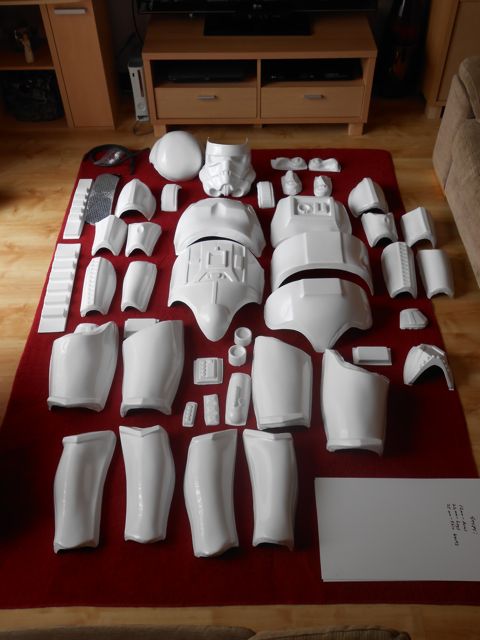
Hi all, keeping you all up to date with how my build is coming along....

So here it is, arrived August 2012 last year and first thing I had to do was lay it all out and admire.

Big cheesy grins, it's only been around 10 years trying to buy one of these!!!
Second was start building?


The ears, oh the ears? What a pain they were.....


...just as well there were two sets of them!
-
I know what you mean Glen, it would be so easy if all the sizes and information were to be in one place but there really is so much to go through.
Not to mention that new ideas and new information on how the armour was put together keeps coming out.
It all depends on how screen accurate you want to go, what film version etc etc.
It's just as we'll there is a forum like here and guys like Billhag who are so willing to help with any question.
And that's it, somewhere to come and ask no matter how daft you think your question may be.
Long live the Empire.
-
Billy.....you de man!!!
As always the perfect source of informationí ½í¸Ží ½í±
-
Hi all, can anyone please tell me what size the cut outs in the bottom corners should be on the kidney plate?
Thanks, Mark.
-
Thanks for all the replies guy, really looking forward to getting this completed and start trooping.
Cheers.
-
It's finally here. The kit I've been waiting for what seems an eternity thanks to our Customs Officers and Parcelforce Officials.
But anyway it's here.

Going to start with the lid first but one question going out.
How much E6000 do you need for the armour build?
Thanks.
-
Thanks all and yes Jenny i certainly have been reading up and prefer the ANH stunt.
I know, I know, its probably what most go for but also like most of us here, that's gotta be the first impression of Stormtroopers that stuck with us from when we were all a little younger?
I really do fancy doing a sandy though but I've gotta start with that ultimate image firstly.
And if I had loads a cash (and time) then I do something more current that the kids could really relate too, and go clone?
Yep they love the TKs too, but that's my era and the clones seem to be more theirs.
But for now anyway just finishing getting bits and pieces together and building my E11.
-
WooHoo just had that email I've been waiting for.
Your kit is next to be made.....YES!!!
Now the finger biting starts as I eagerly await the next all important email....
Your kit has been despatched!
-
Thanks Keith, Ill check it out right now.
My 2mm ATA Build
in Build Threads Requireing Maintenance
Posted
Hi all, quick question.
I'm just about to mount the Ab buttons and have cut them to the recommended size, but as you can see I've run into a slight problem.
The centre panel is fine, but the four button panel looks too long and over hangs.
Should I cut this down to coincide with the mounting area?
I'm just itching to cut this and make it fit, but don't want to make a mistake if doing so would be wrong!
By the way the size of the mount is 21mm x 67mm.