

piklz36
-
Posts
80 -
Joined
-
Last visited
Content Type
Profiles
Forums
Gallery
Articles
Media Demo
Posts posted by piklz36
-
-
Welcome, sir. You've found the right place for all things TK. Have fun with the research and build.
-
Congrats, Chadd. Great job with the build.
-
Looks good, man.
-
Looks good so far, sir. Pretty easy fixes suggested too.
-
Congrats, sir. Great build!
-
Congrats, and nice job on the build.
-
The build looks pretty great, man. Nice job.
A small piece of advice (this has nothing to do with approval):
Once I started trooping, I found that a lot of my strapping (especially elastic) would fail due to the snaps pulling through the elastic straps. I only had single layered straps at the time. I see you've done the same thing for many of your straps. I would suggest (or at least be on the lookout) that you double up the elastic straps. Use the same length, just fold them over once and put the snap through 2 layers of elastic. Things will feel more solid as well.
Just a small tip from someone with an ATA, and a similar strapping setup.
Good luck with the approval, sir.

-
Really good changes here. I think that providing a clear list of expectations should calm applicants down a bit. If not, just point them to the list of expectations again. It's like having a syllabus in a college course.
Great modifications. Here's hoping it works out for everyone!

-
Nice work with the newsletter. Thanks for keeping us up to date.
-

Maybe trim the inside of the eyes a little more. There seems to be some flashing left on the inside of the eye sockets. Especially near the bridge of the nose.
Other than that, it looks great. Nice job with the hand-painting. -
I see them at Cons all of the time.
-
Hey man! Everything looks good so far. You've got some of the best troopers on these boards helping you out.
Painting took forever for me as well. Ally (my wife) painted everything by hand. She masked the top and bottom of the stripes (on the back traps), then freehanded the lines with a 8-0 liner brush. The tube stripes were the same way. Masked the tops and bottoms, then freehanded with a larger brush. Two strokes per tube stripe, one down, one up to create the bend.
My S-Trim puckers too. I've not glued anything either. Holds up fine.
The bucket is looking fantastic so far! Great to see another TK in the TBS!
-
Welcome, buddy.
FISD has a ton of info, and great people who are willing to help.
Are you on the Florida Garrison Boards yet? Lots of people there too. We are a very active group here in the Sunshine State.
Glad to have you aboard.
-
Great build! I, too, love the coloring on it.
Yeah, it does seem a little heavy for trooping though. I get sick of holding up a Hyperfirm, hahaha.
-
I've seen both TK Bondservnt's and Darmon's holsters, and I agree both are great!
You could just make your own. The holster is a fun little project, but in the end you won't save a lot of money (if you don't have leather tools, dyes, etc already). It's actually a testament to how little $$ the vetted sellers make on these holsters. Troopers helping Troopers!
-
Sweet photos.
-
Thanks for everything, Terrell.
-
@Ales: The leather loosens up after you wet it, and I flexed it back and forth while I dyed and finished the holster. I would recommend cutting the leather while it is dry and rigid though. It should make for straighter, better cuts.
The strap works well on mine, and the holster works too. The holster holds shape very well, but remains flexible enough to fit E-ll's easily. I was going for a more structured look with the holster, rather than something flimsy and light. As you put use into it, the holster will loosen up as well.
"*Warning* The screen-used holsters were very flabby, so this is a small diversion from super screen-accuracy."
I really tried to find the balance between function, look, and screen-accuracy. I just made the decision to structure the holster a bit more than the screen-used ones.
And, no, I didn't use any impregnations. Just cut, wet and punch holes, dye, and finish.
I hope this helps.
-
Nice. Thanks for sharing this. Great video!
-
-
Hey RainTrooper. Your helmet build looks very nice so far. Great work!
As far as the liner goes, I just did a quick star pattern out of foam from a fabric store. The trick with the ATA helmet is that it is quite small, not the smallest, but small nonetheless. A hard hat liner might be a little too big to fit in there (along with your head). My hat size is around a 7, and I have a hard time finding room in the helmet.
I took 1" foam and carefully cut it in half for the star pattern liner. Of course, you can buy thinner foam, but I wanted to make sure 1" wasn't going to work before I trimmed it. It's cheap and effective. Plus, the more room you have in the helmet, the more air can circulate around which will keep you trooping longer.
I attached the foam via velcro. I just stuck the fuzzy velcro on the top of the inside of the helmet. I had to CA glue the hook velcro to the foam so it would stay in place.
-
Yeah, the teeth look good. Nice, squared corners.
-
Hi Ken. I hope you're out there on the 4th! It'll be my first troop(s) as well.
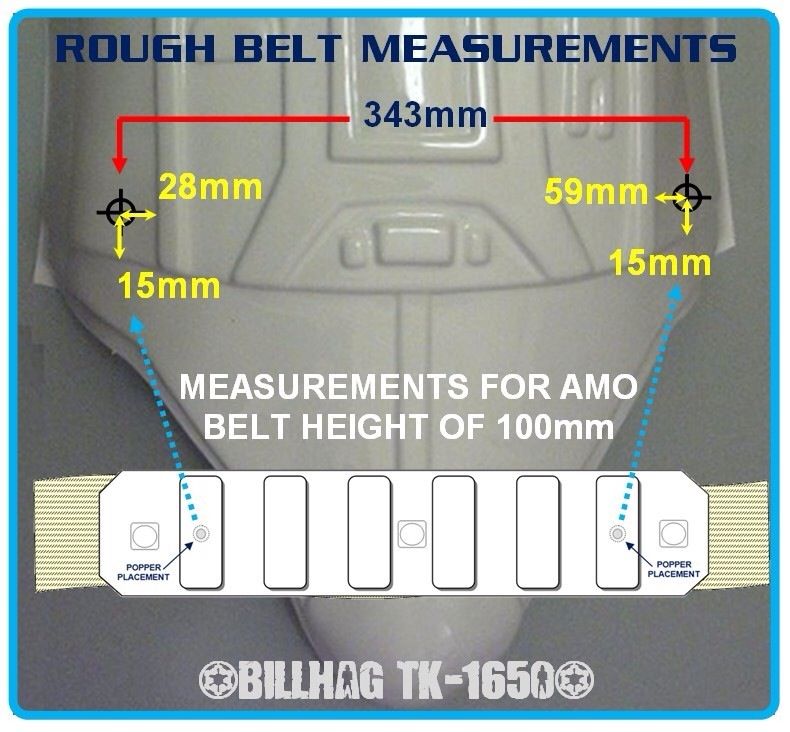
The only thing I see (besides the things already mentioned) is that your belt needs to come up a bit. The top edge of the plastic portion of the belt should be on the lower edge of your ab button box. I needed guidance for this too.
Did you secure the front of the belt to the ab plate? Most use female snaps through the canvas that attach to the ab plate via a couple of male snaps.
-
oh, right. Thanks for the reminder. On the canvas it is!
TK-71940 Requesting ANH Stunt EIB Status [MTK][408]
in Request Expert Infantry Status
Posted
Congrats, man.