


batninja
-
Posts
109 -
Joined
-
Last visited
Content Type
Profiles
Forums
Gallery
Articles
Media Demo
Posts posted by batninja
-
-
The CRL currently reads:
"The soft belt proper is made of canvas, or material with a canvas covering. Size must be 2.75†(70 mm) to 3.25â€(83 mm) wide and not wider than the plastic portion of the belt. The color is be white to off-white."
No mention is made of what the edge of the belt should be, but all the ones I've seen used a whip stitch or zig-zag stitch along the edge that, over time, allows the belt to fray, and in my opinion, looks...unprofessional.
----------
I'm okay with the 'accuracy-for-the-win' idea, but if I sew my belt with a cleaner look, would this ruffle any feathers as far as the 501st is concerned?
I'll post a pic later today of what I'm thinking of doing for my own belt.
-
Awesome. And the thigh boxes?
-
Forgive the crudeness of the diagram ("I know, Doc, it's not to scale."), but is this the correct placement of the thigh boxes and holster for ANH Stunt?

Thigh box even with the end of the belt?
Thigh box almost touching the bottom of the belt?
Holster butted up against the thigh box and the belt?
Holster rivets near the top of the belt?
-
And that makes perfect sense to me, too. Thanks!
Now to buy some more magnets...

-
 1
1
-
-
Okay, I've got the arms taped up to the desired circumference, and will be working on the joining pieces this week. Is the preferred method to use shims on the inside of the pieces as well? If so, is it advisable to glue both inside and outside at the same time, or one and then the other?
I hope that makes sense...
Also, I have both ABS glue and E6000. Is there a preferred adhesive? I was thinking of using the ABS stuff for the internal shims (for strength), and the E6000 for the for the outer joins (in case I need to reposition anything in the future).
Thoughts?
-
Awesome! Thanks for the info!
-
Moving onto the armor...
Is there a thread that discusses the widths of the butt joint covers for all the pieces (bicep, forearm, thigh, and calf)?
And how much wiggle room should there be inside the pieces, between the plastic and the undersuit?
-
I was trying to copy the look of the frown reference pictures from above:
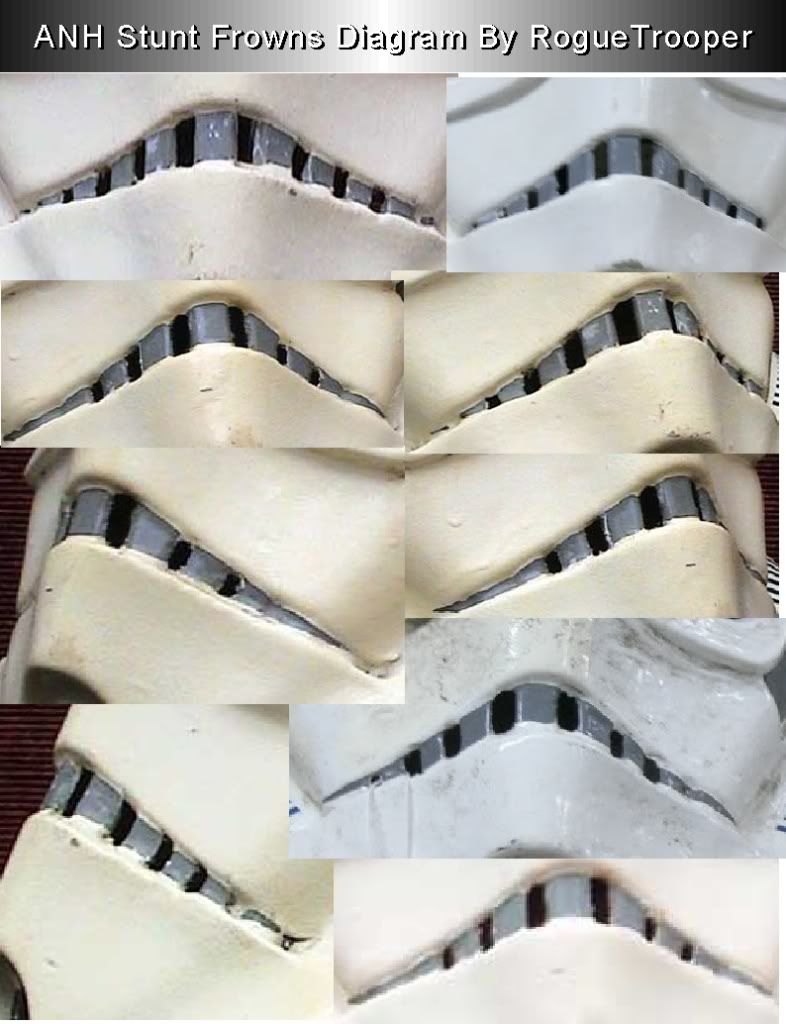
Here are better pics of mine:


Does it still look like I went too far?
-
It's been a few weeks since I did anything on the helmet, but since my boots came in today, it spurred me to do some painting. I've just done the teeth and the vocoder:


I'll give it a few days to dry and cure, then I'll do a little touch up if necessary. I think it came out better than I expected!
-
I just received my boots as well! I originally ordered a size 12, but exchanged for size 13 due to my wide feet and bunions.
 They're still a little tight, width-wise, but the leather will stretch over time. I'm very happy with my purchase! And the communication with Francois, including tracking info, was amazing!
Buy these boots!
-
Yeah, that's what I figured as well. I decided that if I was going to chafe, I wanted to chafe equally on both legs!
-
Okay, good. I didn't realize the bottom edge was rounded. I thought the pieces were supposed to join. Now I can sleep at night.
-
And just to reiterate, I did NOT make this cut - this is how it arrived. I have yet to make any trim cuts to the body pieces.
-
As I started inspecting the major pieces, I noticed that the bottom edge of the abdomen piece does not appear to have been cut in the right place prior to shipment. Did anyone else have this issue?


What really clued me in is that there is a faint cut line in the plastic, but unfortunately, it was cut much wider here. You can barely make out the cut line in this pic:

I could cut this line, but then the bottom edge would be too narrow to match the bottom edge of the butt-plate. I'm not exactly sure how to correct this issue.
I understand the armor was not designed to be symmetrical in all areas, but this seems like a rather crucial area (my twig and berries!) to get right.
Are other AM-owners seeing the same thing? Should I see about getting a replacement piece?
-
Brian, what is that thing called, and where can I find it? That would make future ears alot easier!
-
Thanks, Germain! That makes me feel a lot better, man. I'm going to try to finish this up this week.
A couple of questions:
1) Regarding the S-trim for the bottom edge of the helmet, does it matter which channel I use?

2) What black do I use for the vocoder? Flat black? Satin? Gloss?
-
I finally got a few hours to work on the kit some more. I removed the return edges on the shoulders, forearm, and shins last weekend.
This weekend, I tackled the ears. Emphasis on the work 'tackle'.
Using my trusty Dremel and sanding wheel, I was able to carve them to fit (mostly) on the helmet. Not too bad, in my opinion, but still didn't get them as close as I wanted. So onto the pics:

The best one of the bunch, the left rear:

And then it just goes downhill:


And the 'disaster' gap:


I even added a small rivet to 'pull' the front edge a little closer to the helmet, but that's as good as it got.
Maybe it looks okay to others, but I'm not complete happy with it. Or maybe I'm being too hard on myself. I know there are several screen-used helmets that weren't perfect either.
On the bright side, I was able to use a large drill bit to bevel the hole edges so that the screws would fit more flush. Very happy with that!

Thoughts and constructive criticism welcome!
-
Welcome! I'm in Houston, too (Cypress)!
-
For what it is worth,being in the same garrison, I own several pairs of boots from IB, including the TK ones and they are all awesome.
I did a 2k run in full TK outfit can't see crap in the bucket, ended up with bruises all over my legs - but the boots were comfy as slippers.
Okay, that's it. I'm sold. Gotta check my Paypal funds!
-
I gotta say it, as a newbie, their TK boots look pretty good to me. What's the consensus from the veterans here? Do they look okay?
-
Aside from the forearms and shoulders, are there any other pieces where the return edge needs to be removed? Biceps? Shins? Thighs?
I'm getting ready to order a bunch of rare earth magnets to assist in the assembly. Is there a particular size that most folks are using?
-
Yeah, I knew about the eye one being movie-accurate and all (still wish this wasn't so), but hadn't heard about the chin mark. Okay, as long as we's all the same!
-
The AM helmet has 4 screw dimples on the right, and 5 on the left.
In my screw baggie, I have:
5 long flat head screws (7/8")
4 short round Phillips head screws (1/2")
1 short flat head screw (1/2")
9 washers
9 locking nuts
So...what screws go where? Will there be leftovers? Or am I missing pieces?
-
At a garrison mate's suggestion, instead of the standard drill-a-hole, use-an-Xacto-knife method, I used my Dremel and a sanding wheel to work the teeth. From the interior of the helmet, sand down the 'nubs':

Here's what it looks like from the outside:

After maybe five minutes, the wheel has knocked out the teeth!

Some final sanding with varying grits (from the inside only), and a few swipes of a flat file to straighten some areas, and here is the result!

Neckseal Fabric?
in Boots, Soft Parts, and other Accessories
Posted
I was nosing around Jo-Ann's tonight, but hesitated before buying any fabric. Am I looking for Lycra? Swimsuit material? Something heavier?